

Introduction
Choosing the right flooring starts with moisture, subfloor, and how you live in the space.
There isn’t one universal best option; you pick what fits your basement or crawlspace, concrete slab, or plywood subfloor and your daily use. This article walks you through common moisture problems, how they start, and practical fixes you can evaluate safely.
Moisture is the main culprit behind many flooring issues, from clouds under vinyl to cupping on wood. Look for signs like damp spots, musty smells, staining, or a visibly damp subfloor, and check for high humidity or condensation. Different floors tolerate moisture differently, so know what your subfloor and climate allow and follow manufacturer instructions and local rules when testing and choosing materials.
Key takeaways
- Assess underlying moisture before installing any flooring to prevent failures.
- Moisture issues commonly originate from concrete subfloors, humidity, or leaks.
- Use a moisture test per manufacturer instructions and local code requirements.
- Install a proper moisture barrier and ensure proper subfloor leveling before cover.
- Choose floors resilient to moisture when installed over concrete or basements.
- Safety: wear respirators and ventilation when using adhesives or leveling compounds.
Table of Contents
- Introduction
- Key takeaways
- Quick Overview: How to Choose Flooring That Fits Your Home
- Types of Flooring Materials — Pros, Cons, and Best Use Cases
- Common Problems by Flooring Type and Their Root Causes
- Testing and Diagnosis — DIY Checks and Professional Tests
- Fixes and Mitigation Strategies for Common Flooring Problems
- Comparing Costs, Roi, and Lifecycle Implications
- Practical Planning Checklist Before You Buy or Install Flooring
- Practical Next Steps and Trusted Sources
- Conclusion
- FAQ
Quick Overview: How to Choose Flooring That Fits Your Home
This section sets up the article’s purpose: help you quickly determine which flooring fits your home by weighing practical factors like room use, moisture, budget, and durability against health considerations and long-term maintenance. You’ll get a simple decision roadmap to guide your choices. Expect a diagnostic framework and a path to testing, repairs, and upgrades later in the piece.
Think of it as a quick-start guide for matching flooring families to room categories. Consider occupancy, moisture and subfloor conditions, and the balance between upfront cost and life-cycle costs. You’ll find a brief checklist to assess environment and plan ahead for more thorough testing and fixes as you read on.
Key decision factors
The first step in choosing the right flooring is understanding your home’s needs and your lifestyle. Here are the key variables to weigh:
Traffic: High-traffic areas like hallways, kitchens, and entryways need durable, easy-to-clean materials.
Moisture risk: Wet rooms like bathrooms and laundry rooms require moisture-tolerant options. Basements may have humidity issues that need addressing.
Budget: Consider both initial cost and long-term maintenance expenses. Cheaper materials might end up costing more in the long run if they require frequent repairs or replacement.
When to DIY vs hire a pro
Knowing when to tackle a project yourself and when to call in professionals can save you time, money, and headaches. Here’s some guidance:
DIY: Simple installations like some vinyl planks or laminate flooring can be done by homeowners with basic tools and know-how.
Hire a pro: Leave complex tasks to the professionals. This includes subfloor moisture testing, major repairs, and intricate installs like tile or hardwood floors. They have specialized equipment and expertise to ensure the job is done right.
Types of Flooring Materials — Pros, Cons, and Best Use Cases
This section introduces a decision framework based on how you use the space, traffic, moisture exposure, allergies, and budget. You’ll see how these factors steer material choices for each room. The goal is to map rooms to material families with practical caveats.
For each material, you’ll get concise pros and cons, maintenance needs, durability notes, rough cost ranges, and typical installation considerations. You’ll also see the best-use rooms and any room-specific caveats tied to moisture, subfloor prep, and substrate compatibility.
Durability, lifespan, and maintenance comparison
Each flooring material has its own lifespan and maintenance needs. Here’s a quick rundown:
Hardwood: Longest lifespan (100+ years) but high maintenance – refinishing every 7-10 years.
Engineered Wood & Laminate: Similar durability, mid-range lifespan (25-30 years), low maintenance. Engineered wood can be refinished like hardwood.
Vinyl/LVT & Tile/Stone: High durability, long lifespans (50+ years), low maintenance. Grout in tiles needs occasional sealing and cleaning.
Carpet: Shortest lifespan (5-15 years), high maintenance – regular cleaning to prevent stains and wear.
Concrete & Cork: High durability, long lifespans. Concrete needs sealing; cork requires occasional refinishing.
Health, allergy, and VOC considerations
Indoor air quality is crucial for health and comfort. Here’s what to consider:
Carpet: Holds allergens but can be treated with anti-allergen sprays. Some emit VOCs (volatile organic compounds) that can irritate lungs.
Hard Surfaces: Don’t hold allergens, easier to clean. Some have low-VOC emissions; look for certifications like GREENGUARD or FloorScore.
Consider cork – naturally hypoallergenic and resistant to mold/mildew. Concrete can be sealed with eco-friendly sealers.
Always check product VOC levels, especially if you’re sensitive to indoor air quality issues. Consider low-VOC or no-VOC products for a healthier home.
Common Problems by Flooring Type and Their Root Causes
We’ll map common failure modes to flooring types and explain how subfloor prep, moisture, and movement influence outcomes. You’ll see how issues like buckling or wear link back to root causes. The aim is to help you spot warning signs early.
Expect a practical breakdown of moisture damage, adhesive failures, and finish-specific problems. You’ll learn what to test or verify before repairs, including humidity readings and substrate flatness. Quick remediation steps will be outlined for each type, plus safety notes for mold and hazardous adhesives.
Moisture-related issues and sources
Moisture is a flooring enemy number one. It can cause damage, encourage mold growth, and weaken your floor’s structure.
Water can enter your floors from various sources:
- Groundwater: High water tables or hydrostatic pressure can push water up through the concrete slab.
- Plumbing leaks: Burst pipes, dripping faucets, or leaking appliances can saturate your subfloor.
- Condensation: Warm, moist air meeting cool surfaces can cause condensation, leading to moisture buildup.
- Weather/runoff: Rainwater or snowmelt entering through cracks or gaps in your foundation.
- Improper vapor barriers: Without a proper barrier, moisture from the ground can migrate into your flooring system.
Symptoms to watch for include: buckling, warping, discoloration, musty odors, and visible mold or mildew growth.
Installation and material mistakes that cause failures
Choosing the right materials and proper installation techniques are crucial for a long-lasting floor. Here are common pitfalls to avoid:
- Wrong product for environment: Using flooring not suited to your home’s humidity or temperature can lead to warping, cracking, or delamination.
- Inadequate acclimation: Not allowing materials to adjust to your home’s conditions before installation can cause problems later on.
- Over- or under-troweling concrete: Incorrect application of the cement-based layer can result in weak bonds, cracking, or uneven surfaces.
- Wrong adhesives: Using incompatible or improperly mixed adhesives can cause poor bonding and eventual failure.
- Lack of expansion gaps: Not leaving room for materials to expand and contract with temperature changes can lead to buckling, cracking, or other damage.
Testing and Diagnosis — DIY Checks and Professional Tests
This section covers straightforward visual and olfactory checks you can do at home. You’ll learn what dampness or mustiness may indicate about hidden moisture. Use these as a first pass before deeper testing.
Then we’ll outline professional tests to consider, like in-situ RH or moisture mapping. You’ll know when to call a pro for mold, concrete moisture, or vapor-barrier assessments, and how results influence flooring choices and warranties.
DIY Inspection Checklist and Quick Tests
Before you start any flooring project, it’s crucial to inspect your subfloor. This checklist helps you spot issues early.
- Surface dampness: Feel the floor for moisture. If it’s wet or cool to touch, there might be a problem.
- Staining and efflorescence: Check for discoloration, stains, or white powdery deposits (efflorescence) on the concrete. These could indicate moisture issues.
- Musty odor: Smell the area. A musty odor often signals hidden mold or moisture.
- Buckling or cupping: Look for warped, buckled, or cupped boards. This can happen due to excessive moisture.
- Condensation on walls: Check walls near the floor. Condensation can indicate high humidity levels.
- Visible mold patches: Inspect for any visible mold growth. If found, document it for professional help.
- Moisture-related floor feel: Walk on the floor. A spongy or soft feel might indicate moisture beneath.
- Document findings: Take photos and notes of any issues. This helps pros diagnose problems later.
Quick rule: If you find any signs of moisture, don’t install flooring until the problem is fixed. Moisture ruins floors.
Professional Testing Methods Explained
When DIY checks raise concerns, hire a pro for these tests:
ASTM F2170 In-Situ RH Test: This measures relative humidity (RH) in the concrete. It’s non-destructive and accurate. Use it to check for moisture migration from below.
Pinless Moisture Meters: These detect moisture by measuring changes in capacitance. They’re great for quick, non-invasive checks. However, they can’t measure depth or provide RH readings.
Calcium Chloride Test Limitations: This test measures moisture content but isn’t as reliable as ASTM F2170. It’s destructive and only measures surface moisture. Use it to confirm suspicions, not as a primary test.
Thermal Imaging and Mold Sampling: These are specialized tests. Thermal imaging can locate hidden moisture sources. Mold sampling identifies mold spores in the air. Both require specialized equipment and interpretation. If you suspect serious issues, hire a mold inspector or structural specialist.

Fixes and Mitigation Strategies for Common Flooring Problems
You’ll start with stop-gap and source-control measures to address leaks and exterior water intrusion before or during installation. The emphasis is on preventing moisture from undermining the floor surface. Plan to fix the root cause alongside any repair work.
Next, we cover moisture mitigation and material-specific repairs. You’ll get guidance on when to repair subfloors, when to replace, and how to layer in barriers or primers. The focus is practical steps you can actually complete or supervise safely.
Moisture remediation and subfloor fixes
First, tackle moisture at its source. Improve exterior drainage by sloping the ground away from your home’s foundation. Fix any gaps or cracks in your foundation that could let water seep in.
Install or repair vapor barriers on your walls and under your slab to stop moisture from rising into your flooring. If you have a concrete slab, consider applying a moisture mitigation coating like an epoxy sealer to further protect against dampness.
If your subfloor is wet, it might need time to dry out. Use dehumidifiers to speed up the process. In some cases, you may need to remove and replace damaged subflooring.
Note: If moisture levels are high, consider hiring a professional to assess and address the issue before proceeding with flooring work.
Repair techniques by flooring type
Hardwood: For minor scratches, sanding and refinishing can restore your floor’s appearance. For larger issues like gaps or warped boards, you’ll need to replace them. Always use appropriate wood adhesives when reinstalling.
Tile: Regrouting and sealing can fix many tile problems. If tiles are cracked or loose, remove and replace them using a suitable thin-set mortar and grout.
Carpet: If padding is damp or damaged, it should be replaced to prevent mold growth and maintain carpet performance. Use an appropriate adhesive when reinstalling the padding.
Vinyl/laminate: These floors can often be repaired by replacing individual planks or tiles. Always ensure the subfloor is dry and clean before reinstallation. For vinyl, use a suitable adhesive; for laminate, click-lock systems usually don’t require glue.
Comparing Costs, Roi, and Lifecycle Implications
This section explains total cost of ownership for flooring options relevant to DIY concrete projects. Break costs into upfront materials and subfloor prep versus long-term maintenance. You’ll see how durability affects value over time.
We’ll compare upfront costs, installation effort, and typical maintenance. Lifespan expectations inform resale value and marketability, with guidance on where to check local pricing and regional factors that shift the math.
Budget planning and long-term value
When choosing a flooring option, it’s crucial to consider the total cost of ownership (TCO). This includes upfront materials, tools, subfloor prep, installation labor, and long-term maintenance.
The cheapest option isn’t always the best. High-quality materials may have a higher upfront cost but can last longer and require less maintenance, saving you money in the long run.
For example, polished concrete might seem expensive at first, but it’s durable, low-maintenance, and can increase your home’s resale value. Compare this to cheaper options like vinyl or laminate that may need replacing every 10-15 years.
To estimate lifetime costs: add upfront expenses, divide by expected lifespan, and factor in maintenance costs. Balance budget with durability for the best long-term value.
When higher upfront cost pays off
Spending more upfront can prevent expensive failures later, especially in moisture-prone areas or high-humidity climates. Here are a few scenarios:
Basements: Investing in professional moisture testing and quality waterproofing systems can save you from costly mold and mildew issues down the line.
High-traffic areas: Premium materials like heavy-duty epoxy or high-quality overlay systems can withstand more wear and tear, reducing the need for early repairs or replacement.
Climate-specific concerns: In humid regions, opting for moisture-resistant finishes or professional moisture control measures can prevent warping, buckling, or other climate-related damage.
Practical Planning Checklist Before You Buy or Install Flooring
Begin with a thorough site assessment: subfloor condition, levelness, cleanliness, utilities, and load-bearing considerations. Note any finishes that affect installation. This keeps surprises to a minimum.
Then chart moisture testing, material specs, acclimation needs, essential tools, permits, and a realistic timeline. You’ll also see sequencing steps and contingencies for weather or material delays.
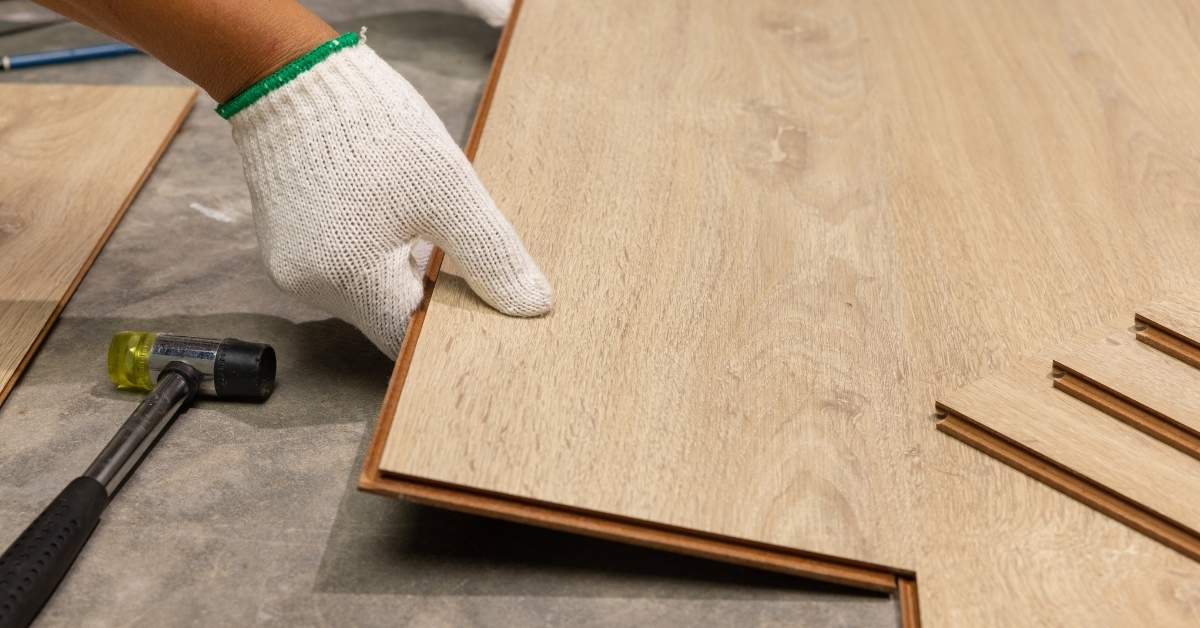
Tools and materials checklist for DIY installs
Before you start any flooring project, make sure you have the right tools and materials. This checklist helps ensure a smooth install.
- Moisture meter: Essential for testing subfloor moisture levels before installation.
- Masonry buffer: Helps level uneven subfloors, ensuring proper flooring adhesion.
- Trowel (notched and straight): Used to apply adhesives evenly. Notched for thin-set mortars, straight for larger areas.
- Spacers: Maintain consistent grout lines or gaps between planks/tiles.
- Adhesive/mortar: Choose the right one based on flooring type. Skip this and risk poor adhesion, warping, or cracking.
- Underlayment (if needed): Provides a stable base for flooring, improves comfort, and reduces noise.
- Vapor barrier: Prevents moisture from rising into the subfloor, protecting your new floor.
- Protective gear: Safety glasses, gloves, knee pads, and ear protection for a safe work environment.
Quick rule: Always double-check your tools and materials before starting. Missing something can cause delays or poor results.
Visual checkpoints at each stage of installation
Regular visual inspections throughout the installation process help catch potential issues early, saving you time and money.
- Before install: Inspect subfloor for flatness, cleanliness, and any damage. Uneven surfaces can lead to uneven flooring.
- Moisture testing: Check readings with your moisture meter. High moisture levels can cause flooring failure.
- Acclimation complete: Ensure flooring has reached target temperature and humidity before install. Skipping this can result in warping or buckling.
- During installation: Check seam/gap tolerances as you go. Inconsistencies here can affect the final look of your floor.
- Final finish checks: Inspect for any missed spots, uneven areas, or damaged pieces after install is complete.
Quick rule: Regular visual inspections help maintain quality control throughout the installation process.
Practical Next Steps and Trusted Sources
Here’s a concise recap and quick-start checklist focused on moisture, mold risk, and chemical exposure. It translates the article into actionable steps you can begin now. Use this to set priorities before buying or installing.
We outline routine maintenance schedules by common concrete-over-flooring scenarios and safety guidelines for mold or chemical concerns. You’ll also find a map of trusted pros, labs, and certification bodies to consult for testing or installation help.
Routine Maintenance Schedule By Material
Maintaining your concrete floor depends on the type of flooring you choose. Here’s a simple, frequency-based routine to extend its life.
- Sealed Concrete: Clean weekly with mild detergent. Inspect annually for cracks and reapply sealant if needed. Avoid harsh chemicals that can strip the seal.
- Epoxy Coatings: Sweep daily to remove debris. Mop weekly with a mild cleaner. Inspect annually for chips or peels, touch up as necessary. Don’t use abrasive cleaners that can dull the finish.
- Ceramic Tile: Sweep and mop weekly. Inspect grout lines monthly for cracks. Seal grout annually to prevent moisture intrusion. Avoid heavy objects that could crack tiles.
- Vinyl/Plank: Sweep daily and mop weekly with a manufacturer-approved cleaner. Rotate area rugs to even out wear. Inspect edges quarterly for lifting, reattach if necessary. Don’t let water sit on the floor as it can cause swelling.
- Carpet: Vacuum weekly. Spot clean spills immediately. Deep clean annually with a professional service. Avoid heavy furniture that could crush fibers.
How To Choose A Qualified Contractor Or Inspector
Hiring professionals ensures your flooring project goes smoothly. Here’s how to pick the right ones.
Contractors: Look for licenses, insurance, and certifications. Ask for references and check their work quality. Request a detailed contract outlining scope, materials, timeline, and payment schedule.
Inspectors: Seek those certified by professional organizations like the American Society of Home Inspectors (ASHI) or the International Association of Certified Indoor Air Consultants (IAC2). They should provide a detailed report outlining their findings.
Always ask about warranties and test reports to ensure you’re covered in case of any issues. Trust your instincts; if something feels off, it probably is.

Conclusion
Choose flooring with safety, durability, and long-term appearance in mind, and tackle each step with a clear plan to avoid costly mistakes. Start with a small, protected area to test moisture, adhesion, and wear before you commit to a full install.
Before you buy or install, confirm the room’s conditions by verifying moisture levels, subfloor stability, and potential structural issues, then match your flooring choice to the room use, climate, and expected traffic; plan a realistic budget, schedule, and a simple maintenance routine you can follow.
Common mistakes to avoid include ignoring moisture tests or mixing incompatible materials, skipping surface prep, and rushing the install without a clean, dry subfloor or proper acclimation; always keep safety first, wear eye protection and respirators when advised, and seal or ventilate areas as needed to prevent dust and fumes from spreading.
If moisture or structural problems surface, or if the job would require significant subfloor repair, call a professional rather than pushing ahead; otherwise, use the practical steps laid out, stay within your plan, and you’ll finish with a floor that performs well and lasts. Stay steady, and you’ll get solid results you can be proud of.
FAQ
What are the common signs of excess moisture on a concrete subfloor?
Look for damp patches, dark staining, efflorescence, or a musty smell. You may also see curling edges, warping, or cupping on adjacent flooring. If you see moisture, assume the subfloor needs drying and testing before installing new flooring.
What usually causes excessive moisture in concrete subfloors?
Water intrusion from exterior sources, high groundwater, or plumbing leaks can saturate concrete. Poor or missing vapor barriers during construction lets moisture migrate upward. Condensation from indoor humidity can also push moisture into the slab over time.
Which flooring types are most likely to show moisture problems?
Wood and engineered wood floors are highly sensitive to moisture. Laminate and carpet with padding can bubble, warp, or delaminate if moisture is present. Any porous flooring without a solid moisture barrier risks damage from damp concrete.
How do I test moisture content and what should I do with the results?
Use a concrete moisture meter or perform a relative humidity test per the product instructions. Check that the subfloor is dry to the touch and follow the flooring manufacturer’s guidance before install. If readings suggest excess moisture, fix the source and dry the slab first, then recheck before continuing.