
Introduction
A practical, do-it-yourself guide for repairing and maintaining stucco homes.
You’ll learn the steps and considerations involved, from assessing damage to choosing safe techniques and common pitfalls to avoid.
The guide walks through practical tips, rules of thumb, and examples to help you plan projects, manage materials, and achieve durable results.
Key takeaways
- Assess climate and substrate to select cement-based or acrylic stucco correctly.
- Rent basic mortar mixer, hawk, trowels, and scaffolding for safe work.
- Prepare surface by cleaning, repairing cracks, and priming to improve adhesion.
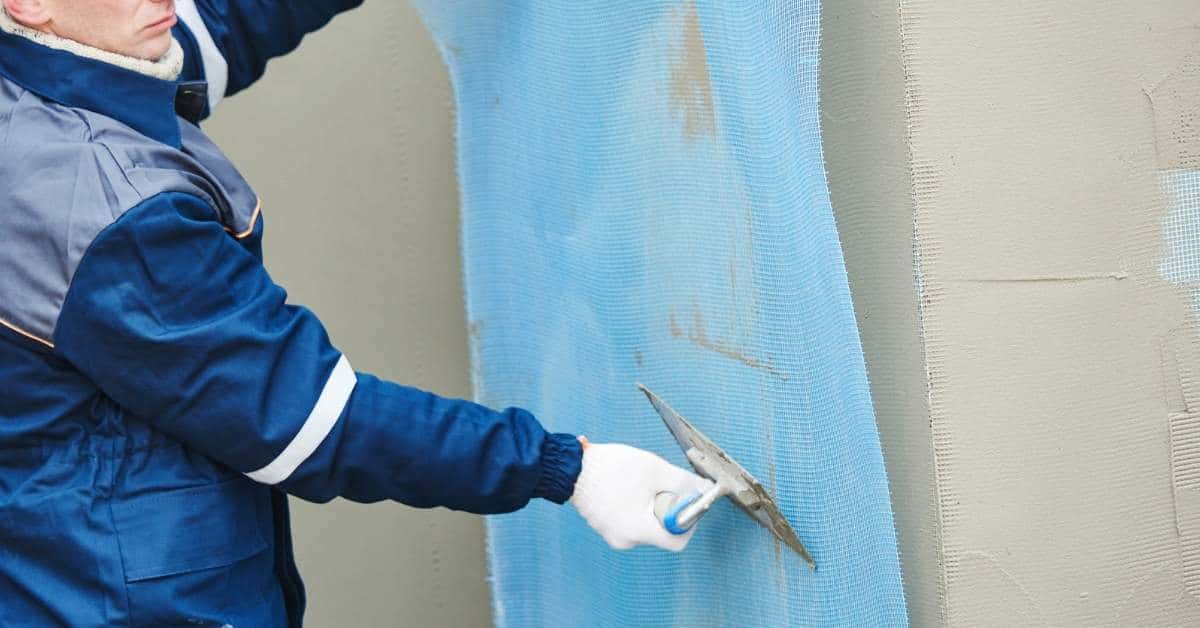
- Apply base coat evenly, verify thickness, then embed reinforcement mesh where needed.
- Match texture using controlled trowel pressure, stippling, or knockdown techniques.
- Document maintenance schedule and check sealant joints to prevent moisture intrusion.
Table of Contents
- Introduction
- Key takeaways
- Understanding stucco: types, composition, and where each is used
- Tools and materials checklist (what to buy or rent)
- Preparing the surface for repair or retexturing
- Applying stucco: step-by-step patching and layering process
- Texturing techniques to match existing finishes
- Common DIY mistakes and how to avoid them
- DIY vs. professional: cost, risk, and when to hire a pro
- Long-term maintenance and troubleshooting after repair
- Conclusion
- FAQ
Understanding stucco: types, composition, and where each is used
Understanding stucco breaks into two main families: traditional cement-sand-lime stucco and synthetic EIFS, which uses an insulation board with an acrylic finish. You can tell them apart by the substrate and how the finish sits: traditional stucco sits on solid masonry or a wood-lath base with a solid, sometimes rough texture, while EIFS usually shows a thinner finish over a foam board and a smoother, more uniform surface. Look for edge details and drainage layers as quick clues a DIYer can use to identify the type from the outside.
Knowing the type matters because it guides how you dry out, repair, and insulate the wall, and it reflects typical regional assemblies and moisture-control strategies. This matters for repair approach, safety, and long-term maintenance, so use it to spot failure signs early and plan proper prep and finish work. A simple check of exterior cues, service history, and available documentation can help you decide when to DIY vs. bring in a pro, and it should prompt you to review regional variants and their repair implications.
How to identify what type of stucco you have
To figure out if your home has traditional stucco or synthetic EIFS, start by looking at the exterior walls. Traditional stucco is usually a solid layer over brick or concrete block, while EIFS often features foam insulation boards covered with a thin plastic-like finish.
Inspect the texture and edge details of the stucco. Traditional stucco has a rougher, more textured surface compared to the smoother, almost glossy appearance of EIFS. If you see foam insulation or plastic mesh under the finish layer, it’s likely EIFS.
If your initial visual inspection is unclear, check for signs of moisture damage like bubbling, cracking, or discoloration. These issues might require a professional to use tools like moisture probes to determine if there’s hidden water damage behind the stucco.
When each type is appropriate for DIY vs. pro work
For traditional stucco, minor repairs like patching small cracks or replacing damaged areas are usually safe to do yourself if you have the right tools and materials. However, any sign of extensive moisture damage should be checked by a professional.
(EIFS repairs can get tricky due to its complex layers and insulation properties. DIY fixes for EIFS might work for minor surface issues but anything deeper or larger in scale is best left to professionals who understand how the system works and can ensure proper repair without compromising insulation or moisture control.
Height and complexity also play a role. If you’re dealing with high walls, large areas, or intricate patterns, it’s safer to hire a pro to avoid mistakes that could lead to costly repairs later on.

Tools and materials checklist (what to buy or rent)
This section covers the essential tools and materials you’ll actually use on a stucco job, from trowels and a hawk to mixing tools, a wire brush, and the scratch, brown, and finish coats, plus the safety gear that keeps you out of trouble. It also lists the main materials—stucco base coats, bonding agents, lath, backer rod, and sealants—and notes how quality levels and expected lifespans affect what you buy versus what you rent. Focus on reliable, field-proven tool sets and material packs, and treat safety gear as a non-negotiable investment rather than an afterthought.
Why this matters: choosing the right mix of tools and materials saves time, reduces waste, and improves long‑term durability. Plan around prep, substrate compatibility, required primers or bonding agents, and how to verify supplier compatibility for base coats and finishes. Expect quick checks for proper bonding and uniform coat thickness, and keep a simple workflow to minimize downtime. Use practical decision rules for buying versus renting, guided by project size, reuse frequency, and maintenance needs, so you’re not stuck with idle gear or oversized purchases when the job wraps up.
Materials: mixes, primers, and sealants — specs to match
Before you start mixing stucco, ensure your materials match the existing type for a seamless repair.
- Match mix type: Use Portland cement or acrylic based on existing stucco; check color and texture.
- Select primer: Choose bonding agent that matches substrate material; test compatibility with small patch.
- Backer rod: Install at joints to prevent cracking; measure gaps accurately for proper fit.
- Sealants: Use compatible sealant for joint sealing; check manufacturer’s recommendations.
Quick rule: Always test materials on a small patch first to avoid mismatches and costly repairs.
Safety equipment and job-site protections
Ensure your safety gear is ready before you start any stucco work.
- Respirator: Wear to protect lungs from dust; check seal fits snugly over face.
- Eye protection: Use goggles or a face shield; inspect for cracks or damage.
- Gloves: Wear heavy-duty gloves; ensure they fit properly and are clean.
- Scaffolding/ladders: Inspect regularly for stability; check all rungs and braces.
Quick rule: Always wear full PPE and inspect equipment before each use to prevent accidents.
Preparing the surface for repair or retexturing
Preparing the surface means cleaning, removing loose material, and checking the wall’s underlying support so patches or retexturing actually stick and stay put. You’ll remove loose stucco, inspect the lath or backing for corrosion or movement, and address any moisture issues before you touch the patching or finish. This work sets a solid foundation and prevents future failures like cracking, delamination, or moisture intrusion that will bite you down the line.
Doing the prep right saves time and headaches later by guiding proper drainage, flashing, and substrate stability. It matters because a clean, well-prepped surface with solid backing and a clear moisture path reduces recurring failures and makes bonding agents and patch materials work as intended. Document findings mentally as you go, plan for maintenance, and choose primers and patching methods that suit the existing materials—check labels and manufacturer guidance if you’re unsure about compatibility or curing requirements.
Moisture diagnosis and remedial steps
Before you start any stucco repair, it’s crucial to check for moisture issues. Use a moisture meter or simply press your hand against the wall; if it feels damp, there’s likely water intrusion.
If you find wet spots, remove some of the stucco to inspect for rot or rust on metal lath. If you see significant damage, don’t just patch over it—address the source of moisture first. This might mean fixing leaks in your roof or gutters and ensuring proper drainage around the foundation.
Temporary fixes like applying a waterproof membrane can buy you time while you plan for long-term solutions. But if the problem is severe, consider hiring a professional to ensure the job is done right and prevent future issues.
Remember, ignoring moisture problems can lead to bigger headaches down the line, including mold growth, structural damage, and costly repairs.
Surface profiling, control joints, and edge details
Maintaining your stucco’s integrity starts with proper surface preparation. Clean the area thoroughly to remove any loose material or debris that could interfere with adhesion.
Control joints are critical for managing thermal expansion and contraction. Make sure they’re clean and free of old sealant, then apply a new bead of caulk to keep water out.
When working around edges like windows and doors, taper the stucco correctly so it blends seamlessly with the trim or siding. This not only looks better but also helps prevent cracking along these vulnerable areas.
Properly profiling the surface ensures a strong bond between new and old materials. Use wire brushes or sandblasting to roughen smooth surfaces and give your patch material something to grip onto.
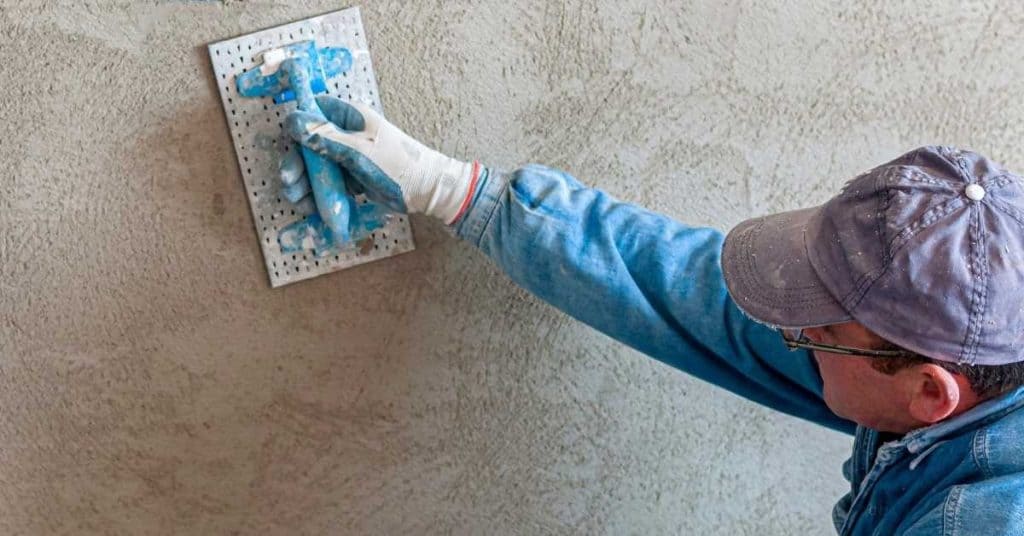
Applying stucco: step-by-step patching and layering process
Applying stucco requires a clean, well-prepared surface and a strict sequence: scratch coat, brown coat, then finish coat. Use safe mix ranges for each coat and follow manufacturer instructions; consult labels for ratios of cement, sand, and water, and any admixtures. Cure between coats and plan patches differently for small repairs versus large areas.
For DIYers, you’ll get the best results by keeping curing conditions within the recommended range and using methods like misting or damp curing as advised. Surface prep and patch strategy matters: clean the area, assess moisture, choose a bonding agent if needed, and size patches to maintain texture and adhesion. Watch for cracks or delamination and adjust timing, feather edges, and joint considerations; if unsure, check the product label or datasheet for specifics.
Step-by-Step Process
This sequence guides you through the process of applying stucco, ensuring each step is clear and practical for DIY work.
- Start with a thorough surface prep: clean, dry, and assess moisture levels. Use a primer if needed to ensure good adhesion.
- Mix your scratch coat according to manufacturer guidelines. Aim for a consistency that holds its shape when troweled but isn’t too wet.
- Apply the scratch coat evenly with mechanical keying. Press firmly into place and let it cure as per product instructions, usually 24-48 hours depending on weather conditions.
- Mix your brown coat to a slightly thicker consistency than the scratch coat for better adhesion. Apply this layer over the scratch coat, feathering edges carefully to blend with existing stucco.
- Finish off with your chosen texture and color in the final coat. Use tools like trowels or brushes to achieve uniformity across patches and large areas.
Mixing, Consistency, and Curing Times
Mix your stucco carefully to ensure the right consistency. It should be workable but not too wet or dry.
Test the mix by squeezing a handful of material; it should hold together without crumbling. Adjust water content as needed for proper application.
Curing times vary based on weather conditions. Aim for at least 24 hours between coats in mild temperatures, longer if it’s hot and dry or shorter if cool and damp. Always check product instructions first.
Bonding, Feathering, and Blending Old-to-New Surfaces
Use a bonding agent to ensure new stucco adheres well to existing surfaces. Apply it evenly before starting your scratch coat.
Feather edges carefully when applying the brown coat to minimize visible transitions between old and new stucco. This helps achieve a seamless look.
To match colors, apply a thin layer of matching base coat over patches first, then feather into existing areas with additional coats as needed for uniformity.
Texturing techniques to match existing finishes
You’ll get a practical run‑through of base textures—smooth, dash, skip trowel, sponge, and swirl—and how to build each one in a way that matches existing finishes without obvious seams. We cover stepwise methods from surface prep to applying the base coat and then textures, with clear notes on rhythm, pressure, and pass directions so patterns stay consistent. Expect guidance on choosing the right tooling, what each tool does for edge control, and how practice patches help you lock in a repeatable result.
This matters because the texture you choose changes depth, shadow, and durability, and it governs how you blend new work with old surfaces while avoiding mottling or gloss differences. You’ll learn why practice boards and small test patches pay off, how to feather edges to mask joints, and how weather and curing conditions influence the final look. We’ll also cover common pitfalls like pattern drift or overworking a finish, plus quick, safe fixes to help you stay on track in a real jobsite workflow.
Visual checkpoints for a good texture match
Use this checklist before you start texturing to ensure your new work matches the existing finish.
- Lighting angles: Check how shadows fall at different times of day; avoid harsh midday sun.
- Sample boards: Test texture and color on small boards first; compare with original surface.
- Shadow depth: Ensure new texture mimics existing shadow patterns; use a flashlight to check consistency.
- Edge transitions: Feather edges smoothly into old work; avoid sharp lines or visible seams.
- Surface uniformity: Look for consistent texture across the board; patch any uneven areas.
- Color variation: Ensure new color blends well with existing finish; use a color chart to match accurately.
- Moisture traps: Avoid pooling water in textured crevices; ensure proper drainage and drying time.
- Weather conditions: Apply texture on dry, mild days; avoid windy or rainy weather.
Quick rule: Always test your work under similar lighting and weather conditions as the final application site.
Color matching and finishing (painting vs. integral color)
When it comes to coloring your stucco, you have two main options: painting a cured patch or using an integral color mix.
Paint timing: If you choose to paint the cured stucco, wait until the surface is fully dry and cured. Apply primer first if needed, then use matching paint to blend in seamlessly with existing finishes.
Integral color: For a more uniform look, mix integral color into your base coat before applying it. This ensures that the entire patch matches perfectly without visible seams or edges.
Sealant application: Once your texture and color are set, apply sealant to protect against moisture and UV rays. Ensure you use a compatible product with both new and existing finishes for consistent protection.
Common DIY mistakes and how to avoid them
Common DIY mistakes in stucco work include trapping moisture, skipping primers, using the wrong mix or texture, ignoring control joints, improper curing, using the wrong tools, and safety lapses. These errors often happen from rushing, skipping instructions, or underestimating moisture and climate impacts, and they can lead to cracks, delamination, or moisture damage. Prevent them by planning joints, checking moisture signs, following primer and mix guidance, choosing appropriate tools, and wearing proper PPE.
Understanding why these mistakes matter helps you spot trouble early and apply quick fixes without wasting time. A small slip can become a bigger patch job or risk structural performance, so stick to a safe, step-by-step workflow: surface prep and substrate check, weather and moisture checks, appropriate bonding agents, careful patching, texture matching, and proper curing and sealing. Keep a practical red-flag checklist handy to stay on track and avoid common pitfalls.
Moisture-related failures and prevention
Water infiltration after stucco repair can lead to serious issues like mold, rot, and structural damage. The key is to ensure a proper drainage plane and flashing system that directs water away from the building.
To prevent moisture entrapment, always install a continuous layer of building paper or housewrap as your first line of defense against rain and wind-driven moisture. This should be properly lapped and sealed at all edges and penetrations to create an effective barrier.
Flashing around windows, doors, and roof-to-wall intersections is critical. Use metal flashing with a drip edge that extends below the stucco layer by at least 2 inches. Seal all joints and laps with a high-quality sealant designed for exterior use.
Finally, ensure there’s adequate space between your stucco and any wood or other moisture-sensitive materials to allow drying. A gap of at least 1/4 inch is recommended, which should be filled with backer rod before applying the final layer of stucco.
Timing, weather, and curing mistakes
Mistakes in timing your work or not considering weather conditions can lead to poor curing and compromised stucco quality. Here’s how to avoid these issues:
- Avoid wet weather: Don’t start a job if rain is forecasted within 24 hours.
- Check temperature: Work only when temperatures are between 50°F and 90°F, avoiding extremes that can affect curing.
- Cover work areas
- Use heaters carefully: If you must work in cold weather, use electric or propane heaters to maintain a minimum temperature of 40°F for proper curing.
- Protect from wind: Wind can dry out stucco too quickly, causing cracking. Use tarps or plastic sheeting to shield the area.
Maintaining these conditions ensures your stucco cures properly and lasts longer.
DIY vs. professional: cost, risk, and when to hire a pro
DIY vs. professional comes down to cost estimates—DIY materials and rental tools versus typical contractor pricing. Expect local variance and get multiple quotes to compare scope and inclusions. Save yourself trouble by knowing when to DIY (basic patches) and when to hire (rot, moisture, or warranty issues).
Key risk factors justify professional involvement: extensive rot, moisture intrusion, EIFS risks, high elevations, or complex textures that affect durability and warranties. Credentials matter—permits, inspections, insurance, licensing, and compatibility with existing stucco systems can protect or void warranties. To cut costs, demand clear scope, itemized estimates, and compare what service inclusions cover, along with any work guarantees.
When a Pro Is Strongly Recommended
If you notice extensive rot behind the stucco, it’s a clear sign that professional help is needed. Rot can compromise the structural integrity of your home and lead to further damage if not addressed properly.
Another red flag is when there are repeated leaks or moisture issues in the same area. These could indicate underlying problems with flashing, roof valleys, or other waterproofing elements that require a trained eye to diagnose and fix.
If you’re dealing with EIFS (Exterior Insulation Finishing System), it’s crucial to have a professional inspection before attempting any repairs. EIFS has specific requirements for moisture management and repair techniques that differ from traditional stucco systems.
Large patches or the need for a whole-house recoat also signal when to hire professionals. These projects often involve complex textures, high elevations, and extensive surface preparation that are best handled by experienced contractors who can ensure proper bonding and texture matching.
Finally, any job requiring permits, inspections, or warranty considerations should be left to the pros. They know how to navigate local building codes and can secure warranties that protect your investment.
What to Expect From a Pro: Scope, Warranties, and Verification
When hiring a professional for stucco work, you should receive detailed estimates that outline the full scope of services. This includes surface preparation, material application, texture matching, and any necessary repairs or replacements.
To vet bids from contractors, ask for itemized estimates and verify their credentials such as licensing, insurance, and experience with similar projects. Look for references or reviews to gauge past performance and customer satisfaction.
Ensure that the contractor obtains all required permits and inspections before starting work. This is crucial for legal compliance and warranty eligibility. Ask about the types of warranties they offer, including material guarantees and labor warranties, which can provide peace of mind against future issues.
Verification of their work should be done through regular site visits to check progress and quality control measures. Don’t hesitate to request samples or mock-ups if you’re unsure about texture matches or color consistency. This proactive approach helps ensure the final product meets your expectations.
Long-term maintenance and troubleshooting after repair
Set a seasonal inspection cadence that looks for cracks, moisture intrusion, stucco staining, and paint failure. Create a simple cleaning and resealing plan based on product labels and manufacturer guidance, with typical reapplication intervals in mind. Watch for moisture signs like damp spots, ghosting, or musty odors and keep notes on small repairs such as minor crack fill using backer rods and careful patching.
Why it matters: moisture control and proper drainage around the home prevent ongoing damage and extend stucco life. Document findings to spot trends, and know when to call a pro for movement, widening cracks, hollow patches, or repeating moisture despite DIY steps.
Simple inspections and quick fixes homeowners can do
Monthly and annual checks help catch issues early, preventing costly repairs down the line.
- Check sealants: Look for cracks or gaps in caulk around windows and doors. Reapply as needed to prevent water intrusion.
- Inspect flashing: Ensure metal pieces are intact and properly installed at roof edges, chimneys, and other penetrations. Missing flashing can lead to leaks.
- Verify gutters: Clean out debris regularly; clogged gutters cause water damage. Check for proper slope towards downspouts.
- Look for cracks: Small hairline cracks are normal but need attention before they grow into major issues. Fill with caulk or stucco patch.
- Check for staining: Dark spots on walls can indicate water damage. Address any stains by cleaning and applying a sealant to prevent further deterioration.
- Inspect roof flashing: Ensure it’s properly sealed around chimneys, vents, and other roof penetrations. Missing or damaged flashing allows water entry.
- Maintain soil slope: Keep the ground sloping away from your home’s foundation to prevent water accumulation near walls.
- Cut back vegetation: Trim bushes and trees close to exterior walls to allow for proper air circulation and reduce moisture buildup.
Quick rule: Regular inspections catch small issues before they become big problems, saving you time and money in the long run.
Signs of serious problems and next steps
Dark stains on walls or ceilings can indicate hidden water damage. Persistent dampness often leads to mold growth, which is harmful to your health.
If you notice bulging areas in the stucco or significant cracking around windows and doors, these are signs of structural movement that needs immediate attention from a professional contractor.
When moisture issues persist despite DIY maintenance efforts, it’s crucial to consult with an expert who can perform detailed inspections using moisture meters and other tools to identify underlying causes.
Conclusion
Getting this right matters: a solid patch looks good, lasts, and keeps moisture from causing hidden damage that costs more later. Stay focused on safety, follow the steps, and test small areas before committing to larger sections.
Make your plan as a short, practical checklist: verify you have the right stucco type for your project, gather the tools and materials you need, clean and prepare the surface, dampen the area if required, apply patching and layering in thin coats, texture to match the existing finish, and let each coat cure before adding the next. Check the conditions in the work area, wear proper protection, and work in manageable sections to avoid overloading any spot.
Two or three mistakes to avoid first: jumping to texture without a proper base can crack, over-wetting or over-watering can weaken the mix, and skipping surface prep invites failure. A simple safety rule is to test a small patch first and never work in extreme heat or cold; follow the product’s curing times, and keep tools clean to prevent ragged edges.
If the job grows beyond patching small areas, or you’re unsure about moisture issues, it makes sense to call a professional instead of pushing on. When in doubt, prioritize safety and moisture control, and remember that a well-done repair pays off in durability and curb appeal. Stay practical, stay patient, and you’ll finish with a solid, lasting result.
FAQ
When should I repair stucco outdoors?
Do repairs in dry, mild weather. Avoid rain, wind, and freezing temps. Let any moisture dry before applying patch.
Do I need a scratch coat on repairs?
Yes, use a scratch coat to key the new stucco to the old. Keep repairs shallow and feather edges for a smooth blend. If you skip the scratch coat, the patch can fail later.
What tools do I need?
A hawk, trowels, a mixing tub, and a grout bag cover most jobs. Keep tools clean and use the right plaster mix for your climate. Don’t overreach with fancy gear when basics work.
What are common mistakes to avoid?
Don’t overwork the mix or apply thick layers at once. Don’t skip moisture barriers or flashing around openings. Don’t mix too wet; it will crack as it dries.