
Introduction
Fixing stucco around hose bibs is best achieved by installing proper drip loops to divert water away from the wall.
You’ll learn why drip loops matter for preventing water intrusion and stucco damage. The guide walks through practical steps, tips, and general rules of thumb for creating reliable loops around exterior hose connections.
Key takeaways
- Inspect hose bib location and stucco cracks for moisture entry points.
- Install drip loop and proper flashing to channel water away.
- Use corrosion-resistant fasteners and silicone for tight seal around bib.
- Apply feathered stucco patch and mesh to blend with existing wall.
- Prioritize safety: shutoff water, relieve pressure before starting repairs first.
- Test waterproofing with water spray and observe for leaks after cure.
Table of Contents
- Introduction
- Key takeaways
- Why stucco fails around hose bibs
- Planning the repair: assessment and safety
- Tools and materials checklist
- How to install a proper drip loop and flashing under a hose bib
- Step-by-step stucco repair process around the hose bib
- Waterproofing, drainage, and sealing techniques
- Common mistakes, troubleshooting, and maintenance
- Conclusion
- FAQ
Why stucco fails around hose bibs
Exterior plumbing penetrations are common trouble spots for stucco. Movement, flashing gaps, and water from hoses can all start small cracks that grow over time. Prompt attention helps prevent structural issues and mold growth.
Understanding how stucco bonds to backer, lath, and framing explains why gaps around penetrations lead to delamination and moisture migration. Proper flashing and sealants around hoses, drip loops, and penetrations are critical, and so are avoiding common mistakes like misangled flashing or failing caulk. Look for seasonal factors that accelerate deterioration and interior moisture clues as indicators of trouble.
Typical failure patterns and signs
The first sign of trouble around hose bibs is often hairline cracks appearing on the stucco surface. These can widen over time, allowing water to seep in and cause further damage.
Gaps between the stucco and the plumbing penetration indicate poor adhesion or delamination. Look for loose or crumbling stucco, which signals spalling – a serious sign of deterioration.
Staining or efflorescence on the stucco can hint at water intrusion. Check inside your home for damp spots, musty odors, or visible mold growth, as these are interior indicators of moisture problems.
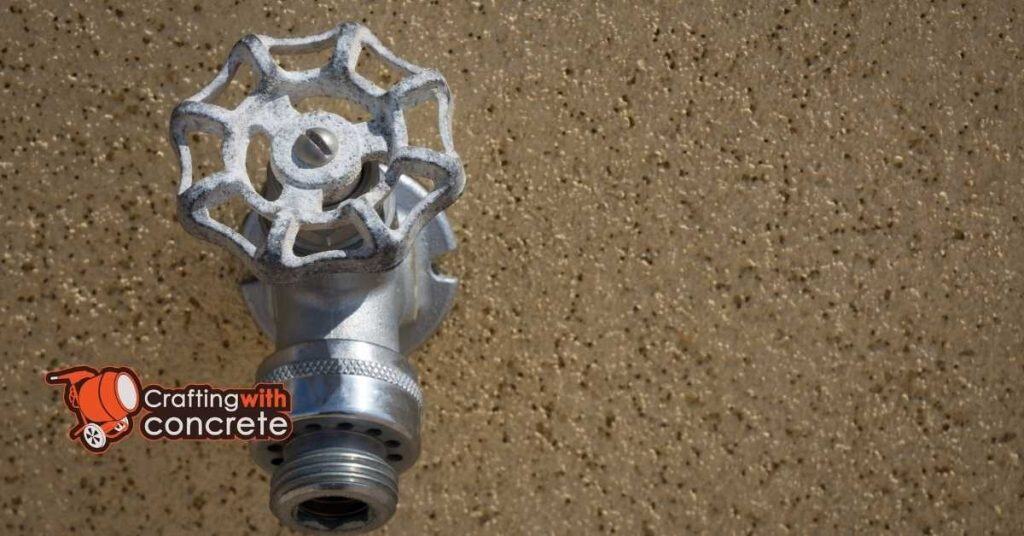
How hose bib installation affects stucco
The size of the penetration for your hose bib can impact the surrounding stucco. Larger penetrations require more careful flashing and sealing to prevent water intrusion.
A lack of a proper drip loop – a downward-sloping extension of the pipe above the penetration – allows water to run back towards the house, saturating the stucco and causing damage.
Incorrect mounting height can also cause issues. If the hose bib is too low, it may sit below grade level, allowing water to pool around it and seep into the stucco. Conversely, if it’s too high, it can put mechanical stress on the stucco as hoses are connected and disconnected.

Planning the repair: assessment and safety
Start with a thorough pre-repair assessment. Inspect the stucco ring around the bib for cracks, scaling, or moisture intrusion, and note any mold or rot behind the surface. Document findings with photos and measurements to guide scope and insurance notes.
Decide if the damage is cosmetic or structural, and verify permit and inspection requirements before starting. Choose DIY or professional help based on the extent, and plan for safety with ladders, PPE, and weather considerations. Identify the hose bib shutoff and plan for temporary isolation to prevent leaks during work.
Scope assessment checklist
Use this checklist during your pre-repair inspection to document the extent of damage and plan materials and labor.
- Loose stucco area: Measure square footage with significant cracks or scaling. Skipping this may lead to underestimating material needs.
- Distance to sill/door: Check how close damage is to the door or window sill. Closer damage may indicate a bigger problem behind the surface.
- Pipe condition: Inspect the pipe itself for rust, leaks, or corrosion. Ignoring this could lead to further water intrusion and stucco failure.
- Moisture intrusion: Look for signs of water entry like stains or mold behind the stucco. Not checking may result in incomplete repairs.
- Crack width: Measure widest cracks. Wider cracks may indicate structural issues requiring professional attention.
- Crack pattern: Note if cracks are horizontal, vertical, or diagonal. Different patterns suggest different causes and repair approaches.
- Mold or rot: Check for signs of organic growth behind the stucco. Presence may indicate hidden water damage needing professional assessment.
- Flashing condition: Inspect existing flashing around the hose bib. Damaged flashing could be causing water intrusion.
Quick rule: The more items on this list you check, the better prepared you’ll be for the repair process.
When to call a pro
Some stucco damage around hose bibs requires professional help. Here are clear signs it’s time to call in the experts:
Extensive structural cracking indicates that the framing behind the stucco may be compromised, requiring professional assessment and repair.
Active leaks around the hose bib suggest plumbing issues that could lead to further damage if not addressed promptly by a licensed plumber.
Concerns about asbestos in older homes should always prompt a call to a professional. They have the training and equipment to safely handle and remove asbestos-containing materials.
Inaccessible framing or other areas where you can’t fully inspect the damage may require professional help to ensure all issues are addressed properly and safely.
Tools and materials checklist
Define the repair scope to determine which tools and materials are required for patching versus full-depth repair around hose bibs. Assess the problem area and necessary flashing to guide your shopping. Gather the essential hand tools and safety gear, noting what’s needed for simple patching versus deeper work.
Catalog materials by repair type, including bonding agents, coats, stucco mix, lath, mesh, flashing, caulk, and appropriate plumbing fittings. Check compatibility with existing stucco and flashing, and plan for wetting, curing, and weather considerations. Create a practical purchasing list with estimated quantities for typical bib area and substitutions if items aren’t available.
Material specs and recommended alternatives
Use this checklist to ensure you’ve got the right materials for your climate and substrate.
- Stucco mix: Choose cement-based (cementitious) over acrylic. It’s tougher, longer-lasting, and better suited for exterior repairs.
- Bonding agent: Opt for a polymer-modified latex. It enhances adhesion and flexibility.
- Flashing: Use galvanized steel or aluminum. Avoid plastic; it degrades over time.
- Caulk/Sealant: Select silicone-based. It’s flexible, waterproof, and UV-resistant.
- Plumbing fittings: Ensure they’re compatible with your hose bib model and local codes.
- Lath: Expanded metal lath is best for full-depth repairs. Wood lath works for small patches but may rot over time.
- Primer: Choose one that’s compatible with your bonding agent and stucco mix.
- Curing compound: Use a membrane-curing compound to protect against moisture loss during curing.
Quick rule: Always check local climate and substrate conditions before choosing materials. What works in dry, sunny areas may not hold up in humid regions or on certain surfaces.
Estimated costs for supplies and typical labor
Use this checklist to budget for your repair. Prices may vary by location, so check local pricing.
- Stucco mix: $20-$40 per 80-lb bag (DIY). $50-$100 per sq ft installed (pro).
- Bonding agent: $10-$30 per quart (DIY). $20-$50 per sq ft installed (pro).
- Flashing: $10-$20 per linear ft (DIY). $20-$40 per linear ft installed (pro).
- Caulk/Sealant: $5-$15 per tube (DIY). $10-$30 per tube installed (pro).
- Plumbing fittings: $5-$20 each (DIY). $10-$40 each installed (pro).
- Lath: $1-$3 per sq ft (DIY). $3-$6 per sq ft installed (pro).
- Labor: $50-$100 per hour (pro). Total repair cost ranges from $200 to $800, depending on size and complexity.
Quick rule: Always get multiple quotes if hiring a pro. Prices can vary significantly between contractors.
How to install a proper drip loop and flashing under a hose bib
The goal is a drip loop and flashing that directs water away from stucco, keeping moisture out of the wall. Make sure the loop is formed on the supply pipe below the bib to encourage gravity drainage outward. Plan to integrate with the hose bib interface for a continuous path away from the wall.
Choose durable flashing options and determine if additional sealant or flashing under the stucco is needed. Follow proper sequencing: prep the pipe, form the loop, install flashing with overlap, and connect at the bib area. Ensure everything is weatherproof and ties into the stucco boundary cleanly.
Step-by-Step Installation Process
Follow these practical steps to install a proper drip loop and flashing under your hose bib, ensuring water is directed away from the stucco.
- Prep the pipe: Turn off the water supply, open the faucet to relieve pressure, and clean the pipe around the hose bib.
- Form the drip loop: Using a hacksaw or tubing cutter, create a 1/4″ to 3/8″ deep groove in the supply pipe below the hose bib. Bend the pipe at this groove to form a gravity-driven loop.
- Secure the drip loop: Use stainless steel wire or clamps to secure the drip loop in place. Ensure it’s tight and won’t move under pressure.
- Install flashing: Position metal or flexible flashing around the hose bib, ensuring it extends at least 4″ below the stucco line. Secure with nails or screws, overlapping seams by at least 2″.
- Integrate with hose bib: Reattach the hose bib, ensuring it’s properly sealed and aligned with the drip loop and flashing.
- Test for leaks: Turn on the water supply slowly, checking for any leaks around the hose bib or under the flashing. Tighten connections as needed.
- Check slope: Ensure the drip loop and flashing create a continuous path away from the wall, with no low spots where water could pool.
- Clean up: Remove any debris, and inspect your work to ensure everything is secure and watertight.
Drip loop geometry and best practices
The drip loop’s shape, length, and attachment points are crucial for effective water diversion. Aim for a smooth, continuous curve with no sharp angles that could trap water.
For most applications, an oval or circular drip loop works best. The loop should be at least 1/4″ to 3/8″ deep, creating enough space for water to flow away from the wall. Ensure the loop is positioned below the hose bib and slopes outward, directing water away from the stucco.
Do not create a drip loop that’s too shallow or too close to the wall, as this can trap water and lead to moisture intrusion. Also, avoid creating sharp angles in the loop, which can cause water to collect and potentially freeze, damaging the pipe.
Flashing types and installation tips
Choose durable flashing materials like copper or galvanized steel for metal flashing. For flexible flashing, opt for self-adhered membranes or EPDM rubber.
When installing metal flashing, ensure it’s wide enough to extend at least 4″ below the stucco line and overlap seams by at least 2″. Secure with nails or screws, using a washer under the head to prevent tearing. Seal any nail or screw holes with a dab of silicone caulk.
For self-adhered membranes, peel off the backing and press firmly into place, ensuring it’s smooth and free of wrinkles. For EPDM rubber, use a special adhesive designed for this material. Always ensure flashing extends under the stucco boundary to create a continuous water-shedding path.
Step-by-step stucco repair process around the hose bib
Assess the damage scope around the hose bib, noting loose or cracked stucco, moisture signs, and any substrate issues. Plan safety steps and containment to prevent debris from entering irrigation lines or fixtures. Prepare for removal and repair with a clear, safe plan.
Remove loose material and prepare the substrate, cleaning and drying the surface and addressing mold or mildew. Install lath or mesh, moisture barrier, and seal around the bib, including flashing or drip loop details. Apply scratch and brown coats with proper technique and curing in mind, then texture and seal as needed for a match with the existing wall.
Step-by-Step Repair Process
This sequence will guide you through repairing stucco around your hose bib, ensuring a durable and long-lasting fix.
- Inspect the damage: Carefully examine the area to understand the extent of the repair needed. Look for cracks, holes, or crumbling stucco.
Why it matters: This helps you gather the right tools and materials.
Check: A clear understanding of what needs fixing. - Gather your tools and materials: You’ll need a trowel, putty knife, sandpaper or wire brush, stucco patching compound, mesh tape, and safety gear (gloves, goggles).
Why it matters: Having the right tools ensures a smooth repair.
Check: All items are accounted for before starting. - Prepare the surface: Clean and remove any loose stucco using your wire brush or sandpaper. Ensure the area is dry.
Why it matters: A clean, dry surface promotes better adhesion.
Check: Surface feels smooth and looks dry. - Apply mesh tape: Cut the tape to fit the damaged area. Apply it using a thin layer of stucco patching compound as an adhesive.
Why it matters: Mesh tape reinforces the repair, preventing future cracks.
Check: Tape is securely attached and fully covered in compound. - Apply the first coat of stucco patching compound: Using your trowel or putty knife, apply a thin layer over the mesh tape. Ensure it’s smooth and even.
Why it matters: A thin base coat helps prevent cracking when applying subsequent layers.
Check: Coat is smooth, even, and covers the entire damaged area. - Apply additional coats (if needed): Allow each coat to dry according to the manufacturer’s instructions before applying the next. Typically, this is 24-48 hours.
Why it matters: Multiple thin layers create a stronger, more durable repair than one thick layer.
Check: Each coat dries smooth and even. - Sand the repaired area (optional): Once fully dry, use sandpaper to lightly sand any rough edges or high spots. This ensures a smooth finish.
Why it matters: Sanding creates a smooth surface for painting or texturing.
Check: Surface feels smooth and even. - Inspect your work: Step back and examine the repaired area. Look for any missed spots, rough edges, or other issues.
Why it matters: Catching mistakes now prevents costly rework later.
Check: Repair looks complete and even.
Pro tip: Always follow the manufacturer’s instructions for drying times. Rushing this process can lead to a weak, easily damaged repair.
Preparing the opening and treating the pipe
First off, you gotta cut back that damaged stucco. Use a utility knife or a chisel to score around the hose bib, then snap it off. Be careful not to damage the pipe.
Now, clean up the area. Remove any loose material and dust. You can use a wire brush for this. Once done, prime that surface. Use a good quality primer designed for stucco. This’ll help your patch stick real good.
While you’re at it, let’s not forget about that hose bib and supply pipe. If the pipe’s damaged, replace it. You don’t want leaks later on. As for the hose bib, if it’s rusted or busted, replace it too. It’s cheaper than fixing a leaky one down the road.
Before you patch, protect that pipe. Wrap it with some foam insulation or even a bit of rags and tape. This’ll keep your patch from cracking when the pipe expands and contracts with temperature changes.
Layering stucco and finishing touches
Now that you’ve prepped the area and applied your first coat, it’s time to build up those layers for a durable, seamless repair. Here’s how:
Scratch Coat (Day 1): Mix your scratch coat as per manufacturer’s instructions. Apply evenly over the primed area using a hawk and trowel. Work it into the substrate, checking base compaction. Let it cure for at least 24 hours.
Brown Coat (Day 3): After two days, mix your brown coat. Apply this layer to build up texture, matching existing stucco. Use a darby or float to work it in, blending with surrounding walls. Let cure for another 24 hours.
Finish Coat (Day 5): Mix and apply your finish coat, ensuring it’s smooth and even. Use a trowel to create the desired texture, matching existing stucco as best you can. Let this final layer cure for at least 72 hours before repainting.
Waterproofing, drainage, and sealing techniques
Define drip loop design basics around bibs, focusing on height, shape, and positioning to direct water away from stucco. Check drainage paths and ensure a clean surface ready for coatings. Assess compatibility with coatings and sealants for long-term performance.
Consider elastomeric coatings and backer rod usage to control sealant depth, along with primer and curing requirements. Choose appropriate exterior sealants, noting joint sizing and curing times. Ensure flashing and drainage are integrated with a plan for ongoing maintenance and inspection.
Sealants and compatibility with stucco
When it comes to sealing around your stucco home, you’ve got options. But remember, not all sealants play nice with stucco.
Silicone-based sealants are your best bet. They’re flexible, waterproof, and won’t crack or peel like some others. Check the label to ensure it’s suitable for exterior use and compatible with stucco.
For those big gaps, don’t skimp on backer rod. It keeps sealant from sagging and provides extra protection. Cut it to size, insert into the gap, then apply your sealant overtop.
Sealants don’t last forever. Expect a lifespan of around 5 to 10 years, depending on the product and conditions. Inspect seals annually, and touch up or replace as needed. It’s better to catch small issues early than let them turn into big problems.
Ensuring proper drainage around the bib
First things first, check base compaction. You don’t want water pooling ’cause your base is too soft. Aim for a minimum of 95% compaction.
Now, let’s talk grading. You want the ground around your bib to slope away at least 1/4 inch per foot. This ensures water doesn’t just sit there and find its way back into your wall. Use a level or a string line to get it right.
Next up, align that drip line. Make sure the bib’s edge is at least 2 inches above finished grade. This stops water from spilling over and causing trouble. If you’re using an escutcheon or diverter, make sure it’s properly installed and won’t let water sneak back behind.
Lastly, don’t forget about those joints. Make sure they’re properly sealed with a compatible sealant, like we talked about earlier. You don’t want water wicking up through them and causing issues down the line.
Common mistakes, troubleshooting, and maintenance
Identify the most frequent errors, such as insufficient flashing, over-reliance on caulk, and inadequate substrate prep. These issues commonly drive recurring leaks around hose bibs. Recognize symptoms early to interrupt the leak cycle.
Perform diagnostic checks like staining, efflorescence, or soft stucco near the bib, and test water flow after rain or irrigation. Develop a quick-fix workflow for DIY scenarios and a long-term maintenance plan to prevent future repairs. Consider when to involve a pro and how to document work for warranties or inspections.
How to Test Your Repair and Spot Hidden Leaks
After fixing stucco around hose bibs, it’s crucial to test your repair work. Here are simple tests to ensure your fix is effective:
Hose Test: Run water through the hose for a few minutes. Inspect the area around the bib for any signs of leaks or moisture.
Visual Inspection: Look for staining, efflorescence, or soft/damaged stucco near the bib. These could indicate recurring leaks.
Moisture Meter Check: Use a moisture meter to pinpoint hidden leaks. Scan the area around the bib, focusing on flashings, backer rod, and sealant joints.
Long-Term Maintenance Schedule and Tips
Maintaining your stucco repair work around hose bibs ensures longevity. Here’s a simple maintenance schedule:
Annual Inspection (Spring): Check for cracks, hairline fractures, or any signs of wear. Promptly repair these to prevent further damage.
Pre-Wet Season Refresh (Fall): Before peak wet seasons, refresh sealants around the bib to ensure a continuous water-shedding path away from the stucco.
Upgrade for Longevity: Consider upgrading to dedicated drip-edge flashing and corrosion-resistant bibs for added durability. Regular maintenance will extend the life of your repair work and hose bib.

Conclusion
Fixing the drip loop and flashing under a hose bib matters for safety, durability, and curb appeal. When done right, you protect the wall from water intrusion and keep stucco looking solid for years.
First, check the area and plan the repair in a simple, repeatable order: inspect for cracks, remove loose stucco, install a proper drip loop and flashing under the bib, seal and waterproof, repair the stucco around the opening, and then test for leaks before finishing. Do this in small steps, with a dry-run and cautions in place, so you don’t rush and miss a key detail.
Common mistakes to avoid are skipping the flashing or a proper drip loop, using mismatched sealants or over-spraying waterproofing, and ignoring drainage. Always shut off water and protect your work area, dry-fit first, and then test for leaks in a controlled way. Work in small sections to prevent staged failures, and don’t seal or plaster over an area until you’ve confirmed it sheds water properly.
If structural cracking, hidden rot, or complex plumbing behind the wall shows up, or you can’t access the back side to install proper flashing, call a pro. For everything else, follow the solid sequence, test the system, and finish cleanly. Stay practical, stay safe, and you’ll keep the water out and the wall looking right.
FAQ
What is a drip loop and why do I need one around a hose bib?
A drip loop is a short bend in the hose bib hose that keeps water from traveling back into the wall. It catches water and lets it drip off outside the stucco. Without it, water can run behind the siding and cause rot or mold.
Where should the drip loop be placed for best protection?
Place the loop directly under the hose bib where the hose connects. It should be visible and free of tight bends. Keep it above any stucco joints or seams to avoid water wicking into the wall.
What materials should I use for the loop and hose connections?
Use standard exterior garden hose and a short piece of flexible hose if needed. The loop should hold its shape and not kink. Avoid copper or hard metal close to the stucco where it can abrade the coating.
How do I fix a loose drip loop or drip loop that’s leaking?
Tighten any loose fittings and replace worn washers. If water still leaks behind the stucco, redo the loop with a longer bend and secure it so it drains outward. Do not leave a loose loop that lets water sit against the wall.