
Introduction
Stucco over foam (EIFS/thin coat) is a layered exterior finish that uses insulation foam beneath a base coat and reinforced mesh. This article keeps it practical for DIYers and focuses on how base coat and mesh placement change when you install over foam. Think of it as a lightweight, flexible alternative to traditional stucco, with some different preparation steps.
Key differences from traditional stucco include the foam insulation layer, and the way base coat and mesh are applied to hold everything together. EIFS components typically include adhesive to the board, insulation, mesh, base coat, and the finish; check the product label and instructions for your specific system. DIY-friendly benefits include added insulation and lighter weight, but beware common mistakes like improper mesh embedment or inadequate base coat coverage.
Key takeaways
- EIFS differs from traditional stucco in insulation layer and lightweight base coat.
- EIFS system includes adhesive, insulation board, mesh, base coat, finish; ensure correct order.
- Substrate prep matters: clean, dry, and secure boards before base coat.
- Base coat thickness and curing affect performance; follow manufacturer guidance and PPE.
- Mesh selection and embedding technique crucial; avoid gaps and exposed edges.
- Common installation errors include improper adhesion, insufficient embedding, and inadequate flashing.
Table of Contents
- Introduction
- Key takeaways
- Eifs Vs Traditional Stucco — Core Differences
- Types of Eifs and System Choices That Affect Base Coat and Mesh Work
- Substrate and Preparation Best Practices Before Applying Base Coat and Mesh
- Base Coat Application: Thickness, Mixing, and Curing Impacts
- Mesh Selection, Placement, and Embedding Techniques
- Common Installation Errors and How They Affect Performance
- Repairing and Retrofitting Eifs/Stucco over Foam
- Advanced Techniques, Innovations, and Safety Considerations
- Conclusion
- FAQ
Eifs Vs Traditional Stucco — Core Differences
EIFS is an insulated, finish-system that uses base coats and reinforced mesh over foam insulation. Traditional stucco relies on cementitious base and finish layers that are applied in sequence.
Weight, detailing, and moisture control differ noticeably between the two. Consider the building’s framing, retrofit plans, and expected performance when choosing which system fits the project.
Layer-by-Layer Comparison
The core difference between EIFS and traditional stucco lies in their layer composition.
EIFS is a five-layer system: adhesive, insulation board, base coat, mesh, and finish. Each serves a purpose – adhesion, insulation, reinforcement, and final appearance.
Traditional stucco, on the other hand, is a three-coat cementitious system: scratch coat (base), brown coat (body), and finish coat. It lacks the insulation layer found in EIFS.
Performance Implications
The foam insulation in EIFS boosts its R-value, providing better thermal resistance compared to traditional stucco. This means improved energy efficiency and indoor comfort.
EIFS is lighter due to its foam core, reducing dead load on framing. However, it may not offer the same impact resistance as heavier traditional stucco in high-traffic areas or regions prone to severe weather events.
Durability-wise, EIFS can last up to 40 years with proper maintenance, matching traditional stucco’s lifespan. But, both systems require regular inspection and repair as needed.
Code, Insurance, and Fire-Safety Considerations
Building codes often dictate EIFS use based on climate and location. In some areas, it’s required for energy efficiency; in others, it’s prohibited due to fire safety concerns.
NFPA/IBC testing ensures EIFS meets fire resistance standards. However, insurance companies may have specific requirements or exclusions related to foam-based systems, so check with your provider before installation.
Proper detailing and flashing are crucial in both systems to prevent water intrusion and potential damage. Always follow local codes and manufacturer guidelines for best results.

Types of Eifs and System Choices That Affect Base Coat and Mesh Work
Different EIFS types include adhesion/lamina, drainage EIFS, and insulated cladding variants. Each type changes base coat formulas, mesh weights, and application thickness.
System choice influences base coat composition and mesh specifics, including size, weight, and resin content. Expect variations in edge handling, openings, and moisture management tied to the selected variant.
Drainage EIFS vs Face-Sealed EIFS
EIFS systems differ in their moisture management strategy. Drainage EIFS allows water to escape through weep holes, while face-sealed EIFS relies on a waterproof membrane.
Drainage EIFS: Requires thicker base coats (1/4″ to 3/8″) for proper drainage channels. Mesh placement is crucial – install two layers of mesh, one at the base and another midway through the base coat, ensuring they’re properly embedded.
Face-Sealed EIFS: Uses a thinner base coat (1/8″ to 3/16″). Mesh is installed similarly but with less emphasis on drainage channels. Ensure mesh termination at weep holes and proper edge detailing.
Adhesive-Applied vs Mechanically-Fastened Insulation Boards
EIFS systems use different methods to attach insulation boards. Adhesive-applied uses a bonding adhesive, while mechanically-fastened uses fasteners.
Adhesive-Applied: Requires a smooth, clean substrate for proper adhesion. Apply mesh after the first layer of base coat is applied and before it dries. Embed mesh fully into the base coat.
Mechanically-Fastened: Needs pre-drilling and countersinking for fasteners. Mesh should be installed over these fasteners, ensuring they’re covered by at least 1/4″ of base coat. This method allows for better board flatness but requires more labor.
Thin-Coat EIFS vs Cementitious Thin-Coat Systems
EIFS thin-coat systems can be acrylic-based (Thin-Coat EIFS) or portland-based (Cementitious Thin-Coat). The choice affects base coat formulation and mesh type.
Thin-Coat EIFS: Uses an acrylic base coat, which is flexible and durable. It requires a lightweight, flexible mesh for proper embedding and to resist cracking.
Cementitious Thin-Coat Systems: Uses a portland-based cement mix as the base coat. This system needs a heavier, stiffer mesh to provide structural support and prevent delamination. The base coat may also require admixes for improved performance.
Substrate and Preparation Best Practices Before Applying Base Coat and Mesh
Start with a substrate inspection that looks for foam over studs, movement, and compatibility with EIFS or Thin Coat systems. Note any areas needing structural repair before proceeding.
Ensure surfaces are clean, sound, and flat within tolerance. Plan moisture checks, barrier readiness, and flashing details around openings as part of the prep workflow.
Inspecting and repairing the substrate
The first step in preparing your substrate is a thorough inspection. Look for any signs of damage or issues that could affect adhesion and board flatness.
Rot: Check for any soft, spongy, or discolored areas. If found, cut out the affected area and replace it with new material.
Loose sheathing: Tighten any loose sheathing using screws or nails. Ensure they’re driven in flush to avoid interfering with the EIFS system.
Uneven surfaces: Fill any voids, depressions, or low spots with a suitable patching compound. Ensure the surface is flat and smooth within substrate tolerance for base coat and mesh application.
Air/moisture barrier and flashing integration
The air/moisture barrier (WRB) is crucial to prevent water intrusion. Install it before any other components.
Window/door flashings: Ensure these are in place and properly sealed around openings before installing insulation or base coat.
Weep screeds: Install weep screeds at the bottom of walls to facilitate water drainage. This prevents moisture buildup behind the EIFS system.
Proper sequencing ensures a continuous barrier, preventing water damage and maintaining the integrity of your EIFS system.
Tools and materials checklist for prep
Before you start, ensure you have all necessary tools and materials. This checklist helps you stay organized and prepared.
- Moisture meter: To check surface and in-wall moisture levels before applying base coat.
- Scraper: For removing loose material, dust, and efflorescence.
- Compatible primers: To pre-treat slick or oily areas and improve adhesion.
- Fasteners: For securing loose sheathing and reembedding foam.
- Tape measure: To ensure accurate measurements for repairs and mesh placement.
- Level: To verify flatness and straightness of the substrate.
- Patching compound: For filling voids, depressions, or low spots.
- Manufacturer’s guidelines: Consult these for specific product recommendations and application instructions.
Quick rule: Always double-check your tools and materials before starting. Missing something can lead to delays and poor results.
Base Coat Application: Thickness, Mixing, and Curing Impacts
Define base coat consistency and how to test tack and spread with a trowel. This helps ensure proper mesh embedment.
Discuss mixing guidelines, water ratios, and additives needed for system compatibility. Address curing conditions and how they affect mesh embedding and long-term performance.
Achieving uniform base coat thickness
The key to a strong EIFS system is applying a consistent base coat. Here’s how:
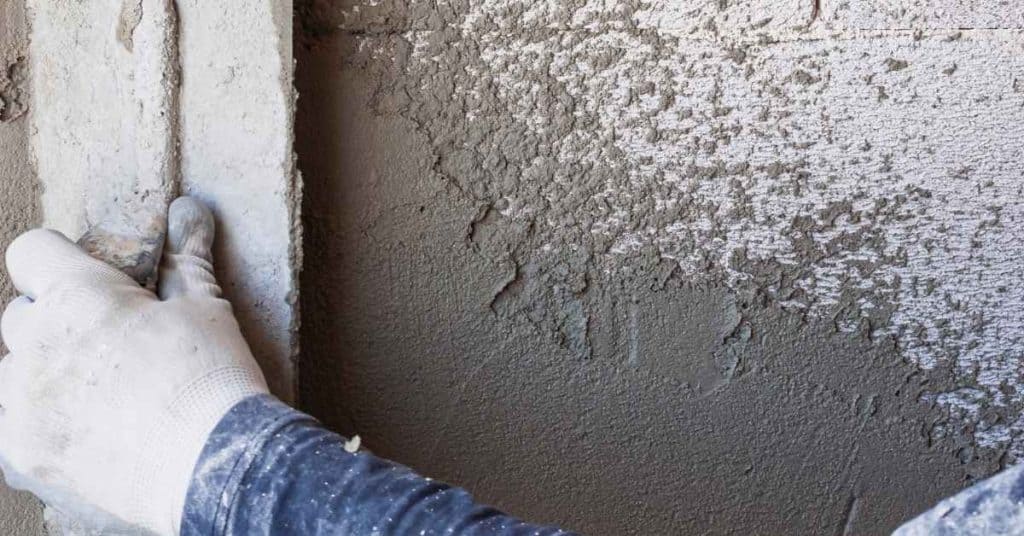
Trowel Application: Use a straight edge trowel to apply the base coat in smooth, even strokes. Start from the top and work your way down.
Checking Thickness: Use a base coat gauge (usually 3/8″ or 1/2″) to ensure consistency. Press it into the wet mix at regular intervals. If it’s too thin, you’ll see substrate; if too thick, it won’t press in fully.
Avoid: Overly thin coats (less than 3/8″) can lead to weak adhesion and cracking. Excessively thick coats (more than 1/2″) can cause delamination and poor mesh embedment.
Curing time, temperature, and weather precautions
Minimum Cure: Allow the base coat to cure for at least 24 hours before applying mesh. This lets it set but remain tacky for embedding.
Temperature & Humidity: Ideal curing conditions are between 50°F – 90°F (10°C – 32°C) with relative humidity around 40-70%.
Weather Precautions:
- Rain: Protect the curing base coat from rain. Cover it if necessary to prevent premature drying or washing away.
- Freezing: Avoid freezing temperatures during cure. If freeze is imminent, cover and insulate the area.
Material selection and compatibility
Choosing compatible materials ensures a strong bond between layers and prevents issues down the line.
- Base Coat: Use manufacturer-recommended cementitious base coats. They’re designed for system compatibility.
- Polymer Modifiers: Add as per manufacturer’s instructions. Too little can cause cracking, too much can lead to poor adhesion with finish coat.
- Water Ratio: Follow the mix design closely. Too much water weakens the base coat, too little makes it hard to apply.
- Additives: Some additives enhance performance (e.g., accelerators for faster cure). Check manufacturer specs before use.
- Mesh Types: Use compatible mesh types. Galvanized or stainless steel work best with cementitious base coats.
- Finish Coats: Ensure the finish coat is compatible with your base coat and mesh. Incompatibility can cause staining, peeling, or cracking.
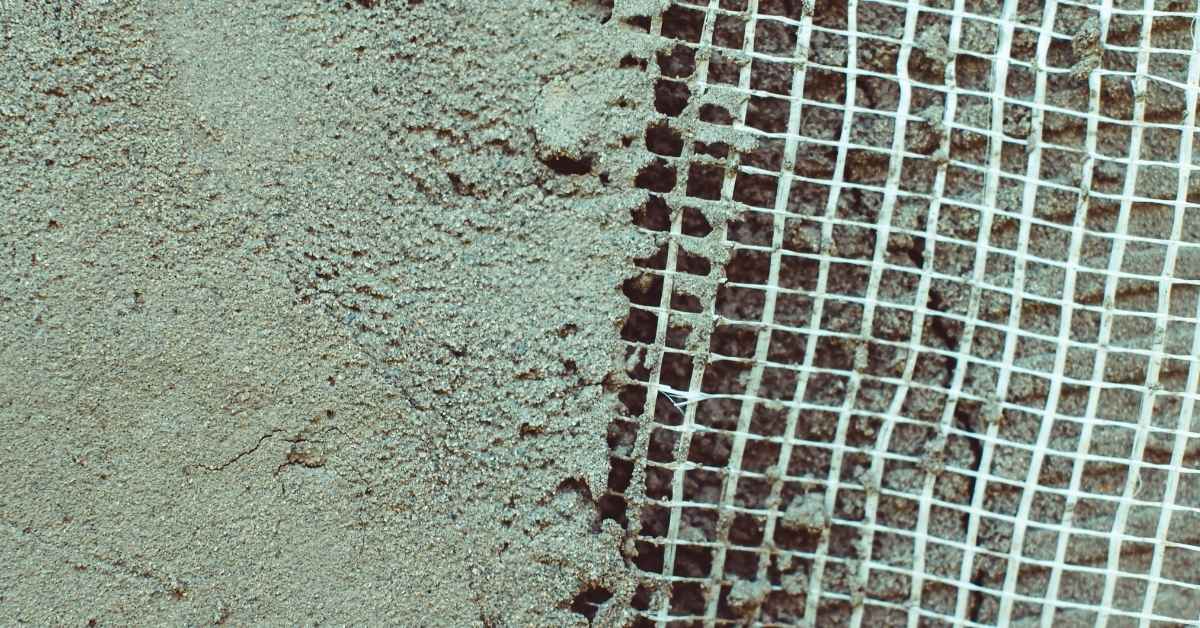
Mesh Selection, Placement, and Embedding Techniques
Explain mesh material choices (alkali-resistant vs standard fiberglass) and how they interact with base coats and finishes. Include typical mesh weights and their effect on crack control.
Outline layout strategies for joints and irregular surfaces, including overlap, corner reinforcement, and edge coverage. Provide embedding steps to prevent wrinkles and voids.
Proper mesh overlap and lapping details
The key to a strong EIFS system is proper mesh overlap. Here’s how to do it right.
Recommended overlap width? 2 inches. This gives you enough strength at joints without using too much material. Stagger laps like bricks in a wall for even distribution of stress.
Laps should be oriented perpendicular to seams and board joints. This ensures maximum load transfer and prevents cracks from propagating.
Reinforcing openings, corners, and terminations
Openings like windows and doors need extra reinforcement. Here’s how to do it.
Use corner mesh at outside corners for added strength. Wrap the mesh around the corner, embedding both sides into the base coat.
At inside corners, use a 90-degree bend in the mesh, embedding both sides. For angles, use a 45-degree cut and embed as usual.
Integrate mesh with flashing and sealants around openings to prevent water ingress. This is crucial for a durable EIFS system.
Visual checkpoints and quality control
Before you apply the next coat, use this checklist to ensure proper mesh placement. Do it after embedding but before the base coat cures.
- Check for wrinkles: Mesh should lay flat with no wrinkles or creases. Wrinkles can cause cracks later on.
- Confirm full embedment: Mesh fibers should be fully buried in the base coat, not sticking out or barely covered.
- Inspect overlaps: Ensure laps are properly staggered and secured. No gaps or misalignments.
- Check corners: Corner mesh should be securely embedded on both sides with no exposed fibers.
- Verify openings: Mesh around windows, doors, and penetrations should be properly integrated with flashing and sealants.
- Look for air voids: Air pockets under the mesh can cause delamination. Tap the surface to release any trapped air.
- Feel for proper embedment: Gently run your fingers over the embedded mesh. It should feel smooth and fully covered.
- Check for exposed fibers: Any exposed fibers can rust (if galvanized) or cause delamination. Ensure all fibers are buried.
Quick rule: If you’re unsure, use a flashlight to check for any issues under the mesh before it’s too late to fix them.
Common Installation Errors and How They Affect Performance
Identify prep failures, moisture issues, and substrate readiness problems that undermine adhesion. Include quick checks for field notes and diagnosis.
Cover base coat thickness, mesh embedment standards, and how to verify with gauges. Discuss the consequences of misapplication on insulation and durability.
Moisture intrusion and trapped water scenarios
Trapped moisture is the silent killer of EIFS systems. It leads to mold, substrate damage, and eventually, system failure.
Face-sealed details can trap water behind the finish coat. Make sure all seams are properly taped and sealed before applying the finish coat.
Missed flashings around windows, doors, and other openings allow water to get behind the EIFS and stay there. Ensure all flashings are in place and correctly installed.
Inadequate drainage can also lead to trapped moisture. Check that all gutters and downspouts are functioning properly and directing water away from the walls.
Cracking, delamination, and premature failure causes
Several factors can cause cracking and delamination in EIFS systems, leading to premature failure.
Inadequate mesh embedment leaves the system vulnerable to cracking. Ensure the mesh is fully embedded in the base coat according to manufacturer’s guidelines.
Wrong base coat mix can affect adhesion and flexibility. Always follow the manufacturer’s mixing instructions.
Thermal movement and missing expansion joints can also cause cracking. Make sure expansion joints are installed where needed, and the system is allowed to move with temperature changes.
Mistakes DIYers commonly make (and how to avoid them)
Even with the best intentions, DIYers can make mistakes that compromise their EIFS system. Here are some common pitfalls and how to avoid them.
- Rushing cure times: Patience is key when it comes to curing. Rushing this process can lead to poor adhesion and system failure. Always allow the recommended cure time before applying the next layer.
- Skipping WRB integration: The weather-resistant barrier (WRB) is crucial for protecting the substrate from moisture intrusion. Make sure it’s properly installed before applying the EIFS.
- Improper tool use: Using the wrong tools or using them incorrectly can damage the EIFS system. Always use the right tools for the job and follow proper techniques.
- Not checking manufacturer’s guidelines: Every product is different. Always check the manufacturer’s guidelines for specific installation instructions.
Taking these steps can help avoid common DIY mistakes and ensure a long-lasting, high-performing EIFS system.
Repairing and Retrofitting Eifs/Stucco over Foam
Start with a diagnostic checklist for moisture signs, delamination, and prior repairs. Distinguish EIFS from traditional stucco when assessing damage.
Evaluate whether patching is enough or a full replacement is needed. Consider upgrading to drainage EIFS or adding waterproofing or barrier details as part of the retrofit plan.
Diagnosing hidden damage and when to open the wall
Not all damage is visible. Here’s how to spot signs that warrant invasive inspection:
Soft spots, stains, or persistent moisture readings indicate potential issues behind your stucco finish.
Safety first: before you start poking around, ensure there are no live electrical wires or gas lines in the walls. Use a stud finder and turn off power at the main panel.
Gently probe suspect areas with a screwdriver or awl. If it goes in easily, you’ve found a soft spot. Mark these spots for further investigation.
Stepwise repair methods (patch, partial, full replacement)
Repairing EIFS involves choosing the right method based on damage extent:
Patching is quick and cheap but only suitable for small areas with no structural issues. It involves removing damaged finish and base coat, applying new base coat, and reapplying finish.
For larger areas or where insulation boards are compromised, partial replacement may be necessary. This includes replacing foam boards, mesh, and applying new base and finish coats.
In cases of extensive damage or failed systems, full system removal might be the best option. This involves stripping off everything – finish, base coat, mesh, and insulation – then starting fresh.
Cost considerations and lifespan impacts
Repairing or replacing EIFS comes at a cost. Here’s what to expect:
Patching is the cheapest option, typically ranging from $50 to $200 per square foot. However, it doesn’t extend your system’s life significantly.
Partial replacement costs more – around $100 to $400 per square foot – but increases lifespan by addressing underlying issues.
Full system removal is the most expensive route, ranging from $300 to $800 per square foot. Yet, it provides the longest-lasting solution and often comes with improved performance features like drainage EIFS or additional waterproofing.
Maintenance costs also vary: patched areas may need frequent touch-ups, while fully replaced systems require less maintenance but have higher upfront costs.
Advanced Techniques, Innovations, and Safety Considerations
Compare new base coat formulations and application methods, including spray versus trowel options and their impact on adhesion. Consider substrate compatibility and thermal performance.
Discuss safety practices, PPE, ventilation, and handling of foam products. Include quality assurance steps and maintenance strategies to prolong system life.
Modern adhesives, breathable coatings, and vapor management
The latest EIFS/Thin Coat systems boast advanced base coats. New formulations like acrylic-polymer modified cement offer superior adhesion to foam substrates.
Spray vs. trowel applications: Spray-applied base coats penetrate deeper into the foam, enhancing substrate compatibility and thermal performance. Trowel-applied coats provide a thicker layer for better crack resistance.
Breathable finishes allow moisture to escape while keeping water out. Specify vapor-permeable coatings in high-humidity areas or where moisture dynamics may affect substrate integrity behind the foam.
Safe handling of foam boards and combustible concerns
Fire safety: Use non-combustible insulation alternatives where required by code. Always check local regulations regarding fire-resistant barriers.
Wear appropriate PPE when cutting, handling, or installing foam boards. Safety glasses protect from debris, and gloves prevent skin irritation.
Ventilation: Ensure proper ventilation during installation to reduce exposure to chemicals and dust. Follow manufacturer guidelines for safe handling and storage of foam products.
Quality assurance, inspections, and maintenance schedule
When to use the checklist: Inspect your EIFS/Thin Coat system annually or after severe weather events.
- Visual check: Look for cracks, peeling, or discoloration. Address any issues promptly to prevent further damage.
- Sealant inspection: Check sealants around openings and terminations. Replace if necessary.
- Moisture testing: Conduct a moisture survey using a non-invasive meter to detect trapped water or excessive moisture.
- Adhesion test: Perform an adhesion test on suspect areas to confirm bond strength.
- Corner detailing: Inspect corners for signs of stress or cracking. Reinforce if needed.
- Mesh inspection: Check mesh for proper embedment and alignment. Repair any exposed or damaged mesh.
- Drainage check: Ensure weep screeds and other drainage features are functioning properly.
- Professional assessment: Consult a professional if you find signs of significant damage or are unsure about the cause of an issue.
Quick rule: Address minor issues promptly to prevent them from becoming major problems that could require extensive repairs or replacement.
Conclusion
Getting EIFS over foam right matters for safety, durability, and curb appeal. The base coat and mesh work are the backbone—do them well and you’ll avoid cracks, moisture damage, and costly fixes down the line.
Before you start, walk this through in order: check substrate readiness and edge conditions, confirm the base coat type and thickness recommended for your system, choose the correct mesh and embedding method, mix and apply in clean, workable conditions, and cure the coating as directed. Test a small area first, keep temperatures in the acceptable range, and inspect each stage for full embedment and even coverage.
Common mistakes to avoid are skipping substrate prep, using the wrong mesh or not embedding it fully, and letting weather or improper curing ruin adhesion. Always keep safety in mind: wear eye protection, gloves, and a respirator if dust is present, and don’t apply when rain, heavy wind, or freezing temperatures are forecast. If you see loose coating, delamination, or cracking, stop and reassess before continuing.
If you’re unsure about system type, substrate compatibility, or proper edge detailing, call a qualified contractor rather than pushing ahead. A solid, properly executed retrofit pays off in long-term performance and avoids costly errors. Stay deliberate, test often, and you’ll finish strong and safe.
FAQ
What are the key differences between EIFS and traditional stucco you should know as a DIY homeowner?
EIFS uses an insulation layer behind the base coat, while traditional stucco sits directly on the substrate. EIFS includes an adhesive/adhesion layer, an insulation board, base coat with mesh embedded, and a final finish coat. Traditional stucco is usually a cement-based mix applied in layers without insulation behind it.
What are the main components of EIFS you’ll encounter during installation?
In EIFS you’ll see insulation board, an adhesive or mechanical fasteners, a base coat with embedded mesh, and a protective finish coat. The system relies on good substrate prep, proper bonding, and correct mesh placement to resist cracking. Always follow the manufacturer’s instructions for each layer’s role and curing times.
What are common installation errors that hurt EIFS performance, and how can you spot them?
Watch for gaps in the mesh, improper embedding, or missing base coat coverage. Look for insufficient flashing at penetrations and joints. Poor substrate prep or skipping waterproofing steps can lead to moisture ingress and delamination over time.
How should you approach substrate preparation and waterproofing for EIFS on a DIY project?
Ensure the substrate is sound, clean, and properly primed per the product instructions. Repair or replace damaged areas before applying any base coat. Use the recommended flashing details and, if required, a moisture barrier or water-resistant membrane specified by the manufacturer.