

Introduction
A failed stucco expansion joint sealant is a broken or failed seal that lets water move through the joint between stucco panels. It shows up as cracks, staining, or moisture near the joint and can worsen with movement. This is a common DIY fix when you want to stop leaks and restore a smooth, protective joint line.
To repair, start by confirming the joint type and cleaning the area well according to the label directions. Gather the materials you need and follow the manufacturer instructions for the sealant you choose, making sure it is suitable for exterior stucco and climate. This guide gives a practical, hands-on approach you can adapt, while you check product labels and local rules as you go.
Key takeaways
- Understanding expansion joints’ role protects stucco from cracking and water intrusion.
- Inspect joints for cracks, gaps, and sealant separation before repairs.
- Gather compatible sealant, backing, and primers per manufacturer’s instructions.
- Follow a step-by-step protocol: remove failed sealant, clean, prime, apply.
- Use proper safety gear and containment to protect surrounding stucco.
- Schedule regular inspections and maintenance to extend joint life and performance.
Table of Contents
- Introduction
- Key takeaways
- Why Expansion Joints Exist and How They Protect Stucco
- Recognizing a Failed or Stressed Expansion Joint
- Tools, Materials, and Safety Precautions
- Preparing the Joint for Repair: Assessment and Prepping Steps
- Step-by-Step Sealant Replacement Procedure
- Common Mistakes and How to Avoid Them
- Maintenance, Inspection Schedule, and Long-Term Care
- Cost Considerations and When to Hire a Pro
- Conclusion
- FAQ
Why Expansion Joints Exist and How They Protect Stucco
Expansion joints and control joints in stucco/EIFS systems serve different but complementary roles. They absorb thermal expansion and contraction, wind movement, and substrate shifts so cracks don’t run wild; without them, random cracking can invite water intrusion and interior damage. A properly functioning joint is a barrier that keeps movement from forcing cracks open at the wrong spots.
For DIY homeowners, the key is understanding what makes a joint work: backer rods, flexible sealants with enough movement capacity, and flashing integrated into the detailing. Joints belong at obvious stress points—edges, corners, around openings, and along long runs where movement shows up—yet the exact spacing depends on the system and substrate, so check manufacturer guidance or local rules. If you see cracking near joints, gaps, sealant debonding, or signs of moisture, stop and assess; these symptoms often mean the joint needs attention or replacement, not a quick patch elsewhere, and that’s when you bring in a pro or consult the product labels for proper steps.
Difference between expansion, control, and movement joints
In stucco and EIFS systems, three types of joints serve different purposes:
- Expansion Joints: Allow for thermal expansion and contraction. Typically found at edges, corners, and long expanses.
- Control Joints: Limit the length of cracks by creating a planned crack at regular intervals. Usually seen around window/door openings.
- Movement Joints: Accommodate any unforeseen movement or shifts in the substrate. Can be found where there’s potential for substrate movement, like above foundations.
What happens when sealant fails
Sealant failure can occur in several ways:
- Adhesive Failure: Sealant peels or lifts off from the joint surface. This allows water intrusion and promotes further deterioration.
- Cohesive Failure: Sealant breaks apart within itself, leading to gaps that let in water and dirt.
- Extrusion Loss: Sealant squeezes out or is forced out of the joint due to excessive movement. This leaves the joint unprotected and vulnerable to water intrusion.
Recognizing a Failed or Stressed Expansion Joint
A failed or stressed expansion joint shows up as visible cracks, gaps, and movement around the joint. You’ll notice sealant peeling, hardening, shrinking, or separating from stucco, plus staining or moisture at and near the joint.
These signs tell you moisture may be getting in and the joint may be losing its ability to move with temperature or settling. Look for patterns like stains, efflorescence, or gaps at transitions and don’t ignore soft or hollow spots when you press gently. For product specifics, check the label or manufacturer instructions and your local rules before attempting any repair.
Visual checkpoints and simple tests
Before you start poking around, grab a flashlight and some tools. This checklist helps spot obvious issues.
- Gaps: Wide gaps mean sealant’s failed. Check if they’re consistent or worsening.
- Cracks: Hairline cracks are normal, but widening ones need attention. Check if they radiate from joints.
- Bubbling: Sealant bubbles signal trapped moisture or poor application.
- Hard/crumbly sealant: This means it’s old and needs replacing. Check for flaking or peeling.
- Adhesion test: Gently probe sealant with a flathead screwdriver. If it lifts easily, adhesion’s poor.
- Caulking separation: Check if caulking pulls away from stucco at joints.
- Joint filler condition: Inspect for signs of compression or decomposition in joint fillers.
- Temperature/moisture effect: Check if cracks worsen with temperature changes or moisture.
Quick rule: If you find any of these issues, don’t ignore them. Address them soon to prevent bigger problems.
When signs point to deeper problems
Some signs hint at more serious issues beneath the surface. Don’t overlook these red flags.
Interior staining or efflorescence: These could indicate moisture intrusion, which can damage substrates and cause mold growth.
Sagging or misaligned stucco: This suggests structural movement or substrate damage at expansion joints. It’s a sign you shouldn’t ignore.
Separation at transitions: If walls are separating from ceilings, foundations, or other materials, it could mean flashing has failed or there’s substrate movement. These need professional assessment.
Tools, Materials, and Safety Precautions
Here’s the compatibility-focused shopping list: sealants such as polyurethane, silicone, and elastomeric acrylic, plus backer rods and tapes that play well with stucco finishes. Also grab the right tools and PPE: caulk gun, utility knife, masking tape, putty knife, mixing/bonding tools, moisture barrier, release tape, plus gloves, goggles, and a respirator as needed. Always check the product label to confirm substrate compatibility and follow the manufacturer’s instructions for curing temps and humidity.
Choosing the right backer rod and tape matters for proper joint geometry and sealant adhesion, and you should check compatibility notes on the package. This matters for long-lasting joints on stucco, so plan a quick prep-to-cure workflow and avoid common pitfalls like over- or under-sizing materials.
Personal protective equipment and safety tips
Safety comes first when working on your home. Here’s what you need to protect yourself and ensure a smooth job.
- Gloves: Protect your hands from sealant, chemicals, and sharp edges. Disposable gloves are cheap and effective.
- Eye Protection: Goggles or safety glasses shield your eyes from dust, debris, and chemical splashes. Consider getting an anti-fog coating for clear vision.
- Respirator/Dust Mask: Essential when dealing with old sealant removal and drywall dust. A basic N95 mask should do the trick.
- Ladder Safety: Use a sturdy, secure ladder. Don’t overreach; move the ladder instead. Always have three points of contact.
- Cleaning Old Sealant: Wear PPE when scraping and sanding old sealant. Wet the area first to minimize dust.
Material selection guidance and standards to check
The right materials ensure a durable, long-lasting repair. Here’s what to look for when choosing your sealant and accessories.
- Sealant Type: For stucco, choose between polyurethane, silicone, or elastomeric acrylic. Each has its pros and cons; check manufacturer datasheets for details.
- Movement Capability: Look for a sealant with high movement capability (ASTM C920) to accommodate stucco expansion and contraction.
- Paintability: If you plan to paint the sealed joint, ensure the sealant is paintable. Some silicones are not.
- Adhesion to Cementitious Surfaces: Check if the sealant adheres well to cement-based substrates like stucco (ASTM C834).
- Backer Rod and Tape: Choose compatible backer rod (polyethylene or closed-cell foam) and tape based on your sealant type. Ensure they’re suitable for your specific stucco finish.
Preparing the Joint for Repair: Assessment and Prepping Steps
Begin>Your joint should be ready for sealant by thoroughly assessing its condition, removing old sealant completely, and then cleaning and drying the joint. Inspect the backer rod or foam and the flange for any wear, gaps, or damage that could affect adhesion, and note what you find before you choose materials.
Begin>
How to remove old sealant and clean the joint
Start by scoring the failed sealant with a utility knife, creating small cuts at regular intervals. This helps prevent substrate damage when removing the sealant.
Use a sharp chisel or a sealant scraper to carefully pry out the old sealant. Work from one end of the joint to the other, applying steady pressure and pulling the tool towards you.
Once most of the sealant is removed, use a stiff-bristled brush to remove any remaining debris or dust. For stubborn spots, apply a suitable solvent like mineral spirits or paint thinner using a cloth, let it sit for a few minutes, then scrub and wipe clean.
Substrate repairs and flashing checks
Inspect the substrate around the joint for any signs of damage or deterioration. If you find cracks, crumbling, or other issues, repair these areas before proceeding. Use a suitable patching compound and follow the manufacturer’s instructions.
Check metal flanges and reveals for rust or corrosion. If found, clean the affected area with a wire brush or sandpaper, then apply a primer designed for metal surfaces to prevent further oxidation.
Inspect the backer rod (if present) for any signs of compression, gaps, or deterioration. If necessary, replace it with new backer rod that matches the original size and material. Ensure any metal reveals are properly seated and secure before applying new sealant.
Step-by-Step Sealant Replacement Procedure
This step-by-step guide covers removing the old sealant, choosing backer rod and primer, setting the new depth, applying sealant, and tooling the joint to the right profile for good adhesion and movement. You’ll assess damage, clean the joint, and follow through with proper installation without gaps or air pockets. The goal is a clean, dry surface and a continuous bead that sticks and moves with the joint.
Doing it right matters because improper prep or wrong depth can lead to failure, moisture intrusion, or early wear. Following the sequence helps you spot trouble early, apply the right products, and plan maintenance so the seal lasts and keeps the area watertight. Check product labels and manufacturer instructions for specifics on tack time, cure, and any primer requirements for your substrate.
Step-by-Step Process
The following steps guide you through the sealant replacement procedure, ensuring a thorough and effective repair.
- Assess the joint: Check damage extent, moisture intrusion, substrate cracks, note dimensions, temperature, and weather constraints. If deeper problems are found, address them before proceeding.
- Remove failed sealant: Safely excise degraded material using a utility knife or chisel, ensuring not to damage the substrate.
- Clean the joint: Rinse and dry the joint, remove dust/oil, and ensure a clean, dry surface for bonding. A wire brush can help with this.
- Select backer rod and primer: Choose correct backer rod size for 50% depth fill, install at correct depth, and determine if a primer is needed per sealant and substrate requirements.
- Apply backer rod and prime (if required): Install straight, fully seated backer rod without gaps. Apply primer evenly where required, following product specs for tack time.
- Sealant application: Inject or extrude sealant in a continuous, uniform bead, ensuring no air pockets form.
- Tool the joint: Strike off flush and tool with proper profile to maximize adhesion and movement capability. Use a suitable tool like a joint sealer tool or putty knife for this.
- Cure, inspect, and plan maintenance: Adhere to cure times, inspect for gaps or pull-out, address edge adhesion, and note routine maintenance intervals and re-sealing cues.
Backer rod depth and sealant bead profile
The backer rod’s size is crucial for proper sealant performance. It should fill the joint to about 50% of its depth.
For example, if your joint is 1/2″ deep, use a 1/4″ backer rod. This allows the sealant to bond properly with both sides of the joint and provides adequate movement capability.
Width-to-depth ratios are also important. A common ratio is 3:1 (width:depth). So for a 1/2″ deep joint, aim for a 1-1/2″ wide sealant bead.
Proper backer rod and sealant bead sizing ensures optimal performance, preventing premature failure due to inadequate movement capability or insufficient bonding.
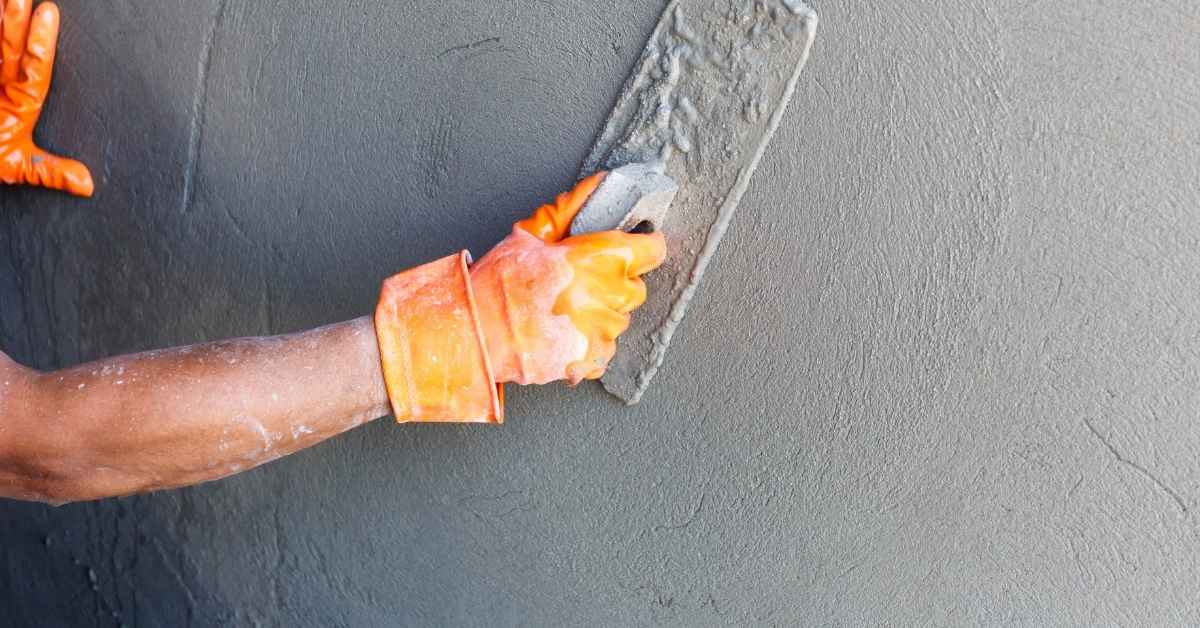
Application technique and finishing tips
Before applying the sealant, cut the nozzle at a 45-degree angle for even application. Hold the cartridge at a consistent angle (usually 45 degrees) to ensure a steady bead.
When tooling the joint, use a concave profile to maximize adhesion and movement capability. This can be achieved with a suitable tool like a joint sealer tool or putty knife.
Curing considerations are crucial for proper sealant performance. Follow manufacturer guidelines regarding temperature and humidity during application and curing. Generally, temperatures between 50-90°F (10-32°C) with low humidity provide optimal conditions.
If the weather is too cold or humid, consider using a sealant specifically designed for those conditions or temporarily heating the joint area to facilitate proper curing.
Common Mistakes and How to Avoid Them
The big mistakes are using the wrong sealant for EIFS or stucco, not digging the joint deep enough, leaving contaminants or old sealant in, and skipping proper surface prep or sealing over moisture. Fixes are to pick a low-modulus, paintable, UV-resistant sealant and follow the label for joint width and depth, clean and dry the joint, remove old material, use a backer rod, and prime as required.
Why it matters for a DIYer: missed steps lead to early cracking, edge pull-out, and rework. Check the label for curing times and temperature ranges, watch forecasts, and test adhesion in a small area; know when to patch versus replace and when to call a contractor.
Paintability, compatibility, and adhesion pitfalls
These are common mistakes that can lead to sealant failure. Avoid them for a lasting repair.
- Using non-paintable silicones: These won’t stick to paint. Use low-modulus, paintable sealants instead.
- Mixing incompatible products: Different brands or types may not bond well. Stick with recommended combinations.
- Not testing adhesion: Apply a small test patch first. Scrape it after curing to check adhesion.
- Ignoring UV resistance: Direct sunlight can degrade sealants. Choose UV-resistant options for exposed areas.
Remember, compatibility and adhesion are key. Test before you apply!
Timing and weather-related mistakes
Applying sealant in the wrong conditions can cause failures. Here’s what to avoid.
- Extreme temperatures: Too hot or cold affects curing. Apply when temps are 40-90°F (4-32°C).
- High humidity: Moisture hinders adhesion. Keep relative humidity below 85%.
- Wet substrates: Sealants won’t stick to damp surfaces. Ensure the joint is dry before sealing.
- Rain forecasts: Rain can wash away fresh sealant. Avoid applying before rain.
Timing and weather matter. Check forecasts, wait for ideal conditions!
Maintenance, Inspection Schedule, and Long-Term Care
This maintenance plan aims to protect the expansion joint, stop crack growth, and extend sealant life with a simple, annual routine. Do an annual inspection of exterior condition, joint gaps, sealant color or texture changes, and moisture signs, and plan timely re-sealing before wear shows up. If the joint shows aging or you see soft sealant, plan replacement.
Keeping a yearly log with photos and notes helps you catch creeping problems early and plan timing around weather. It matters because clean joints and proper sealant choices reduce water intrusion, preserve stucco edges, and save bigger repairs later. Follow product labels and manufacturer guidance for cure times and compatibility.
DIY Maintenance Checklist
Use this seasonal checklist to spot wear, clean joints, and perform minor touch-ups on your stucco expansion joint sealant.
- Spring: Inspect for winter damage. Clean out any dirt or debris from the joints.
- Summer: Check for signs of cracking around joints. Ensure sealant is not soft or rubbery.
- Fall: Re-seal if necessary before temperature extremes and heavy rains. Clean joints again to remove any dirt built up over the season.
- Winter: Inspect for signs of water intrusion. Ensure sealant is not warping or pulling away from edges.
Quick rule: Regular maintenance prevents minor issues from becoming major problems.
When to Schedule Professional Maintenance
Know when it’s time to call in a stucco/EIFS specialist for help with your expansion joint sealant.
- Widespread Joint Failure: If multiple joints are failing, it may be a sign of a larger issue that requires professional attention.
- Moisture Entry: Any signs of moisture or efflorescence indicate water intrusion and should be addressed by a professional.
- Recurring Separation: If joints are separating repeatedly, it could be due to underlying issues that need expert diagnosis and repair.
Quick rule: Don’t wait until the problem becomes too big. Regular professional maintenance can prevent costly repairs down the line.
Cost Considerations and When to Hire a Pro
Costs come from the length of the joint, how accessible it is, the substrate condition, and the sealant you pick. Use a simple DIY-vs-pro framework to estimate material, tools, disposal, and any substrate repair needs, and to weigh what warranties cover. Keep in mind these are the main drivers you’ll actually see on the bill.
Hire a pro when the substrates are complex, damage is extensive, or EIFS-only joints are involved. When DIY, use a bid checklist: credentials, insured status, scope, timelines, and warranty terms, plus plan for curing, surface prep, substrate sealing, and long-term maintenance.
Estimating scope and budgeting advice
First, measure the linear feet of joint that needs repair. This is your primary cost driver.
Accessibility affects labor costs. If you need scaffolding or lifts, expect additional charges.
Check substrate condition. If repairs are needed, they’ll add to the bill. Flashing replacement can also increase costs.
Choose a sealant compatible with your EIFS or stucco. Premium products cost more but may last longer.
Choosing the right contractor and warranties
When hiring, ask for references. Check their past work and customer satisfaction.
Look for certifications, like EIFS or stucco applicator certifications. These pros know what they’re doing.
Ensure they’re familiar with the sealant type you need. They should understand its compatibility and application.
Expect warranties for both workmanship (usually 1-5 years) and materials (often 20-30 years). Ask about coverage and any exclusions.
Conclusion
Getting this right protects the stucco, keeps water out, and preserves curb appeal. When you follow solid prep, correct sealant choice, and careful application, you reduce costly leaks and ongoing maintenance while staying safer on the job.
Take it step by step: inspect the joint and substrate, clean and dry the area, select the right sealant, mask and apply neatly, then let it cure fully before loading the joint with rain or heat. Check the area again after cure and schedule a simple once- or twice-yearly inspection to catch trouble early.
Common mistakes to avoid include rushing the prep, using the wrong sealant for exterior stucco, and skipping a test patch or sufficient cure time. Safety matters: wear eye protection and gloves, work in good light, ventilate if indoors, and test any repair in a small area before committing. If you see wide movement, cracking in multiple joints, or signs of structural movement, it’s wise to call a pro rather than force a DIY fix, to prevent costly damage.
With disciplined prep and a clear plan, you can finish confidently and extend the life of your stucco. Stay patient, follow the steps, and you’ll finish with a durable joint that looks right and performs well for years to come.
FAQ
What signs indicate a failed expansion joint sealant in stucco?
You’ll see cracking, peeling, or gaps in the sealant. Look for water behind the joint, mold, or staining on the stucco near the joint. If the joint moves or buzzes when you poke it, it’s not sealing properly.
What materials and tools do I need to repair a sealant?
You’ll need the replacement sealant compatible with stucco joints, a backer rod if required, a caulk gun, a sharp utility knife, and a grout or sealant remover for cleaning. Have a stiff brush, rags, a masking tape roll, and a moisture meter or a simple moisture check method. Check the product label for surface prep and cure requirements.
What is the step-by-step protocol for repairing sealant?
Remove old sealant cleanly from the joint and flush the area dry. Install backer material if the joint calls for it, then apply the new sealant with steady pressure and a smooth bead. Tool the bead to a neat finish and let it cure according to the manufacturer’s instructions.
How can I prevent future failures and maintain joints?
Keep joints clean and free of debris. Inspect joints at regular intervals and after heavy rain or freeze–thaw cycles. Re-seal when you notice wear or gaps, and follow product maintenance guidelines to avoid premature failure.