
Introduction
Repairing stucco at inside corners means reinforcing the corner with mesh and creating controlled stress relief so the patch bonds and moves without cracking. In practice you’ll cut and embed mesh over the corner, feather the scratch/base coats into the surrounding sound stucco, and finish with compatible topcoat material; check product labels and local rules for compatible materials and cure times. Keep tools, substrate prep, and clean bonding surfaces jobsite-simple to avoid adhesion failures.
This work is a hands-on patch job more than a decorative skim—expect tight-fitting cuts, neat embedding of mesh, and attention to termination points to manage movement. If you’re unsure about material compatibility or how much reinforcement to use, check manufacturer instructions or consult a pro; err on the side of thorough prep and gradual build-up of coats rather than one thick layer.
Key takeaways
- Inspect inside corners for hairline cracks before applying mesh or repair.
- Use corrosion-resistant mesh and matching plaster patch to ensure long-term adhesion.
- Embed mesh with consistent pressure from center outward to avoid bubbles.
- Detail stress relief at corners with proper control joints and backing material.
- Protect finished texture during curing; limit traffic and cover with breathable wrap.
- Verify dry skin test and visual inspection after cure before painting.
Table of Contents
- Introduction
- Key takeaways
- Project Overview and Goals
- Diagnosis and Inspection Before Repair
- Tools and Materials Checklist
- Preparing the Inside Corner for Mesh and Repair
- Mesh Layout: Principles and Step-by-Step Placement
- Stress Relief Details and Control Points at Inside Corners
- Embedding, Finishing, and Texture Matching at Inside Corners
- Curing, Protection, Inspection, and Verification
- Conclusion
- FAQ
Project Overview and Goals
This repair scope is limited to inside-corner stucco damage and the immediate surrounding area; it does not cover full-wall rework or substrate replacement beyond what is required to make the corner sound. The focus is on layout of reinforcing mesh and inclusion of stress-relief features so the repair resists recurring cracks and transfers loads into the intact system.
Desired performance outcomes include a durable joint that accommodates normal building movement and a finish that reads visually consistent with adjacent surfaces within reasonable DIY tolerances. If a specific finish or movement tolerance matters for your situation, check product data sheets and local requirements before proceeding.
Intended audience and skill level
This guide is written for DIY homeowners with basic handyman skills. You should be comfortable using common tools like trowels, hawks, and tape measures.
While some experience with stucco repair is helpful, we’ll explain the key techniques in detail. If you’re a pro stucco contractor, this guide will serve as a useful refresher.
What you’ll need: Basic hand tools, safety gear (gloves, goggles), and some basic knowledge of construction materials.
When a corner repair is the right fix
A localized repair at inside corners is usually sufficient when the damage is limited to small areas and there are no signs of widespread deterioration or moisture intrusion.
Check for these signs before proceeding:
- The damaged area is less than 2-3 square feet.
- There’s no visible cracking or crumbling beyond the immediate repair zone.
- The underlying lath and framing are sound.
When to consider a larger rework: If you find extensive damage, widespread cracks, or signs of moisture intrusion, it might be best to re-clad the entire wall section or consult with a professional.
Diagnosis and Inspection Before Repair
Start with a targeted inspection of the inside corner to identify why the stucco failed: delamination, hairline cracking, wide cracks, moisture intrusion, or movement-related gaps. Probe the substrate, look for rusted fasteners or soft backing, and note any signs of ongoing water entry or structural shifting that will affect repair longevity.
Decide whether the corner needs simple patching, partial tear-out, or further investigation by a professional if there are signs of structural issues or active leaks. When you encounter conditions beyond DIY scope, check manufacturer guidance and consider consulting a structural or moisture-control specialist.
Identifying common failure modes
Before you start repairing, use this checklist to identify typical problems in your stucco corner.
- Hairline cracks: Check for thin, long cracks. They may indicate minor settling or shrinkage.
- Movement cracks: Look for wider cracks that change shape over time. This could signal ongoing movement.
- Delamination: Tap the area; a hollow sound suggests the stucco has separated from the substrate.
- Corner edge spalling: Check if edges are chipped or missing. This weakens the corner and needs immediate attention.
- Crack patterns: Identify ‘map’ cracks, which indicate serious structural issues.
- Stucco discoloration: Dark spots may hint at water intrusion or efflorescence.
- Missing pieces: Check for large chunks missing from the corner. This requires a full rebuild.
- Crumbly texture: If the stucco feels soft and crumbles easily, it’s too far gone to repair.
Quick rule: If you spot any of these issues, address them in your repair plan.
Assessing substrate, lath, and corner geometry
Evaluate the existing structure before you start working. This checklist helps ensure your repair lasts.
- Lath/mesh condition: Inspect for rusted or damaged metal lath, or broken mesh. Replace as needed.
- Fastener integrity: Check screws and nails are secure and not backing out. Tighten if necessary.
- Corner beads: Look for bent, dented, or missing corner beads. Replace if damaged.
- Backer condition: Inspect backer board for cracks, warping, or delamination. Repair or replace as needed.
- Geometry check: Ensure the corner is square and true. Out-of-square corners need realignment before repair.
- Lath spacing: Check lath/mesh spacing. Too wide can cause cracking, too narrow wastes material.
- Substrate condition: Inspect for rotted wood or crumbling masonry. Repair before proceeding.
- Expansion joints: Ensure there are proper expansion joints every 10-15 feet to prevent cracking.
Quick rule: If you find any of these issues, address them before applying new stucco.
Moisture and movement checks
Before you start repairing, check for moisture and ongoing movement to prevent future problems.
- Recent water intrusion: Look for signs of water damage like discoloration or soft spots. Use a moisture meter to confirm.
- Ongoing movement: Check if cracks are widening over time. This could signal structural issues.
- Efflorescence: White powdery deposits may indicate past water intrusion and need further investigation.
- Structural observations: Look for signs of settling, like sloping floors or cracked walls. Consult a structural engineer if in doubt.
- Plumbing checks: Inspect nearby plumbing for leaks that could cause moisture issues.
- Gutter function: Ensure gutters are functioning properly to direct water away from the corner.
- Roof overhang: Check if the roof overhang is directing water onto the corner.
- Window/door function: Ensure they seal properly and aren’t allowing water intrusion.
Quick rule: If you find moisture or ongoing movement, address these issues before proceeding with your repair.
Tools and Materials Checklist
Gather essential hand tools (trowel, hawk, utility knife, wire brush, mixing bucket), PPE (gloves, eye protection, dust mask), and materials such as compatible base coat, reinforcing mesh, corner bead or trim, and finish coat. Verify compatibility of adhesives, base coats, and meshes with each other by reading product labels or data sheets before you buy and mix.
Include items for substrate repair like fasteners and corrosion protection, plus temporary protection materials such as plastic sheeting and tape. If a specific accessory or chemical is needed for your system, confirm manufacturer instructions and local rules prior to use.
Mesh and reinforcement options
Use this checklist before you start mixing concrete to ensure you have the right mesh and reinforcement for your project.
- Check mesh type: Ensure it’s either alkali-resistant fiberglass or metal lath. Both are suitable, but they have different characteristics.
- Verify mesh size: Measure the mesh size (e.g., 1/2″, 3/4″) to match your project requirements. Too small might not provide enough strength; too large can lead to waste and higher costs.
- Inspect for damage: Visually check mesh for any tears, holes, or bends that could compromise its integrity.
- Check manufacturer datasheet: Confirm the mesh is suitable for your concrete mix design and application (e.g., slab on grade, wall, or beam reinforcement).
- Verify wire size (for metal lath): Measure the wire size (e.g., 17-gauge, 16-gauge) to ensure it matches your project needs. Smaller gauges provide more strength.
- Check mesh spacing: Ensure the mesh is spaced correctly within the concrete formwork to provide even reinforcement throughout the pour.
- Inspect rebar (if applicable): Check for any bends, cracks, or rust on rebars that could weaken their strength. Also, ensure they’re properly tied and placed according to your project plans.
- Verify rebar size: Measure the rebar diameter (e.g., #4, #6) to match your project requirements. Too small might not provide enough strength; too large can lead to waste and higher costs.
Quick rule: Always check manufacturer datasheets for specific product suitability and follow local building codes for reinforcement requirements.
Basecoats, bonding agents, and finish materials
Use this checklist before starting any application to ensure you have the right materials and understand their usage.
- Basecoat mortar: Check product label for type (e.g., polymer-modified, cement-based). Ensure it’s suitable for your substrate and climate.
- Bonding agent/primer: Verify it’s compatible with your basecoat and finish materials. Follow manufacturer instructions for application.
- Finish stucco material: Confirm it matches the desired texture (e.g., smooth, textured) and color. Check if it requires aggregate or other additives.
- Mixing ratio: Always follow product-specific mixing instructions. Wrong ratios can lead to poor adhesion, cracking, or delamination.
- Water-to-cement ratio: Keep it within safe ranges (typically 4-6 parts water to 1 part cement). Too much water weakens the mix; too little makes it hard to apply.
- pH level of water: Check if your water source is alkaline or acidic. Some materials may react poorly with certain water types, affecting durability.
- Application temperature: Ensure it’s within the recommended range (usually 40-90°F/4-32°C). Extreme temperatures can impact curing and adhesion.
- Moisture content in substrate: Before applying any material, check for excessive moisture. High moisture can cause delamination or efflorescence.
Quick rule: Always follow manufacturer instructions for mixing, application, and curing to ensure the best results and avoid costly rework.
Required tools and safety equipment
Before you start mixing concrete, ensure you have all the necessary tools and safety gear at hand. This checklist will help you prepare for a smooth and safe job.
- Work gloves: Check for durability and grip to protect hands from cuts and provide a secure hold on tools.
- Safety glasses: Ensure they meet ANSI Z87.1 standards for eye protection.
- Steel-toed boots: Verify they fit well and provide adequate protection against falling objects.
- Ear protection: Check if they’re comfortable and provide sufficient noise reduction, especially when using power tools.
- Concrete trowel (hand float): Ensure it’s the right size for your project; typically 6″ to 12″.
- Margin trowel: Check if it’s suitable for your slab size, usually 4″ to 8″.
- Edging tool (straight edge): Verify it’s long enough for your largest pour and has a straight, smooth edge.
- Concrete finishing broom: Ensure it’s stiff-bristled and suitable for the finish you want to achieve.
- Specialized tools (optional): Consider using a corner form or corner trowel for accurate, clean corners. Check if they’re compatible with your project size and requirements.
Quick rule: Always prioritize safety first. Wear appropriate PPE, and ensure all tools are in good working condition before starting any task.
Preparing the Inside Corner for Mesh and Repair
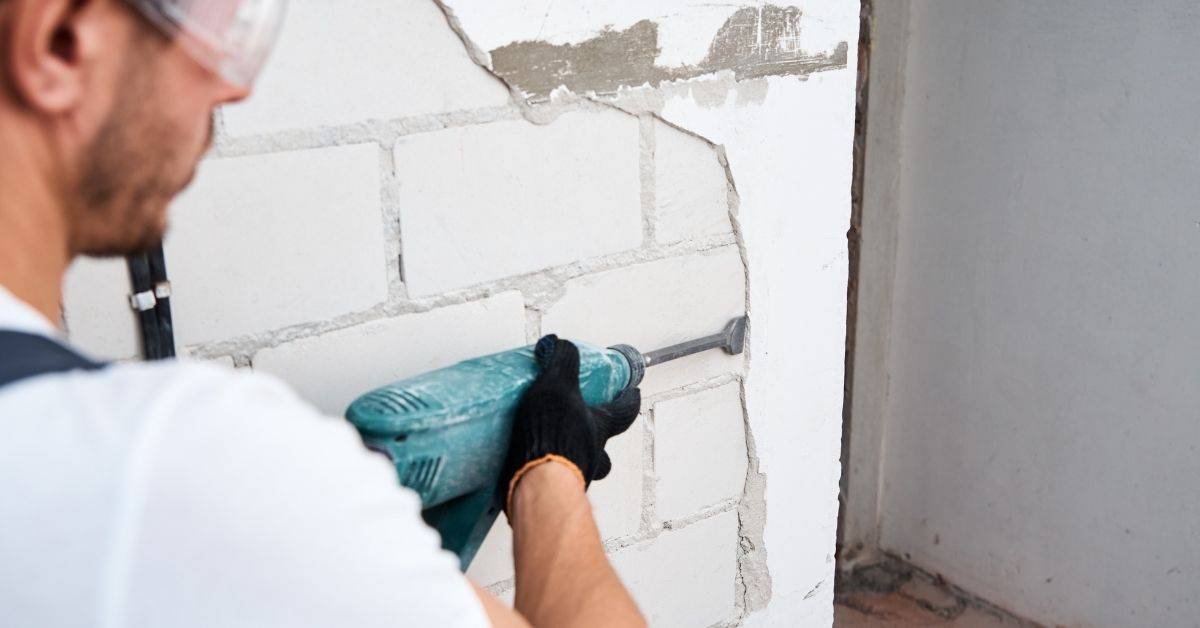
Remove all loose or failed stucco back to a sound edge and clean the substrate of dust, rust, and contaminants so the mesh and base coat can bond properly. Repair any rotten or compromised backing, replace corroded fasteners, and dry the area thoroughly; if moisture or mold is present, address the source before patching.
Establish straight, plumb sightlines for the corner and apply any recommended primers or bonding agents per product instructions. When in doubt about substrate compatibility or primers, consult the product label or technical data sheet for the materials you plan to use.
Removing failed material and cleaning
The success of your repair depends on exposing a clean, solid substrate. Here’s how to safely remove failed stucco and clean the surface:
- Safety first: Wear gloves, goggles, and a dust mask. Use a safety harness if working above ground level.
- Softening agent: Apply a softening agent like muriatic acid (follow manufacturer’s instructions) to make removal easier. Avoid using harsh chemicals that could damage the substrate.
- Removal tools: Use a chipping hammer, flathead shovel, or oscillating tool with a carbide blade to remove loose material. Be careful not to damage the lath or substrate.
- Cleaning: Remove dust and contaminants using a stiff-bristle brush, wire brush, or pressure washer. Ensure the surface is free of rust, mildew, or other impurities that could hinder adhesion.
- Avoid: Do not use high-pressure washing on soft or damaged substrates as it can cause further damage.
Repairing or installing backer, corner bead, or substrate fixes
To re-establish a stable corner and prevent future damage, you’ll need to address any voids, gaps, or damaged substrate. Here are your options:
Rigid corner bead: This is a durable, pre-formed angle that provides structure and support for the new stucco application. It’s ideal for repairing deep voids or when the original corner bead has failed.
Backer rod: For smaller gaps or voids behind the existing lath, use backer rod to fill the space before applying a basecoat. This helps create a smooth, even surface for your repair.
Substrate repairs: If the substrate (e.g., wood, metal, or masonry) is damaged, make necessary repairs before installing new lath and applying stucco. Ensure any repairs are structurally sound and corrosion-resistant to prevent future issues.
Attachment checks: Before installing any new materials, ensure the existing lath is securely attached to the substrate. Tighten or replace screws as needed to provide a solid foundation for your repair.
Mesh Layout: Principles and Step-by-Step Placement
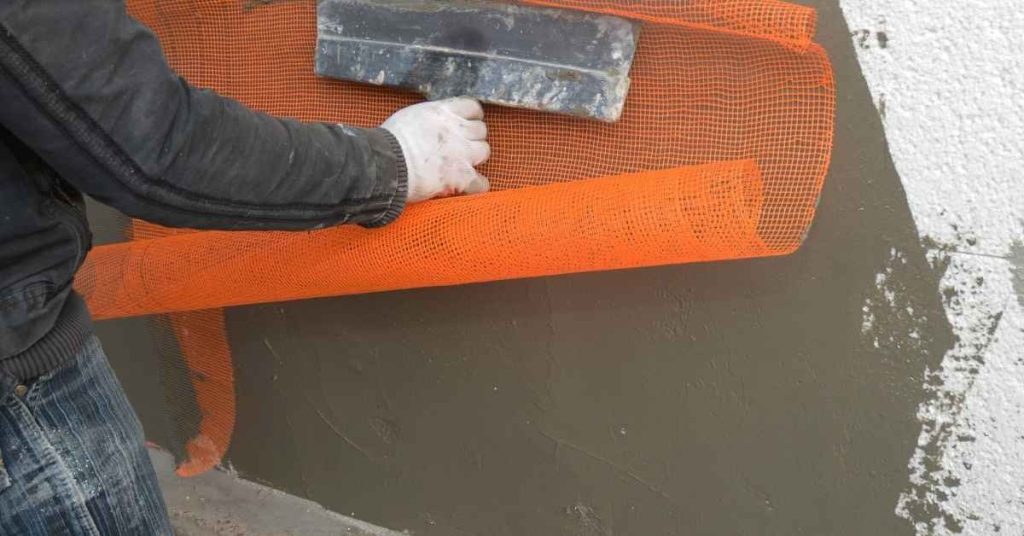
Cut mesh strips so they extend well beyond the damaged area into sound stucco, allowing overlap onto the flat faces and back into the corner so loads transfer smoothly into adjacent material. Lay the mesh embedded in a full bed of base coat, ensuring continuous coverage with proper overlaps and avoiding wrinkles or bridging that would create weak spots.
Anchor the mesh per manufacturer guidance—mechanical fasteners or embedding techniques vary by system—while keeping the corner crisp and maintaining the intended cover thickness over the reinforcement. If you need exact overlap or fastening spacing, consult the mesh and base-coat product literature before fastening.
Step-by-Step Layout Process
This step-by-step guide walks you through the mesh layout process, from preparation to final checks. Follow these practical steps for a successful repair.
- Wear safety gear: gloves, goggles, and a dust mask.
- Measure and cut mesh pieces. Aim for 1-2 inches overlap at the corner.
- Position the first piece at the corner, ensuring it’s square and level.
- Use mesh ties or screws to anchor the mesh temporarily. Don’t fully tighten yet.
- Lay out the second piece, overlapping the first by 1-2 inches. Ensure a smooth transition.
- Anchor the second piece with mesh ties or screws.
- Check for proper overlap and alignment. Adjust if necessary.
- Tighten all fasteners securely but avoid over-tightening.
- Inspect your work, ensuring no gaps or misalignments.
Planning layout and overlap strategy
Plan your mesh layout to avoid stress lines at seams. Consult the manufacturer’s guidelines for recommended overlaps, typically around 1-2 inches.
For multi-piece repairs, stagger the mesh like bricks in a wall to distribute stress evenly.
Never end a piece of mesh at a corner or stress line. Always overlap into the field.
Anchoring and transition to existing stucco
Securely anchor your mesh at the corner for a strong repair. Use mesh ties or screws, spacing them every 4-6 inches.
For multi-coat systems, step the reinforcement into the existing field. This creates a continuous layer, preventing stress concentrations and cracks.
Do not leave any gaps between the new mesh and the existing stucco. Ensure full contact for proper adhesion.
Layer sequencing in multi-coat systems
Apply basecoats, mesh layers, and finish coats in the correct order to ensure full embedment of the mesh. This creates a strong, durable repair.
First, apply a basecoat, embedding the mesh about 1/4 inch into it. Allow it to set slightly before proceeding.
Apply the next coat, fully embedding the mesh this time. Scratch the surface to create a mechanical bond for the final finish coat.
Never apply a finish coat directly over mesh without proper embedment and scratch coating.
Stress Relief Details and Control Points at Inside Corners
Inside corners concentrate movement, so plan relief by using control joints, thin relief gaps, or flexible sealant interfaces where building movement is expected. Choose the method based on observed movement potential: rigid details for negligible movement, and flexible or jointed solutions where cyclical or differential movement occurs.
Position control points so loads bypass the corner or are transferred into more flexible elements; protect those details during finishing so texture and sealant bond properly. Refer to product instructions and local practice to determine joint placement, joint width, and compatible sealants for your system.
Locating and designing control joints and relief gaps
Control joints and relief gaps are crucial for managing stress at inside corners. They allow the stucco to move independently without cracking.
Placing control joints: Locate them about 1/4″ from the corner, following the substrate’s movement direction. Size them based on substrate movement: wider gaps for more movement. Back them with foam or other compressible material to prevent voids.
Relief gaps: These are wider gaps that run perpendicular to the corner. They should be about 1/2″ wide and backed similarly to control joints. Place them every 4-6 feet along the corner, depending on movement potential.
Bond-breakers, compressible backer, and flexible seals
These materials help accommodate movement at inside corners. Choose the right one based on your specific situation:
Bond-breaker tapes: These are thin, flexible strips that prevent adhesion between coats or layers. Use them when there’s minimal substrate movement.
Compressible backer rods: These are foam or rubber rods used to fill wide gaps before sealing. They’re ideal for larger relief gaps and higher movement potential.
Flexible sealants: These are caulks or sealants designed to stretch and compress without cracking. Use them in combination with backer rods for the best results, especially when there’s significant movement.
Integrating control details with mesh and beads
Mesh and corner beads should terminate or step at control points to allow for movement. Here’s how:
Mesh termination: End the mesh about 1″ before reaching a control joint or relief gap. This prevents bridging, which could cause cracking.
Corner bead stepping: Step corner beads back from control joints and relief gaps by about 1/2″. This allows the bead to move independently of the stucco layer, preventing stress buildup at the corner.
Always ensure that your mesh and beads are properly anchored and transitioned into existing stucco as per the earlier sections in this article.
Embedding, Finishing, and Texture Matching at Inside Corners
Fully embed the mesh in the base coat, using a trowel or float to eliminate voids and ensure consistent cover without thinning the reinforcement layer at the corner. Use focused trowel techniques to form a crisp inside edge while keeping relief details intact and avoiding overworking the material where movement joints or sealants will later be applied.
Match adjacent texture by practicing on scrap and by feathering the finish out beyond the repair so the transition blends without compromising joint function. If a precise match or specialty texture is required, check manufacturer guidance for compatible finish products and application methods.
Proper embedment and thickness control
Start by checking your mesh’s manufacturer guidelines for recommended embedment depth. This ensures you’re fully encapsulating the mesh without creating voids or weak spots.
Use a straight edge to maintain consistent thickness. Aim for about 1/4″ to 3/8″ thick, depending on your specific stucco mix and application. Too thin, it won’t cover the mesh; too thick, it’ll crack over time.
Pro tip: Apply in layers, letting each one set slightly before adding the next. This helps maintain even thickness and prevents delamination.
Trowel techniques for clean inside corners
Start with a 12″ trowel, spreading the stucco evenly along the corner. Use smooth, steady strokes to avoid creating air pockets or voids.
For crisp corners, hold your trowel at a consistent angle and maintain contact with both surfaces. Use the edge of the trowel for tight spots. If you’re repairing an imperfect corner, use a flexible filler first to create a straight line.
Pro tip: Practice on scrap material before tackling the real deal. It’ll help you get a feel for the right angle and pressure.
Feathering, texture blending, and color considerations
To blend your repair into existing texture, use a soft touch with your trowel. ‘Feather’ the edges of your repair, gradually reducing the thickness to nothing over an inch or two.
For color matching, mix small batches and test them on scrap material until you get it right. Once you’ve matched the color, apply it in thin layers, letting each one dry before adding more. This helps maintain a consistent finish.
Pro tip: Don’t forget to match the texture of any control joints or relief gaps nearby. Use a matching tool or create custom tools for a perfect match.
Curing, Protection, Inspection, and Verification
Protect the repair from rain, freezing, and rapid drying while the base and finish coats cure according to the product recommendations; use temporary covers or shading as needed. Avoid loading joint areas or exposing them to movement until the materials have reached the manufacturer-specified curing condition.
Inspect the repair once cured for continuous mesh coverage, proper joint appearance, and absence of shrinkage cracks or delamination; if any of these issues appear, re-evaluate mesh layout and stress-relief details. For measurable checkpoints—such as adhesion or visual uniformity—follow the testing or inspection steps in the product data sheets or local standards.
Curing and temporary protection best practices
After completing your stucco repair, follow this checklist to ensure proper curing and protect the repair from elements.
- Check weather forecast: Avoid rain or freezing temperatures for at least 72 hours.
- Apply cure compound: Follow manufacturer’s instructions. It helps retain moisture and prevents rapid drying.
- Cover with plastic sheeting: If rain is expected, cover the repair loosely with plastic to keep it damp but allow air circulation.
- Avoid direct sunlight: Especially in hot weather, as it can cause rapid drying and cracking.
- Monitor for signs of improper curing: Check for excessive cracking, discoloration, or powdery surface (a sign of over-drying).
- Keep off the repair: Avoid walking on or applying any pressure to the repaired area until fully cured.
- Remove temporary protection: Once the curing period is up, carefully remove any plastic sheeting or cure compound.
- Inspect for damage: Before removing final protection, check for any signs of damage from elements or animals.
Quick rule: Always follow product guidelines and monitor weather conditions to ensure proper curing and temporary protection.
Visual and tactile inspection checklist
Once your stucco repair has cured, use this checklist to visually and tactically inspect the quality of the work.
- Mesh visibility: Ensure mesh is not visible under the finish. If it is, there may be insufficient coverage or improper embedment.
- Embedment uniformity: Check that the mesh and beads are evenly embedded in the stucco. Inconsistencies could lead to stress points and cracking.
- Control joints: Verify that control joints are intact and running continuously from top to bottom of the repair.
- Adhesion test (tactile): Gently press on the repaired area. It should feel solid with no give or crumbling.
- Sound test: Tap the repair gently with a coin or small hammer. A hollow sound could indicate delamination or voids.
- Color match: Check that the color of the repair matches the existing stucco. If not, there may be issues with blending or curing.
- Texture match: Ensure the texture of the repair is consistent with the surrounding stucco. Inconsistencies could indicate improper finishing techniques.
- Feathering check: Verify that the edges of the repair feather out smoothly into the existing stucco, with no abrupt transitions.
Quick rule: Regular visual and tactile inspections help catch any issues early, preventing costly repairs down the line.
When to perform a performance follow-up
Re-inspect your stucco repair at specific intervals and under certain conditions to ensure its long-term performance.
- After 7-14 days: Check for any signs of cracking or movement, especially in hot or cold weather.
- After 30 days: Perform a thorough visual and tactile inspection to ensure the repair has cured properly.
- Seasonally (spring/fall): Inspect for any movement-related issues due to temperature changes or moisture expansion/contraction.
- Annually: Conduct a comprehensive inspection, including checking control joints and looking for signs of recurring distress.
- After heavy rain or snowmelt: Inspect the repair for any signs of water damage or movement.
- After significant temperature changes: Check for any cracks or movement that may have occurred due to thermal expansion/contraction.
- Document recurring distress: Keep a record of any persistent issues, as they may indicate underlying problems with the repair or structure.
Quick rule: Regular follow-ups help identify potential issues early and maintain the longevity of your stucco repair.
Conclusion
Repairing inside corners with proper mesh layout and stress relief keeps water out, avoids cracking, and preserves the look of the space. Do the work right, and you gain durability as you move back into use without repeated fixes.
First, inspect for moisture or damage, gather the exact tools and materials you already listed, and prepare the corner clean and dry. Then place the mesh with the correct overlaps, embed it solidly, and apply finishing and texture so it blends with the surrounding surface. Finally, cure, protect, and verify the repair by checking for movement, moisture, and finish uniformity before trusting the area to the elements again.
Common mistakes to avoid are skipping the diagnosis step, rushing the mesh layout, or not letting the material cure fully. Always test in a small area, wear eye and skin protection, and follow the product instructions for mixing and application. If you see active leaks, persistent cracking, or you’re unsure about the underlying framing, stop and call a professional rather than guessing.
When in doubt about the extent of damage or if conditions expose you to structural concerns, call a pro. Stay deliberate, document each step, and you’ll finish with a solid repair and the confidence to move on to the next project. You’ve got this—keep the work steady and stay safe.
FAQ
1. How do I decide the right mesh layout for inside corners?
Line up the mesh with the corner so wrinkles aren’t fighting you. Follow the manufacturer’s recommendations, and keep the mesh edges centered on the corner bead. If in doubt, prioritize clean coverage over speed and check label instructions.
2. How should I place embedment and control points to avoid cracking?
Embed the mesh flush in the base material, with enough pressure to seat it without squeezing out too much mud. Use control points at the inner and outer corners to pin the mesh and slow any movement. If you’re unsure about location, verify against product guidance and local rain protection practices.
3. What should I watch for during curing and protection at inside corners?
Protect the repair from rapid drying and direct sun. Keep the area shielded and follow any suggested cure times on the product label. If you see hairline cracks starting, pause and recheck your embedment and mud thickness per manufacturer instructions.
4. How can I ensure the finished texture matches around inside corners?
Work the texture cautiously around the corner to blend with the adjacent area. Keep the finish crosshatched or feathered into the corner so there are no hard edges. If the texture looks off, compare to the surrounding surface and adjust with light passes until it reads right.