
Introduction
Tackling plaster repairs around window casings can seem daunting, but with a clear understanding of the timeline, you’ll find it’s a manageable project. This step-by-step guide breaks down the process into digestible stages, helping you complete your repair efficiently and effectively.
From assessing damage to applying the final coat of paint, let’s explore how long each stage takes and provide tips for staying on schedule.
For the full guide, see Repairing Plaster Around Window Casings: Keeping Returns Straight and Corners Crisp.
Understanding the Timeline: How Long Does Each Stage Take?
The duration of your plaster repair project depends on several factors, including the extent of damage, weather conditions, and your familiarity with the tools. Here’s a breakdown of each stage and an approximate timeframe:
- Assessment and Planning (15-30 minutes): Inspect the damage, gather materials, and create a plan.
- Surface Preparation (30-60 minutes): Clean the area, remove loose plaster, and prepare the substrate for repair.
- Rebuilding Returns and Corners (45-90 minutes): Apply backing material, patch compound, and shape the returns and corners.
- Painter’s Tape Application (15-30 minutes): Apply tape carefully to protect edges and create straight lines.
- Sealing Gaps and Filling Cracks (30-60 minutes): Seal gaps, fill cracks with appropriate filler, and feather transitions smoothly.
- Finishing and Sanding (30-60 minutes): Lightly sand the repaired area to maintain crisp edges.
- Painting (15-30 minutes per coat): Apply paint in thin coats, allowing adequate drying time between each application.
Total estimated time: 2 hours 45 minutes – 4 hours 30 minutes
Key takeaways
The prep work involved in surface preparation can significantly impact the overall timeline. Taking the time to clean and prepare the substrate properly will save you from having to redo work later, ensuring a smoother and more efficient repair process.
- Plan damage assessment and scope before starting to avoid rework.
- Use a sharp bevel knife and proper substrate repair for straight lines.
- Apply painter’s tape correctly and burnish edges to prevent bleed-through.
- Wear eye protection and dust mask during sanding and cleanup.
- Remove tape while the joint is tack-free to preserve crisp corners.
- Inspect for gaps and rework transitions to avoid feathering or gaps.
Table of Contents
- Introduction
- Key takeaways
- Planning the Repair: Assess Damage and Scope
- Tools and Materials Checklist
- Surface Preparation and Substrate Repair
- Techniques for Achieving Straight Returns and Crisp Corners
- Proper Use of Painter’s Tape and Masking for Sharp Lines
- Sealing Gaps, Filling Cracks, and Feathering Transitions
- Finishing, Sanding, and Painting to Maintain Crisp Edges
- Troubleshooting Common Mistakes and Maintenance Tips
- Conclusion
- FAQ
Planning the Repair: Assess Damage and Scope
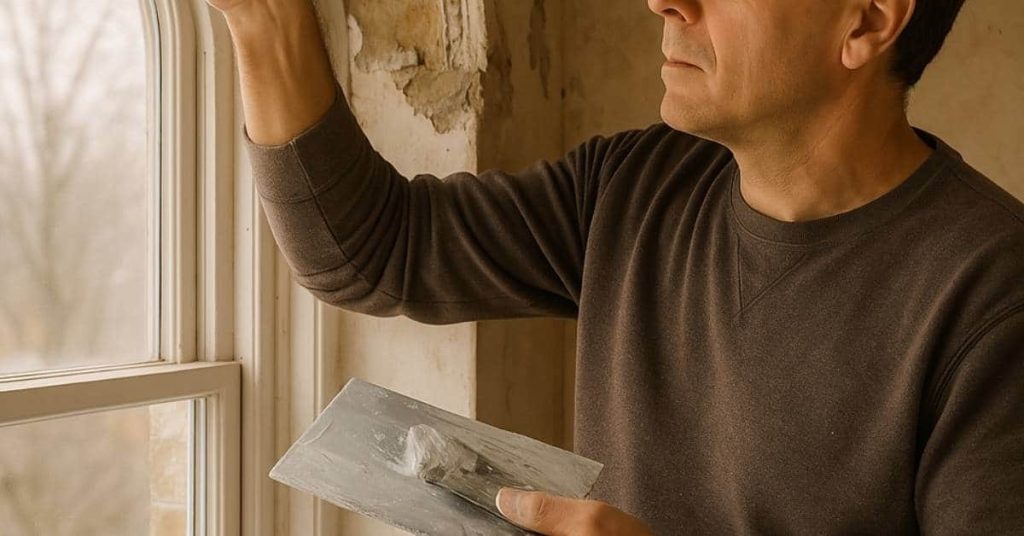
Walk the entire window assembly and surrounding wall to locate every distressed area; note cracks, bulging, moisture staining, loose plaster, and any failing edge at the casing. Photograph each problem, sketch a simple map, and measure openings so you can compare before and after and choose an appropriate repair path.
Differentiate cosmetic hairline cracks from failure modes that need deeper work by checking for recurring moisture, rot, or movement and by inspecting both interior and exterior signs. If you encounter extensive structural movement, hidden water intrusion, significant rot, or suspected lead/asbestos, stop and get a professional assessment and see the product data sheet or local rules before proceeding.
Measuring and documenting returns and corners
Start by taking clear photos of the damaged areas around your window casings. These will serve as a reference throughout the repair process.
Next, measure the length and width of each return (the sides of the casing) and corner pieces. Note any warped or out-of-square sections – mark these clearly in your photos and sketches for future reference.
Use a tape measure to record precise dimensions. For corners that are significantly out of square, consider using a laser level or plumb bob to ensure accurate measurements.
Deciding the repair approach (patch, partial replaster, or trim replacement)
Assess the condition of your existing plaster and trim. If there are only small cracks or minor damage, a simple patch job might suffice.
Patching is quick and cost-effective but may not be suitable for extensive damage or areas with significant movement. It’s best used when the substrate is sound and the aesthetic goal is to maintain the existing finish.
For larger damaged areas, consider a partial replaster. This involves removing damaged plaster, replacing any rotten lath, and applying new coats of plaster. This approach can help restore structural integrity and provide a smooth finish, but it’s more time-consuming and messy than patching.
If your trim is significantly damaged or you’re looking to update the look of your windows, consider replacing the trim. This gives you the opportunity to change the style and color of your casings. However, it’s the most expensive option and requires more skill to install correctly.
Tools and Materials Checklist
Gather core hand tools first: a set of putty knives, a stiff 6–8 inch trowel, a margin trowel, utility knife, straightedge, sponge, and a hawk or mud pan; add an oscillating tool, drill with mixer, or small sander if you already use power tools. Pack PPE—safety glasses, gloves, a dust mask or respirator, hearing protection—and drop cloths or a stable work platform before you begin.
Collect repair materials that match your chosen method: an appropriate patch plaster or premix, bonding agent if needed, fiberglass or paper tape for cracks, painter’s tape, and a quality acrylic or compatible sealant for the trim joint. Include backup fasteners and backing options (shims, galvanized screws or nails) and check the product label or manufacturer instructions for compatibility, cure expectations, and any special surface prep.
Material specs and recommended plaster compounds
Before you start mixing or applying your plaster, use this checklist to ensure you’ve got the right materials for the job. This is crucial to avoid common issues like poor adhesion and paintability problems.
- Check plaster type: Ensure you’re using either setting-type (requires mixing on-site) or ready-mix (pre-mixed, just add water).
- Verify workability: Check the label for ‘workability’ info. It should match your project needs – e.g., high workability for complex surfaces.
- Confirm adhesion: Ensure the plaster is suitable for your substrate (e.g., concrete, brick, or existing plaster). Check the label for adhesion ratings.
- Check paintability: Look for ‘paintability’ info on the label. It should indicate how long you need to wait before painting over the plaster.
- Match plaster to surface type: Use a fine finish plaster for smooth surfaces, and a coarser one for rough or textured surfaces.
- Check setting time: Ensure the setting time suits your project schedule. Check the label for ‘open time’ and ‘setting time’.
- Verify water-to-plaster ratio: Follow the manufacturer’s instructions for mixing to avoid wastage or poor results.
- Check for additives: Some plasters may require additives (e.g., retarders, accelerators) based on your project needs. Check if any are needed and follow the manufacturer’s guidelines.
Quick rule: Always check the label and follow the manufacturer’s instructions to ensure you’re using the right plaster for your job and mixing it correctly.
Essential hand tools and optional power tools
Before you start mixing your plaster compound, ensure you have all the necessary tools on site. This checklist will help you verify that you’re well-equipped for a smooth job.
- Trowels (3-4 sizes): Check you have various sizes to handle different tasks – e.g., 6″, 10″, and 12″. Ensure they’re in good condition, not bent or chipped.
- Hawk: Make sure your hawk is sturdy and large enough (around 14″ x 18″) to hold a good amount of plaster. Check it’s not cracked or warped.
- Corner tools: Verify you have both inside and outside corner trowels for creating sharp, clean corners.
- Putty knives (2-3 sizes): Ensure you have a variety of sizes – e.g., 1″, 2″, and 4″. Check they’re not bent or dull.
- Scrapers: Confirm you have both straight and flexible scrapers for various scraping needs. Check their edges are sharp.
- Sanding blocks (various grits): Ensure you have sandpaper of different grits – e.g., 120, 150, and 220 – for final finishing. Check the sandpaper is securely attached to the block.
- Optional: Power tools (mixers, grinders): If using, check they’re in good working order, with no visible damage or worn-out parts. Ensure you have appropriate safety gear.
Quick rule: Always inspect your tools before starting work to avoid unexpected delays and rework due to damaged or missing items.
Surface Preparation and Substrate Repair
Start by removing loose plaster and contaminants to create a stable substrate; that means checking for loose lath, damaged drywall, and wobbly trim and addressing any moisture or lead-paint concerns first. Clean the area thoroughly—vacuum with a HEPA attachment where available, damp-wipe residual dust, and mask adjacent surfaces to prevent accidental adhesion or staining.
Secure loose lath or replace compromised drywall, and refill gaps with a compatible patch compound, embedding fiberglass mesh where the joint needs reinforcement. Verify plumb and flatness of the return and casing, plane or re-scribe edges as needed, and follow the manufacturer’s directions for priming or bonding agents on transitions between plaster and drywall.
Cleaning and removing loose or damaged plaster
Start by clearing the area around the window casing. Use a HEPA vacuum to remove any dust or debris from the surface.
Loose plaster should be carefully removed using a scraper or putty knife, working from the top down to avoid further damage. Chip away at it until you reach a solid edge that can serve as a key for new plaster.
Use a damp cloth to wipe any remaining dust and prepare bonding areas for patches. Ensure all surfaces are clean and dry before proceeding.
Repairing or stabilizing the substrate (lath, drywall, trim)
Inspect the lath, drywall, and trim around the window casing. If any are loose, refasten them using appropriate screws or nails.
For damaged sections of lath or drywall, cut out the affected area using a utility knife or saw, then replace it with new material. Ensure the replacement piece is securely fastened and flush with the surrounding surface.
Check that the framing and trim are solid. If any are wobbly, reinforce them using screws or brackets as needed. Ensure everything is level, plumb, and square before proceeding with plastering.
Techniques for Achieving Straight Returns and Crisp Corners
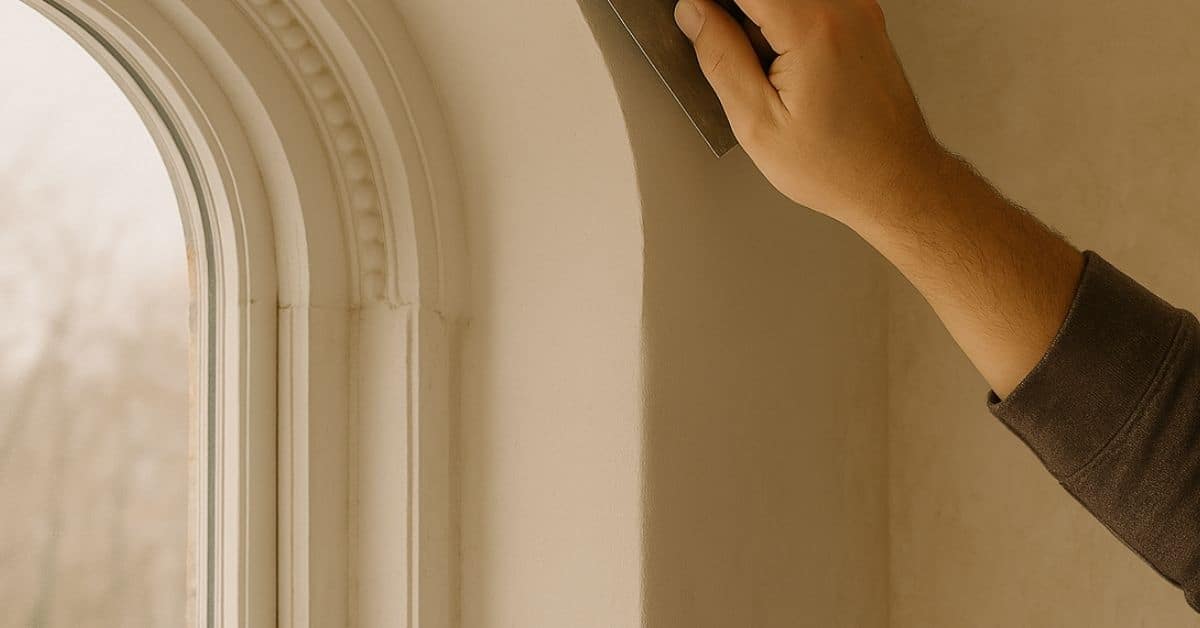
Set accurate forms and stops first: install temporary stops or wood returns, shim them true, and check squareness before applying plaster so the returned plane is consistent. Use corner beads or metal splines where appropriate and make sure they are plumb and firmly fastened to prevent movement during setting.
Apply plaster in controlled, even coats, strike with a straightedge at the appropriate angle, and feather edges to meet the casing cleanly; use slurry or bonding agent as required for adhesion. If a corner is slipping or showing chatter, reassess bead placement, re-shim forms, or remove and reapply the affected coat rather than overworking the surface.
Building and checking square returns
Start by setting up temporary guides or straightedges along the window casing. These will help keep your plaster returns plumb and square as you pack and strike them.
Plumb: Ensure your guide is vertical using a level. Check it at multiple points to avoid any slant.
Square: Use a 90-degree test – align the straightedge with the window frame, then measure diagonally across the corner. If it’s square, both measurements should be equal.
Forming crisp inside corners and miters
For sharp inside corners, consider using corner beads or metal splines. These provide a clean edge for your plaster to follow.
Corner Beads: Ensure they’re plumb before securing them in place. Use a level to check.
Splines: Fit them tightly into the corner. Tape around the edges to keep lines sharp and prevent plaster from seeping behind.
If you’re using hand-tool jointing or scoring, remember: Less is more. Remove only what’s necessary to create a crisp edge.
Visual checkpoints and measuring tips
When: After each coat of plaster, before final finishing, and after curing.
- Check flatness: Use a straightedge to ensure no dips or humps. If missed: You’ll see waviness when painting.
- Squareness: Re-check with your 90-degree test. If missed: Corners will be off, causing light reflection issues.
- Line continuity: Ensure lines are clean and unbroken. If missed: You’ll see gaps or unevenness in your final finish.
- Edge crispness: Check corners for sharpness. If missed: Corners will be rounded, affecting overall aesthetic.
- Plumb and level: Re-check using a level. If missed: Returns may lean, causing visual imbalance.
- Miter alignment: Ensure miters meet flush without gaps. If missed: You’ll see visible seams when painting.
- Plaster adhesion: Check for any signs of delamination. If missed: Plaster may peel off over time.
- Cracking: Look for hairline cracks. If missed: These can grow and compromise your repair.
Quick rule: Always check after each major step. Small issues are easier to fix early on.
Proper Use of Painter’s Tape and Masking for Sharp Lines
Choose tape based on substrate sensitivity and paint type—use a gentle green/low-tack option for delicate trim and a sturdier crepe-style tape for rougher plaster where a razor-sharp line is needed. Clean and prime the surface before taping so adhesive holds; press tape down firmly along the edge to prevent seepage during plastering or painting.
For deep gaps, movement-prone joints, or nonpainted surfaces, consider backing with caulk, backer rod, or bead instead of relying on tape alone; follow the sealant manufacturer’s instructions for cure and paintability. Remove tape at the recommended time and angle to avoid peeling fresh paint or thin plaster, and replace or touch up any small bleeds with a light skimming pass.
Choosing the right tape and prepping surfaces
The first step to sharp lines is choosing the right painter’s tape. For delicate plaster, use green or lattice tape. For sharp edges and crisp corners, opt for premium crepe tape. Match your choice to the paint type you’ll be using – solvent-based paints need a more durable tape.
Before applying tape, prep surfaces. Clean with a damp cloth to remove dust and dirt. Brush away any loose plaster. Prime edges to seal them and improve tape adhesion. If there’s existing bleed or rough returns, address these before taping.
Remember, proper surface preparation is key to preventing paint or plaster bleed and ensuring your tape adheres well.
How and when to remove tape for best results
Removing tape at the right time is crucial. Wait until the paint or plaster has fully dried and cured. This could take anywhere from a few hours to a full day, depending on temperature and humidity.
When ready, start removing tape slowly and carefully. Pull at a low angle – around 45 degrees – to avoid peeling off paint or plaster. Work in small sections if you’re using long strips of tape.
If it’s cold or the paint/plaster is still tacky, wait longer. If tape pulls off paint or plaster, touch up with a light hand and repaint as needed.
Sealing Gaps, Filling Cracks, and Feathering Transitions
Choose backer options that support the patch without showing through—use foam backer rods for deep voids, mesh or fabric for wider joints, and ensure they sit slightly below the final face so the sealant and plaster can form a continuous bead. Select a sealant compatible with trim and paint; check cure and paint windows on the product label to avoid joint failure from seasonal movement.
Feather repairs in multiple, progressively thinner coats so each layer blends into existing plaster without ridges; sand lightly between coats where recommended and keep grit low around corners to preserve edges. Plan a workflow: mask, place backer, apply sealant if needed, lay the base coat, build to finish coat, and follow manufacturer guidance for curing before priming and painting.
Sealing gaps and choosing the right sealant
Before you grab any old tube of caulk, let’s get clear on what you need. Gaps come in all shapes and sizes, so do our sealants.
Small gaps (less than 1/4″): Reach for paintable caulk. It’s cheap, easy to apply, and can be painted over once dry. Use it on trim, baseboards, or where walls meet ceilings. Check the label to ensure it’s suitable for your surface.
Medium gaps (1/4″ to 3/8″): Here, you’ve got options. You can use paintable caulk if the gap isn’t too wide, or opt for an expanding backer rod. These foam strips expand when filled with caulk, creating a tight seal. Check your local hardware store for sizes.
Large gaps (3/8″ and above): For these, you’ll need a plaster-compatible filler. It’s more expensive but can handle wider gaps and minor cracks. Apply it with a wide putty knife, let it dry, then sand and paint. Always check manufacturer instructions for application and safety.
Multi-coat application and feathering technique
When dealing with deep fills or transitions, don’t try to fix it all in one go. That’s a recipe for disaster. You’ll end up with a patch job that stands out like a sore thumb.
Layer your repairs. Start by filling the gap or crack with a suitable filler. Let it dry, then sand it smooth. Check if you’ve filled deep enough. If not, repeat the process until you’re level with the surrounding surface.
Now, here’s where feathering comes in. You want your new plaster to blend seamlessly into the old. So, don’t just slap on a thick coat of joint compound and call it a day. That’ll leave you with a visible transition line.
Taper your coats. Start with a thin layer, working outwards from the center of the repair. This helps to gradually build up the thickness, mimicking the natural profile of the wall or ceiling. Let each coat dry before sanding and applying the next. With each pass, you should be able to see the transition line disappearing.
Finishing, Sanding, and Painting to Maintain Crisp Edges
Sand with a light, controlled progression and avoid aggressive rounding at corners—use finer grits near edges and a soft touch on the face so you preserve the sharp junction with the casing. Remove dust thoroughly with a vacuum and tack cloth before priming to get an even finish and avoid sanding residue affecting adhesion.
Prime repaired areas with a product recommended for plaster-to-trim transitions and follow the primer’s instructions for recoat timing and compatibility with your chosen paint. When painting, use cutting-in techniques with a steady hand or angled brush at the joint, protect edges with tape if necessary, and inspect corners under raking light for final touch-ups.
Sanding and final texture matching
Start with a fine grit, like 120, to avoid rounding those crisp edges. Work carefully around the casings, focusing on maintaining sharp corners.
For texture matching, feathering works best. Apply thin coats of joint compound, tapering off towards the existing plaster. Use a flexible putty knife for smooth, even application.
Let each coat dry completely before lightly sanding with 220 grit to remove any ridges or imperfections. This helps maintain straight returns and keeps corners crisp.
Painting tips to preserve crisp lines
Use a 2-inch angled sash brush for cutting in. Its shape lets you paint right up against the casing without getting on your newly repaired plaster.
For rolling, use a 9-inch roller cover with 3/8-inch nap. This gives good coverage and control. Work in small sections, maintaining a ‘W’ or ‘M’ pattern to avoid leaving lap marks.
To prevent bleed-through at the jambs, lightly ‘dab’ your brush along the edge, barely touching the surface. This helps seal the porous plaster and keeps paint from soaking in.
Troubleshooting Common Mistakes and Maintenance Tips
Address frequent errors quickly: if you over-sand an edge, rebuild thin sections with a thin skim coat instead of more sanding; if the substrate was inadequately prepared, re-clean, prime, and reapply a proper base coat. For tape-related failures, experiment with a different tape grade or burnish the edge more firmly and check removal timing against temperature and paint cure.
To restore a distorted return, verify squareness with a square, add light skim coats to correct the plane, and maintain consistent build thickness to prevent cupping. For ongoing maintenance, control interior humidity during curing, inspect annually for hairline cracks or moisture signs, and re-tape and touch up paint before problems grow.
Fixes for common problems (bulges, gaps, rounded corners)
Plaster around window casings can develop issues over time. Here’s how to tackle the most common ones:
Bulges: These occur when excess plaster is applied or not properly sanded. To fix, lightly score the bulge with a utility knife, then re-sand using fine-grit paper.
Gaps: Gaps form due to insufficient plaster application or substrate movement. Fill gaps by applying a thin layer of joint compound, let it dry, and sand smooth.
Rounded corners: Corners lose their crispness when over-sanded or not properly feathered. To restore sharp corners, use a straight edge and light skim coats, ensuring consistent build thickness.
Long-term inspection and touch-up checklist
Regularly inspect your plaster work to catch any issues early. Here’s a simple routine:
- Check joints: Look for cracks or separation. If found, apply a thin layer of joint compound, let dry, and sand smooth.
- Inspect paint: Check for peeling or chipping. Touch up as needed to prevent further damage.
- Examine caulk: Ensure it remains intact and adheres well. Replace if necessary.
- Monitor temperature: Extreme heat or cold can cause plaster to crack. Maintain consistent temperatures.
- Control humidity: High moisture levels can lead to mold growth. Keep humidity below 50%.
- Check for moisture damage: Look for water stains, which may indicate a leak. Repair the source and touch up the plaster.
- Inspect corners: Ensure they remain crisp. Touch up as needed.
- Check tape lines: Ensure they remain sharp. Re-tape if necessary before repainting.
Quick rule: Inspect your work annually, and touch up any issues promptly to prevent bigger failures.
Conclusion
Keep returns straight and corners crisp through careful planning, the right materials, and steady, deliberate technique. A solid repair not only looks right, it lasts and keeps the window area secure.
Check the damage and scope, gather the tools and materials, prep the surface, apply painter’s tape correctly, mask the edges, seal gaps, fill cracks with the right filler, feather transitions smoothly, and finish with even sanding and a careful coat of paint. Do a small patch test first, follow cure times, and work in good light with a steady hand.
Avoid common missteps: don’t rush the tape or skip surface prep, don’t overfill or sand aggressively, and don’t ignore gaps around the casing. Always wear eye protection and a mask, keep ventilation up, and test a tiny area before committing to the whole job. If you see recurring cracks, water intrusion, or warped casings, don’t push forward—true fixes may require professional help.
If the frame shows warping, active water damage, or persistent cracks after attempts, call a professional. Stay methodical and patient, and you’ll protect the look and longevity of your casing without unnecessary risk.
FAQ
How should I prep the surface before taping for crisp edges?
Clean the area and remove loose plaster or dust. Dampen the surface lightly if needed to help the patch adhere, but don’t oversaturate. Check that the casing joints are dry and free of grease or wax that can bleed under tape.
What’s the right way to apply painter’s tape around window casings for plaster repair?
Press the tape down firmly along the edge where you want the line, keeping it tight to the casing. Use a straight edge or a custard stick to guide a clean edge, and apply tape on both sides if you need two different finishes. If corner work is involved, run tape along the corner first and then along the flat surface.
When should I remove the tape to keep the edge sharp?
Peel the tape while the joint compound is still slightly soft, not dry. Pull the tape back toward the area you just filled, in a slow, steady motion. If you see any pull-through, recoat the edge and re-tape as needed.
What are common tape mistakes that ruin crisp corners and how can I avoid them?
Avoid stretching the tape, which causes gaps. Don’t skip pressing the tape down along the edge. Check the tape for gaps before you apply compound, and remove slowly to prevent tearing or peeking under the tape.