
Introduction
The process of plastering over cement board involves several steps that require careful timing to ensure a successful outcome. Understanding the timeline and duration for each stage is crucial for planning your project effectively.
In this guide, we’ll walk you through the step-by-step timeline of plastering over cement board, helping you allocate the right amount of time for each task and avoid common pitfalls that can delay your project.
For the full guide, see Plaster Over Cement Board: Bonding Agents and Scratch Patterns That Hold.
Step-by-Step Timeline: Plastering Over Cement Board
The entire process of plastering over cement board typically takes around 7 to 10 days, depending on factors such as the size of the area, weather conditions, and your experience level. Here’s a detailed step-by-step timeline to help you plan your project:
- Day 1: Preparation (2-3 hours) – Clean the cement board surface, remove any dust or debris, and ensure all fasteners are secure.
- Day 2: Priming and Bonding Agent Application (1-2 hours) – Apply a compatible primer or bonding agent to the cement board, following the manufacturer’s instructions for mixing and application.
- Day 3: Creating Scratch Patterns (1-2 hours) – Use a scratch comb or rake to create consistent scratch patterns across the entire surface, ensuring proper mechanical keying for the plaster.
- Day 4: Scratch Coat Application (2-3 hours) – Apply a cement-based scratch coat over the scratched surface, using a hawk and trowel. Allow it to set according to the manufacturer’s instructions before proceeding.
- Day 5: Plaster Application (2-4 hours per layer) – Apply the first layer of plaster, ensuring even coverage and proper embedding of any mesh reinforcement. Allow it to set slightly before applying the next layer. Repeat this process until you achieve the desired thickness.
- Day 6-7: Curing and Finishing (Passive time) – Allow the plaster to cure according to the manufacturer’s instructions, typically requiring at least 24 hours of undisturbed curing time. Once cured, lightly sand any imperfections and apply a sealant if desired.
- Day 8-10: Final Inspection and Touch-ups (Variable) – Perform a thorough inspection of the finished surface, addressing any minor imperfections or touch-ups as needed. Ensure that the plaster has cured properly and adheres well to the cement board before proceeding with any additional work.
By following this step-by-step timeline, you can effectively plan your project and allocate the necessary time for each stage of the plastering process over cement board.
Key takeaways
The preparation stage on Day 1 is crucial as it sets the foundation for the entire project. Taking the time to clean the surface thoroughly will ensure better adhesion and prevent potential issues down the line, which could delay your overall schedule.
- Check compatibility of cement board with plaster and local codes before starting.
- Wear safety gear; clean dust, wipe, and dry surface to ensure plaster bonds well.
- Use appropriate bonding agents recommended by manufacturer for cement board plastering.
- Create scratch patterns across board joints and field for mechanical grip.
- Use proper tools and materials: trowels, hawk, plaster mix, bonding agent, mixing bucket.
- Monitor curing conditions and avoid rapid drying to prevent cracks.
Table of Contents
- Introduction
- Key takeaways
- When and Why to Plaster over Cement Board
- Preparing Cement Board for Plastering
- Bonding Agents for Cement Board — Types and Selection
- Creating Scratch Patterns That Hold
- Application Methods and Tools for Plaster over Cement Board
- Curing Time, Conditions, and Finishing
- Troubleshooting Common Issues and How to Fix Them
- Safety, Planning, and Cost Considerations
- Conclusion
- FAQ
When and Why to Plaster over Cement Board
Plastering over cement board makes sense when you need a durable, moisture-tolerant finish or when cement board is already in place and you want a traditional plaster appearance. Consider bathrooms, kitchens, wet rooms, or retrofits where tearing out the substrate isn’t practical.
Choose plaster type to match conditions: cementitious plasters bond well to cement board in damp areas, while gypsum-based plasters are typically a poor match where moisture is present. Balance advantages—rigidity, moisture resistance, and longevity—against drawbacks like added weight, longer cure and finishing time, cracking risk if movement isn’t controlled, and greater finishing skill; check product data sheets and local code for compatibility and required joints or barriers.
Assessing substrate suitability
Before you start, check your cement board’s condition. Look for any cracks, warping, or damage.
Framing rigidity is crucial. Plaster adds weight, so ensure your framing can handle it.
Check moisture exposure too. If the area’s prone to dampness, consider a cement-based plaster mix for better resistance.
Building code and moisture considerations
Cement board is great where codes allow it. Check local rules before starting.
In moisture-prone areas, like bathrooms or kitchens, cement board’s a good choice. But ensure you’re using compatible plasters and moisture barriers.
Consider using cement-based plasters in damp areas for better resistance. Gypsum plasters aren’t recommended where moisture is an issue.
When to choose other finishes
Plaster over cement board isn’t always the best choice. Here’s when to consider alternatives:
If you’re tiling directly, a cement render or thin-set mortar might be simpler and cheaper.
For a traditional look, veneer plaster over lath could be better. It offers more flexibility for textured finishes.
If budget’s tight, consider ready-made panels. They’re quicker to install but offer less durability than plaster.
Preparing Cement Board for Plastering
Start with a hands-on inspection: confirm boards are intact, flat, and firmly fastened, looking for loose screws, delamination, bulges, or moisture damage. Replace or re-secure compromised boards and address any framing or moisture problems behind the panels before proceeding.
Treat joints and fasteners properly using recommended tape and joint systems, set corner beads where needed, and feather compound to create a uniform plane ready for plaster. Clean dust and residues, verify surface porosity, and follow the bonding agent or primer instructions on the label for drying conditions and application before you apply the scratch coat.
Inspecting and repairing boards
Before you start plastering, give your cement board a thorough once-over. Look for any signs of damage or wear.
Loose screws: Tighten them up. If they’re stripped, replace them with longer screws that grab the studs better.
Damaged edges: Check for cracks or chips. Small ones can be patched with cement board repair compound. Larger ones might need a new piece of board.
Gaps: Fill them with joint compound to prevent plaster from falling through later on.
Sealing seams and fasteners
Next, you’ll want to seal up any seams or gaps between boards. This stops plaster from squeezing through and keeps moisture out.
Joint tape: Use cement board tape for seams. Press it firmly into place with a joint knife, making sure there are no bubbles or wrinkles.
Joint compound: Apply a thin layer of joint compound over the tape. Let it dry according to the manufacturer’s instructions before sanding lightly and applying another coat.
Fasteners: Seal any screw holes with a dab of joint compound. This keeps plaster from sticking to the screws and makes your final finish smoother.
Surface cleaning and priming
Now it’s time to clean and prime your cement board surface. A clean, primed surface helps plaster stick better and look nicer in the end.
Dust: Wipe down your boards with a damp cloth to remove any dust or debris. Let them dry completely before moving on.
Curing compounds: If you’ve recently installed new cement board, make sure any curing compounds are fully rinsed off and the board is dry.
Primer: Apply a bonding primer to your boards. This helps plaster stick better and seals the surface to prevent moisture from getting in or out. Follow the manufacturer’s instructions for application and drying times.
Bonding Agents for Cement Board — Types and Selection
Common bonding choices include cementitious bonding slurries, polymer-modified primers, and acrylic-based bonding agents; each adheres differently and suits different plaster mixes and exposure conditions. Match the bonding product to the planned plaster—cementitious slurries for cement plasters, specific polymer primers for mixes that rely on adhesion rather than mechanical keying—and verify manufacturer guidance for compatibility with your cement board system.
Consider environment: indoor dry rooms require different products than continuously wet spaces, and temperature/humidity affect application and cure—check product datasheets for recommended conditions. Prepare the board (clean, dust-free, free of release agents), follow the mixing and application instructions on the label, and watch for signs of poor bond so you can address adhesion problems before they become delamination.
Cementitious bonding slurries
Cement-based slurries create a strong bond between cement board and plaster. They’re made by mixing cement, sand, and water.
Use them with gypsum or lime plasters for best results. Apply after surface cleaning and priming.
Before full application, test adhesion on a small area. Scratch the surface lightly with a trowel to ensure good bonding.
Acrylic and polymer primers/admixtures
These enhance adhesion and flexibility. Acrylic primers are water-based, easy to apply, and suitable for gypsum plasters.
Polymer admixtures mixed into cement slurries improve bonding with lime plasters. They increase flexibility, preventing cracks due to movement.
Use according to manufacturer’s instructions. Apply after surface cleaning and priming, then let dry before plastering.
Manufacturer recommendations and compatibility checks
Always check product technical data sheets for recommended use with your specific cement board and plaster type.
Perform a small adhesion test before starting the full job. Apply the bonding agent to a small area, let it dry, then apply a thin layer of plaster. Let it cure, then scratch or tap gently to check bond strength.
If unsure, consult with a professional or contact the manufacturer for advice.
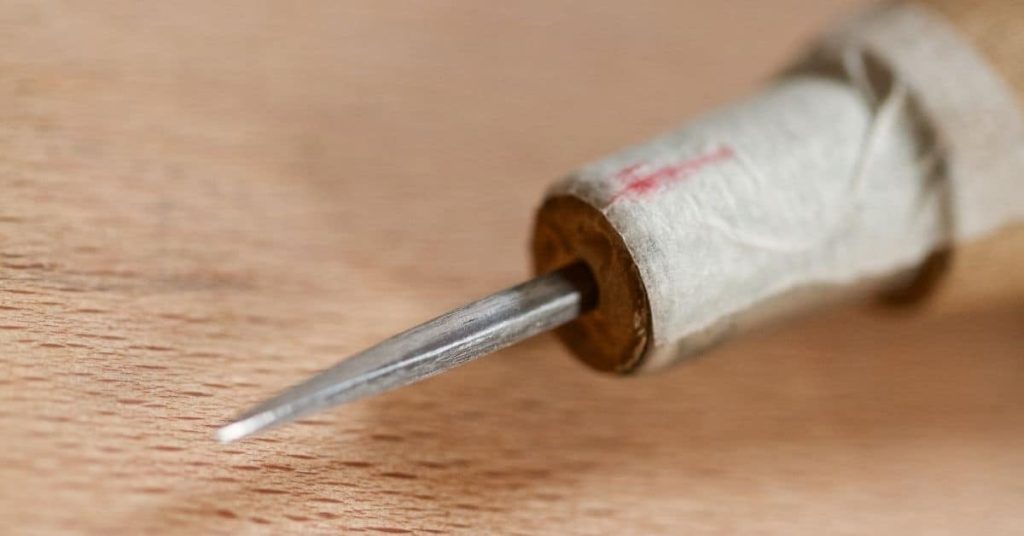
Creating Scratch Patterns That Hold
The scratch coat’s job is mechanical: produce a uniform keyed surface so the brown coat bonds over the entire area and stresses distribute without hairline cracking. The depth, spacing, and consistency of the scratch pattern directly influence adhesion—too shallow and you lose key; too aggressive and you weaken the coat.
Use the right tool for the mix—a notched trowel or plastic comb suited to the plaster’s aggregate—and keep consistent pressure and spacing as you work across boards and over joints. Check the pattern frequently, re-scratch shallow areas, and pay extra attention at edges, corners, and penetrations to ensure continuous key for the brown and finish coats.
Scratch Coat Basics and Desired Profile
The scratch coat’s primary function is to create a mechanical key for the brown and finish coats. Its texture provides a uniform, well-keyed surface that ensures consistent thickness across the entire panel area.
Desired profile: A consistent, shallow-to-medium depth groove pattern that promotes adhesion with subsequent coats. The ideal scratch coat is neither too shallow (which won’t provide enough key) nor overly aggressive (risking board damage).
The scratch coat’s thickness influences adhesion with the brown and finish coats. Too thin, and it won’t provide a good mechanical bond; too thick, and it may crack or not set properly.
Tools and Techniques for Consistent Scratches
Achieving uniform grooves without damaging the board or overworking the coat requires the right tools and techniques.
- Notched trowel: Use a 1/4″ or 3/8″ notched trowel to create consistent grooves. Hold it at a consistent angle (around 45 degrees) and apply even pressure.
- Plastic scratch comb: A cheaper alternative, but requires more manual control. Ensure teeth are evenly spaced and maintain consistent contact with the surface.
- Double-pass technique: Apply the first pass at a 45-degree angle, then rotate the trowel 90 degrees for the second pass to create a grid pattern. This helps ensure even coverage and keying.
- Consistent pressure: Maintain steady pressure while scratching to avoid shallow or overly aggressive scratches. A light touch won’t create enough key, while too much force can damage the board.
- Match pattern to mix: Different plaster mixes may require different scratch patterns. Consult bagged product instructions for recommended scratch coat techniques.
Visual Checkpoints for a Good Key
Inspect the scratch pattern after applying and before setting to ensure a reliable mechanical bond. Use this checklist:
- Scratch depth: Grooves should be visible but not too deep (around 1/8″ to 1/4″). Too shallow, and it won’t provide enough key; too deep, and it may weaken the board.
- Spacing: Grooves should be evenly spaced (around 3/8″ to 1/2″ apart). Inconsistent spacing can lead to weak points in the finish coat.
- Cleanliness: Remove any debris or excess material from grooves. Contaminants can hinder adhesion with subsequent coats.
- Edges and corners: Ensure grooves are consistent along edges and corners. These areas often require extra attention to maintain a good key.
- Seams and penetrations: Check for consistent grooves over seams, fasteners, and any penetrations. Inconsistent scratching in these areas can lead to weak points or cracking.
Quick rule: If unsure about any aspect of the scratch pattern, re-scratch or touch up the area before applying the brown coat. A good key ensures a strong, durable finish.

Application Methods and Tools for Plaster over Cement Board
Organize the work in stages: substrate prep, bonding agent if needed, scratch coat, brown/base coat, and finish/skim, using the appropriate mix for each stage. Decide ahead whether you’ll use factory premixed products or field-mix blends and follow the manufacturer’s mixing and sequencing directions rather than guessing ratios.
Equip yourself with the right tools—mixing paddle, mixer, hawk, trowels, darbies, scratch combs—and use consistent trowel angles and pressure to control thickness and texture. Maintain safe workflow: set up clean mixing and staging areas, control dust, and allow proper curing intervals between coats as recommended by the product instructions or technical data sheet.
Mixing and consistency control
First off, always check your bonding agent’s label. Some need pre-mixing with water before adding to the plaster.
Start dry, mix your cement board joint compound (plaster) in a large bucket or on a flat surface. Add the recommended amount of bonding agent, mixing it well into the dry plaster.
Now, add water slowly and steadily. You want a consistency like thick peanut butter – not too runny, not too stiff. Remember, a little water goes a long way. It’s easier to add more than to take out excess.
Here’s where most DIY’ers mess up: they mix too much at once or don’t mix enough. Aim for small batches – you can always make more. And keep mixing until it’s smooth and lump-free. Check your work with a trowel, scrape the sides and bottom of the bucket.
Layering: scratch, brown, and finish coats
The key to a smooth plaster job is applying the right layers in the correct order. Here’s how:
Scratch Coat (Base): This is your first layer. Its purpose is to bond with the cement board and provide a base for the next coats. Mix your plaster as per the previous section, but make it slightly thicker than normal. Apply it evenly using a trowel or hawk. Let it dry until it’s no longer tacky, then use a comb to score lines into it. This helps the next coat stick better.
Brown Coat (Middle): Once the scratch coat is dry, you’re ready for the brown coat. Mix your plaster to a normal consistency this time. Apply it over the scratch coat, filling in the scored lines and creating a smooth surface. Let it dry until it’s no longer tacky. This usually takes around 24 hours, but check the product label or manufacturer instructions for specifics.
Finish Coat (Top): The finish coat is the final layer that gives your wall its smooth, finished look. Mix your plaster to a thinner consistency than before. Apply it evenly over the brown coat using a trowel or hawk. Let it dry according to the manufacturer’s instructions. Once dry, you can sand any rough spots and paint.
Tools checklist and ergonomics
Before you start applying plaster over cement board, ensure you have the right tools at hand. Use this checklist to double-check your equipment and maintain a consistent application quality while minimizing fatigue.
- Trowel (4″ – 12″): Check trowel edges for sharpness; dull edges won’t spread plaster evenly.
- Hawk: Ensure your hawk is clean and free of debris to prevent contamination in the plaster mix.
- Plaster Mixing Bucket: Use a bucket with a wide mouth for easy mixing and application. Check it’s clean before use.
- Plaster Mixing Paddle: Ensure your paddle is in good condition; a broken one can cause inconsistent mix.
- Drill (for power mixing): If using, check the drill’s battery life or ensure it’s plugged in nearby. A dead drill mid-job causes delays.
- Plaster Mix: Check the plaster bag for any signs of damage; moisture can ruin the mix. Follow manufacturer instructions for water-to-plaster ratio.
- Safety Gear: Wear gloves, goggles, and a dust mask to protect against plaster dust and chemicals.
- Ladder or Scaffolding: Ensure your access equipment is stable; unstable platforms lead to accidents.
Quick rule: Always keep your tools clean during use. A dirty trowel can leave marks on the plaster, ruining the finish coat.
Curing Time, Conditions, and Finishing
Curing depends on ambient and substrate moisture, temperature, ventilation, and coat thickness; stable environmental control is essential to avoid weak or uneven cures. Aim for steady conditions and follow product guidance for acceptable temperature and humidity ranges rather than guessing specific times.
Manage moisture during cure—protect from direct sun, strong drafts, or rain, and use dehumidifiers or heaters to maintain steady conditions if needed, checking product literature for allowable measures. Verify full set before sanding or applying primers and finishes, inspect for shrinkage cracks or discoloration, and document conditions if you need to postpone finish work or perform remedial steps.
Managing drying conditions
The cure of plaster over cement board is a delicate balance between moisture loss and gain. Too fast, it weakens the finish; too slow, it invites mold.
Control temperature: Keep it steady, ideally 60–75°F (15–24°C). Use space heaters or fans as needed.
Manage humidity: Maintain moderate relative humidity (RH), around 40-60%. Use dehumidifiers or humidifiers to adjust.
Prevent rapid drying by covering with plastic sheeting or curing blankets, especially at night or during colder periods. Avoid direct sun and strong drafts.
Timing for sanding, taping, and topcoats
Patience is key. Sand too soon, you’ll damage the finish. Wait too long, you’ll lose your key.
Sanding: Check for a slight haze when you rub your hand over the surface. That’s your cue to sand lightly with fine-grit paper.
Taping and topcoats: Let the last coat dry until it no longer feels cool or warm to touch, usually 24-48 hours. Gently press to check for tackiness before proceeding.
Remember, every job’s different. Trust your eyes and hands over a clock.
Accelerators, retarders, and additives — when to use
Chemical modifiers can speed up or slow down cure, adjust slump, or enhance bonding. But they’re not one-size-fits-all.
Accelerators: Use in cold weather or when you need a quick set. Follow product guidance for dosage and compatibility.
Retarders: Help in hot, humid conditions to prevent rapid setting. Again, follow product instructions.
Additives: Enhance bonding, water retention, or air entrainment. Always check manufacturer recommendations before mixing.
Troubleshooting Common Issues and How to Fix Them
Common failures include poor initial adhesion, delamination from moisture, cracking from movement, and efflorescence from salt-laden substrates; diagnosing the root cause is the first step. Check surface prep, board condition, moisture readings, and environmental conditions during application to pinpoint likely causes.
Corrective actions vary: clean and re-profile for adhesion failures, seal or remove efflorescence sources, reinforce cracks with mesh or stitching, and re-prime before re-plastering where needed. Prevent problems by following surface-prep protocols, choosing compatible bonding agents, controlling cure conditions, and confirming adhesion with simple pull or scratch checks before proceeding.
Diagnosing and fixing adhesion failures
Adhesion issues can lead to plaster falling off your cement board. Here’s how to diagnose and fix them.
Testing Adhesion: Gently scratch the plaster with a screwdriver or coin. If it comes off easily, you’ve got an adhesion problem.
Common Causes: Poor surface prep (dust, oils), moisture-related delamination, and contaminated surfaces can cause bond loss.
Repair Approaches: For spot repairs, clean the area, remove loose material, and re-prime before recoating. For full removal, score, soak, and scrape off the plaster, then prep and prime the surface again.
Addressing cracking and shrinkage
Cracks in your plaster can let moisture in, leading to bigger problems. Here’s how to deal with them.
Types of Cracks: Hairline cracks (due to shrinkage) and wider ones (from movement or settling).
Likely Sources: Inadequate scratch patterns, improper curing, or board movement can cause cracking.
Repair/Reinforcement Methods: For hairline cracks, use a crack stitching compound. For wider ones, install mesh reinforcement before reapplying plaster. Always ensure proper curing conditions to prevent recurrence.
Repairing delamination and surface defects
Delaminated plaster needs careful removal and replacement to avoid recurring issues.
Removing Delaminated Plaster: Score, soak, and scrape off the loose material. Be careful not to damage the cement board.
Preparing the Substrate: Clean the surface thoroughly, remove any dust or debris, and allow it to dry completely before priming.
Reapplying a Secure Bonding System: Use a compatible bonding agent suitable for your plaster type. Apply it evenly, following the manufacturer’s instructions. Ensure proper curing conditions to prevent future delamination.
Safety, Planning, and Cost Considerations
Prioritize PPE—gloves, eye protection, and respiratory protection where dust or chemical exposure is possible—and plan ventilation for mixing and sanding operations. Assess on-site hazards, set up containment for dust, and follow local disposal rules for cement board and plaster waste.
Plan the project in stages with realistic buffers for cure and weather, factor in tool rental or purchase, labor time, and potential rework, and compare material and labor trade-offs against alternatives like drywall or direct tile finishes. For product specifics, check labels and data sheets and budget accordingly while building contingencies for delays or repairs.
Safety precautions and handling bonding agents
Plastering over cement board requires careful handling of materials, especially bonding agents. Always wear appropriate PPE: gloves for mixing and applying, and eye/face protection to shield against splashes.
Ventilation is crucial when working with bonding agents due to their strong fumes. Use a fan or hire a dust collection system to ensure adequate airflow. Mix materials in well-ventilated areas, preferably outdoors if possible.
Clean up spills immediately and dispose of materials responsibly. Follow local regulations for waste disposal. Store bonding agents in cool, dry places away from heat sources and direct sunlight.
Material specs, cost comparison, and budgeting tips
Choosing the right materials is key to a successful plaster job. High-quality products may cost more but can save you money in the long run by reducing maintenance and repair costs.
- Plaster: Look for high-quality, low-shrinkage plasters with good bond strength. Avoid cheap alternatives that may crack or stain easily.
- Bonding Agents: Choose a bonding agent suitable for your substrate and plaster type. Read labels carefully to ensure it’s compatible with your chosen plaster.
- Tapes/Compounds: Use high-quality, flexible tapes and compounds to prevent cracking at joints and seams.
- Tools: Factor in tool rental costs when budgeting. Consider buying tools if you plan on doing more DIY projects in the future.
- Labor: If your project is large or complex, consider hiring professionals to ensure a quality job. They may cost more but can save you time and stress.
Project timeline and staging
Planning your project timeline is crucial for a smooth, efficient workflow. Allow ample time for each stage of the plastering process, especially drying times between coats.
Multi-coat jobs require careful planning. The typical sequence is: scratch coat, brown coat, and finish coat. Each coat needs adequate drying time before applying the next. Allocate buffers in your timeline to account for weather delays or unexpected issues.
Coordinate with other trades if you’re working on a larger project. Ensure they’re aware of your schedule and that their work doesn’t interfere with yours, especially during critical drying periods.
Conclusion
Good plaster over cement board pays off in safety, durability, and a clean finish, but only if you do it right from the start. Take control now by sticking to solid prep, the right bonding, and proper curing to avoid costly callbacks or damage.
Make sure you follow a simple, practical sequence: test a small patch first, clean and dry the surface, select the appropriate bonding agent, roughen with a proper scratch pattern, mix plaster to a consistent set, apply in thin coats with even pressure, keep conditions within recommended ranges, and allow the plaster to cure before finishing. Work in a logical flow and document any readings or temps to hold you accountable. If you’re unsure about any step, validate your approach in a test area and proceed only when you’re confident the repair will hold over time.
Common mistakes to avoid are skipping the bonding step or not matching the scratch pattern to the board, applying plaster too thick in one go, and forcing finishes in bad conditions. Protect yourself with proper PPE, ventilate well, and test each stage in a small area before scaling up. If moisture is a factor, or if the substrate shows damage, back off and address those issues first. When in doubt about bond strength, edge cases, or cure times, don’t push it—call a professional. Stay steady, follow the plan, and your wall will be strong, smooth, and long-lasting.
FAQ
What types of bonding agents work best for plaster over cement board, and how do I choose?
Use bonding agents that are labeled for cement board and plaster. Read the manufacturer instructions and patch test on a small area first. If in doubt, check local rules or talk to a supplier about products compatible with your plaster mix.
How should I create scratch patterns to hold the plaster, and what patterns are most effective?
Make light, even scratch scores across the cement board surface in a consistent pattern. The goal is to create enough tooth for the plaster to grip without gouging the board. Follow the product guidance for depth and spacing and do a quick test patch before full application.
What tools and materials do I need to plaster over cement board effectively?
Have a trowel, a hawk, a mixing container, a bonding agent, plaster mix, and a mixer or drill with a paddle. Keep a clean water source and rags handy for cleanups. Use the bonding agent and plaster exactly as the labels require and avoid substitutes that aren’t rated for cement board.
What common issues should I watch for and how do I fix them during plastering?
Watch for delamination, cracking at joints, and plaster that won’t grip. If you see a failure in a spot, stop, dry the area, and recheck the scratch pattern and bonding agent application. For persistent issues, consult the product instructions or a pro to avoid unsafe or weak patches.