

Introduction
Accelerators speed up set time and retarders slow it down when added to bagged concrete or mortar, and they should be used according to the product label and mix instructions. In practice that means choosing the right additive for the job, measuring it, and avoiding ad hoc water or burlap tricks that can create weak surface layers.
For DIY finishing, use finishing aids and surface retarders as directed—apply them with the recommended method and only at the stage the manufacturer specifies. If you need to loosen a stiff mix, check product guidance for approved retempering options or consider purpose-made additives rather than adding extra water, and consult the label or manufacturer if unsure.
Key takeaways
- Accelerators speed set times in bagged mixes; retarders extend workable pot life safely.
- Check bag label and manufacturer guidance before dosing any additive or finish.
- Use proper dosing per product instructions; small batches avoid surface weakness.
- Avoid retempering with water to touch up surfaces; risk of weak layers.
- Finish aids and surface retarders should be applied per guidelines to prevent flaws.
- Test patch and inspect early; compare with recent articles and credible sources.
Table of Contents
- Introduction
- Key takeaways
- What Are Accelerators and Retarders?
- When to Use Accelerators and Retarders (Job Scenarios)
- Proper Dosing and Mixing with Bagged Mixes
- Application Techniques to Avoid Weak Surface Layers
- Risks, Common Mistakes, and Troubleshooting Weak Surfaces
- Compatibility and Safety Precautions
- Tools, Materials Checklist and Testing Plan
- Practical Next Steps and Trusted Sources
- Conclusion
- FAQ
What Are Accelerators and Retarders?
Accelerators are additives that speed the concrete’s early hydration and shorten the time to initial set; retarders do the opposite, extending workable time by slowing early hydration. Both are intended to adjust setting timelines so the mix meets job needs without changing the basic strength recipe of the bagged mix.
With common bagged mixes (Type I/II), these products interact at the chemical level with cement hydration—check the product label or data sheet for recommended dosages and compatible mix types. Use decision criteria tied to project goals (need for early strength versus extended workability), ambient conditions, and desired surface finish; always trial a small patch first and follow manufacturer instructions to reduce risk of weak surface layers.
How they work chemically
Accelerators and retarders are chemicals that speed up or slow down the setting time of concrete by influencing the hydration process.
Accelerators, like calcium chloride, make the cement particles react faster with water. This quickens the setting time but can lead to earlier strength gain if managed properly.
Retarders, such as citric acid or tartaric acid, delay this reaction, giving you more working time before the concrete sets. They also help maintain workability longer.
Common product types and forms
Accelerators and retarders come in various forms, affecting how you handle and dose them:
Liquid: Easy to mix but can cause slump loss if not added correctly. Dose by volume (e.g., gallons per cubic yard).
Powder: Precisely dosed by weight, but dusty and messy. Store in a dry place.
Preblended bags: Convenient, with the additive already mixed with cement. Dose by bag count per batch. Less common for accelerators.
When to Use Accelerators and Retarders (Job Scenarios)
Choose accelerators when you need faster set or early strength in cold weather or time-critical pours, and choose retarders to preserve workability in hot, dry conditions or when multi-pass finishes require longer open time. Match the choice to temperature, humidity, pour size, and finishing workflow rather than treating them as automatic fixes.
In staged finishes or large pours with long haul times, run small trial mixes and document dosage and results; follow the product instructions or technical bulletin for mixing order and testing steps. Expect trade-offs—accelerators can speed set but may increase surface cracking risk if misused, while retarders help finishing but require careful curing; always verify compatibility and keep records for quality control.
Bagged Mix-Specific Considerations
When using bagged concrete mixes, it’s crucial to consider how accelerators and retarders interact with the preblended materials. These mixes often contain proprietary blends of cement, aggregates, and sometimes admixtures.
Compatibility is key: Always confirm that your chosen accelerator or retarder is compatible with the specific bagged mix you’re using. Some manufacturers may have recommendations for their products’ use with accelerators/retarders.
Field testing is a good practice: Before adding any admixture, test a small batch of the bagged mix to ensure it behaves as expected under your conditions. This helps avoid surprises on the jobsite.
Alternatives to Chemical Timing Control
While accelerators and retarders are powerful tools, there may be times when you prefer not to use them. Here are some alternative methods to control concrete set time:
Curing blankets: These insulated covers help retain heat and moisture, promoting faster setting in cold weather.
Shading: Protecting the pour from direct sunlight can slow down the setting process, especially in hot, dry conditions. This is particularly useful when working with large pours or complex finishes that require more time to complete.
Scheduling pours: Plan your work strategically. For example, pouring concrete early in the morning allows for a longer initial curing period before heat buildup accelerates setting.
Proper Dosing and Mixing with Bagged Mixes
Dosing must follow the accelerator/retarder manufacturer instructions and the bag mix guidance; do not guess concentrations—confirm the units (oz/gal, % by weight, ppm) on the technical data sheet before mixing. Use calibrated measuring tools and a consistent unit system so you don’t mix incompatible metrics on the job.
Pre-dissolve products if the label calls for it and add to the mix water slowly rather than dumping onto dry cement to avoid streaking or non-uniform set. Always run a small trial batch to check set time, slump, and surface finish, record the exact dose, ambient conditions, and observations, and adjust only after documented testing.
How to determine the correct dose
The first step is to read the product label. It should tell you the recommended dosage rate, usually expressed as parts per million (ppm), ounces per gallon (oz/gal), or percentage by weight.
If it’s not clear, contact the supplier. They can provide specific guidance based on your mix design and environmental conditions.
But don’t stop there. Always run a small batch test to confirm performance. Mix up a trial batch using the recommended dose. Check set time, slump, and surface finish. Adjust the dose if needed before you pour.
Mixing procedures for liquids vs. powders
Liquids are usually added to the mix water or directly into the wet mix, as per product guidance. Powders are typically pre-dissolved in a small amount of water before adding.
For both, mixing time and agitation are crucial. Follow these steps:
1. Add cement and aggregates to the mixer.
2. Start the mixer at low speed.
3. Slowly add the required amount of water.
4. Let it mix for a minute or two.
5. Now, slowly introduce the accelerator/retarder liquid (or pre-dissolved powder) around the edge of the mixer.
6. Increase the mixer speed and let it run until you see uniform dispersion.
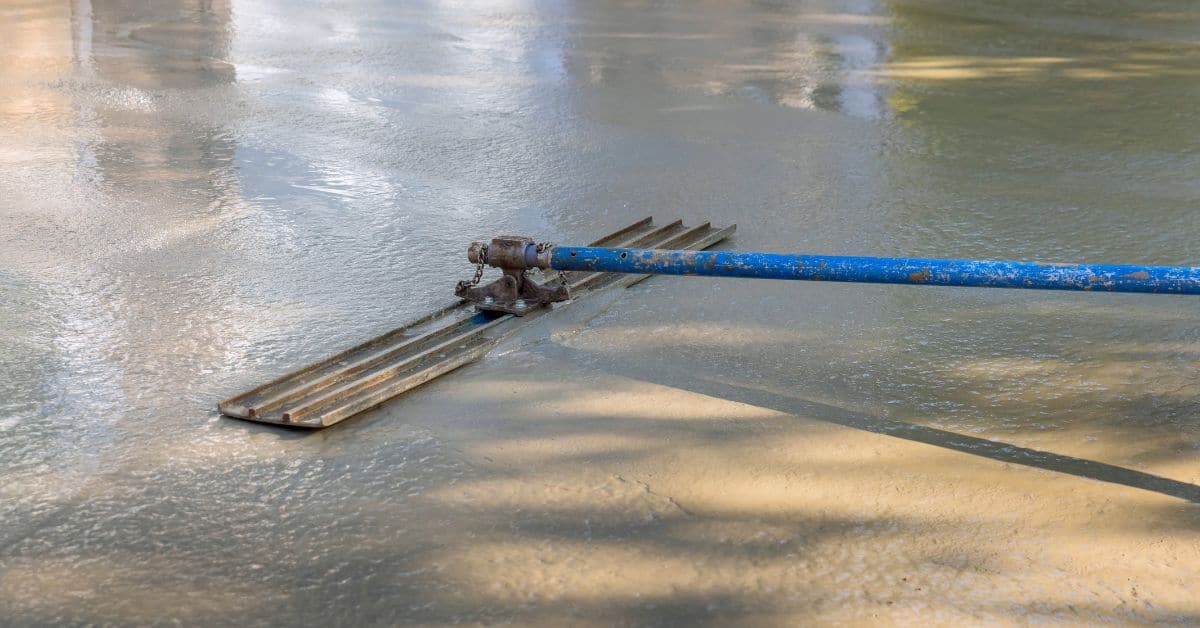
Application Techniques to Avoid Weak Surface Layers
Keep surface retarders and finishing aids strictly on the surface when that is the intent; do not work retarders into the mix or over-apply, which can leave a weak, dusting layer. The objective is even coverage and controlled exposure time so finishing tools contact the intended concrete matrix, not a chemically altered skin.
Time applications relative to finishing: follow the product instructions for when to spray or brush and when to begin floating/troweling, and avoid aggressive troweling immediately after retarder use. Use light, controlled finishing, check small test areas for surface hardness, and start curing promptly using the method recommended by the manufacturer to protect the newly finished surface.
Spraying, brushing, and rolling methods
Applying surface retarders and finishing aids evenly is key to protecting your concrete’s strength. Here are some tips:
Spraying: Use a fine mist spray nozzle to create an even film. Keep the can moving at a steady pace to avoid over-application.
Brushing/Rolling: Use a soft-bristle brush or roller for even coverage. Work in small sections, applying just enough product to coat the surface without leaving puddles.
Timing finishing operations
Knowing when to start finishing is crucial for maintaining your concrete’s strength. Here’s how:
After applying the retarder/finishing aid, wait until it just starts to haze or lose its gloss. This indicates that the product has started to evaporate and is ready for finishing.
For stamped patterns, wait a bit longer – until the surface feels slightly tacky. This ensures the pattern will release cleanly without damaging the concrete.
Risks, Common Mistakes, and Troubleshooting Weak Surfaces
Major risks include incorrect dosage, adding water after placement (retempering), expired products, and incompatible admixtures—each can create powdery, weak surface layers or bonding problems with overlays. Mistakes often show as dusting, low surface hardness, or uneven color/texture.
Diagnose weak surfaces with simple checks: visual inspection, a hardness comparison, and small pull or adhesion tests; consult the product MSDS or technical sheet for corrective advice. Immediate fixes range from spot grinding and patching to redoing the surface after removal—prevent issues by strict dose control, batch testing, and consistent curing practices documented for each pour.
Why retempering with water can weaken surfaces
Adding water to the surface of your concrete mix might seem like a good way to fix slump loss or improve workability. But it’s a risky move that can leave you with weak surfaces.
Here’s why: Water changes the water-to-cement ratio. Too much water dilutes the cement, reducing its ability to bind with aggregates and create strong bonds. This results in lower surface strength and increased porosity, making your concrete more susceptible to damage and deterioration over time.
Instead of retempering with water, consider these safer alternatives:
- Use a concrete accelerator: These chemicals increase the rate of hydration, helping maintain workability without affecting strength.
- Adjust your mixing process: Ensure you’re using the right amount of water from the start. Over- or under-hydrating can lead to slump loss and other issues.
Troubleshooting checklist for weak finishes
If you notice your concrete surface isn’t as strong or durable as it should be, use this checklist to diagnose and address the issue.
- Overdosing additives: Check if you’ve used too much accelerator or retarder. Excess can lead to weak surfaces and inconsistent set times.
- Early finishing operations: Ensure you’re not finishing the concrete too early. This can result in weak, dusty surfaces with poor bond strength.
- Contamination: Inspect for any contaminants that might have affected the surface, such as dirt, oil, or other substances.
- Inadequate curing
- Incorrect mixing sequence
- Neglecting ambient conditions
- Using expired products
- Improper dosage of water
- Incorrect timing of additive addition
Quick rule: Always follow the supplier’s guidelines for additives and curing. Regularly test your mix and adjust as needed to maintain consistent quality.
Compatibility and Safety Precautions
Check compatibility with other admixtures, pigments, and reinforcement before use—some accelerators or retarders interact with air-entrainers, plasticizers, or pigments in ways that affect finish or set. Read the manufacturer’s compatibility guidance and run small batch tests to confirm color stability, air content, and bond behavior when mixing multiple products.
Follow safety basics: wear suitable PPE (gloves, eye protection, long sleeves), handle chemicals in ventilated spaces, and keep separate storage by chemical family per the product guidance. Keep MSDSs available, document mixing order and doses, and set up a pre-use checklist that includes compatibility checks, PPE, and first-aid steps in case of exposure.
PPE, storage, and disposal
Safety first. Here’s what you need:
Personal Protective Equipment (PPE): Gloves, goggles, long sleeves. Protect your skin and eyes.
Storage: Keep chemicals separated by type. Follow manufacturer guidelines. Cool, dry place. No heat sources or open flames.
Disposal: Don’t dump down drains. Check local regulations. Often, it’s hazardous waste. Use approved disposal methods.
Checking compatibility with colors and admixtures
Before you mix, check if accelerators/retarders play nice with others:
Pigments: Trial mixes are key. Check for color bleed, efflorescence, or staining. Supplier guidance helps.
Air entrainers and fibers: They can affect set time and strength. Do small-batch trials to check workability, slump, air content, and surface texture. Adjust dosages if needed.
Remember, every mix is unique. What works once might not always work. Always test before you go full-scale.
Tools, Materials Checklist and Testing Plan
Gather measuring gear (calibrated scale, graduated containers), mixing tools (drill with paddle, wheelbarrow or tub), finishing tools, curing materials, and PPE before adding any admixture to the job. Include the bagged mix, the accelerator/retarder product with its label and dosage info, clean water, and a small extra sand supply for test patches.
Run a small-scale test pour to verify dose effects: measure slump, set time, surface texture, and any bleed or laitance, and record ambient and mix temperatures. Keep a batch log with dose, lot numbers, test results, and acceptance criteria so you can scale up only after the test meets your documented surface and curing benchmarks.
Essential tools and measuring equipment
Before you start, ensure you have the right tools to maintain dosing accuracy.
- Graduated cylinders or measuring cups: Accurate liquid measurement is crucial for admixtures. Inaccurate dosing can lead to weak surfaces or wasted product.
- Digital scale: Weighing solids ensures consistent dosage. Skipping this can result in under- or over-dosing.
- Thermometer: Concrete temperature affects set time and strength. Monitor it to maintain quality.
- Moisture/weight scale: Check moisture content of sand and aggregates for consistent mix design.
- Water container: Use clean water only. Contaminated water can cause weak surfaces or discoloration.
- Mixing hoe/paddle or drill with mixing attachment: Proper mixing ensures admixtures are evenly distributed, preventing weak spots.
- Wheelbarrow or bucket: Transport and mix small batches for testing. Improper handling can lead to inconsistent results.
- Timer: Monitor set time to ensure finish operations are completed on schedule. Delayed finishing can result in weak surfaces.
Quick rule: Always double-check your tools and measurements before mixing to avoid costly mistakes.
Small-batch testing and record-keeping
Before full-scale application, test admixtures on a small scale to ensure they perform as expected.
- Plan a 1–2 ft³ (0.03–0.06 m³) test pour: This size allows for easy control and observation of the process.
- Perform a quick slump or flow test: Check workability to ensure the mix is suitable for your application.
- Monitor set time with a watch: Record set times to plan finishing operations accurately. Unexpected set times can lead to weak surfaces.
- Observe bleed/laitance: Excessive bleeding or laitance indicates improper admixture dosage, which can weaken the surface.
- Document surface texture and color: Note any abnormalities that could indicate incompatibility with additives or contaminants.
- Take temperature readings of mix and ambient conditions: Temperature affects set time and strength. Record it to maintain consistency.
- Record dosage, batch size, and observed finish: Keep detailed records for each test to identify trends and make adjustments as needed.
Quick rule: Thorough testing and record-keeping ensure consistent results and help troubleshoot any issues before full-scale application.
Practical Next Steps and Trusted Sources
Decide whether the job is a DIY scope or should be contracted based on risk tolerance, time sensitivity, and the complexity of admixture use; plan lead times for materials and a conservative timeline for trial patches and curing. Factor potential waste and rework into your cost and schedule thinking rather than assuming a single trial will prove everything.
Compile a short list of authoritative references—product technical data sheets, MSDSs, and reputable industry guidance—and consult them before full-scale use. Create a simple procurement and timeline checklist that includes dosages to try, PPE, small-batch testing, and go/no-go criteria so you can reduce the chance of weak surface layers and know when to seek professional help.
Budget and time-saving tips
Admixtures like accelerators and retarders can speed up or slow down setting times, but they come at a cost. Here’s when it pays to use them:
Use admixtures when you need to pour in cold weather or want to extend working time for complex forms. They’re worth the extra expense then.
For simple slabs or patios, non-chemical controls like temperature management and proper mixing might be enough. It’s cheaper but requires more planning.
Labor is another cost. Plan around set times. If you use an accelerator, have your crew ready to strip forms as soon as the concrete reaches 50% strength. Retarders give you more time, so schedule reinforcement or other tasks accordingly.
Recent articles and supplier resources
Concrete technology keeps advancing. Stay updated with these resources:
Check manufacturer websites for the latest technical data sheets. They often have guides on using their admixtures effectively.
Read recent industry articles from sources like Concrete Construction, Practical Concrete, or your local university’s extension service.
Join online forums like Concrete Network to learn from other pros and DIYers. They often share tips and troubleshoot issues in real-time.
Conclusion
Using accelerators and retarders the right way matters for a solid, durable surface that won’t crack or delaminate. Focus on safety, follow the plan, and you’ll avoid costly rework and disappointing results.
Check this practical flow in plain terms: confirm bagged mix compatibility, verify the labeled dosage, measure environmental conditions, mix thoroughly in small batches, apply with clean tools using consistent passes, test a small patch first and document how it cures, then scale up if the test looks good while keeping a strict curing routine. Keep notes so you can reproduce the good result and adjust only when you see a real need.
Two or three traps to avoid: overdosing or underdosing the product, skipping a test patch on a real surface, and rushing the mix or cure without proper surface prep. Safety rules are simple: wear eye and skin protection, work in a ventilated area, keep quantities small enough to discard if you see trouble, and never mix beyond the recommended time. If anything looks off, stop and reassess before you proceed.
If the surface is wide, or you’re unsure about compatibility, curing, or potential failure modes, call a pro before you push ahead. Stay practical, follow the plan, and you’ll finish with a surface that’s safe, smooth, and dependable—your future self will thank you for it.
FAQ
What exactly are accelerators and retarders in bagged mix concrete?
Accelerators speed up the set of cement in the mix. Retarders slow it down to give you more working time. Both are used with bagged mixes, but you must follow the label and manufacturer instructions to avoid weakening the surface.
Why is adding water to touch up or retouch surface layers risky?
Adding water can create a weak cap or crumbly top. It can also cause cold joints or inconsistent finish. If you need more time, use a proper retarder per instructions instead of extra water.
How should finishing aids and surface retarders be applied?
Apply finish aids as directed on the product label, usually with a controlled spray or light mist after the initial set. Surface retarders should be applied per the label and allowed to work without wetting the surface again until the product has evaporated and the finish stage begins.
What are sensible alternatives to retempering, and where do chemical additives fit in?
Consider using a controlled retarding product or a finish aid designed for bagged mixes. If you use a chemical additive like a finish-control product, read the label for compatibility and timing. If unsure, check the manufacturer instructions or local guidelines before mixing in.
Why must I wait for the surface retarder to evaporate before finishing?
Finishing on top of a wet or damp surface will trap moisture and weaken the top layer. Wait until the retarder has evaporated or cured as specified, then proceed with finishing tools and methods as directed.