
Introduction
Stucco cracks that follow lath lines are cracks that track along the edges or seams of the metal or wood lath behind the plaster, usually where movement or poor bonding occurred. In plain terms, they’re telling you the crack path is guided by the backing rather than a random surface fault. This usually means the issue is about attachment, bond, or movement at the lath rather than just a surface finish problem.
For a DIY patch strategy you’ll want to expose the crack, assess the lath and substrate, and choose a repair approach that addresses both the surface and the underlying cause. Check product labels and manufacturer instructions for compatible patch materials and follow local rules for structural or exterior repairs if the damage looks extensive.
Key takeaways
- Inspect cracks along lath lines to distinguish hairline versus shifting movement patterns.
- Confirm substrate and lath condition before patching to avoid repeated failure.
- Use appropriate patching method: local repair or lath replacement per diagnosis.
- Safety: wear eye protection and masks when mixing and applying cementitious patch.
- Verify patch adhesion by visual check and gentle probing after cure time.
- Document crack pattern changes to track movement and trigger preventive measures.
Table of Contents
- Introduction
- Key takeaways
- What These Cracks Look Like and Why They Matter
- Root Causes: Attachment, Lath, Substrate, and Movement
- Diagnostic Inspection: Step-by-Step Checklist
- Decide: Localized Patch Vs Partial Re-Lath Vs Full Replacement
- Tools, Materials, and Safety Checklist
- Patch Strategy: Step-by-Step Repair Workflow
- Quality Checkpoints During and After Repair
- Prevention, Maintenance, and Long-Term Strategies
- Conclusion
- FAQ
What These Cracks Look Like and Why They Matter
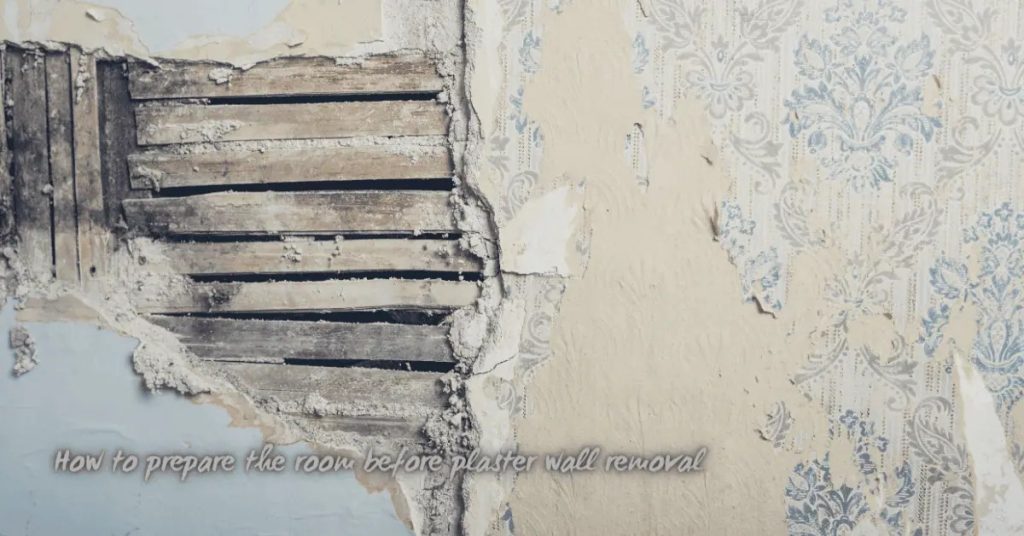
These cracks run in straight or slightly irregular lines that match the layout of the metal or wooden lath under the plaster or stucco. They are not random hairlines from normal drying; they trace the lath fastener lines and show the render is separating from its support.
That pattern matters because separation along lath lines can let water reach the backing and fasteners, degrading weatherproofing and risking rust, rot, or loss of bond to structure. Fixes for surface shrinkage won’t stop this—check the substrate and attachment and follow product datasheets or a pro’s advice before patching.
Visual characteristics and common locations
Lath-line cracks are easy to spot once you know what to look for. They typically run parallel to the lath lines beneath your stucco, following a straight or slightly wavy path.
The width of these cracks usually remains consistent along their length, unlike hairline cracks that can widen at random points. You’ll often find them in common trouble spots like corners, near windows and doors, or under eaves where the lath is more likely to move.
Remember: These aren’t your average shrinkage cracks. They’re wider and follow a distinct pattern.
Why cosmetic fixes often fail
Slapping some joint compound or spackle on these cracks might seem like an easy fix, but it’s usually just a temporary band-aid. Why? Because the problem isn’t just skin deep.
The lath underneath is likely loose or damaged, causing the stucco to pull away from the wall. Or maybe there’s a moisture issue behind the scene, slowly rotting your substrate. Either way, until you address the root cause – be it nail pops, water damage, or poor construction – those cracks will keep coming back.
Lesson learned: Don’t waste time and money on surface patches alone. Get to the heart of the problem first.
Root Causes: Attachment, Lath, Substrate, and Movement
Lath-line cracking usually comes from one or more mechanical failures: fasteners that pulled out, corroded or detached lath, framing movement that flexes the lath, or a failing substrate that no longer holds mechanical bond. Each failure mode leaves telltale signs—loose lath, rust staining, or gaps behind the finish—that explain why the finish separated along the lath line.
Identify which mechanism is primary because the repair differs: corrosion suggests replacement of metal components and fasteners, framing movement may need framing fixes or movement joints, and substrate failure often requires removing to sound backing before patching. When uncertain about material compatibility or load issues, consult manufacturer instructions or a structural/building official for what to verify next.
Fastener and framing problems
The most common cause of lath-line cracking is issues with fasteners and framing. Here’s what to look for:
Loose or backed-out nails, screws, or other fasteners can’t hold the stucco in place. As a result, any pressure on the wall causes it to crack along the lath seams.
Check your fasteners. If they’re loose, tighten them. If they’re missing or damaged, replace them.
Shifted framing can also cause problems. When the frame moves, it pulls on the lath and stucco, creating cracks. Make sure your framing is secure and not moving.
Corrosion, rot, and lath deterioration
Another cause of lath-line cracking is the deterioration of the lath itself. Here’s what to look for:
Rusted metal lath loses its holding power. As it corrodes, it can’t grip the stucco, leading to separation along the lines.
Decayed wood lath also loses its strength and can no longer support the stucco. Check your lath for signs of rot or rust.
If you find damaged lath, replace it. This will help prevent further cracking.
Thermal and structural movement
Differential movement can also cause lath-line cracks to form and reopen. Here’s why:
As temperatures change, materials expand and contract at different rates. This can open the bond between the stucco and the lath, creating cracks.
Similarly, framing shrinkage over time can pull on the lath and stucco, causing cracks to form or reopen.
To mitigate this, ensure your structure is sound and not subject to excessive movement. If you find recurring cracks, consider addressing any underlying structural issues.
Diagnostic Inspection: Step-by-Step Checklist
Start with a thorough visual sweep, then probe cracks with a screwdriver or scraper to see if the finish is bonded or loose and map the extent of delamination. Follow with moisture readings and check fastener heads, lath condition, and any evidence of corrosion or rot.
Document locations, crack width and length, and whether cracking corresponds to framing or lath lines so you can prioritize repairs and track progression over time. If a specific inspection device or threshold matters, check the instrument manual or product label for correct use and interpretation.
Step-by-Step Process
Before you start any concrete work, follow this checklist to ensure a successful project. Use it during preparation, while working, and for final checks.
- Preparation: Check weather forecast. Concrete needs temperatures between 50-90°F (10-32°C) for proper curing.
- Safety first: Wear appropriate PPE: hard hat, safety glasses, gloves, and steel-toed boots. Ensure the site is clear of debris.
- Formwork check: Inspect forms for damage or leaks. Tighten any loose bolts or nails.
- Reinforcement inspection: Verify rebar is properly placed, secured, and follows design specifications.
- Mix design verification: Check concrete mix design on delivery ticket. Ensure it matches your project’s requirements.
- Water-cement ratio check: Ask the plant if they use a water reducer. If not, add one to maintain a proper 0.45-0.60 water-cement ratio.
- Concrete placement: Pour concrete in lifts no more than 12″ thick. Vibrate each lift to remove air pockets.
- Finishing and curing: Strike off, bull float, and power trowel the surface as per finish requirements. Cover with a curing compound or wet burlap within 30 minutes of pouring.
Quick rule: Always check local building codes and manufacturer instructions before starting any concrete work to avoid costly mistakes.
Visual and tactile checkpoints
Before starting any repair or maintenance work on your concrete surfaces, use this checklist to identify potential issues. It’s crucial to catch problems early to prevent costly rework.
- Check for cracks: Visually inspect the surface for hairline cracks or larger ones. Use a magnifying glass if needed.
- Inspect delamination: Gently tap the surface with a hammer and listen for a hollow sound, indicating detachment from the substrate.
- Feel for movement along lath lines: Run your hands over the surface to check for any give or movement, especially along control joints or expansion cracks.
- Look for spalling: Check for flaking or peeling concrete, which can indicate a more significant underlying issue.
- Inspect for efflorescence: White powdery deposits on the surface could signal water penetration and potential damage.
- Check for rust stains: These can indicate reinforcement corrosion, which needs immediate attention.
- Examine trip hazards: Ensure there are no unexpected changes in level or cracks that could cause trips or falls.
- Inspect drainage: Check that water is draining away from the structure properly to prevent pooling and potential damage.
Quick rule: If you find any issues, don’t rush into repairs. Consult a professional if you’re unsure about the cause or extent of the problem. It’s better to be safe than sorry when dealing with concrete.
Moisture, flashing, and window/door interface checks
Before starting any repair work on your lath, use this checklist to inspect for moisture entry points, improper flashings, and faulty interfaces around windows and doors. This will help you understand the root cause of the issue and prevent expensive rework.
- Check window/door sills: Ensure they are sloped away from the interior to direct water outwards. If not, water can seep in and cause moisture issues behind your lath.
- Inspect head flashings: Check if they are properly installed and intact. Missing or damaged head flashings allow water to enter above windows and doors.
- Examine side flashings: Ensure they extend at least 4″ into the wall cavity and are securely attached. Inadequate side flashings let water seep in from the sides of openings.
- Check weep holes: Make sure they are unobstructed to allow moisture to escape. Clogged weep holes can cause water to build up and damage your lath.
- Inspect expansion joints: Ensure they are properly filled and maintained. Damaged or missing expansion joints can lead to cracks that let in water.
- Check for efflorescence: Look for white, powdery deposits on the surface of your lath. This indicates moisture intrusion and needs further investigation.
- Verify proper drainage: Ensure gutters are clean and downspouts are directing water away from the building. Improper drainage can cause water to pool around foundations and enter through cracks or gaps.
- Examine caulking/ sealants: Check if they are intact and properly applied around windows, doors, and other penetrations. Cracked or missing sealants allow water to seep in.
Quick rule: Always remember that water follows the path of least resistance. If you find any gaps, cracks, or improper flashings, address them before proceeding with lath repair work to prevent further damage.
Documentation and severity rating
Use this checklist after completing the initial visual and tactile checks. It helps you record findings and assess repair priorities.
- Record crack locations: Note down where each crack is, using simple descriptions like ‘north wall’, ‘southeast corner’, etc.
- Take photos: Snap pictures of cracks from different angles. Use a ruler or tape measure in the shot for scale.
- Measure crack width: Use a crack gauge to measure the widest part of each crack. Record these measurements.
- Check crack depth: If possible, use a screwdriver or probe to estimate crack depth. Deeper cracks need more attention.
- Note any movement: Check if the crack moves when you push or pull nearby walls or floors. Movement indicates structural issues.
- Check for moisture: Refer back to your earlier moisture checks. If present, note down locations and severity.
- Assess flashing and interfaces: Review your previous checks of windows, doors, and other openings. Note any issues.
- Rate crack severity: Use a simple scale (e.g., 1-5) to rate each crack’s severity based on width, depth, movement, and moisture presence.
Quick rule: Prioritize repairs based on your ratings. Wider, deeper cracks with signs of movement or moisture should be addressed first.
Decide: Localized Patch Vs Partial Re-Lath Vs Full Replacement
Choose a repair scope based on how widespread the failure is, whether the lath and fasteners are sound, and the risk of future movement or moisture intrusion causing recurrence. Localized patching can work for isolated delamination where underlying lath and substrate are intact; partial re-lath or full replacement is needed when corrosion, widespread detachment, or substrate deterioration is present.
Consider expected service life and how visible the repair will be; when in doubt, lean toward a more durable fix for areas exposed to weather or structural movement. If product coverage, structural criteria, or code thresholds affect the decision, check the manufacturer instructions and local code guidance before proceeding.
When a localized patch is reasonable
A localized patch might be your best bet when:
Cracks are short and isolated. They don’t run the length of the lath line or connect to other cracks.
The lath is secure. No wobbling, detachment, or rust. Tap it gently with a screwdriver; it should sound solid.
There’s no sign of moisture intrusion. Check around windows and doors. No mold, warping, or peeling paint.
When to re-lath the affected area
Re-lathing is necessary when:
The lath is detached or rusted. If it’s loose, wobbly, or has visible rust, it needs replacing.
There are multiple parallel cracks. This suggests a systemic issue with the lath that can’t be patched locally.
The cracks are long and widespread. They run the length of the lath line or connect to other cracks. Patching won’t solve the underlying problem.
Signs that full system replacement is needed
Full replacement might be required when:
Widespread lath corrosion is present. If rust is evident across large areas, it’s a sign of systemic failure.
There’s chronic moisture intrusion. Repeated water issues suggest a problem with the system as a whole, not just localized patches.
The weather-resistant barrier (WRB) is compromised. If the WRB has tears, holes, or is missing altogether, it needs to be replaced along with the lath.
Tools, Materials, and Safety Checklist
Gather hand and power tools for removing failed finish and lath, fasteners and replacement lath, appropriate patch mortars and bonding agents, and testing tools such as moisture meters and straight edges. Personal protective equipment—gloves, eye protection, dust mask or respirator, and hearing protection—should be on hand and used according to label directions.
Read product data sheets and manufacturer instructions for the patch mortars, lath, and fasteners to confirm compatibility, cure conditions, and required substrate preparation. If local code or job-specific safety requirements apply, check those resources before starting work.
Visual checkpoints and test pieces
Before you start patching, use this checklist to ensure your repairs will blend seamlessly.
- Check for matching texture: Stucco has many textures. Make sure your new material matches the old.
- Inspect color variation: Stucco can fade over time. Test a small, hidden area to ensure color match.
- Test adhesion: Apply a small test patch. Let it cure, then tap it gently. No hollow sound? It’s good.
- Confirm finish compatibility: Ensure your new material accepts the same finish (smooth, rough) as the existing stucco.
- Check for proper curing time: Curing too fast can cause cracks. Test patch should cure at same rate as existing.
- Inspect for moisture issues: Moisture can ruin repairs. Ensure area is dry before starting.
- Verify lath condition: Underneath your test patch, check lath isn’t damaged or rusted.
- Examine window/door interfaces: Ensure no gaps or moisture issues around openings.
Quick rule: Always do test patches first. It saves time and money in the long run.
Material compatibility and selection guidance
Matching your existing stucco system is crucial for a lasting repair.
- Identify mix type: Is it traditional three-coat, one-coat, or something else? Match the old.
- Check bond coats: Ensure new material bonds well with existing. Follow manufacturer’s advice.
- Verify lath/fastener compatibility: New materials should work with your existing lath and fasteners.
- Confirm manufacturer instructions: Always follow the manufacturer’s guidelines for best results.
- Check local codes: Some areas have specific stucco requirements. Make sure you’re in compliance.
- Inspect for proper curing agents: Curing agents help prevent cracks. Ensure your new material has them.
- Examine additives: Stucco can have various additives (pigments, accelerators). Match the old if possible.
- Check for proper sand content: Too much or too little sand can cause problems. Match the old.
Quick rule: If in doubt, consult a professional or the manufacturer. Better safe than sorry.
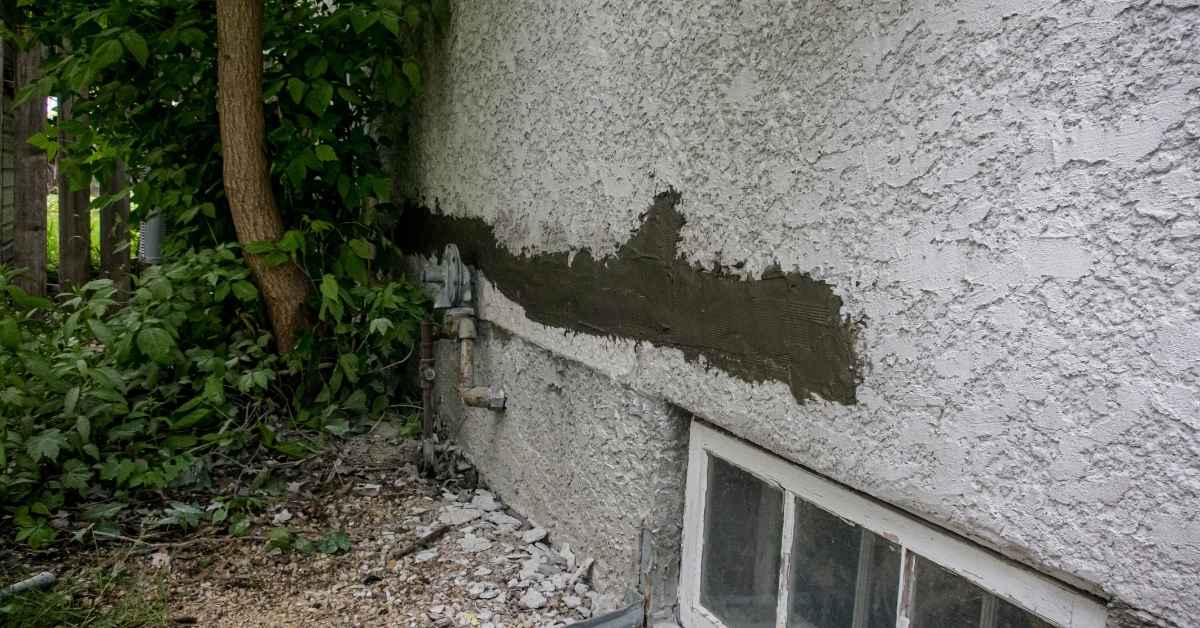
Patch Strategy: Step-by-Step Repair Workflow
Begin by removing loose finish and any failed lath until you reach sound backing; clean and dry the area before installing new lath or re-securing existing lath with appropriate fasteners. Rebuild the scratch and brown coats in layers compatible with the original system, using bonding agents where the manufacturer specifies them and maintaining proper thickness and overlap.
Finish with a color coat or texture that matches the surrounding surface, and protect the repair from weather during cure as the product instructions require. If you encounter unexpected conditions such as concealed rot or framing issues, stop and verify repair options with product data sheets or a qualified professional.
Step-by-Step Repair Process
This section guides you through the practical steps to repair your stucco cracks, from preparation to final checks.
- Inspect and prepare: Safety first! Clear the area, wear protective gear. Check for moisture and document damage.
- Remove failed material: Use a grinder or chisel to carefully remove damaged stucco, exposing lath.
- Prepare substrate: Clean exposed lath, ensure it’s sound. Remove any rusted fasteners.
- Repair or replace lath/fasteners: Follow the next section for detailed steps. If unsure, consult a pro.
- Apply bond coat and layers: Once substrate is ready, apply bond coat, scratch, brown, and finish coats as described in the following sections.
- Cure properly: Keep patched area moist (cover with plastic) for 72 hours to allow proper curing. Do not let it dry out too fast!
- Inspect and touch up: After curing, inspect your work. Touch up any areas as needed.
- Cleanup: Remove all debris, tools, and protective gear.
Substrate and Lath Repair or Replacement Steps
Exposing and assessing the lath is crucial before repairing cracks. Here’s how to do it safely and effectively.
First, use a utility knife or chisel to score and remove damaged stucco. Be careful not to damage lath further. Once exposed, inspect for rusted fasteners or weak spots.
Remove any failed sections of lath using wire cutters or tin snips. Reinforce remaining lath with new pieces if necessary. Use galvanized nails or staples to prevent future rusting.
Reinstall or reinforce lath, ensuring it’s securely fastened and properly spaced (usually 6″ on center). Check for level and alignment before proceeding with patching.
Applying Bond Coat, Scratch, Brown, and Finish Layers
The order of mortar layers is crucial for a strong, durable patch. Here’s how to apply them correctly.
First, mix and apply bond coat, ensuring it adheres well to the exposed lath. Allow it to set slightly before proceeding.
Next, apply scratch coat. This layer provides the base for your final finish. Use a hawk and trowel to spread it evenly, creating grooves (scratches) with the edge of your trowel.
After the scratch coat has set, apply brown coat. This layer smooths out any imperfections and provides the base for your final finish. Ensure you feather this layer into existing stucco to avoid a visible patch.
Finally, apply your finish coat. Match the texture of existing stucco as closely as possible. Allow each layer to cure according to manufacturer’s instructions before proceeding with the next.
Matching Texture and Paint/Finish Considerations
Matching texture and paint is crucial for a seamless repair. Here are some tips to ensure compatibility and breathability.
First, sample your existing stucco to determine the exact texture and finish. Use these samples as guides when mixing and applying new material.
When painting, use a breathable paint to prevent trapping moisture behind the finish. This can lead to further damage if not addressed properly. Always prime before painting to ensure even coverage and adhesion.
If you’re unsure about matching textures or finishes, consider hiring a professional painter or stucco contractor for assistance. They have the tools and experience needed to achieve a seamless repair.
Quality Checkpoints During and After Repair
During the repair, confirm each layer is fully keyed and bonded, fasteners are properly driven and spaced, and the surface is true to adjacent areas using straight edges and tactile checks. Perform adhesion tests or pull checks where appropriate and monitor moisture levels before closing up finishes.
After completion, walk the area to look for hairline re-cracking, check that flashings and joints are intact, and document the repair locations and materials used for future inspections. If you need exact test methods or acceptance criteria, consult the product data sheet or testing standard for the material used.
Short-term monitoring and performance indicators
Use this checklist in the weeks and seasons following your repair to ensure it’s holding up.
- New hairline cracks: Check for any new, fine cracks around the repaired area. If present, they may indicate a problem with adhesion or substrate movement.
- Staining: Look for discoloration or water marks on or near the repair. This could signal moisture issues behind the stucco.
- Delamination: Gently tap the repaired area with a handle of a trowel. A hollow sound indicates delamination, where the stucco is separating from the substrate.
- Texture match: Compare the texture of the repair to the surrounding stucco. If it’s noticeably different, you may need to touch up or redo the finish layer.
- Paint/finish adhesion: Gently pull on any paint or finish around the repair. If it lifts easily, there might be an issue with adhesion.
- Moisture content: Check for signs of excess moisture in the repaired area, such as mold or mildew growth.
- Sealant integrity: Inspect any sealants used around the repair to ensure they’re intact and not allowing water intrusion.
- Expansion/contraction: Monitor the repair during temperature changes. Stucco expands and contracts with heat and cold, so new cracking could be due to normal movement.
Quick rule: Regular inspections in the first few months are crucial for catching any issues early.
When to retest or reopen a repair
Use this checklist if you suspect the initial repair didn’t address the root cause, or if new problems arise.
- Recurring lath-line cracks: If cracks along lath lines reappear, it might indicate that the underlying issue (like movement in the wall) wasn’t resolved.
- New separation: Check for any new gaps or separations between the stucco and the substrate. This could signal a failure of the bond coat or a problem with the lath.
- Water intrusion: Look for signs of water getting behind the stucco, such as stains on the interior walls or peeling paint.
- Bulging or warping: If the repaired area is bulging or warping, it could indicate a problem with the substrate or a failure of the repair.
- Cracking at corners or joints: Cracks at these points might signal a problem with the expansion joint system or movement in the wall.
- Efflorescence: White, powdery deposits on the stucco could indicate water intrusion and a potential salt buildup behind the stucco.
- Soft spots: If the repaired area feels soft or spongy, it might indicate a problem with the substrate or moisture behind the stucco.
- Fungal growth: The presence of mold or mildew could signal excess moisture and a potential problem with the repair.
Quick rule: If you notice any of these signs, don’t wait – retest or reopen the repair immediately to prevent further damage.
Prevention, Maintenance, and Long-Term Strategies
Reduce the chance of future lath-line cracks by ensuring proper flashing and drainage, installing movement joints where required, and using corrosion-resistant lath and fasteners in exposed conditions. Regularly inspect vulnerable areas—seams, penetrations, and transitions—and repair small issues before they allow moisture to reach the lath or substrate.
Document a maintenance schedule and keep records of coatings and repairs to spot patterns over time that indicate systemic issues. For product-specific coating or joint placement guidance, follow the manufacturer instructions and check local building rules when planning long-term upgrades.
Improving drainage and flashings to reduce moisture risk
Moisture is the enemy of your stucco. It can seep in, cause lath deterioration, and lead to those pesky cracks along lath lines.
Flashings are your first line of defense. They should be properly installed around windows, doors, and other openings. Check they’re tight, without gaps or tears. If not, seal them with a flexible caulk.
Next, drainage. Water should flow away from your walls, not towards them. Ensure gutters are clean and downspouts direct water far enough from the foundation. If not, consider adding extensions or regrading the ground.
Lastly, ensure your foundation is well-sealed. Any cracks here can let moisture seep in. Seal them with a masonry sealant to keep your walls dry.
Movement joints and design considerations
Stucco moves. It expands in heat, contracts in cold. Control joints help manage this movement, reducing stress on the stucco and lath.
Ensure control joints are properly spaced. They should be about 8-10 feet apart horizontally and vertically. If yours are too far apart, consider adding more.
Also, ensure they’re deep enough. They should go through the entire stucco layer to the lath. If not, you might need to cut them deeper.
Lastly, detail matters. Corners and intersections are high-stress areas. Ensure they’re properly reinforced and detailed to handle movement.
Routine maintenance schedule and what to inspect annually
Preventing lath-line cracks is easier than fixing them. A yearly inspection can catch issues early.
Flashings first. Check they’re still tight, without gaps or tears. Seal any with a flexible caulk.
Next, sealants. Around windows and doors, check the sealant is still intact. If not, replace it to prevent moisture intrusion.
Lastly, stucco. Look for small cracks. If they’re less than 1/8 inch wide, you can probably seal them with a flexible acrylic paint or caulk. Wider cracks might need professional repair.
Conclusion
Cracks that follow lath lines are a sign you may be dealing with movement or poor attachment, so fixing them correctly protects safety, appearance, and long-term durability. Correct diagnosis and a solid patch plan keep water out, prevent further cracking, and save you from costly mistakes later.
Start by verifying the pattern and scope: check if the cracks stay along a lath line, note any related movement or bulging, confirm the condition of the lath, substrate, and fasteners, then decide whether you can patch locally, need a partial re-lath, or a full replacement. Gather the approved tools and materials, prep the area, follow the repair workflow step by step, test a small area first, and then widen only as needed. After patching, perform quality checks during cure, then seal, finish, and monitor the repaired spot as part of your maintenance routine.
Common mistakes to avoid are skipping a proper inspection, underestimating movement, and rushing the patch without adequate cure or moisture control. Safety rules to follow are always turn off and lock out power near the work area, wear eye protection and a dust mask, and test a small area first to confirm there is no hidden damage before you proceed. If you encounter loose lath, significant substrate failure, or persistent movement despite a patched area, stop and call a professional instead of pushing on alone.
When in doubt, or if the crack reappears after a repair, bring in a pro for a proper re-lath or replacement. Stay conservative, follow the diagnostic steps, and you’ll wrap this with a solid, durable finish. Move forward with confidence and keep the project safe and under control.
FAQ
How do I confirm cracks follow lath lines and what does that tell me?
Look for cracks that align with wall lath or grid lines. If they run in straight, narrow bands, that usually points to lath attachment or substrate movement rather than random settling. Verify by tapping around the crack and checking for hollow sounds or loose material.
Can I patch without re-lathing if cracks are shallow and follow lines?
For shallow cracks along lath lines, you can often patch without full re-lathing, but you must follow the patch plan exactly. Check manufacturer instructions and local rules for patching over existing lath. If in doubt, consult the product label and look for guidance on acceptable substrates and preparation.
What patch approach should I use if cracks are along lath joints but not across the whole wall?
Use a localized patch that targets the crack, backing with appropriate reinforcing material if needed. Clean the crack, apply a compatible patch compound, and embed any mesh or lath-friendly mesh as directed by the product instructions. Don’t skip the prep or cure steps the label requires.
What signs indicate I need partial replacement or full re-lath?
If you see loose or rusted lath, obvious attachment failures, or widespread movement beyond shallow cracks, plan for more than a patch. Follow the guidance on the patch materials and local rules for when re-lath or full replacement is required. Always clear and document the condition before proceeding.