

Introduction
Seam ghosting after painting is when joint lines, tape, and seams remain visible through the paint due to differences in texture, sheen, or how light hits the surface.
This happens when the joint material and surrounding wall reflect light differently, or when the paint film doesn’t level over the seam. It’s common after patching and can look like a subtle highlight or a dark line.
To prevent it, sand smooth, seal or prime the joints, and use proper taping and even paint application in thin coats. If it shows up after the fact, feather the edges with careful sanding, touch up with matching primer on the seam, and repaint with steady, even strokes. If lighting makes it stand out, try adjusting the room lighting or re-check the texture and joint work to keep the surface uniform.
Key takeaways
- Seam ghosting are visible joint lines after painting caused by lighting and texture.
- Inspect seams early to prevent ghosting by proper taping and mudding techniques.
- Retouch fading spots with compatible primer and recoat to equalize sheen.
- Use low-luster paints or flat finishes to minimize glare on seams.
- Mask lighting angles during painting to reduce shadow lines along joints.
- Safety: wear dust masks and eye protection when sanding or scraping repairs.
Table of Contents
- Introduction
- Key takeaways
- What Is Seam Ghosting and Why It Matters
- Common Causes of Seam Ghosting
- Tools and Materials Checklist
- Step-by-Step Repair Process for Existing Seam Ghosting
- Painting and Priming Techniques That Hide Seams
- Preventive Measures During Drywall Installation and Finishing
- Safety, Dust Control, and Cleanup During Repair
- Cost, Time Commitment, and When to Hire a Pro
- Conclusion
- FAQ
What Is Seam Ghosting and Why It Matters
Seam ghosting is the visible line that can appear where drywall joints meet painted surfaces. Light plays across the wall and reveals contrasts along the joint line, especially on flat panels or where texture is uneven. This phenomenon affects how the paint looks and how solid the surface feels to the eye.
Ghosting matters because it influences perceived quality, surface uniformity, and the appeal of the room when viewed from typical angles and lighting. It can impact resale value or how the space is experienced in person and in photos. common causes include texture mismatches, tape showing through, sheen or color differences, sanding gaps, and incomplete priming or sealing.
Visual characteristics to look for
Seam ghosting isn’t always obvious. Look for:
- Visible lines running parallel across your wall or ceiling.
- Shadows cast along joint lines, especially in low light.
- Uneven sheen or gloss along joints, even if barely noticeable.
Distinguish ghosting from texture: Ghosting shows up as straight lines. Texture is random and uneven.
How lighting and viewing angle make seams visible
Lighting plays a big role in seam ghosting:
- Directional light, like sunlight through windows, can highlight joints.
- Low-angle grazing light, such as from floor lamps or high ceilings, emphasizes imperfections.
- High-sheen finishes reflect light differently, making joints stand out more.
Viewing angle matters too: Check seams from different angles. Kneel down, stand on a ladder – see how they look.
Common Causes of Seam Ghosting
Finish and sheen mismatch occurs when joints and surrounding areas have different reflective properties. The choice of topcoat and pigment depth can steer light into line-like reflections that look like a seam. Surface porosity also plays a role in how light scatters across edges.
Substrate prep and moisture affect how the surface accepts paint and how light bounces off it. Uneven patches, uncured materials, or moisture behind the coating can sharpen seam lines after drying. Tape, mesh, and joint treatments that aren’t flush can catch light and read as lines, too.
Tape, joint compound, and insufficient embedding
Poor tape embedding is a common culprit behind seam ghosting. If the tape isn’t fully embedded in the joint compound, it creates a slight ridge that catches light.
Using thin or thick mud layers also leads to issues. Thin layers may not fill the gap properly, while thick layers can create a raised edge after sanding.
Solution: Ensure tape is fully embedded by using a joint knife with a straight edge and applying even pressure. Use appropriate mud layer thickness for your joint width.
Sanding, feathering, and edge build-up mistakes
Over-sanding, under-feathering, or creating ridges at edges can all lead to seam ghosting. These mistakes produce light-catching transitions that appear as ghosts.
- Over-sanding: Removes too much compound, leaving a shallow valley that catches light.
- Under-feathering: Leaves sharp edges where tape meets drywall, creating a distinct line.
- Ridges at edges: Form when excess compound builds up along the edge of the tape, creating a raised line.
To avoid these mistakes, sand lightly and evenly, feather out your joint compound, and check for build-up along edges.
Substrate alignment, board edges, and texture mismatch
Uneven drywall edges can create visible seams. Recessed or raised tape also contributes to the issue.
Texture mismatch: If your walls have an existing texture, applying a smooth finish over it can highlight seams. Conversely, applying a textured finish over smooth walls can make seams stand out.
To minimize these issues, align drywall edges as closely as possible during installation. Ensure tape is level and flush with the wall surface. If using different finishes, consider skim coating or sanding to create a more uniform base before painting.
Tools and Materials Checklist
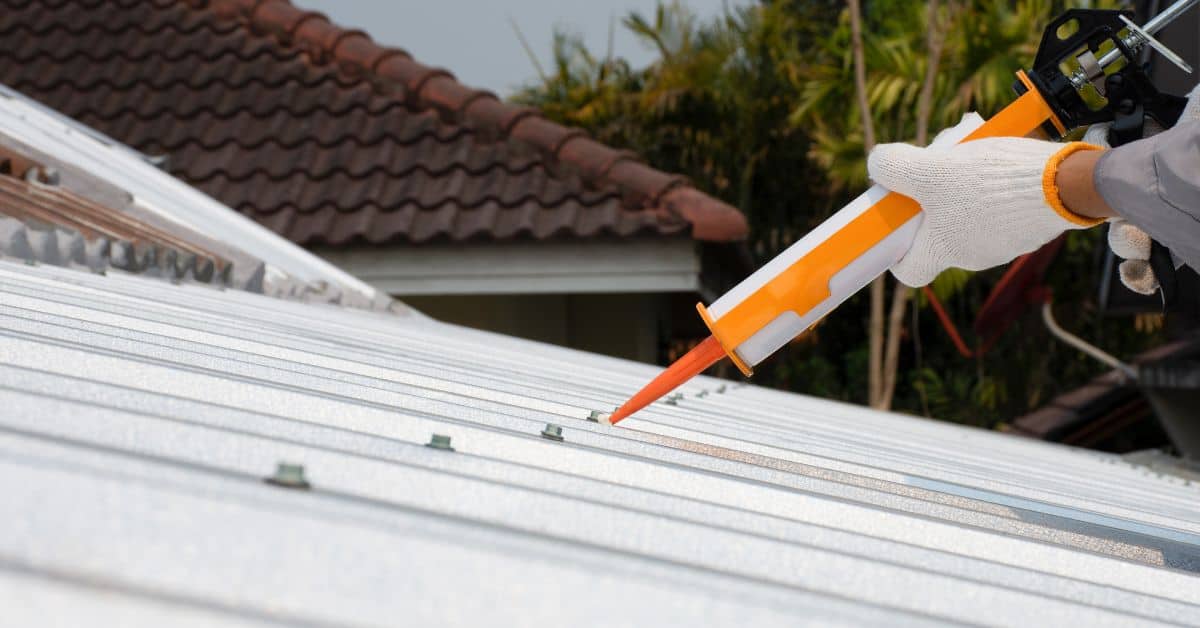
Core materials to prevent ghosting include a stain-blocking primer compatible with the topcoat and a high-build patch compound to even out joint appearances. Choose products that work well with the expected sheen to minimize light differences. Have a reliable patching option ready for quick corrections.
Patch materials for joints should be available with backer rods or mesh tape and different setting times. Sealing and finishing options should align with the sheen and curing needs of the repair. Keep a range of application tools and cleanup supplies ready for fast work and tidy results.
Essential tools
Before you start your concrete project, ensure you have all the essential tools at hand. This checklist will help you verify that you’re well-equipped to tackle any task.
- Taping knives (4″, 6″, 12″): Check blade condition; replace if dull or bent. Ensure you have sizes needed for your project.
- Sanding blocks (coarse, medium): Inspect for wear; replace sandpaper as needed. Check grit size matches job requirements.
- Poles (extension and magne-tip): Verify length is suitable for your project. Test magnet strength on metal surfaces.
- Lighting: Ensure you have enough portable lights to inspect work in low-light conditions. Check batteries are fresh.
- Tape measure (25′, 30′): Confirm accuracy by measuring known distances. Tape should be undamaged and easy to read.
- Level (4′, laser): Test level’s accuracy using a known flat surface. Ensure laser level has fresh batteries.
- Shovel, rake, broom: Inspect tools for damage; replace if needed. Check tines/bristles are intact and flexible.
- Wheelbarrow: Test wheel functionality; ensure it rolls smoothly. Check tire pressure and tread condition.
Quick rule: Always inspect tools before starting work to avoid costly delays and rework due to faulty equipment.
Materials and recommended primers/paints
Use this checklist before starting your drywall finishing project to ensure you have the right materials. Check each item off as you gather them.
- Joint Compound: Check product label for setting time (15-90 minutes) and choose based on your project’s needs. Thinner compounds are easier to sand, thicker ones offer better coverage.
- Tape (Paper or Mesh): For most projects, use paper tape. It’s cheaper and easier to work with. Mesh tape is stronger but more expensive. Check tape width (3/4″ – 2″) matches your joint compound’s recommended width.
- Primer: Choose a primer that blocks odors and stains, especially for new drywall or problem areas. Check manufacturer instructions for application methods and drying times.
- Paint Sheen: Select paint sheens based on the room’s function. Flat/Matte (living room), Eggshell/Satin (kitchen/bathroom), Semi-Gloss/Gloss (trim). Check paint labels for light reflectivity and durability.
- Sandpaper/Grit: For most projects, use 120-grit sandpaper. Check your joint compound’s recommended grit for best results.
- Putty Knife Set: A set of 4″ – 6″ – 8″ putty knives is essential. Check knife flexibility and blade width to match your project needs.
- Joint Tape Applicator: Optional, but helpful for applying joint tape evenly. Check product reviews for ease of use and compatibility with your joint compound.
- Protective Gear: Safety glasses, dust mask, work gloves, and ear protection (for sanding). Check gear for proper fit and functionality before starting.
Quick rule: Always check product labels and manufacturer instructions to ensure you’re using the right materials for your specific project. Skipping this can lead to poor results or expensive rework.
Step-by-Step Repair Process for Existing Seam Ghosting
Start with a clear assessment of every ghosted joint under grazing light. Note width, location, and whether texture changes contribute to the visibility. Distinguish structural movement from cosmetic issues before choosing a fix.
Contain and prep the area, remove loose paint, and abrade lightly to improve adhesion. Check for moisture or movement that could reappear after repair, and plan the repair method accordingly.
Step-by-Step Repair Process
This section guides you through a clear, numbered sequence of practical steps to repair existing seam ghosting. From preparation and safety checks to the main work and final cleanup, these are realistic DIY/home-improvement actions.
- Assess and document all ghosted joints under grazing light. Note their width, location, and any differences in texture or paint layer at the seam. Determine if the issue is structural or just cosmetic.
- Protect surrounding surfaces with drop cloths or tape. Remove loose paint using a scraper or sandpaper. Lightly abrade the area to promote adhesion.
- Test for moisture or structural movement that could reappear after repair. Use a moisture meter and tap the seam gently to listen for any hollow sounds.
- Decide on your repair approach: skim coat with joint compound, embedded fiberglass mesh or paper tape, and/or re-taping the seam. Plan for multiple thin coats rather than a single heavy fill.
- Smoothly sand the repaired area, vacuum dust, apply a stain-blocking or sealer primer to the repaired seam, and re-check under grazing light before proceeding with final paint.
- Apply a test patch of finish paint with the same sheen. Inspect at grazing angles to confirm the seam no longer shows. Repeat priming/painting as needed until the light test passes.
- Re-evaluate after curing, ensure consistent texture and color match, and note preventive measures for future projects.
Prep and assessment under proper lighting
To accurately assess seam ghosting, set up grazing lights by placing a bright light source at a low angle to the wall. This will help you locate all problem areas.
Mark each ghosted joint with a pencil or painter’s tape for easy reference during repair. Check if partial rework is sufficient or if full re-taping and mudding are needed.
If the seam is wider than 1/8 inch, or if there are multiple issues along the same seam, consider full rework. Otherwise, partial rework may be enough.
Re-taping, re-mudding, and feathering techniques
If full rework is needed, start by removing the old tape using a utility knife or sandpaper. Apply new tape, ensuring it’s well-embedded in joint compound.
Apply compound in thin layers, allowing each layer to dry completely before sanding lightly. This helps prevent ridges and ensures proper adhesion.
When feathering edges, use a wide putty knife (6-inch or wider) to blend the compound into the wall. Work from the center of the seam outwards in smooth, even strokes.
Sanding, touch-up, and final inspection
Use this checklist after sanding to ensure a smooth finish and no remaining ghosting.
- Check for ridges or flats: Run your hand along the seam. Any raised areas need more sanding; any flat spots may need additional compound.
- Inspect for missed spots: Re-check under grazing light to ensure no ghosting remains. Use a magnifying glass if needed.
- Check for dust: Wipe the area with a damp cloth to remove any remaining sanding dust.
- Test for proper adhesion: Gently tap the seam. It should sound solid, not hollow.
- Inspect tape edges: Ensure tape is fully embedded and no edges are visible.
- Check for moisture: If you initially found moisture, re-test to ensure it’s gone before painting.
- Ensure consistent texture: Compare the repaired seam to surrounding walls. Sand or add more compound as needed.
- Confirm color match: Once painted, check that the repaired area matches the surrounding wall color.
Quick rule: Always re-check your work under grazing light to ensure no ghosting remains before applying final paint.
Painting and Priming Techniques That Hide Seams
Primer helps even out porosity and blocks stains, creating a uniform base to reduce light differences at joints. Use a primer that matches the intended finish and is compatible with the topcoat you plan to apply.
Apply primer with methods that promote even film thickness, then select finishes with lower glare. Ensure joint compounds and tapes are properly sealed and primed to minimize differential absorption and color shifts.
Primer selection and application tips
A good primer is your first line of defense against seam ghosting. It evens out porosity, blocks stains, and creates a uniform base for paint.
Use stain-blocking primers to tackle discolorations or water marks. For new drywall, adhesion primers help seal the surface and prevent paint from peeling.
Coverage: Apply primer in thin, even coats. Too thick and it’ll crack; too thin and it won’t do its job.
Let each coat dry according to manufacturer’s instructions before applying the next one. This usually takes around 30 minutes to an hour.
Paint type, sheen choice, and application method
For hiding seams, opt for low-sheen or matte finishes. They reflect less light, minimizing the appearance of joints.
Consistency is key. Use the same paint color throughout to avoid any shifts in hue that might highlight seams.
Application: Use a roller or sprayer for even coverage. Back-rolling or back-brushing helps create a uniform film and reduces lap marks.
Let each coat dry according to the manufacturer’s instructions before applying the next one. This typically takes 2-4 hours, depending on humidity and temperature.
Preventive Measures During Drywall Installation and Finishing
Identify root causes of seam ghosting during painting, including mud shrinkage, premature tape exposure, and lighting angles that reveal uneven surfaces. Understanding these helps prevent issues before they start.
Detail joint techniques such as embedding and the number of mud coats with proper feathering. Plan sequencing to control moisture, dust, and finish quality so joints stay concealed under typical lighting.
Best practices for taping and mud application
Embedding tape correctly is crucial. Use a wide, flexible knife – at least 12 inches – to press the tape firmly into the joint compound. This ensures no air pockets form under the tape, which can cause bubbles or ridges.
Timing your mud layers right is key. Apply the first coat thinly, let it dry (usually 24 hours), then apply a second, wider coat. Feather the edges of this coat into the wall to minimize ridges.
Use a flexible knife for the final skim coat. This helps achieve a smooth, consistent finish. Remember, patience and consistency are your best tools here.
Planning, inspection, and lighting checks before painting
Before you grab that paintbrush, inspect your work. This is when you catch high spots, pinholes, or chalking. Do this under raking light, like late afternoon sun or a flashlight held at an angle.
- Check for high spots – use your fingers to feel for bumps.
- Look out for pinholes – these can be filled with a little more mud and sanded smooth.
- Inspect all joints and corners for any missed spots or ridges.
- Ensure all touch-up areas are marked clearly.
- Confirm your primer is dry (usually 24 hours) before painting.
- Double-check that you’ve sanded lightly and vacuumed off any dust.
- Verify all joints are sealed with a light-blocking primer to prevent ghosting.
- Make sure your final sanding is smooth and even.
Quick rule: Never rush this step. A thorough inspection now saves you from rework later.
Common mistakes to avoid
Here are some pitfalls to steer clear of:
- Skipping primer – This leaves your drywall porous, causing paint to absorb unevenly and ghost.
- Using high-sheen paint too early – High sheen highlights imperfections. Stick with flat or eggshell until you’re sure your joints are perfect.
- Poor sanding – Incomplete sanding leaves rough spots that show through paint. Always sand lightly and evenly.
- Rushing drying times – Skipping proper drying time between coats causes ghosting. Be patient, let it dry as recommended.
Remember, prevention is cheaper than cure. Take your time and do it right the first time around.
Safety, Dust Control, and Cleanup During Repair
Outline essential PPE and tool safety practices for sanding and compound work. Protect eyes, lungs, and skin, and take breaks to prevent fatigue during repetitive tasks. Check tool grips and cords to avoid accidents on the job.
Implement a dust management plan with containment and vacuuming. Ventilate the space to minimize buildup, and avoid blowing dust with air; long-term occupancy considerations should be reviewed before reuse.
Personal protective equipment and ventilation
The right gear keeps you safe from dust and debris. Here’s what you need:
- Eye protection: Safety glasses or goggles to shield your eyes from dust and particles.
- Respirator/Dust mask: A P100 respirator or N95 dust mask is crucial for fine silica dust. Rentals start at $20/day.
- Gloves: Protect your hands with work gloves, around $5-$10 a pair.
- Hearing protection: Earplugs or earmuffs to safeguard against tool noise, typically $10-$20.
- Proper clothing: Long sleeves and pants to minimize skin exposure. Consider disposable coveralls for $5-$10 each.
Dust control, cleanup, and proper disposal
Controlling dust is key to a safe and clean workspace. Start by sealing off the work area with plastic sheeting or drop cloths. This limits dust migration to living spaces.
Use a shop vacuum with a HEPA filter for effective dust collection. Rentals start at $30/day. Wet wipe surfaces with damp rags to capture remaining dust particles.
For safe disposal, double-bag collected dust and waste in heavy-duty plastic bags. Seal tightly and dispose of according to local regulations. Always check for recontamination before repainting. A quick post-repair inspection checklist includes:
- Wipe surfaces with a damp cloth
- Check for missed dust or residue
- Ensure all tools are cleaned and stored properly
Cost, Time Commitment, and When to Hire a Pro
Break down materials versus labor to understand potential costs and how bundled purchases can reduce waste. Consider regional variations without relying on fixed price assumptions. Look for opportunities to reuse tools and materials where possible.
Estimate the time for each phase and leave room for humidity or substrate absorption. Identify factors that raise complexity, such as widespread ghosting or moisture behind coatings, and determine when professional protection or guarantees are prudent.
Cost factors: prevention vs remediation
Preventing seam ghosting is cheaper than fixing it. Here’s why:
Materials: Preventive measures like proper taping, mudding, and sealing use common drywall supplies. Fixing ghosting needs specialized patching compounds, primers, sealers, and sometimes moisture barriers.
Labor: Prevention takes less time as it’s part of the regular finishing process. Remediation requires extra labor for surface inspection, repair, priming, painting, and final touch-ups.
Bundled purchases can save on materials, but rework due to improper initial care can offset these savings.
Time estimates and project planning considerations
Plan for each phase of your project:
Prep & Masking (1-2 days): Inspect surfaces, mask off areas, and prepare tools.
Surface Inspection & Repair (1-5 days): Assess damage, apply repairs, let dry. Humidity can extend drying times.
Priming/Moisture Treatment (1 day): Apply primer or moisture barrier, let dry. Substrate absorption may add time.
Painting/Resealing (1-2 days): Paint or reseal, let cure. Follow manufacturer’s guidelines for optimal drying times.
When to call a professional
Hire a pro when:
Large areas or complex repairs: Extensive ghosting across multiple seams or hard-to-reach joints can be time-consuming and tricky for DIYers.
Structural issues: Moisture, efflorescence, or structural movement behind the paint may require professional assessment and remediation.
Persistent ghosting: Recurrent problems despite previous attempts at repair might indicate underlying issues best addressed by a pro. Their guarantee can provide peace of mind.
Conclusion
Paragraph 1: Fixing seam ghosting is about making the joints disappear with solid, safe work you can trust over time. Do it right and you’ll get a clean, durable finish that looks good under any light.
Paragraph 2: Start by assessing the area, then gather the right tools and materials, and test a small spot first. Move in a practical order: clean the surface, repair or fill the seam, sand smooth, apply a primer, then paint and recheck the lighting effect. If the patch looks even in natural and artificial light, you’re ready to finish the room.
Paragraph 3: Common mistakes to avoid include over-sanding or removing too much material, skipping dust control, using the wrong compound or primer, and rushing the cure times or paint coats. Always follow safety rules, keep the work area clean, and test a small area before committing to the whole wall.
Paragraph 4: If you’re dealing with widespread damage, persistent moisture, or compromised structural work, it’s wise to call a pro. When in doubt, don’t push on overhead or risky tasks; focus on small, reversible steps instead. With careful planning and steady work, you’ll restore a consistent look and keep future repairs simple and affordable.
FAQ
What exactly is seam ghosting after painting, and how do I recognize it?
Seam ghosting is the faint line that shows where drywall joints were taped, mudded, or covered by paint. You’ll see a lighter or darker edge along the seam when the lighting hits the wall. If you can spot a thin line that wasn’t there before painting, you’re seeing ghosting.
What causes seam taping to remain visible after painting, and how can I prevent it?
The fault lies in how the joint compound, tape, and paint interact with light and the wall surface. Poor mud layering, insufficient sanding, or not sealing the tape can let the edge reflect differently. Prevention means proper taping technique, thorough sanding, and using a compatible primer and paint that hide edges well.
Which paint and primer choices help reduce ghosting, and what should I check on the labels?
Choose paints and primers that are designed for drywall finishes and have good opacity. Check the label for coverage claims and recommendations for joint areas. If in doubt, follow the manufacturer instructions or ask the store for guidance on hiding seams with your chosen products.
What are practical repair and retouch steps to fix visible seams after painting?
Sand the seam area smooth, reapply joint compound as needed, and feather the edges. Reprime lightly, then repaint with even coats, paying attention to light direction to avoid new highlights. If the problem persists, reassess surface preparation and consider a higher-opacity primer or alternative finish per product instructions.