

Introduction
Bush-hammered concrete finish is a textured surface created by striking the concrete with bush-hammer tools to expose the aggregate and create a rough, irregular pattern. This guide helps you think through what tools work, how to control dust, and where the finish makes sense in a DIY project. You’ll find practical notes on safety and choosing surfaces that respond well to this technique.
Tools range from hand-held bush hammers to powered hammers or machines, with variations in weight and hammering action. Plan for solid dust control by localizing work areas, using extraction where possible, and wearing a respirator or mask and eye protection. Check the surface type and condition to ensure the finish will hold, and always follow the manufacturer instructions and local rules for equipment and safety.
Key takeaways
- Inspect substrate for hollows or laitance before starting bush hammering.
- Select between manual hammer and machine: balance noise, vibration, and access constraints.
- Protect dust with enclosures, local exhaust, and water mist where feasible.
- This finish suits worn floors, exposed aggregates, and outdoor surfaces.
- Budget time for dry matching, curing, and quality checks during final review.
- Always wear PPE and stop if vibration or dust becomes uncomfortable.
Table of Contents
- Introduction
- Key takeaways
- What Is a Bush-Hammered Finish?
- When a Bush-Hammered Finish Makes Sense (Applications & Benefits)
- Tools and Equipment — Manual Vs. Machine
- Tools and Materials Checklist (DIY and Professional)
- Dust Control, Silica Risk, and Regulatory Standards
- Step-by-Step Technique and Quality Checkpoints
- Safety Guidelines Specific to Bush-Hammering
- Cost, Maintenance and Project Planning Considerations
- Conclusion
- FAQ
What Is a Bush-Hammered Finish?
A bush-hammered finish is defined by repeated impact with a bush hammer, creating a uniform micro-pitted surface. The result is a slightly rough, durable texture that provides good slip resistance. It differs from exposed aggregate, where visible stones dominate the surface, and from sandblasted finishes that remove more paste to expose texture differently.
The texture shows micro-pitting with a matte or low-sheen look and tends to read evenly across large areas. Shade, aggregate color, and how aggressively the tool is applied all influence the final feel. Preparation calls for a cured, flat surface and masking or edge protection to keep edges clean during treatment. The process can be done manually or with machines, and depth control affects texture, slip resistance, and longevity. Bush-hammered finishes suit interior floors, showers, and exterior non-slip pavements, while other finishes may be preferable for certain surfaces. For maintenance, keep surfaces clean and wear gloves and eye protection during work to reduce dust exposure and protect against chips.
Definition and visual characteristics
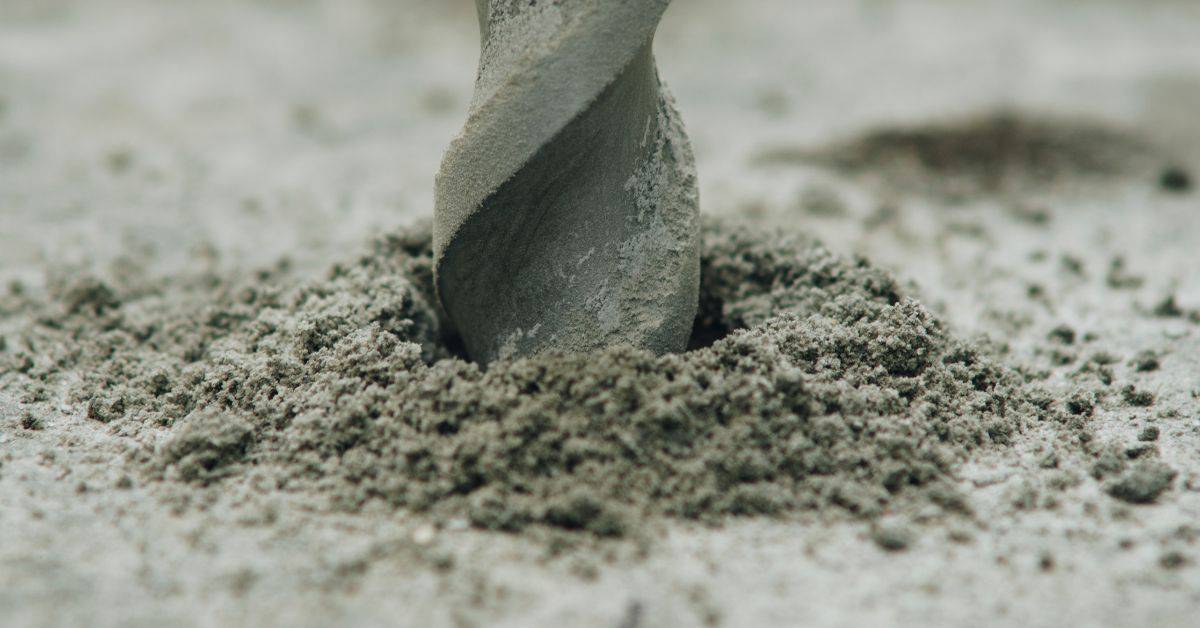
A bush-hammered finish is created by repeatedly striking concrete with a specialized tool called a bush hammer. This action creates thousands of tiny pits across the surface, giving it a pebble-like texture.
The final look is matte, not shiny, with an even feel underfoot. The depth and size of these pits can vary depending on how aggressive your tool is and how many passes you make.
Shade and aggregate color also play a role in the overall appearance. Lighter aggregates show more contrast, while darker ones blend in more. Proper curing and surface preparation ensure the pits hold and don’t fill back in.
How it affects slip resistance and durability
The micro-texture of a bush-hammered finish provides excellent traction, making it ideal for areas where slip-resistance is crucial, like showers or pool decks.
Each pit acts like a tiny suction cup, helping shoes and bare feet grip the surface. This textured surface also wears more evenly than smooth surfaces, extending its lifespan.
However, test your specific needs. Slip resistance can vary based on factors like footwear and moisture. For critical areas, consider professional testing or consulting with a concrete specialist.
When a Bush-Hammered Finish Makes Sense (Applications & Benefits)
Identify clear use-cases where the texture adds value, such as surfaces that benefit from grip and reduced glare. It works well for exposed-aggregate aesthetics and for walkable areas where slip resistance matters. Typical substrates include new pours, finished slabs, concrete pavers, and overlays needing a textured surface.
Benefits include improved slip resistance and easier dirt concealment, along with compatibility with certain sealers or coatings. Remember to consider limitations like very thin slabs or substrates where heavy texture could trap debris. Texture depth, expected traffic, and cleaning routines all inform whether bush-hammering is the right choice for your project.
Best use-cases (paving, facades, pool decks, repair blending)
A bush-hammered finish is perfect for surfaces where traction and durability matter. Here are some top use-cases:
Paving: Driveways, walkways, and patios benefit from the non-slip texture. It’s great for areas with varying weather conditions.
Facades: Bush-hammering adds a rustic, weathered look to exterior walls. It reduces glare and maintenance needs.
Pool Decks: Slippery surfaces around pools are a safety hazard. A bush-hammered finish provides grip when wet.
Repair Blending: If you’re repairing an existing surface, bush-hammering helps blend the new patch with the old. It hides repair lines and maintains consistency.
Advantages and limitations
Bush-hammering offers several benefits, but it’s not always the best choice. Let’s weigh the pros and cons:
Advantages: Enhanced slip resistance, reduced glare, easier maintenance with dirt hiding, improved abrasion resistance.
Limitations: Material removal means a thinner slab. It’s noisy and dusty, so consider your site conditions and neighbors.
It’s not ideal for thin slabs or delicate substrates. It may not be cost-effective or time-efficient for projects with tight budgets/timeframes.
Tools and Equipment — Manual Vs. Machine
Compare manual bush hammers, handheld pneumatic tools, and powered bush-hammer machines to match project scale. Manual tools are common for small patches, while machines handle larger areas with more consistent texture. Handheld options offer portability and lower upfront costs in some cases.
Productivity, control, and finish quality vary with tool type. Consider setup time, noise, and dust control needs, along with maintenance and availability of wear parts. Choose based on budget, project size, and the required uniformity of texture for the target surface.
Manual bush hammers and handheld tools
The old-school way, manual bush hammers offer control for small repairs. They’re cheap but labor-intensive.
- Ball-pein hammer: Basic, versatile. Use for small patches, detail work. Keep blows consistent for even texture.
- Bush hammer tool (handheld): Designed for bush-hammering. Lightweight, easy to handle. Great for DIYers on a budget.
- Pneumatic handheld tools: Powerful, fast. Ideal for larger areas, quick work. Require an air compressor.
- Rentable options: Some hardware stores rent bush hammer tools. Check prices locally.
- Maintenance: Keep hammers clean, grease moving parts. Sharpen heads as needed.
Bush-hammer machines and attachments
Machines boost productivity but require more investment. Choose based on project scale:
Walk-behind: Ideal for large, flat areas like driveways or patios. Rent for one-off jobs.
Plate-mounted: Attach to skid steers or excavators. Great for complex surfaces, tight spaces. Buy if you have the machine already.
Multi-head units: High-output, professional-grade. Best for large-scale projects. Consider buying if you’re a pro or doing many big jobs.
Accessories and consumables
Regularly replace worn-out parts to maintain finish quality:
Bush hammer heads: Available in various sizes, shapes. Choose based on desired texture. Hardness matters; softer heads wear faster.
Mounting hardware: Ensure compatibility with your tool or machine. Check manufacturer’s recommendations for best fit.
Safety gear: Wear safety glasses, gloves, and sturdy boots. Protect yourself from flying debris and vibration.
Tools and Materials Checklist (DIY and Professional)
List essential bush-hammering tools, including a compatible machine or attachments, grinding/polishing options, punch chisels, levels, and measuring devices. Bring backup power sources and vibration-damping handles to maintain steady work. Have a plan for edge protection and cover plates for nearby surfaces.
PPE and safety protocols are crucial, covering gloves, eye protection, respirators or masks, hearing protection, and hard hats. Include site dust containment strategies, wet-dry methods, and water supply considerations. Stock consumables like abrasive pads, replacement bits, slurry collectors, and filters so work isn’t halted by a missing part.
Personal Protective Equipment (PPE)
Before you start bush-hammering, ensure everyone on site has the right PPE. Check this list every time.
- Eye/Face Protection: Safety glasses or goggles with side shields to protect from debris and dust.
- Hearing Protection: Earplugs or earmuffs to reduce noise levels from the bush-hammer machine.
- Respirator/Dust Mask: A certified respirator or dust mask to filter out harmful particles. Check fit and seal before use.
- Gloves: Durable, cut-resistant gloves to protect hands from sharp edges and vibrations.
- Protective Footwear: Steel-toe boots to safeguard against falling objects and compression injuries.
- Hard Hat: A hard hat for protection against impacts and penetration. Check it’s in good condition with no cracks or dents.
- High-Visibility Clothing: If working near traffic, wear hi-vis vests to increase visibility.
- Fall Protection (if elevated): Harnesses, lanyards, and anchors for safe work at heights. Always follow manufacturer’s guidelines.
Quick rule: Never skip PPE checks. It’s your first line of defense against injuries.
Site Equipment and Dust Controls
Set up your site right to minimize dust, keep workers safe, and maintain productivity.
- HEPA-Filter Vacuum: A high-efficiency particulate air vacuum to collect dust at the source. Ensure it’s in working order before starting.
- Water Suppression Gear: A water supply and spray nozzle to dampen dust during bush-hammering. Check pressure and flow rate.
- Containment Barriers: Plastic sheeting or enclosure curtains to contain dust within the work area. Seal gaps with tape.
- Local Exhaust/Ventilation: A system to extract dust from the immediate work area. Test before use.
- Power Requirements: Extension cords, generators, or power packs for your equipment. Ensure they’re rated for the job and in good condition.
- Ventilation Planning: Plan for adequate airflow to prevent dust buildup. Open windows, use fans, or set up temporary ventilation systems as needed.
- Material Staging: Organize your materials (concrete mix, tools, etc.) neatly and safely to keep the site tidy and efficient.
- Waste Containment: Bins or bags for waste concrete dust. Seal and dispose of properly after use.
Quick rule: Proper setup reduces dust exposure, maintains air quality, and keeps your project on schedule.
Dust Control, Silica Risk, and Regulatory Standards
Concrete dust contains respirable crystalline silica, which requires careful handling. Identify the hazards and plan controls before starting work. Prepare for site-specific rules that govern air quality and exposure limits as they apply to your jurisdiction.
Apply the hierarchy of controls: engineering measures first, then administrative controls, and finally PPE. Use water suppression, local exhaust, and physical barriers to contain dust. Have a plan for respirator fit testing and proper storage and maintenance of PPE, plus a simple checklist to verify controls and documentation.
Health risks and what’s in concrete dust
Bush-hammering concrete kicks up a lot of dust. That’s not just dirt – it’s a mix of particles, including respirable crystalline silica. This tiny stuff is bad news for your lungs.
Silica’s hazardous because it’s so small (100 times thinner than a human hair). It can get deep into your lungs and cause serious damage over time. Think silicosis – a lung disease with no cure, caused by long-term exposure to silica dust.
Chronic exposure also raises the risk of lung cancer and other respiratory diseases. So, it’s crucial to understand these risks and take steps to protect yourself.
Engineering controls: wet methods, HEPA vacuums, enclosures
First line of defense against dust? Engineering controls. Here’s how to use them:
Wet suppression: Spray water on the work area before and during bush-hammering. It dampens the dust, making it heavier and easier to control.
HEPA vacuums: Use a vacuum with a HEPA filter to suck up dust at the source. Connect it to your bush-hammer machine if possible.
Temporary enclosures: For high-dust tasks, build a temporary enclosure around the work area. This contains the dust and makes it easier to control. Combine these methods for best results.
Respirators, fit-testing and monitoring
Even with engineering controls, you’ll still need a respirator. Here’s how to choose the right one:
Go for an N95 or P100 respirator. These filter out at least 95% (N95) or 99.7% (P100) of particles, including silica.
Fit-testing is crucial. It ensures your respirator fits properly and seals well around your face. Follow the manufacturer’s instructions for fit-checks each time you wear it.
Regular maintenance and storage are key too. Clean and store your respirator properly between uses to keep it in good working order. Always follow local regulations and consult occupational health guidance.
Step-by-Step Technique and Quality Checkpoints
Begin with a surface assessment to verify substrate condition, moisture, and curing state. Plan for a consistent profile across the area before starting the hammering process. Identify any high spots that will require extra attention later.
Describe the technique in passes, noting pattern, pressure, and how to prune imperfections for even texture. Include edge and detail work to maintain uniformity. Integrate dust suppression and safety steps at each stage, and define objective texture and flatness checkpoints to guide the job. End with a concise quality log for future sessions.
Step-by-Step Process
Before you start bush hammering, follow this step-by-step checklist to ensure a consistent and high-quality finish.
- Safety first: Wear appropriate PPE including respirator, safety glasses, gloves, and ear protection. Refer to the PPE section for details.
- Assess surface: Check substrate condition, moisture content, and curing status as outlined in the Surface Preparation checklist.
- Plan your work: Mark out work zones and plan for profile consistency.
- Set up tools: Choose the right plate size, percussion rate, and exposure target based on your desired finish. Refer to the Tools section for guidance.
- Start with a light touch: Begin with a low pressure to avoid overworking the surface.
- Work in patterns: Maintain consistent striking patterns and overlap passes as outlined in the Execution checklist.
- Check progress: Regularly inspect your work using the Visual Checkpoints to ensure consistency and make adjustments as needed.
- Edge and detail work: Pay extra attention to edges and details, using handheld tools if necessary. Refer to the Tools section for guidance on manual bush hammers.
- Clean up: After completion, clean the area thoroughly to remove any remaining dust or debris. Use wet methods and HEPA vacuums as outlined in the Dust Control section.
- Document your work: Keep a concise quality log noting adjustments, reworks, and any issues encountered to guide future sessions or repairs.
Quick rule: Always follow the sequence from preparation to final inspection for consistent results.
Surface Preparation and Protection
Before you start bush hammering, prepare the surface and protect adjacent finishes with this checklist.
- Clean the surface: Remove any dirt, grease, or contaminants using a suitable cleaner. A clean surface ensures better adhesion of the finish.
- Remove weak laitance: If present, remove weak laitance (the weak outer layer of concrete) to expose stronger aggregate. This can be done using a scarifier or by hand with a chisel and hammer.
- Check moisture content: Ensure the surface is dry enough for bush hammering. A simple moisture meter can help confirm this.
- Mark work zones: Clearly mark out the areas to be bush hammered to avoid confusion or overworking.
- Protect adjacent finishes: Cover and protect any adjacent finished surfaces, edges, or openings with painter’s tape and plastic sheeting to prevent damage from dust or debris.
- Check curing status: Ensure the concrete has cured enough for bush hammering. As a general rule, wait at least 28 days after pouring before starting any surface treatments.
- Inspect for defects: Check the surface for any cracks, voids, or other defects that could affect the final finish. Repair as necessary before proceeding.
Quick rule: Thoroughly preparing the surface and protecting adjacent finishes ensures a better final result and minimizes waste.
Execution: Pattern, Pressure and Overlap
Follow this checklist to maintain consistent striking patterns, avoid overworking, and achieve a uniform texture during the bush hammering process.
- Start with a light touch: Begin with low pressure to avoid digging into the surface. Gradually increase pressure as needed.
- Work in patterns: Maintain consistent striking patterns, such as overlapping passes or a specific pattern recommended by your tool manufacturer.
- Avoid concentrated overworking: Keep moving and avoid spending too much time on any one spot to prevent overworking the surface and causing uneven texture.
- Follow tool-maker guidance: Refer to your tool’s manual or manufacturer recommendations for specific striking patterns, percussion rates, and exposure targets.
- Control edge work: Pay extra attention to edges. Use a lighter touch and slower pace to avoid overworking the edges and causing them to crumble.
- Handle details carefully: For intricate detail work, use handheld tools or reduce machine pressure to maintain consistency with surrounding areas.
- Prune high spots: Periodically check for any high spots that may have formed due to overworking. Prune these down using a light touch and slow pace.
- Monitor tool condition: Regularly inspect your bush hammering tools to ensure they are in good working order. Replace worn or damaged parts as needed.
Quick rule: Consistency is key in bush hammering. Maintain a steady pace, pressure, and pattern for uniform texture.
Visual Checkpoints and Finish Acceptance Criteria
Use this checklist to visually inspect your work and ensure it meets the desired finish acceptance criteria.
- Texture uniformity: Inspect for consistent texture across the entire surface. Look for any areas that are overworked or underworked.
- Surface flatness: Check for any dips, waves, or other deviations from a flat surface. Use a straight edge and level to confirm flatness.
- Aggregate exposure: Ensure the desired level of aggregate exposure is achieved. Too much exposure can lead to a rough, uneven finish, while too little may not provide the desired aesthetic.
- Color consistency: Check for consistent color across the entire surface. Inconsistencies could indicate overworking or underworking in certain areas.
- Tolerance for variation: Acceptable variation tolerances depend on your specific project and desired finish. As a general rule, allow for minor variations in texture and color.
- Rework or blend areas: If necessary, rework or blend any areas that do not meet the desired finish acceptance criteria. Use a light touch and slow pace to avoid overworking these areas.
- Final inspection: Perform a final walkthrough of the entire area to ensure all work meets the desired finish acceptance criteria.
Quick rule: Regularly inspect your work during and after completion to ensure it meets your desired finish acceptance criteria.
Safety Guidelines Specific to Bush-Hammering
Establish explicit exclusion zones around work areas with clear access control and temporary barriers. Implement sign-in/out procedures to prevent unintended entry during operations. Maintain intact boundaries to protect others on site.
Outline communication protocols, including pre-shift briefings and documented start/continue alerts. Define emergency planning specifics like shutdown steps and muster points. Clarify responsibilities, permits, equipment checks, and training compliance to ensure accountability on every task phase.
Site controls and communication
Establish clear boundaries around your bush-hammering work area using temporary barriers. This keeps non-essential personnel safe from flying debris.
Signage is crucial – post warning signs at entry points, detailing the hazards and access control measures. Use a sign-in/out system to track who’s in the exclusion zone.
Before starting work, hold a pre-task briefing. Discuss the day’s plan, potential hazards, and emergency procedures. Coordinate with other trades to minimize bystander exposure and accidental entry.
Managing noise, vibration and ergonomic risks
Bush-hammering generates high levels of noise and vibration. Protect your hearing with appropriate ear protection. Rotate equipment to reduce hand-arm vibration exposure and crew fatigue.
Choose ergonomic tools that fit well in your hands, reducing strain. Take regular breaks to rest your arms and back. Stretch before starting work to prepare your muscles for the task ahead.
If you’re experiencing discomfort or pain, stop work immediately. Inform your supervisor and follow their guidance on resuming tasks safely.
Cost, Maintenance and Project Planning Considerations
Define the scope and surface complexity to guide tool selection and access requirements. Assess how the existing finish and area layout impact rental or purchase decisions. Consider preps and masking that affect overall effort and timeline.
Identify cost drivers such as labor, equipment, consumables, and post-finish coatings or sealers. Build a planning framework that anticipates dust-control setup and tool wear, with a realistic schedule and milestones. Include a pre-project checklist covering site assessment, permits, crew roles, and safety planning to minimize surprises.
Cost drivers and budgeting tips
The cost of a bush-hammered concrete finish depends on several factors. First, consider the surface area – larger areas mean more material and labor.
Substrate condition: Existing surfaces need prep work like cleaning or grinding, adding to costs. If you’re pouring new concrete, formwork might be needed, which adds another cost line.
Equipment choice: Renting tools is cheaper upfront but may limit access to high-quality or specialized equipment. Purchasing tools offers long-term savings but requires storage space and maintenance.
Dust controls: Expect to spend on dust extraction systems, filters, and respirators to meet safety standards. Labor for setup and operation also adds to the cost.
Tool maintenance and longevity
Maintaining your bush-hammering tools ensures consistent results and extends their lifespan.
- Regular Inspections: Check tools daily for any damage or wear. Tighten loose bolts, replace worn-out bits, and lubricate moving parts as needed.
- Head/bit Replacement: Replace heads and bits when they show signs of excessive wear or dullness. Frequency depends on usage but expect to replace them every 50-100 hours of use.
- Cleaning: After each use, clean tools thoroughly to remove concrete dust and debris. Use compressed air for hard-to-reach areas.
- Storage: Store tools in a dry place away from extreme temperatures. Consider using tool organizers or racks to keep everything accessible and organized.
- Optional/Rentable Tools: Some tools like dust extractors can be rented, saving you the purchase price but adding rental fees to your budget. Realistic prices range from $50-$100 per day.
Pre-project planning checklist
Use this checklist before starting any bush-hammered concrete project to ensure a smooth process and minimize surprises.
- Permits: Check if you need permits for your project. Some areas require them for structural changes or dust control measures.
- Substrate Testing: Test the existing substrate’s strength and condition to ensure it can handle bush-hammering without crumbling.
- Weather & Drying Schedule: Plan your project around favorable weather conditions. Allow enough drying time after any prep work or before applying sealers.
- Crew Training: Ensure your crew is trained in proper bush-hammering techniques, safety protocols, and dust control measures.
- Dust-Control Setup: Plan the setup of dust extraction systems, signage, and any temporary enclosures needed to contain dust.
- Client Sign-off: Clearly define what constitutes an acceptable finish with your client before starting work. Regular progress updates help manage expectations.
- Safety Planning: Develop a safety plan that includes emergency procedures, first aid kits, and communication protocols.
- Equipment Delivery: Coordinate equipment delivery to ensure everything arrives on time and is in working order.
- Realistic Schedule: Create a realistic schedule with milestones for each phase of the project. Regularly review progress to keep things on track.
Quick rule: Always communicate openly with your client, crew, and any relevant authorities throughout the planning process to avoid misunderstandings or delays.
Conclusion
Using a bush-hammered finish can deliver a durable, grippy surface with a distinctive look, but it only pays off when you plan for safety, control dust, and avoid overdoing the process. The right approach protects the surface, your health, and your budget while delivering a professional-looking result.
First, check the area for suitability and surface condition, decide whether you’ll hand-hammer or use light machinery, set up robust dust control, put on proper PPE, test a small patch, follow the step-by-step technique and quality checkpoints, monitor silica exposure, keep the work area clean, and inspect the finished texture against your plan and maintenance needs. Do this in a logical order, and don’t rush any step.
Avoid common mistakes like skipping a patch test, neglecting dust control, choosing tools or pressures that are too aggressive, and hammering too long in one spot. Never skip safety gear such as respirators and eye protection, and never work without securing the area and covering nearby surfaces. If the task feels uncertain or the surface is critical, call in a professional before you push on, and stay committed to slow, careful progress—steady effort wins, not brute force.
FAQ
What tools do I need for bush hammering—manual hammering vs. machine options?
You can start with a manual bush hammer or a small machine attachment. A machine will cover more area faster, but you’ll still need chisels, gloves, and eye protection. Always check the tool’s label or manufacturer guidelines for usage limits and maintenance tips.
How can I control dust while bush hammering?
Use local dust control methods like wetting the surface and using dust-collection attachments on power tools. Keep the area ventilated and wear a proper respirator or masks rated for silica dust. If you’re unsure about a method, consult product labels or manufacturer instructions.
What safety precautions should I follow beyond dust control?
Wear eye protection, hearing protection, and sturdy footwear. Secure the work area to prevent bystanders from entering. Inspect equipment for damage before use and stop if vibration or noise seems abnormal; consult the tool’s guidelines for safe operation.
What surfaces are best suited for a bush hammered finish, and what are its pros and cons?
Rough or irregular concrete surfaces respond well, while freshly sealed or painted surfaces may need proper surface prep. Pros include texture that hides minor imperfections and improved traction. Cons are potential roughness to the touch and more surface wear over time; check with the surface manufacturer or label to confirm suitability.