
Introduction
Different mold types in homes can be identified by appearance and growth patterns, and small, safe DIY steps can often address them.
The guide walks you through spotting common mold forms, diagnosing moisture sources, and following practical, step-by-step fixes.
By the end, you’ll know how to assess risk, apply basic cleaning measures, and decide when professional guidance is warranted.
Key takeaways
- Identify mold by color, texture, and musty odor during visual inspection
- Moisture control is first line of defense to prevent mold recurrence
- Small DIY cleanup requires containment, PPE, and avoiding spread to unaffected areas
- When in doubt about health risks, consult a professional for testing
- Document leaks, patches, and cleaning steps to inform future maintenance
- Mold testing costs vary; budget for certified lab analysis and remediation plan
Table of Contents
- Introduction
- Key takeaways
- Common types of household mold and how to recognize them
- Health effects and who’s most at risk
- DIY diagnosis: how to inspect, document, and decide next steps
- Step-by-step DIY cleanup for small mold problems
- When to call a professional and expected costs
- Preventing mold long-term: moisture control and maintenance plan
- Common DIY mistakes and safety pitfalls to avoid
- Mold testing
- Conclusion
- FAQ
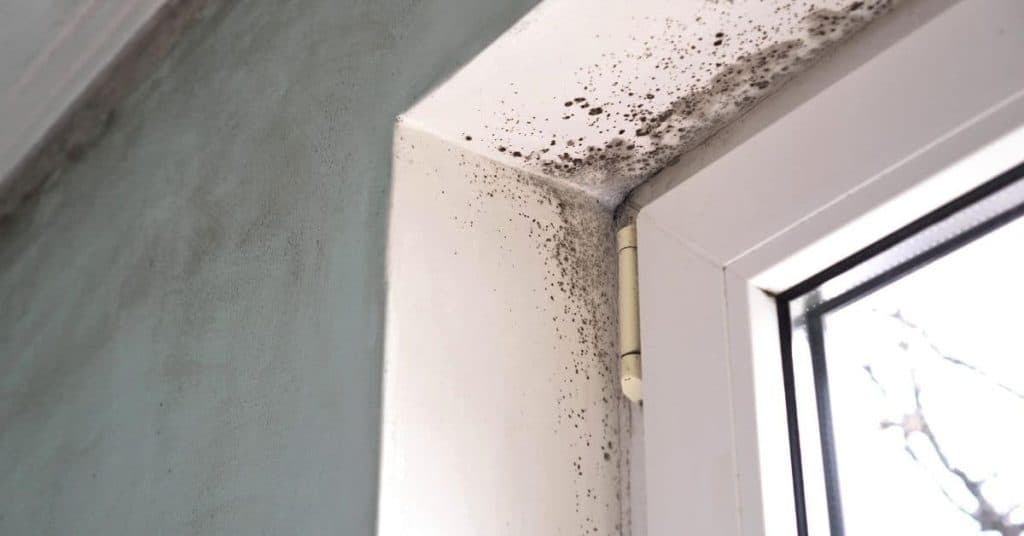
Common types of household mold and how to recognize them
Common indoor molds include Aspergillus, Cladosporium, Penicillium, Alternaria, and Stachybotrys. Each has recognizable traits like color ranges, textures, and typical surfaces such as drywall, ceiling tiles, wood, or fabrics. Use quick field cues like color (greens, grays, blacks), fuzzy or powdery texture, and a musty odor to form a provisional ID.
Watch for moisture signals: frequent condensation, leaks, poor ventilation, or historical water damage that pair with mold hotspots. For DIY readers, limit disturbance on moldy areas, wear basic protective gear, and clean only non-porous surfaces or small growths. If growth is extensive or on porous materials, plan to call in a mold professional and follow product label instructions.
Visual characteristics and where they grow
Mold can come in various colors like black, green, white, or even pink. Each color often points to a specific type of mold that thrives under certain conditions. For instance, black mold, usually found in damp areas like bathrooms or basements, is notorious for its potential health risks.
The texture of mold can also vary from slimy and wet when it’s actively growing on surfaces with moisture to powdery and dry as it ages or dries out. Check behind tiles, under carpets, and inside walls where water might be trapped and not easily seen. These spots are common breeding grounds for mold.
Basements and bathrooms are prime locations due to high humidity levels and poor ventilation. If you spot any signs of moisture issues like damp walls or musty smells, it’s a clear sign that mold could be lurking nearby. Don’t ignore these warnings; address them quickly before the problem gets worse.
Misleading appearances (what is not mold)
When you spot something that looks like mold, it’s important to double-check before assuming the worst. Sometimes what appears to be mold can actually be dirt, efflorescence, or even rust. These look-alikes often show up in similar places as mold but have different causes and treatments.
To tell them apart, start by wiping the area with a damp cloth. If it’s just dirt or efflorescence, you should see an immediate change. Efflorescence will usually wash off easily without leaving any residue behind. Rust can be tricky because it often looks like dark mold spots but is reddish-brown and flakes off when scratched.
Mildew is another common look-alike that grows in damp areas like bathrooms or kitchens. While mildew is related to mold, it’s usually lighter in color and easier to clean with a simple bleach solution. If you’re still unsure after these checks, consider getting a professional opinion to be safe.
When a mold ID matters
Mold species can sometimes dictate how you handle the problem. If you spot Stachybotrys, often called black or toxic mold, it’s serious and needs immediate action. This type of mold grows in areas with persistent water damage and high cellulose content like drywall.
If someone in your home has a compromised immune system, knowing the specific mold can be crucial. Some molds are more harmful to these individuals than others. Always consult a professional if you suspect Stachybotrys or other dangerous types.
In most cases, though, identifying the exact species isn’t necessary. General remediation steps like fixing leaks and cleaning moldy areas with detergent will work for common household molds. If in doubt, check local guidelines or consult a professional to be safe.

Health effects and who’s most at risk
Exposure to mold can cause acute symptoms like nasal and eye irritation, coughing, and wheezing. These symptoms can worsen asthma or other breathing conditions. Claims about ‘toxic mold’ are often overstated, but some molds can produce mycotoxins in certain cases.
During DIY work, disturbing settled mold, poor containment, insufficient ventilation, and ongoing moisture problems raise your exposure for painters, builders, and other do-it-yourselfers. Vulnerable groups include children and infants, older adults, people with asthma or allergies, immune-compromised individuals, and pregnant people, who need extra precautions. If symptoms worsen, sinus infections develop, or headaches persist, seek medical guidance and share details about mold exposure with your clinician.
Short-term symptoms and common reactions
Mold can cause a range of short-term issues, like sneezing, runny nose, itchy eyes, and coughing. If you notice these symptoms after being in an area with visible mold or damp spots, take them seriously.
For some folks, especially those with asthma or allergies, exposure to mold can make their conditions worse. You might see more wheezing, shortness of breath, or even a flare-up of your asthma. If these symptoms stick around for days after you’ve left the area, it’s time to talk to a doctor.
Don’t ignore persistent headaches, sinus infections, or ongoing skin irritation either. These could be signs that mold is affecting more than just your breathing. When in doubt, get checked out by a healthcare provider who knows about mold exposure risks.
Chronic exposure and severe risk factors
If you’re exposed to mold over long periods, especially if it’s in large amounts or contains harmful mycotoxins, the health risks can be serious. People with asthma, allergies, or weakened immune systems are particularly at risk.
Long-term exposure can lead to chronic respiratory issues like bronchitis and even permanent lung damage. For kids and older adults, these risks are even higher because their bodies might not handle mold as well as a healthy adult’s would.
If you have asthma or another respiratory condition, take extra care when dealing with moldy areas. Use proper protective gear and follow strict safety guidelines to avoid making your symptoms worse. If the problem is big, it’s best to bring in professionals who know how to handle these situations safely.
Safety guidance for sensitive occupants during cleanup
If you have kids, elderly family members, or anyone with a compromised immune system at home, cleaning up mold can be risky. It’s crucial to protect these vulnerable people from exposure.
One option is to move them out of the house temporarily while you clean. If that’s not possible, make sure they stay away from areas where mold cleanup is happening. Wear full protective gear like respirators and gloves yourself when dealing with moldy materials.
If the job looks too big or risky for a DIY approach, consider hiring professionals to handle it safely. They have the right equipment and training to minimize exposure risks for everyone in your home. Your health comes first—don’t hesitate to seek help if needed.
DIY diagnosis: how to inspect, document, and decide next steps
DIY diagnosis means you walk the space with your eyes, nose, and a few cheap tools to decide what you can clean safely and what needs pro help. You’ll learn to inspect for discoloration, growth shapes, texture, and odors, check moisture clues, and use simple probes without overreacting to a single reading. The goal is to build a clear, documented trail that supports a DIY cleanup plan or flags situations that require professional remediation or testing.
This approach matters because a careful, repeatable record helps you track changes, justify decisions, and stay safe when dealing with mold or moisture. You’ll document every room with notes, photos, and basic measurements, so you can show what was found and what you did next. Following a simple, truthful process also helps you decide when to ventilate, dry leaks, or call a licensed contractor or industrial hygienist, while avoiding unnecessary disruption or risky, full-step remediation on your own.
Room-by-room inspection checklist
Use this checklist when you suspect mold and need a systematic approach to identify problem areas.
- Bathroom corners: Look for water stains, peeling paint. Confirm with flashlight; skip at risk of missing hidden growth.
- Kitchen under sink: Check for moisture buildup, musty smell. Confirm by lifting cabinet slightly; skip if you miss leaks behind appliances.
- Attic ventilation: Inspect roof edges, eaves. Look for condensation, dark spots; confirm with flashlight and mirror; skip at risk of overlooking damp insulation.
- Basement walls: Check for water marks, peeling paint. Confirm by probing with screwdriver; skip if you miss hidden leaks behind drywall.
- HVAC ducts: Inspect air vents, registers. Look for dust buildup, musty smell; confirm with flashlight and mirror; skip at risk of missing mold inside ductwork.
- Behind appliances: Check refrigerator, washer areas. Confirm by moving appliance slightly; skip if you miss hidden leaks or moisture buildup.
Quick rule: Inspect high-risk spots first to catch major issues early.
Tools and basic tests homeowners can use
These tools help you identify mold without invasive testing.
- Mold meter: Measures surface moisture. Set to detect dampness; tip: check walls, floors for wet spots.
- Hygrometer: Checks relative humidity levels. Aim for below 60%; tip: use near windows and in basements.
- Flashlight: Reveals hidden growths. Use to inspect corners, behind furniture; tip: angle light at walls and ceilings.
- Mirror: Reflects hard-to-reach areas. Hold mirror against wall edges; tip: use in tight spaces like under sinks.
- Tape lift test: Collects surface samples. Press tape on suspected area, peel off slowly; tip: avoid over-interpreting results without professional analysis.
Mention optional tools like moisture probes for more detailed checks, typically around $50-$100 each.
When to test for mold and types of tests
Air sampling is useful when you suspect widespread contamination but isn’t necessary for isolated spots. Surface swabs are good for specific areas, while bulk testing involves removing material samples.
Routine testing is usually unnecessary unless there’s a health risk or visible signs of extensive mold growth. Professional testing is warranted if DIY tests show high moisture levels and you see no clear source.
Professional air sampling can provide detailed data on airborne spores, while surface swabs help identify specific types of mold present in your home.
Step-by-step DIY cleanup for small mold problems
Step-by-step cleanup starts with containment and a plan. Isolate the area, fix the moisture source, and decide what to remove or save. Clean non-porous surfaces, dry thoroughly, and prepare for safe disposal.
Doing it right saves your home and your health. Use proper PPE, follow cleaning procedures, and avoid mixing chemicals. Keep doors sealed, document what you did, and know when to call a pro if problems loom.
Step-by-Step Cleaning Process
This sequence ensures safe and thorough mold removal, from prep to final checks.
- Preparation: Set up containment with plastic sheeting. Seal doors and vents.
Ensure proper ventilation; use fans or exhaust systems. - Safety gear: Put on N95 respirator, gloves, eye protection, and disposable coveralls.
Check that your PPE fits snugly to prevent mold spores from entering. - Mold removal: Scrub non-porous surfaces with a solution of water and detergent.
Rinse thoroughly with clean water; check for residue or missed spots. - Dry surfaces: Use fans, dehumidifiers to dry cleaned areas completely.
Monitor moisture levels with a hygrometer; aim for 30-50% relative humidity. - Cleanup and final checks: Dispose of contaminated materials in sealed bags.
Inspect the area for any remaining mold or dampness before declaring it clean.
Personal protective equipment (PPE) and setup
Wear proper PPE to protect yourself from harmful mold spores during cleanup.
- N95 respirator: Provides adequate protection against airborne particles.
Ensure a tight seal around the nose and mouth; wear it throughout the job. - Gloves: Use nitrile or rubber gloves to prevent skin contact with mold.
Choose disposable gloves for easy disposal after use. - Eye protection: Wear safety goggles to shield eyes from spores and irritants.
Avoid using glasses as they may not provide full coverage. - Coveralls: Use disposable coveralls to prevent mold from sticking to your clothes.
Change into clean coveralls if you need a break or switch tasks. - Ventilation setup: Place fans at entrances and exits for cross-ventilation.
Use negative pressure by placing exhaust fans in windows or doors.
Cleaning methods and approved cleaning agents
Effective mold removal requires the right tools and techniques for non-porous surfaces.
Use a solution of water and detergent to clean non-porous materials. Scrub vigorously with a brush or sponge.
Rinse thoroughly with clean water; check for any remaining residue or missed spots.
Avoid using bleach or other harsh chemicals, as they can damage surfaces and create toxic fumes.
Do not use ozone generators, as they are ineffective against mold spores and may cause respiratory issues.
Drying, monitoring, and verifying success
Proper drying is crucial to prevent future mold growth after cleaning.
Use fans and dehumidifiers to dry cleaned areas thoroughly. Monitor moisture levels with a hygrometer.
Aim for 30-50% relative humidity; continue monitoring until the area feels completely dry.
Check for any remaining signs of dampness or mold growth visually and by smell.
If everything looks clean, smells fresh, and feels dry to the touch, you’ve likely succeeded in your cleanup efforts.

When to call a professional and expected costs
Call a professional when mold or moisture problems cross clear thresholds: more than a small patch of visible growth, involvement of HVAC systems or air ducts, or growth hiding behind walls or under flooring. If you see structural moisture damage or any compromise to the building’s integrity, escalate to a pro right away, and consider vulnerable occupants as a trigger to act sooner; DIY cleanup can spread contamination or miss hidden pockets. A typical professional path includes a thorough inspection, targeted testing if needed, professional remediation or removal, and careful post-remediation reconstruction to restore safety and airflow.
For DIYers, knowing the sequence helps you plan safely: start with a clear inspection to map out affected areas, then decide on testing (air and surface) only if needed to confirm the problem, followed by containment, cleanup, and any required reconstruction or restoration steps. Containment and negative pressure setups are common during cleanup to keep spores from moving through the house, and permits or licenses may be needed depending on local rules and the project scope. Costs vary with area size, accessibility, contamination type, and whether HVAC remediation or replacement is involved, so use a rough range rather than a fixed figure and check labels or manufacturer instructions for guidance; also document findings and conversations for insurance claims and future prevention.
What qualified remediators do differently
When you bring in a pro, they start with containment. They’ll set up barriers and negative pressure to keep mold spores from spreading throughout your home. This is crucial for stopping the problem at its source.
Next, pros use HEPA filtration systems to clean the air inside the containment area. These filters catch even the tiniest particles, ensuring that no mold spores escape during cleanup. They also do thorough testing before and after remediation to ensure all contaminated areas are properly addressed.
Finally, they handle safe disposal of all materials removed from your home. This isn’t just a matter of convenience—it’s about protecting everyone involved in the cleanup process and preventing future outbreaks.
Cost ranges and budgeting considerations
The cost to remediate mold can vary widely. For small issues, like a few square feet of surface growth, you might pay around $500-$1,000. But if the problem is larger or involves hidden damage behind walls, costs could soar to $5,000 or more.
Factors that drive up costs include extensive water damage, HVAC system contamination, and structural repairs needed after mold removal. Always get local quotes since labor rates vary by region.
To budget effectively, start with a thorough inspection to understand the full scope of work required. This helps prevent sticker shock later on when you realize there’s more to fix than initially thought.
How to vet and hire a remediation company
When choosing a mold remediator, start by asking about their licensing and experience. Look for companies that have worked on similar projects before and can provide references from satisfied clients.
Request documentation of the scope of work they plan to undertake. This should include detailed plans for containment, testing, removal, and reconstruction phases. Also ask if they carry insurance in case something goes wrong during the job.
Beware of providers who seem overly eager without a proper assessment or those offering unusually low bids compared to others. These could be red flags indicating lack of expertise or hidden costs down the line.
Preventing mold long-term: moisture control and maintenance plan
Preventing mold long-term comes down to creating a simple, repeatable maintenance plan that keeps humidity in check and stops water intrusion before it starts. Start with a target indoor humidity range, commonly around 30–50% year-round, and monitor it with affordable hygrometers so you can see trends rather than guessing. Track sources like roof leaks, plumbing drips, crawlspace or basement moisture, groundwater intrusion, and condensation hotspots on windows and walls, then pin down the practical changes you can make to reduce each risk.
Drainage, grading, and exterior controls matter just as much as inside measures, so ensure exterior grading directs water away from the foundation, gutters and downspouts work, splash blocks are in place, and exterior drainage guides water away from the home. Good ventilation and air movement are the best defense against humidity buildup, so use exhaust fans in kitchens and baths, consider whole-house ventilation if appropriate, and design for cross-ventilation where possible. Implement a seasonal maintenance checklist with monthly tasks like checking for leaks, inspecting windows, and clearing gutters, plus quarterly or biannual tasks like testing humidity levels, running a dehumidifier if needed, and inspecting HVAC, insulation, and vapor barriers, along with a documented action plan to assess signs of moisture damage and decide on remediation steps without initiating full remediation here.
Humidity, Ventilation, and HVAC Best Practices
Keep your home’s humidity between 30% and 50% year-round. Use a hygrometer to monitor this range; it’s an affordable tool that can be found at any hardware store.
In the warmer months, increase ventilation by using exhaust fans in bathrooms and kitchens after showers or cooking. During colder seasons, reduce condensation risk by limiting unnecessary indoor water use and closing windows.
Regularly maintain your HVAC system to ensure it runs efficiently without contributing to moisture buildup. Clean filters monthly and have a professional inspect the unit annually.
Home Repairs That Prevent Mold (Short- and Long-Term)
Fixing leaks in your roof or gutters is crucial. Make sure water flows away from the house with proper grading and functioning downspouts.
Inspect plumbing regularly for drips or leaks, especially around pipes that run through walls or floors. Address any issues immediately to prevent mold growth.
Increase insulation in attics and basements to reduce condensation on cold surfaces. Install vapor barriers where needed to keep moisture out of wall cavities.
Monitoring and Routine Checks
Maintain a monthly schedule for checking your home’s humidity levels using a hygrometer. Adjust settings on dehumidifiers as needed to keep indoor moisture in check.
Inspect windows, doors, and rooflines regularly for signs of water damage or leaks. Address any issues promptly before they turn into mold problems.
If you notice new damp spots or musty odors, act fast. Document the issue and take steps like running a dehumidifier until you can assess further with professional help if necessary.
Common DIY mistakes and safety pitfalls to avoid
Common DIY mistakes and safety pitfalls can make moisture problems worse and fuel mold regrowth. Always identify and fix moisture sources or ongoing leaks before any cleanup; humidity control is essential for remediation to work. Watch out for cleaning without fixing moisture, using ozone or unproven “kill” products, repainting over mold, and skipping proper PPE and containment.
This matters because protecting occupants and preventing cross-contamination depends on correct steps. Use the right PPE, contain the work area with barriers, and follow safe, evidence-based cleaning on different surface types; decide when testing is helpful and when a professional assessment is warranted. Check local disposal rules and follow safe re-occupation guidance instead of shortcuts.
Why fixing moisture source first is critical
Ignoring the root cause of mold, such as a leaky roof or plumbing issue, can lead to repeated outbreaks. For example, cleaning up visible mold without addressing the water source means you’re just delaying the inevitable regrowth.
To ensure your efforts stick, confirm that moisture issues are resolved before tackling mold. Use a hygrometer to check humidity levels and look for signs of ongoing leaks or condensation. If these problems persist, they’ll undermine all your cleanup work.
Once you’ve identified the source, fix it properly—patch up holes, replace damaged materials, and improve ventilation as needed. Only then should you proceed with mold remediation to prevent future issues.
Unsafe products and approaches to avoid
Avoid these common mistakes that can make your situation worse:
- Ozone generators: These devices produce harmful ozone gas, which is ineffective against mold. Instead, use EPA-approved cleaning agents.
- Antimicrobial foggers without cleanup: Fogging alone doesn’t remove mold spores; it just spreads them around. Follow up with thorough surface cleaning and drying.
- Incorrect bleach use: Bleach isn’t always effective against mold on porous surfaces. Use products specifically designed for mold remediation, like borax or vinegar solutions.
Stick to safe methods that address both the mold and its cause to avoid health risks and costly rework.
After cleaning up mold, it’s crucial to verify your work. Take photos of the affected areas before and after remediation for a clear record.
Keep receipts from any products or services used during cleanup. This documentation can be useful if you need to prove compliance with health codes or insurance claims.
Use a hygrometer to monitor humidity levels in treated areas over time. A stable, low-humidity environment is key to preventing mold regrowth. Also, conduct regular visual inspections for signs of new growth.
Mold testing
Mold testing helps you decide when to test, monitor moisture, or move to remediation. It covers when visible mold, musty smell, high humidity, or ongoing leaks justify testing versus simpler moisture control. You’ll learn the differences between air spores tests, DNA-based tests, and surface or bulk sampling, plus what home test kits can and cannot tell you. Plan to fix condensation sources, aim for humidity under the practical target range, seal the area, and photograph surfaces before you test.
In plain terms, this matters because moisture in concrete-heavy spaces can skew results and hide active growth behind walls or under slabs. A practical workflow guides you from choosing a test type to collecting samples safely, labeling them, and sending them to a reputable lab, then interpreting results with clear caveats about moisture context and false positives or negatives. Use DIY tests for a first look, but know when to escalate to professional remediation and targeted moisture control, cleaning, or structural fixes, while tracking costs and timelines from start to finish.
Pre-test preparation and contamination control
Before you start testing for mold, it’s crucial to prep the area properly. First, fix any obvious moisture issues like leaks or condensation spots. Turn off your HVAC system to prevent cross-contamination between rooms.
Next, seal off the test area with plastic sheeting and tape. This stops spores from spreading during testing. Wear protective gear—gloves, mask, and goggles—to keep yourself safe while handling samples.
Stabilize the moisture levels in your home by running a dehumidifier or air conditioner to bring humidity down below 50%. Take photos of any moldy surfaces before you start so you can track changes later. These steps ensure accurate results without risking further contamination.
Sampling methods explained: air, surface/tape, and bulk samples
Air sampling is best for detecting mold spores floating in the air. Use a pump to draw air through a filter that catches these spores. Surface or tape sampling involves swabbing or taping areas suspected of having mold growth.
Bulk sampling takes small pieces of material from walls, floors, or other surfaces where mold might be growing inside. Each method has its own kit and lab requirements. Air samples are usually the quickest to analyze but surface and bulk can give more detailed information about specific types of mold present.
Choose the right test based on your situation—air sampling for general indoor air quality, surface or tape if you see visible signs of mold, and bulk when you need a deeper look at hidden growth. Follow instructions carefully to avoid contamination and ensure accurate results.

Conclusion
Keep mold on the radar, but stay focused on safety, durability, and a clean, lasting result. Stick to the plan, fix the moisture problem, and don’t let small issues turn into costly damage.
Check in this order: confirm the moisture source, inspect visible areas, document findings, decide if DIY cleanup is appropriate, gather PPE and supplies, isolate the area, clean or repair small patches, and recheck after a few days of drying and monitoring. Do a test patch first and only proceed if the area stays dry and clean, then expand only as needed.
Common mistakes to avoid are skipping the moisture source, over-wetting surfaces during cleanup, and mixing chemicals or using tools in a way that spreads spores. wear PPE at all times, contain the area, and test small areas before full cleanup. If you find mold behind walls, carpet padding, or in large patches, or if odors linger after DIY work, stop and reassess safety and scope.
Call a professional when mold covers a large area, shows up again after cleanup, involves HVAC or unknown growth, or you’re unsure about hidden water intrusion. They can quote the typical costs and scope, helping you avoid wasted effort and expensive mistakes. Stay steady, respect the limits, and you’ll protect your home and your time.
FAQ
What are common signs of mold in a home?
Look for musty smell, visible spots on walls or ceilings, and damp patches. Little bubbles in paint or warped wallpaper can also show moisture behind the surface.
Don’t ignore a building that stays damp after rain or a quick shower. Mold loves moisture and will spread fast if you don’t act.
Can I diagnose mold myself without a pro?
You can spot obvious mold in plain sight, but a proper diagnosis needs moisture checks and sometimes air tests. If you’re unsure, treat any suspect area as a real mold issue and fix the moisture source first.
What should I do first if I find mold?
Stop the water leak or fix the humidity problem right away. Dry the area as much as you can and remove minor mold with soap and water, but don’t disturb large patches or attic spaces without protection.
When should I call a pro?
If mold covers more than a few square feet, or if you have asthma, allergies, or structural damage, bring in a licensed mold remediation pro. Also call in if you see mold growing behind walls or ceilings after a leak that won’t stop.