

Introduction
The installation of parapet caps is a critical step in protecting your building’s exterior from water intrusion. But how long does it take, and what are the key steps involved?
In this guide, we’ll walk you through a detailed timeline for installing stucco parapet caps, ensuring that each stage is completed efficiently and effectively.
The Complete Timeline for Parapet Cap Installation
Installing parapet caps involves several stages, each with its own duration. Here’s a step-by-step timeline to help you plan your project:
- Preparation (1-3 days): Inspect the existing wall and parapet, choose materials, plan flashing, and mock up a fit.
- Installation (2-4 days): Install the caps in dry, measured steps. Check fit and alignment before applying sealant.
- Sealing and Finishing (1 day): Apply sealant, ensure proper curing, and perform a final inspection.
Total estimated duration: 4-8 days, depending on the size of the project and weather conditions.
Key takeaways
The preparation stage is crucial as it sets the foundation for the entire installation process. Proper planning ensures that you have all necessary materials ready and that the existing wall and parapet are sound, which can significantly reduce the overall project duration.
- Parapet caps seal top edges, shed water, and support stucco finish.
- Choose durable, compatible materials and flashing per manufacturer instructions and local codes.
- Detail edges with proper overhang and chamfers to prevent water ingress.
- Prepare surfaces, clean substrates, and prime before cap installation for adhesion.
- Inspect for cracks, sealants, and joints to avoid leaks and failure.
- Follow safety protocols, PPE, and ladder/edge restrictions during top-edge detailing.
Table of Contents
- Introduction
- Key takeaways
- What Are Stucco Parapet Caps and Why They Matter
- Material Selection: Durability, Compatibility, and Performance
- Design and Aesthetic Considerations Without Sacrificing Performance
- Step-by-Step Installation and Top-Edge Detailing
- Common Installation Mistakes and How to Avoid Them
- Maintenance Routine and Long-Term Durability Strategies
- Safety, Tools, and Materials Checklist for Diy or Pro Work
- Budgeting, Project Planning, and Permits
- Conclusion
- FAQ
What Are Stucco Parapet Caps and Why They Matter
A stucco parapet cap sits on top of the parapet and helps seal the top edge against weather. It comes in shapes and materials that suit different building styles and stone or stucco textures. The cap should feel integrated with the wall and roof line, not tacked on as an afterthought.
Moisture path risk comes from gaps, improper detailing, or flashing that doesn’t tie into the rest of the water control system. When water bypasses the waterproofing, you can see in-wall damage, efflorescence, and freeze-thaw stress. Proper flashing, sealants, and a good cap profile reduce those issues and maintain curb appeal as well as function.
Anatomy of a parapet cap assembly
The heart of any parapet cap assembly is the cap itself, a protective layer that sits atop the parapet to seal its top edge. This cap can be made from various materials like concrete, metal, or composite, and comes in different shapes such as flat, sloped, or curved.
Beneath this cap lies the flashing, a thin, impermeable material (usually metal) that directs water away from the wall. The substrate, typically a layer of concrete or masonry, provides structural support. Above the cap, a drainage plane ensures any water that gets past the cap can still escape.
Each of these layers plays a crucial role in weather resistance. The cap protects against direct rain, while the flashing and drainage plane work together to prevent water from penetrating into the wall.
Common failure modes where water gets in
Water intrusion often occurs due to failures at the cap level. Cracking is a common issue, allowing water to seep into the wall. This can happen due to age, settling, or improper installation.
Failed sealant around the cap’s perimeter also lets water in. Over time, caulk and other sealants break down, creating gaps that water can exploit. Similarly, if the flashing is not properly integrated with the cap, it can allow water to bypass the waterproofing layer.
Water can also pond (accumulate) on flat caps, leading to increased hydrostatic pressure that may force water into the wall. Lastly, gaps where cladding terminates at the cap level can provide another entry point for water.

Material Selection: Durability, Compatibility, and Performance
Common cap materials include stucco, preformed metal, stone, concrete, and manufactured caps. Each has its own durability profile, climate response, and maintenance needs. The cap should pair with the substrate and the stucco finish to keep moisture out and look right for years.
Choosing material means weighing climate, substrate, and roof details like membranes and flashing. Consider how the cap will handle expansion, contraction, and UV exposure, plus how easy it is to replace or reseal later. Check manufacturer specs and local guidelines to confirm compatibility with your current assembly.
Material specs and standards explained
Choosing the right material for your parapet cap is crucial to ensure a durable, watertight top edge. Here are key properties to consider:
- Water Repellency: Look for materials with high water repellent ratings to prevent moisture ingress.
- Thermal Movement: Ensure the material can handle expansion and contraction due to temperature changes to avoid cracking.
- Corrosion Resistance: For metal caps, check corrosion resistance ratings to prevent fastener failure.
- Freeze-Thaw Durability: In colder climates, choose materials that can withstand freeze-thaw cycles without degrading.
- Adhesion & Bond Strength: Ensure the material bonds well with your substrate to prevent delamination and water intrusion.
Cost and lifecycle trade-offs
When selecting parapet cap materials, consider both initial cost and long-term maintenance expectations. Here’s what to expect:
Stucco/Thru-Coat Caps: Initial costs are low, but long-term maintenance can be high due to potential cracking and staining. Proper installation is key to longevity.
Preformed Metal Caps: Mid-range cost with good durability. Regular inspections for corrosion and proper flashing integration are crucial for a long lifecycle.
Stone, Concrete, or Manufactured Caps: High initial costs but low maintenance needs. Proper installation, including backside drainage and expansion joints, is vital to prevent cracking.
Design and Aesthetic Considerations Without Sacrificing Performance
Profile shape, slope, and drip details affect both shedding water and visual rhythm along the parapet. A balanced profile helps prevent water from lingering at corners or joints. Keep the design aligned with the building silhouette and surrounding stucco texture.
Map water paths and identify potential failure points to guide safe, durable choices. Choose finishes and colors that work with the stucco, while ensuring sealants and coatings stay compatible through movement. Consistency in lines and proportions reinforces both look and function.
Profiles, slopes, and drip edge principles
The cap’s profile – flat or curved – affects water runoff. Flat caps need a steep slope to shed water quickly. Curved caps can handle gentler slopes.
Slope is crucial. Aim for at least 1/4″ drop per foot away from the wall. Too little slope lets water pool, encouraging leaks.
The drip edge is where water leaves the cap. It should be sharp and well-defined to prevent water wicking back up under the stucco. Visual trims can hide this functional detail.
Matching movement and thermal considerations
The cap and wall move differently with temperature changes. Expansion joints let them move independently without cracking the stucco. Place them every 20-25 feet.
Slip sheets between the cap and wall allow for some slip, reducing stress on both materials. Use them where needed.
Choose compatible materials. Stucco expands and contracts more than concrete or metal caps. Make sure your cap material can handle this movement without causing issues at the joint.
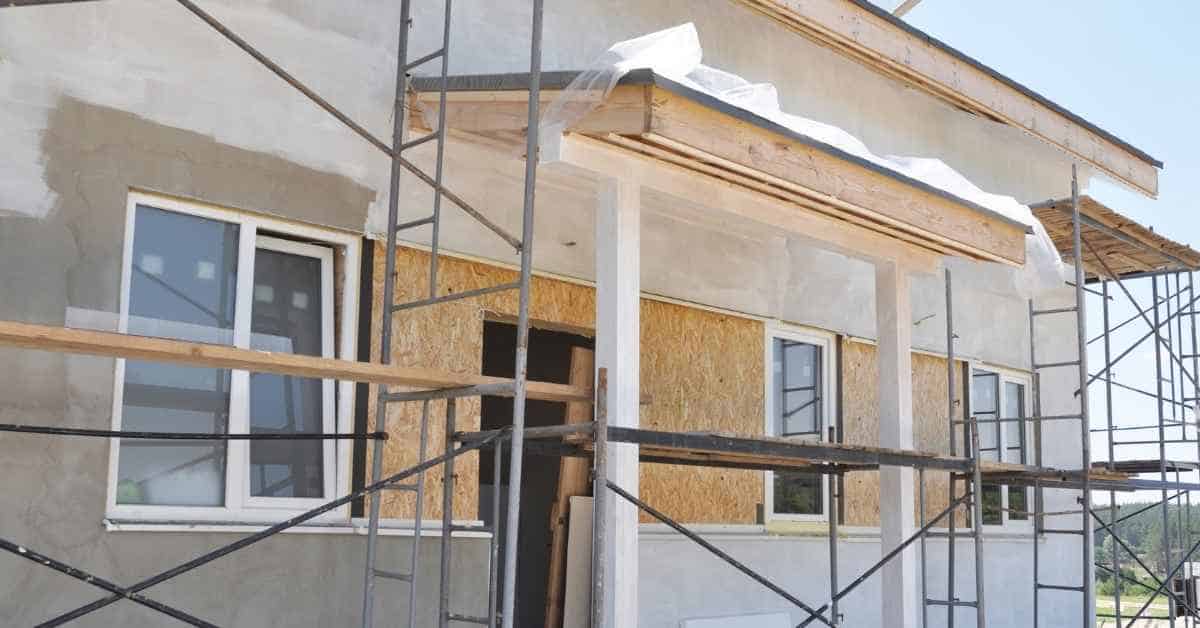
Step-by-Step Installation and Top-Edge Detailing
Begin with pre-checks for parapet geometry, flashing continuity, and proper slope or drip edges. Confirm the wall prep and moisture barriers are ready before cap work starts. Plan for joints and expansion needs so the cap can move with the wall.
Follow a logical sequence from mock-up to final finish. Place the cap with the intended height and overhang, then cure, seal, and integrate flashing behind it. Finish the stucco up to and around the cap edge with correct lath and joints for a clean transition.
Step-by-Step Installation Process
Follow this clear, numbered sequence to install and detail your parapet cap like a pro.
- Preparation: Check safety, gather tools, and ensure all materials are on-site. Why: Safety first, and having everything ready speeds up the job.
- Measure and mark: Accurately measure and mark out your parapet cap’s height and overhang. Check: Double-check measurements to avoid mistakes.
- Form or place the cap: Form it if needed, or place prefab caps with proper height and overhang. Sign it’s right: Cap fits snugly along the parapet’s top edge.
- Cure and seal: Cure formed concrete and seal all cap surfaces to prevent moisture ingress. Why: Proper curing ensures strength, and sealing prevents water from getting in.
- Install flashing and waterproofing: Apply flashing under the cap, tie it into the roof membrane, and add waterproofing behind the cap. Check: Flashing lies flat and is securely attached.
- Apply stucco base coats: Install lath, apply scratch coat, brown coat, and finish coat up to and around the cap edge. Why: Proper lath installation and correct stucco application ensure a strong, water-resistant wall.
- Detail the top edge: Design a clean drip lip, set back the cap edge slightly from stucco, and plan caulking details for joints. Sign it’s right: The cap edge is slightly set back, and drip lips are well-defined.
- Final checks and cleanup: Inspect your work, touch up any areas as needed, and clean up the site. Why: A thorough inspection ensures a quality job, and cleaning up keeps the site safe.
Pre-install planning and substrate preparation
Before you start, inspect and prepare your substrate to ensure a solid base for your parapet cap.
Inspect the existing substrate: Check for cracks, damage, or signs of water intrusion. Repair as needed: Fix any issues before installing the cap to prevent further problems.
Verify water-resistive barrier (WRB) and termination points: Ensure the WRB is intact and properly terminated at the parapet’s top edge. Why: A functioning WRB prevents moisture from getting into the wall assembly.
Plan for expansion joints and weep locations: Mark out where you’ll install expansion joints to accommodate movement, and plan weep locations to allow trapped moisture to exit. Why: Proper planning minimizes future issues due to movement or trapped water.
Flashing integration and through-wall drainage
Properly integrate flashing under your parapet cap to create a continuous barrier against water intrusion.
Integrate metal or flexible flashing: Install flashing under the cap, ensuring it’s wide enough to cover the entire top edge of the parapet. Why: Proper flashing coverage prevents water from getting behind the cap.
Create proper terminations: Fold and secure the flashing at the ends, ensuring it’s tied into the roofing membrane or other appropriate termination points. Check: Flashing is securely attached and lies flat against the substrate.
Provide pathways for trapped moisture to exit: Install weep screeds or other drainage methods at the base of the parapet to allow any trapped moisture to escape. Why: Proper drainage prevents water from building up behind the cap and causing damage.
Fastening, sealants, and finish application
Secure your parapet cap in place, seal critical joints, and apply a proper stucco finish to maintain the waterproof plane.
Recommended fastening methods: Use appropriate fasteners such as concrete screws or anchors to secure the cap to the substrate. Why: Proper fastening ensures the cap stays in place despite wind, weather, or building movement.
Sealant joint locations/types: Apply compatible sealants at all joints and penetrations to prevent water ingress. Why: Sealing critical areas helps maintain a continuous waterproof barrier.
Proper stucco finish detailing: Ensure the cap edge is slightly set back from the stucco face, and apply caulking details for joints as planned. Why: Proper detailing maintains the waterproof plane and enhances the cap’s aesthetic appeal.
Common Installation Mistakes and How to Avoid Them
Common errors include improper slope, blocked drainage, and misaligned pathways that invite moisture intrusion. Missing or weak flashing can undermine the entire cap setup. Incompatibles between cap material and substrate lead to cracking or corrosion over time.
Focus on edge detailing, continuous drainage, and proper sealant timing. Pay attention to cap geometry, overhang, and drip edge design to keep water away from the wall. Regular checks during and after installation help catch issues early.
Visual checkpoints during and after installation
Use this checklist to catch mistakes early, both during install and on final inspection.
- Slope: Check cap’s slope. It should be at least 1/4″ per foot away from the building to ensure water runoff.
- Drainage pathways: Ensure they’re clear, aligned, and not blocked by debris or improper installation.
- Weep holes/vents: Confirm they’re present, unobstructed, and evenly spaced along the cap’s length.
- Flashing: Verify it’s properly installed, continuous, and integrated with the roof membrane.
- Sealants: Check joints for proper sealant application. No gaps or missing areas.
- Cap geometry: Ensure cap overhang is consistent and drip edge design is intact.
- Wind-driven rain: Inspect for potential water entry points, especially at corners and joints.
- Drainage plane: Verify a continuous drainage plane behind the cap to prevent moisture buildup.
Quick rule: Regular visual checks help catch issues early, saving time and money in the long run.
Retrofit fixes for existing failures
If you’re dealing with an existing parapet cap and stucco system that’s leaking, here are practical retrofit options to consider:
Flashing: If flashing is missing or damaged, it can be added or replaced. This often involves removing some stucco and reinstalling new flashing before reapplying the stucco.
Drip edges can also be installed or repaired if they’re missing or damaged. They help direct water away from the building and prevent it from getting behind the cap.
If the cap’s profile is damaged, it may need to be repaired or replaced. This could involve removing and replacing sections of the cap, ensuring proper slope and drainage are maintained.
Joints: If sealants have failed, joints should be re-sealed using a compatible, high-quality sealant. This can often be done without removing the entire cap, but it’s important to ensure any underlying issues (like moisture buildup) are addressed first.
Maintenance Routine and Long-Term Durability Strategies
Set an inspection cadence and watch for cracks, spalling, or sealant degradation. Early signs tell you when to repair before larger leaks form. Keep notes on findings to guide future work.
Maintain the cap with cleaning, resealing joints, and rechecking flashing continuity. Choose compatible coatings and maintain slope to keep water moving away from the wall. Document work so future owners know what was done.
Inspection checklist and visual cues of deterioration
Use this checklist to inspect your parapet caps regularly. Catching issues early prevents costly repairs.
- Cracks: Inspect for hairline or wider cracks. Any size crack can let water in, leading to spalling and structural damage.
- Loose caps: Gently shake the cap. If it moves, there’s a risk of it falling off, causing injury or property damage.
- Sealant failure: Check sealants around joints and edges for cracks, peeling, or missing sections. Failed sealants allow water intrusion.
- Corrosion: Inspect metal flashings and fasteners for rust. Corroded components can fail, leading to leaks.
- Biological growth (moss, algae): Presence of these indicates moisture retention, which can cause damage over time.
- Ponding water: Check for standing water on the cap’s surface. This indicates poor drainage and can lead to saturation and freeze-thaw damage.
- Spalling concrete: Look for flaking or chipping of the concrete surface. This is a sign of moisture intrusion and could indicate more serious structural issues.
- Failed flashing: Inspect flashings at edges, corners, and around penetrations. Failed flashings can cause water to leak into the wall system.
Quick rule: If you find any of these issues, address them promptly to prevent further damage.
Minor repairs vs. scheduled restoration
Some parapet cap issues can be fixed by homeowners or maintenance staff, while others require planned restoration or replacement.
Minor repairs: These include replacing sealants around joints and edges, patching small cracks with a compatible material, and cleaning debris from the cap’s surface. These tasks are relatively inexpensive and can be done by homeowners with basic tools and knowledge.
However, if you notice multiple issues or signs of aging, it might be time for scheduled restoration. This could involve replacing damaged caps, reapplying waterproof coatings, or even rebuilding the entire cap system.
When to plan restoration: If your parapet caps are more than 20 years old, if you notice multiple issues at once, or if minor repairs aren’t fixing the problem, it’s time to consider a planned restoration. This ensures the longevity and performance of your cap system.
Safety, Tools, and Materials Checklist for Diy or Pro Work
Prioritize fall protection and edge safety. Identify required guardrails or other barriers and assess wind and weather risks. Plan for secure access and a clear work zone on the parapet.
Assemble a practical tools and PPE list, then review safe work practices. Include ladder anchors, harnesses, non-slip footwear, and proper caulking and flashing materials. Know when to bring in a pro for complex flashing or structural concerns.
Essential tools and recommended materials
Before you start any concrete work, whether it’s installation or repair, use this checklist to ensure you have the right tools and materials on hand. This will help you complete your project efficiently and safely.
- Cordless Drill: Check battery charge and bring extras if needed. A drill is essential for mixing concrete and drilling anchor points.
- Concrete Mix: Verify the bag’s label for the right mix type (fast-setting, regular, or high-strength) for your project. Check local rules for required PSI (pounds per square inch).
- Fasteners: Ensure you have enough concrete screws, anchors, or bolts suitable for your project’s load requirements.
- Metal Shears: Inspect blades for sharpness. You’ll need these to cut reinforcement mesh or rebar.
- Trowels: Pack a set of trowels in varying sizes (e.g., 6″, 12″, and 24″) for finishing, edging, and bullfloating the concrete surface.
- Concrete Mixing Tub or Wheelbarrow: Ensure it’s clean and in good condition. A damaged tub can cause weak spots in your mix.
- Reinforcement Mesh/Rebar: Check dimensions against your project plans. Verify the rebar has the correct yield strength (e.g., 40,000 PSI or 60,000 PSI).
- Concrete Sealer: Have a suitable sealer on hand to protect your concrete from moisture and stains after curing.
Quick rule: Always double-check your tools and materials before starting. Missing or incorrect items can lead to weak, damaged, or unsafe concrete structures, causing expensive rework.
When to call a pro: scope, qualifications, and documentation
Before you start any concrete work, use this checklist to determine when you need to hire a licensed contractor. Safety and quality are at stake.
- Complex flashing replacement: Check if the damage involves multiple materials (e.g., concrete, brick, siding) or requires specialized flashing types. Confirm by inspecting the entire affected area for signs of multi-material involvement.
- Structural issues: Look for cracks wider than 1/4 inch, diagonal cracks, or cracks at corners. Verify with a coin test: place a coin in the crack; if it disappears, it’s too wide. What goes wrong if you skip this: Structural integrity may be compromised.
- Multi-layer failures: Check for delamination (peeling layers) or multiple cracks. Confirm by tapping the surface with a hammer; hollow sounds indicate delamination. What goes wrong if you skip this: Multiple repairs will be needed, increasing costs.
- Permit requirements: Check local building codes for projects over 4 inches thick or involving structural changes. Confirm by visiting your local permit office or checking their website. What goes wrong if you skip this: Fines and rework may be required.
- Licensing and insurance: Ask for a copy of the contractor’s license and proof of liability insurance. Verify by checking with your state’s licensing board or calling their insurance company. What goes wrong if you skip this: You could be held liable for damages or injuries.
- Experience and references: Ask about their experience with similar projects and contact provided references. Confirm by calling the references and asking detailed questions about the contractor’s work. What goes wrong if you skip this: Poor quality work may result in costly rework.
- Written contract: Ensure the contract includes a detailed scope of work, timeline, payment schedule, and warranty information. Verify by reading the entire contract carefully before signing. What goes wrong if you skip this: Disputes may arise over what was agreed upon.
- Warranty and guarantees: Ask about their warranty policy and any manufacturer guarantees for materials used. Confirm by asking for a copy of the warranty in writing. What goes wrong if you skip this: You may not be covered for future repairs or defects.
Quick rule: If in doubt, call a pro. It’s better to spend a bit more upfront than risk costly rework and potential safety hazards down the line.
Budgeting, Project Planning, and Permits
Outline scope and phasing to sequence removal, repair, cap installation, and finish work. Plan for weather windows and protective measures to minimize exposure. A clear plan reduces rework and keeps the project on track.
Consider permits and codes that govern parapet cap work, along with any HOA requirements. Gather quotes, verify licenses, and outline warranties. Keep an as-built record and a maintenance plan to guide future interventions.
Cost breakdown and factors affecting price
The cost of parapet cap work varies greatly depending on several factors. Here’s a breakdown:
Materials: Parapet caps, flashing, sealants, stucco patch/finish – expect to spend $20-$50 per linear foot.
Labor: Labor costs range from $30-$60 per hour. Access difficulty (scaffolding, lifts) can double these rates.
Repair and Contingencies: Allocate 10-20% of your budget for substrate repairs and contingencies. Flashing complexity may add another 5-10%.
Project timeline and sequencing with other trades
Here’s a realistic project timeline:
Inspection (Day 1): Assess existing parapet, stucco condition, flashing details. Identify moisture risk areas.
Substrate Repair (Days 2-4): Remove damaged stucco, repair substrate, allow to cure before proceeding.
Flashing Installation (Day 5): Install new flashing, integrate with existing drainage systems. Allow a day for inspection and adjustments.
Cap Installation (Days 6-7): Install parapet caps, apply sealants. Coordinate with roofers to avoid conflicts during this phase.
Finish Cure & Inspection (Day 8+): Allow finish materials to cure before final inspection and sign-off.
Conclusion
Keep water out and the cap looking right by treating the parapet edge as the critical detail it is. Solid material choice, proper flashing, and careful detailing at the top edge save you trouble, protect the structure, and maintain curb appeal.
First, confirm the existing wall and parapet are sound, choose durable, compatible materials, plan the slope and flashing, mock up a fit, and then proceed in dry, measured steps. Check fit and alignment before any sealant goes in, then install with clean joints, test the water shed in a controlled way, and schedule routine maintenance to catch issues early.
Avoid common traps: skip flashing or proper slope and you’re inviting leaks; over-tighten or misapply sealant and you create cracks; and ignore safety or permit requirements and you risk injury or failed work. Always wear proper PPE, test a small area first, and work from a stable ladder or scaffold with a clear plan and shutoff for utilities as needed.
If the project already requires significant rework, or you’re unsure about flashing compatibility, parapet height, or code permits, call in a pro. Stay deliberate, stay safe, and you’ll finish with a cap that channels water away and looks built to last. You’ve got this—start now and work to a finish you can trust.
FAQ
What exactly is a stucco parapet cap and how does it function?
A parapet cap is the top piece that covers the edge of a parapet to keep water out. It helps shed rain and blocks granular stucco from soaking into the edge. It’s a critical part of the wall assembly, not just a cosmetic piece.
What material options balance durability and performance for parapet caps?
Look for materials that resist moisture, UV, and cracking. Common choices include solid concrete or masonry caps with a protective finish, and pre-formed caps designed for stucco systems. Always check the manufacturer’s guidance for compatibility with your stucco and climate.
How should I install and surface‑prep before adding a parapet cap?
Prepare a clean, sound surface and ensure proper drainage away from the cap. Follow the product instructions for bonding or mortar type, and make sure joints are sealed where the cap sits on the parapet. Do not skip flashing or underlayment steps recommended by the cap’s manufacturer.
When is it time to call a professional?
If you see cracking, water stains, or loose caps, pause the DIY and get a professional opinion. Structural issues, high-height work, or unusual roofs are also signs to hire help. Always verify guidance with product labels, manufacturer instructions, and local rules before proceeding.