
Introduction
Caulking stucco to window joints means sealing the gaps where the stucco meets the window frame to keep water out and air in check. It’s a hands-on job that protects the wall and helps prevent leaks. You’ll want to know where not to seal so drainage isn’t blocked and you don’t trap moisture.
Start by cleaning the joint and removing old sealant as needed, then follow the sealant’s label for surface prep and cure time. Choose a sealant type suitable for stucco and window framing, and apply it neatly while respecting any flashing or hidden drainage paths. Always check manufacturer instructions and local rules for allowed materials, and don’t seal areas that are designed to drain or move with expansion and contraction.
Key takeaways
- Inspect flashing, WRB, and stucco joints before applying sealant for proper adhesion.
- Choose sealant compatible with stucco and window materials; check manufacturer guidance.
- Backer rods control joint depth and prevent squeeze-out during curing.
- Clean joints thoroughly, remove dust, oils, and old caulk for bonding.
- Apply caulk with even depth and a consistent bead profile.
- Wear gloves and eye protection when cutting or tooling sealant.
Table of Contents
- Introduction
- Key takeaways
- Why This Detail Matters: Moisture Management and Durability
- Anatomy of the Assembly: Stucco, WRB, Flashing, and Window
- Sealant Selection and Compatibility
- Joint Design, Backer Rods, and Depth Control
- Step-by-Step Preparation and Caulking Procedure
- Visual Checkpoints, Common Mistakes, and Troubleshooting
- Maintenance Schedule, Inspection Triggers, and Codes/Specs to Check
- Tools, Materials Checklist, and Visual Checkpoints for Site Readiness
- Conclusion
- FAQ
Why This Detail Matters: Moisture Management and Durability
The stucco-to-window joint is a primary line of defense against water intrusion. It also helps manage condensation and accommodates building movement without cracking. Over-sealing can block drainage paths, while under-sealing can invite leaks and stucco damage.
Think of this joint as a drainage and movement accommodation, not a cosmetic gap filler. Proper sealing allows for drying and air exchange where appropriate. Always weigh the risk of trapped moisture against the need for a tight seal, and verify specifications if in doubt.
Risks of incorrect caulking
Improper sealing at the stucco-to-window joint can lead to serious issues. Here are some common failure modes:
Capillary wicking: Water seeps into tiny gaps, travels along the surface, and causes damage behind the stucco.
Trapped water: If you seal too tightly, water gets trapped in the joint. This can lead to mold growth and structural damage.
Adhesion failure: Incorrect caulking can cause the sealant to peel or crack, leaving gaps for water intrusion.
Freeze-thaw damage: Water expands when it freezes. If it’s trapped in a joint, it can break the seal and cause cracks.
Intended function of seals versus drainage paths
A proper stucco-to-window joint needs both a weather seal and a drainage plane. Here’s why:
Weather Seal: This keeps bulk water out. It’s the first line of defense against rain, snow, and wind-driven moisture.
Drainage Plane/Weep Path: This allows incidental water that gets behind the seal to exit. It prevents water from getting trapped and causing damage.
Both are crucial. A weather seal without a drainage path can lead to trapped water. A drainage path without a weather seal lets too much water in.
Anatomy of the Assembly: Stucco, WRB, Flashing, and Window
Break down the layers: stucco finish and base, water-resistive barrier (WRB), flashing, and the window flange or sill. Each layer has a role in shedding water away from the opening. The joints need the WRB and flashing to remain continuous for drainage to function.
Misplaced or damaged components can create a path for water to bypass the seal. Identify which surfaces and seams must remain unbroken in the assembly. If you’re unsure, check the manufacturer’s installation details for your specific system.
Flashing and its role in drainage
The flashing around your window is a crucial part of the drainage system. It’s made from metal, usually aluminum or galvanized steel.
Properly installed head, sill, and jamb flashing direct water to the exterior weeps. They do this by sloping down and away from the window opening. This ensures that any water that gets behind the stucco has a path to escape.
Never caulk over the lips or termination points of the flashing. Doing so blocks these drainage paths, trapping moisture and leading to potential leaks and damage.
Window flange, sill detail, and return conditions
The window’s flange extends out from the frame. It provides a surface for the stucco to bond with and helps direct water away from the window opening.
The sill is the bottom part of the window that slopes downwards to drain water. Caulking here can trap moisture, so it’s important to leave this area free to drain.
Return conditions are where the stucco comes back onto itself at corners or edges. Here, caulking is appropriate to prevent water from getting behind the stucco and causing damage. But remember, never caulk over weep holes. These allow water to escape.
Stucco terminations, weep screed, and drainage paths
The stucco finish should terminate at the top of the window head flashing. This allows water to drain off the top of the window.
Weep screeds are horizontal grooves in the stucco that allow water to escape. They’re usually found at the bottom of the window opening, just above the sill. Never caulk over weep screeds. Doing so blocks these drainage paths and traps moisture.
Control joints are vertical grooves in the stucco that help prevent cracking. They should align with the vertical legs of the flashing. This ensures that water can drain freely down the sides of the window.
Sealant Selection and Compatibility
Common sealant chemistries include silicone, polyurethane, hybrid MS/polyether, and acrylic-latex. Each brings different adhesion, flexibility, and UV resistance to the joint. Consider paintability and compatibility with stucco and window materials when choosing.
Always consult the manufacturer compatibility charts or product data sheets before purchasing. If a chart is unclear, contact the supplier or the window/masonry manufacturer for guidance. Do not rely on general promises without confirmation.
Adhesion substrates and primers
Sealant adhesion is key to a durable caulking job. Here’s what you need to know about common substrates:
Stucco finish: Most sealants stick well to cured stucco, but using a primer or bond-breaker can enhance adhesion and prevent peeling.
Metal flange: Clean the metal with a wire brush first. A primer designed for metal is usually needed for good adhesion.
PVC and wood: These surfaces are typically easy to seal, but ensure they’re clean and dry before applying any primer or sealant.
Paintability, UV exposure, and expected lifespan
Sealants come in paintable and non-paintable varieties. Here’s how to choose:
If you want to paint your sealant to match the stucco or window frame, opt for a paintable sealant like acrylic-latex or hybrid MS/polyether. But know that they won’t last as long as non-paintable options.
Non-paintable sealants, like silicone and some polyurethane types, offer better longevity but can’t be painted. They’re great for areas with high UV exposure, as they resist sun damage well.
Consider your climate and the sealant’s expected lifespan when deciding on maintenance intervals. Regularly inspect and maintain your caulking to keep moisture out and extend the life of your windows and stucco.
Joint Design, Backer Rods, and Depth Control
Joint geometry and backer rod sizing control sealant depth and how stress is distributed across the seal. A proper backing rod prevents three-sided adhesion, which can lead to premature failure. Depth recommendations come from the sealant manufacturer and must be followed.
Respect the intended cross-section to allow movement without squeezing the seal out of the joint. If you cannot find a depth spec, verify with the sealant supplier or consult job-specific installation guidelines. Safety margin should be considered within the provided ranges and instructions.
Backer Rod Type and Placement
Backer rods are essential for controlling sealant depth. They’re made from compressible materials like foam or felt.
Foam is cheaper, but can degrade over time. Felt lasts longer, but costs more.
Placement is key. Insert the rod into the joint, then press it in until it’s level with the face of the stucco. This sets your target sealant depth and prevents adhesion to the back of the joint.
Target Sealant Depth and Width Guidance
The ideal depth:width ratio is usually around 1:2 or 1:3. This helps distribute stress evenly across the joint.
Check your sealant’s datasheet for exact recommendations. Many installers use common joint widths like 1/4″ or 3/8″.
Use backer rod to control depth. If you’re using a 1/4″ joint, for example, and want a 1:2 ratio, you’d need a backer rod that compresses to 1/8″.

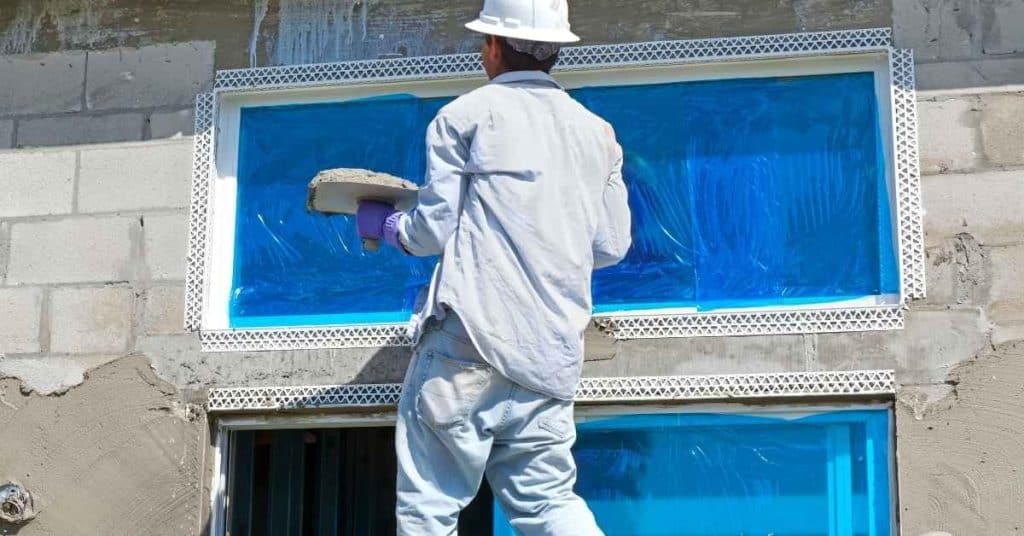
Step-by-Step Preparation and Caulking Procedure
Start with a thorough assessment of the joint, flashing, and WRB continuity. Clean the joint and remove old sealant where needed. Prime only if required by the selected product and substrate, following the label directions.
Tool and extrude the sealant to the proper depth, then tool to a consistent surface that sheds water and dries without pulling away. Clean up promptly and inspect for drainage pathways after tooling. Confirm flashing continuity before finishing the work.
Step-by-Step Process
This sequence will guide you through preparing and caulking your surfaces like a pro, ensuring a long-lasting, watertight seal.
- Gather tools and materials: Have your caulk gun, tube of silicone or acrylic latex caulk, painter’s tape, utility knife, damp cloth, and safety glasses ready. Why: Organization saves time and ensures you don’t miss a step. Check: All items are accounted for.
- Clean the surface: Remove any dirt, grease, or old caulk using a degreaser or soap and water. Let it dry. Why: A clean surface ensures better adhesion. Check: Surface is dry and free of debris.
- Dry fit the joint: Press the joint together to ensure it fits properly. Why: This helps you visualize how much caulk to apply. Check: Joint fits snugly without gaps or overlaps.
- Apply painter’s tape: Tape along both sides of the joint, pressing down firmly. Why: Tape creates clean lines and prevents caulk from sticking to unwanted areas. Check: Tape is secure with no gaps.
- Cut the caulk tube tip: Using a utility knife, cut the tip at a 45-degree angle. Why: This allows for better control and application of the caulk. Check: Tip is cut cleanly.
- Apply the caulk: Hold the gun at a 45-degree angle, apply steady pressure, and move along the joint. Why: This technique ensures even application. Check: Caulk bead is smooth and consistent.
- Tool the caulk: Use your finger or a damp cloth to smooth out the caulk and create a clean edge. Why: This step helps achieve a professional finish. Check: Caulk has a smooth, even appearance.
- Remove the tape: Carefully pull off the painter’s tape at a 45-degree angle while the caulk is still wet. Why: Removing tape early prevents it from pulling off dry caulk. Check: Tape comes off cleanly.
- Let it cure: Allow the caulk to dry and cure according to the manufacturer’s instructions, usually 24-48 hours. Why: Curing ensures the caulk reaches its full strength. Check: Caulk is no longer tacky.
Pro tip: For wider gaps, use a backer rod (a foam or rubber cord) before applying caulk to ensure a full seal and prevent over-applying caulk.
Surface preparation and cleaning
Before you start caulking, prep the surface right. Here’s how:
First, remove any old sealant. Use a utility knife or a caulk remover tool. Be careful not to damage the substrate.
Next, clean stains and dirt. For tough spots, use solvents like acetone or denatured alcohol. But be safe – always check product labels and ventilation before using them. For mild cleaning, water and soap will do. Ensure surfaces are completely dry before caulking.
If you’re working on porous surfaces like concrete or brick, consider mechanical abrasion to improve adhesion. Lightly sand with fine-grit sandpaper, then vacuum and wipe clean.
Application, tooling, and inspection immediately after work
Use this checklist once you’ve applied the caulk to ensure a proper seal and prevent costly mistakes.
- Check gun technique: Hold the caulk gun at a 45-degree angle to the surface. Squeeze steadily, applying even pressure.
- Verify bead size: Aim for a consistent 1/2″ to 3/4″ wide bead. Too thin may crack; too thick can’t be tooled properly.
- Tool caulk immediately: Use your finger or a damp sponge to smooth and shape the bead, ensuring it adheres well and forms a proper profile.
- Check for air pockets: Gently press along the bead. If it feels spongy, there’s an air pocket. Poke it with a nail, then tool again.
- Ensure drainage openings: Check if any weep holes or expansion joints are blocked by excess caulk. Clear them if needed.
- Inspect for gaps: Look for any missed spots or gaps in the seal. Fill with more caulk as necessary.
- Check for proper adhesion: Gently pull on the caulk with your fingers to ensure it’s stuck firmly to both surfaces.
- Wipe off excess: Clean up any squeezed-out caulk from surrounding areas using a damp cloth or sponge.
Quick rule: Always tool the caulk within 10 minutes of application to ensure it adheres properly and maintains its profile.
Curing considerations and temporary protection
After you’ve applied the caulking, it’s crucial to protect your work until it’s fully cured. Here’s what you need to do:
Check manufacturer guidelines for specific curing times. It typically takes around 24-72 hours, depending on temperature and humidity.
Keep these factors in mind during the curing process:
- Temperature: Ideal curing temp is between 50°F to 90°F (10°C to 32°C). Avoid extreme heat or cold.
- Humidity: Maintain high humidity levels, around 80-90%, to prevent the caulk from drying out too quickly. You can use plastic sheets or sprinklers for this.
Until your joints are fully cured:
- Avoid painting or applying any sealants on top.
- Keep water away; don’t let it pond on the surface.
- Protect from rain. Cover with plastic sheets if necessary.
- Prevent mechanical damage. Keep foot traffic and heavy equipment off until cured.
Visual Checkpoints, Common Mistakes, and Troubleshooting
Create a concise inspection list that covers adhesion, depth, joint width, and continuity of flashing and WRB. Look for gaps, pinch points, or squeegee marks that could trap moisture. Photograph key stages for documentation.
Be alert for common issues like over-welding, incomplete tooling, or sealant pulling away from edges. If you spot trouble, note it and plan a timely repair or reseal following the product instructions. Refer to manufacturer guidance for troubleshooting steps.
Visual checkpoints for a correct install
Use this checklist after installation to ensure your caulking job is up to par.
- Continuous flashing: Check if it’s visible and unbroken where required, usually at the top of the window.
- Proper bead profile: Ensure the sealant forms a smooth, continuous bead with no gaps or voids. It should be wide enough to bridge any minor movement but not so wide that it interferes with drainage.
- No sealant in weep paths: Verify that there’s no caulk blocking the weep screed or other designed drainage paths. This can cause water buildup and damage.
- Clean adhesion: Check if the sealant adheres well to the surfaces it’s supposed to, like stucco, trim, and window frames. Poor adhesion can lead to peeling or cracking.
- Sealant depth: Ensure the sealant is deep enough to fill any gaps but not so deep that it creates a reservoir for water.
- Sealant width: Confirm the sealant bead is wide enough to accommodate movement but narrow enough to allow proper drainage and prevent overcaulking.
- No voids or gaps: Inspect the sealant for any voids, gaps, or missed spots. These can let water in and cause damage.
- Sealant color: Check if the sealant color matches the surrounding surfaces as closely as possible to maintain a uniform appearance.
Quick rule: A good install should look clean, continuous, and well-adhered with no obvious defects or drainage obstructions.
Common installation errors and fixes
Use this checklist to troubleshoot common caulking mistakes and learn how to fix them.
- Overcaulked sill weeps: If you see sealant blocking the weep screed, scrape it off immediately. This allows water to drain properly and prevents moisture buildup.
- Three-sided adhesion: Check if the sealant adheres to three sides of the joint. This can cause stress on the sealant and lead to cracking or peeling. Scrape off excess sealant and reapply with proper tooling.
- Inadequate tooling: If the sealant bead is too flat, it may not be properly tooled. Use a damp finger or tool to create the desired profile and ensure proper adhesion.
- Wrong sealant: Ensure you’re using the right type of caulk for your application. Using the wrong kind can lead to poor performance, cracking, or peeling. If in doubt, consult with a professional or manufacturer guidelines.
- Poor surface preparation: Check if the surfaces were properly cleaned and primed before applying sealant. Poor preparation can result in poor adhesion and premature failure of the sealant.
- Exposed edges: Ensure all edges of the sealant bead are well-adhered to the substrate. Exposed edges can crack or peel over time, leading to water intrusion.
- Inconsistent bead width: If the sealant bead varies in width along the joint, it may not be properly applied or tooled. Reapply and tool the sealant for consistent width and proper drainage.
Quick rule: Regularly inspect your caulking jobs to catch and fix any issues early, before they cause major damage.
Maintenance Schedule, Inspection Triggers, and Codes/Specs to Check
Outline a practical inspection cadence that fits your climate and exposure. Document findings and keep warranty information or installation receipts for reference. Trigger re-caulking when you notice cracks, peeling, or water intrusion signs.
Always verify which manufacturer instructions and local code elements apply before work. Check for updates to standards or regional requirements and document any deviations from the original plan. Proper documentation supports warranty coverage and future inspections.
When to re-caulk or repair
Inspect your caulking regularly to catch issues early. Here’s a checklist to help you decide when it’s time for repairs.
- Cracking: Check for hairline cracks or gaps that could let water in.
- Adhesion loss: See if the caulk is pulling away from the stucco or window frame.
- Staining: Look for discoloration, which might indicate moisture intrusion.
- Moisture intrusion: Feel around the joints for dampness. Use a moisture meter to confirm.
- Peeling paint: Check if paint is peeling near the caulk line, indicating a problem underneath.
- Mold or mildew: Inspect for growth, which thrives in moist environments.
- Sagging or bubbling: These are signs of poor adhesion or moisture damage.
- Worn-out appearance: If the caulk looks old and tired, it’s time for a refresh.
Quick rule: Don’t wait until you see water damage. Address minor issues promptly to prevent bigger problems.
Standards, manufacturer instructions, and code considerations
Before starting any work, consult these resources to ensure you’re following best practices and maintaining warranties.
- ASTM International: Check their standards for sealants (e.g., ASTM C834) to ensure your chosen product meets quality and performance criteria.
- Local building code: Verify that your work complies with local codes, which may reference specific standards or products.
- Window manufacturer: Consult their guidelines for proper installation and maintenance of windows in stucco walls.
- Stucco manufacturer: Follow their recommendations for sealant selection and application to maintain the stucco’s warranty.
- Sealant manufacturer: Read their instructions carefully, including recommended surface preparation, application temperature, and curing time.
- Warranty information: Review all warranties (windows, stucco, sealant) to understand what’s covered and for how long. Ensure your work doesn’t void any warranties.
- Previous inspection reports: If available, review past inspection findings to address any recurring issues.
Quick rule: Always consult relevant standards, manufacturer instructions, and local codes before starting any work. It’s your best defense against costly mistakes and warranty claims.
Tools, Materials Checklist, and Visual Checkpoints for Site Readiness
List essential tools, PPE, and materials for a safe, code-compliant job. Include items for surface prep, priming (if required), backing rods, sealants, and tooling. Pre-work visual checkpoints help you confirm readiness before applying product.
Verify product labels and datasheets on every item, ensuring substrate compatibility and correct backer rod size. If any specification is unclear, pause and confirm with the manufacturer or supplier before proceeding.
Recommended tools and PPE
Before you start, make sure you have all the necessary tools and personal protective equipment (PPE) to ensure a safe and efficient job.
- Caulking gun: Essential for applying sealant. Ensure it’s in good working condition.
- Backer rod installation tool: Helps insert backer rod into expansion joints before caulking.
- Cleaning supplies (rags, soap, water): Crucial for preparing surfaces and cleaning up afterwards.
- Knives (razor blade, utility knife): For cutting backer rod and tooling sealant.
- Tooling sticks: Used to smooth and shape the caulk bead after application.
- Safety glasses: Protects eyes from debris and chemical splashes.
- Gloves (latex or nitrile): Prevents skin irritation and makes cleanup easier.
- Respirator: Essential when working with solvent-based sealants to prevent inhalation of harmful fumes.
Quick rule: Always use the right tool for the job. Safety first, then efficiency.
Material specs to verify and safe joint-width ranges to plan for
Before purchasing materials, ensure you’ve verified the following specifications on product datasheets to guarantee a successful installation.
- Adhesion substrates: Check if the sealant adheres to your specific substrate (stucco, concrete, etc.).
- Movement capability: Ensure the sealant can accommodate the expected joint movement.
- Cure times: Know how long it takes for the sealant to cure and become fully functional.
- Joint width range: Verify if the product is suitable for your planned joint widths. Common ranges are 1/4″ to 3/8″.
Quick rule: Always confirm material suitability with the manufacturer before purchasing and installing.
Conclusion
Set the finish now by treating caulking as part of the moisture shield and the look of the job. If you protect joints correctly, you keep water out, prevent rot, and your windows stay seal-tight and clean-looking for years.
Set the finish now by treating caulking as part of the moisture shield and the look of the job. If you protect joints correctly, you keep water out, prevent rot, and your windows stay seal-tight and clean-looking for years.
Finish the work in a simple sweep: verify the area is dry and clean, check that the backer rods and depth are right, choose a compatible sealant, apply evenly with controlled tools, smooth and cap the joints, then inspect the work from multiple angles and test any drainage paths. Do a small-area test first, then repeat in the next joint once you’re sure the materials and timing are correct, and always follow the local codes and the project specifics on flashing and WRB details.
Common mistakes to avoid are skipping the backer rod or depth control, using the wrong sealant for the substrate, and rushing through transitions near window perimeters. Safety rules are simple: wear eye protection, work when the surface is dry, clean up spills immediately, and never force a sealant into a joint that’s wet or dirty. If you see peeling, disbonded flashing, or standing water after a rain test, stop and recheck the setup before proceeding.
If the window wrap, flashing, or drainage paths look uncertain, or the job involves difficult access, plan a professional consult rather than forcing a DIY fix. A proper seal now saves costly repairs later and keeps the exterior looking solid. Stay deliberate, test often, and move forward with confidence. You’ve got this.
FAQ
Where should I seal around the window to prevent moisture but still allow drainage?
Seal the gaps that sit between the window and the stucco where water can wick in. Leave paths or gaps that are designed to drain water away from the sill and back into airflow or drainage channels as directed by the window flashing plan. Check the manufacturer’s instructions for any guidance on sealing near jambs and heads.
What areas around the window should I avoid sealing completely?
Avoid sealing the sill channel and any weep or drainage paths that are meant to shed water. Do not seal areas that are explicitly labeled as draining or venting by the window or wall system. If in doubt, inspect the flashing and weep hole design and follow the labeled directions.
How can I tell if my sealant depth and backer rod placement are correct?
Backer rods should sit behind the seal to control depth and allow proper joint movement. The sealant should compress without being crushed or overheated, creating a continuous bead without gaps. If you’re unsure, measure according to the product label and local instructions, then adjust to the intent of the joint design.
What signs indicate I need to re-seal or touch up the joint?
Look for cracking, surface peeling, or gaps that open during temperature changes. Water stains or dampness near the window frame are red flags. If you see these, reassess sealing locations and reapply following the manufacturer’s guidelines and site safety checks.