
Table of Contents
- What is a pinless (non‑invasive) moisture meter?
- When to use pinless vs. pin/probe meters and moisture scanners
- Tools, gear, and prep checklist for safe EIFS/stucco moisture scans
- Step‑by‑step scanning technique for stucco and EIFS
- Interpreting readings: thresholds, relative values, and common confounders
- Confirming suspect readings and avoiding false positives
- Common user errors, troubleshooting, and quality control
- Reporting, documentation, and next‑step decision framework
- Frequently Asked Questions about using pinless meters on EIFS and stucco
- Conclusion and when to hire a professional
- 2. moisture meter
- Eifs inspection checklist
- 1. visual inspection
- 2. moisture detection
- Frequently asked questions about eifs inspections
- Recent posts
Introduction
A pinless moisture meter can help you locate hidden moisture behind stucco and EIFS without making holes.
In this guide you’ll learn how to interpret readings, identify common problem areas, and apply simple, noninvasive steps to verify unseen moisture.
You’ll walk through practical tips, typical signs of trouble, and best practices to assess and address moisture safely.
What is a pinless (non‑invasive) moisture meter?
Pinless meters are moisture meters that estimate wetness without inserting pins into the material, offering non‑invasive, rapid readings across a broad area. They rely on RF/low‑frequency electromagnetic scanning to detect moisture content in the substrate without penetrating the surface, unlike traditional pin meters which measure resistance through a probe. The technology measures how moisture affects the material, providing surface‑level readings that reflect near‑surface conditions rather than depth measurements.
For EIFS and stucco inspections, use these tools to screen around windows and doors, flashing, corners, and penetrations where moisture tends to collect. They provide a quick way to identify suspect zones, but readings are surface‑oriented and can be influenced by conductive debris, coatings, or calibration; use alongside other methods when precise depth or concealed moisture is a concern. Interpret readings by looking for elevated moisture patterns rather than a single value, documenting locations, and noting whether suspected moisture could be surface moisture or hidden moisture, then report findings clearly for remediation planning.
How pinless sensors work on stucco and EIFS
Pinless meters read moisture through the surface with a wide sensing field, not by piercing it. On stucco and EIFS that means the meter is averaging moisture across a roughly circular area under the pad — typically about 1.5–3 inches across depending on the model — and down to a certain depth. Consumer handhelds usually sense to about 0.5–1 inch, pros to around 1.5–2 inches, and some advanced units claim 2–3 inches. Remember those numbers are a guideline; actual performance depends on substrate and moisture contrast.
Surface finish, paint, and heavy texture change what you see. Thick paint or multiple acrylic coatings can reduce coupling and make readings lower than the true moisture in the base. Deep textured stucco scatters the signal, so readings can jump from one spot to the next. On EIFS the foam backing gives a different return than cement stucco — moisture in the foam may show more clearly at shallow depths but can hide deeper water. If the finish is loose, wet undercoat, or highly textured, scrape a small area or take multiple closely spaced readings.
Practical rules: aim several readings across the area, note patterns rather than single numbers, and confirm with an invasive test if you get high readings near flashing, windows, or the foundation. If you need to know deeper than a meter’s rated depth, don’t guess — either use a deeper professional unit or drill a test hole. Shortcuts like trusting one sweep across painted stucco will cost you time and repairs later.
Advantages and limitations of pinless meters
Pinless meters are great when you need to move fast and keep the finish intact. For EIFS and stucco they let you do broad, non‑destructive scans across walls and details without punching holes—handy for pre‑purchase checks or spot checks after rain. They’re quick to use and let you map moisture trends across a façade in minutes.
Don’t assume a low or high reading tells the whole story. Pinless devices give a near‑surface average and struggle with depth ambiguity. On EIFS you can get a high reading from moisture trapped in the outer lamina while the substrate behind could be dry, or vice‑versa. On thick stucco over wood sheathing the meter may “see” that wood through the render inconsistently depending on mix, lath, or paint.
Also watch for substrate interference and false positives. Metal flashings, mesh, or very wet patches behind a small localized breach can throw readings off. Use pinless meters as a fast screening tool—follow up anomalous areas with a probe, moisture map, or small invasive check before you decide on repairs.
When to use pinless vs. pin/probe meters and moisture scanners
Start by defining your inspection goal: screening for moisture presence, confirming suspect areas, or conducting forensic testing to map moisture trends over time across varying materials, including EIFS and stucco, and in concealed cavities. Choose tools by fit: pinless meters for rapid area screening, pin/probe meters for pinpoint confirmation and depth-specific readings, and moisture scanners for multi-depth or deeper anomalies with minimal surface disruption. Set practical rules of thumb based on accessibility and surface conditions, noting when you need qualitative impressions versus quantitative data, and when a noninvasive screen should be followed by targeted invasive checks.
Plan a simple workflow: lay out a grid or targeted approach, take measurements, log locations with photos, and record surface conditions, readings, and environmental data, then review in a compact field sheet to guide next steps. Interpret readings with caution, recognizing limitations from coatings, metals, temperature effects, and calibration, and decide when invasive confirmatory tests or monitoring are warranted for the client. Document and communicate results clearly, outlining next steps such as remediation or monitoring and providing guidance on when to escalate to invasive testing.
Best uses for pinless meters (screening & mapping)
Use pinless meters when you need to cover a lot of ground fast. Walk the floor, wall, or ceiling in a grid and note areas that read higher than the surrounding material. This is the go-to for large‑area scans, routine inspections, and pre‑repair surveys where you need to find hot spots without tearing things up.
They shine when speed and cost matter. You can scan a whole room in minutes and flag trouble spots for deeper testing. That trims down labor and avoids unnecessary repairs. For contractors and homeowners on a budget, a quick pinless sweep will often tell you where to spend the time and money next.
Don’t pretend a pinless meter replaces a pin/probe for every job — see the parent section for a quick compare — but use it as the first pass. It’s non‑destructive, keeps work moving, and helps you prioritize. When you find a suspect area, switch to a probe or moisture scanner for exact readings and depth checks.
When to follow up with pin/probe meters, infrared, or invasive tests
If your pinless scan shows a suspicious spot, don’t assume it’s a leak. Use a pin/probe to confirm depth and source. Probe readings tell you whether the moisture is surface-level or soaked into the framing. If readings are high near flashings, windows, roof intersections, or on edges of a room, escalate immediately.
Inconsistent patterns also warrant follow-up. If one part of a wall is dry and the area next to it reads wet on the pinless, run a grid of pin checks and an infrared pass to find the cold/wet trail. If infrared shows temperature anomalies but pins are low, you either have hidden cavities or shallow dampness—consider invasive checks like small exploratory cuts or removing a trim piece where practical.
Follow-up is mandatory when repairs, insurance claims, or contractor bids are on the line. Take photo-proof, meter logs, and a few invasive verifications if needed. If a contractor refuses to verify with pins or invasive spot checks after a high reading near critical details, walk away. Proper documentation and direct confirmation save headaches later.

Tools, gear, and prep checklist for safe EIFS/stucco moisture scans
This section defines a safe, repeatable moisture scan workflow for EIFS and stucco, covering the purpose, required PPE, ladder selection, fall protection, and site access. It also lists essential meters, calibration blocks, tape measures, and other accessories to support accurate readings.
A standardized scanning pattern, surface prep, and weather/drying considerations help differentiate EIFS moisture from substrate readings and support reliable data interpretation. Understanding these steps reduces risk and increases confidence for DIYers and on‑site teams, delivering more dependable results with less guesswork.
Recommended pinless meter models and price ranges
Pinless meters save time and keep EIFS and stucco surfaces intact. For a homeowner doing spot checks, expect basic models around $80–$200. For someone serious about diagnostics or a property manager, the mid-range “prosumer” units sit around $200–$500 and give better depth sensing and logging. For contractors who rely on moisture scans daily, the professional units run $500–$1,500 or more and include advanced features like Bluetooth data, multiple sensing depths, and on-board reporting.
Good examples: entry-level meters often come from brands like General or Extech and work fine for quick wet/dry checks. Prosumer-grade tools from Protimeter or Tramex give more reliable readings and better build quality. Professional-grade Tramex and GANN models are rugged and accurate across EIFS/stucco systems. Don’t get fancy features you won’t use. Focus on sensor depth, repeatability, and a solid warranty. If you must choose one takeaway: buy the right tier for how often you scan.
For homeowners, renting a prosumer or pro meter for a day or two is usually the cheapest route. Rent when you need a hidden problem verified. For contractors, the math favors purchase. A good pro meter pays for itself after a few jobs and avoids rental availability issues. If you buy, keep cases and calibration records. If you rent, insist on a recent calibration and test the unit on a known dry area before leaving the shop.
Safety, ladders, and fall‑protection for multi‑story scans
Pick the right ladder and treat it like a tool, not a prop. For second‑story work use a tall extension ladder rated for duty and long enough so you don’t stand on the top two rungs. Never stand on the top two rungs. Inspect the ladder for cracked rails, missing feet, or bent rungs before you set it up. Confirm the load rating covers you plus your gear and the meter pack.
Set ladders on firm, level ground. Use a 4:1 angle (one foot out for each four feet up) and sink the feet if the soil is soft. Tie or lash the top to an anchor or use a stabilizer to prevent side‑to‑side movement. Keep a spotter at the base when raising, lowering, or when someone is on the ladder. If you can’t secure the ladder or you’ll be working near a roof edge, use a manufacturer‑approved harness and anchor point rather than improvising.
Wear the right PPE: non‑slip work boots, eye protection, and gloves for grip. A hard hat is worth the hassle if people are working above or you’re near roof edges. When mold or heavy dust is suspected use a respirator: for light dust an N95 is acceptable; for mold or demolition use a P100 or NIOSH‑approved half-mask with P100 cartridges. Use cut‑resistant gloves (ANSI A3/A4 recommended) when inserting pins or handling torn insulation. Plan the job: check weather, trim nearby branches, limit the reach of the meter so you’re not leaning out, and have a second person on site for ladder holds and emergency help. When in doubt, hire a pro with fall‑protection experience rather than risking a second‑story fall. Also remember your handheld meters and other gear are covered earlier — plan to carry only what you need up the ladder. Secure the gear so nothing drops and distracts you or others below.
Step‑by‑step scanning technique for stucco and EIFS
A repeatable scanning workflow starts with a defined zone setup and perimeter mapping that covers entire elevations, using reference points and grid lines tailored to both stucco and EIFS surfaces to ensure consistent coverage. Begin with pre-scan checks on instrument calibration, probe selection, moisture meter settings, and a quick visual or hard-scan triage to identify high‑risk areas near flashing, joints, penetrations, or prior repairs, then outline a step‑by‑step protocol for data collection and documentation.
The protocol specifies consistent pass direction, clear scan intervals, and appropriate dwell time to balance sensitivity and speed while minimizing false readings, with data captured by zone and labeled for elevated moisture pockets linked to wall elevations, planes, and substrate details. EIFS‑specific considerations are incorporated—accounting for coatings, absorptive layers, wind‑driven moisture, and recent rain—with plans for follow‑up tests if needed, plus a post‑scan workflow that synthesizes results into an elevation map, flags critical findings, outlines remediation, and includes a verification plan for repeat scans.
Scan pattern, distance, and overlap best practices
Keep it simple: hold the sensor steady and roughly perpendicular to the wall. For most handheld thermal or moisture scans on stucco and EIFS, keep the sensor about 6–18 inches from the surface and move at a slow, even pace. Too far and you lose resolution; too close and you miss the context. If your device has a focal distance or recommended range, follow that — don’t guess.
Use a controlled pattern so nothing gets missed. For small areas use a tight grid (horizontal passes, then vertical passes). For long runs use parallel strips along the length of the wall. Aim for about 30–50% overlap between adjacent passes so every spot is imaged at least twice. Overlap is not optional — gaps mean guesswork later.
Mark what you scan so you can replicate or hand off the job. Chalk lines, painter’s tape, or numbered tags work fine; put arrows to show scan direction and note the pass number if you stop. If you find a hot spot or irregular reading, circle it and re-scan with tighter spacing. Consistency beats heroics — same distance, same speed, same overlap every time.
How to handle tricky areas: corners, joints, windows, and penetrations
When you hit corners, window perimeters, sealant beads and roof/wall transitions, slow down and make tighter passes than on flat fields. Stick to the same overall scan pattern you’ve been using but give these spots extra overlap and closer distance to the surface. Flashings, metal trim and dense sealant can throw readings off, so take multiple angles rather than trusting a single pass.
Focus your hands and eyes where water can hide: the lower edge of window sills, inside control joints, behind corner beads, under through-wall flashings and at roof overhang terminations. If the scanner flags anything, probe and document right away — lift a trim piece, remove a small caulk section, or use a pin-style moisture meter to confirm. Don’t guess from one high reading; confirm with a second method before tearing anything out.
Watch for common mistakes: scanning only the flat field, ignoring the sill return, or assuming flashing is intact because you see metal. Photograph each suspect location, note the reading and angle you used, and mark it on your overall scan map. If you find moisture near a penetration, stop and trace uphill and sideways until you find the source — leaks run, they don’t always sit under the wet spot.
Interpreting readings: thresholds, relative values, and common confounders
Readings from pinless moisture meters should be treated as relative indicators rather than exact moisture content, guiding you toward meaningful conclusions on site. They help you determine whether a surface is dry, moist, or wet within stucco and EIFS contexts and to establish practical thresholds or flags that trigger follow‑up actions such as probing, delamination checks, or core sampling, while acknowledging meter calibration variability. Be mindful that substrate type, salts or efflorescence, surface coatings, grime, and recent heating or drying cycles can distort readings and create misleading deltas across the test area.
Moisture signals are shaped by salts, plaster binders, and gradients within multi‑layer assemblies, so expect non‑homogeneous surfaces to show divergent readings that require careful interpretation and context. Build a simple field decision tree: start with an initial pass, then probe targeted spots for evidence of moisture migration, and perform corroborative checks (visual signs, delamination, or relative depth deltas if available) before deciding on remediation steps. Quick, consistent field practices—documenting findings with notes and photos and outlining clear follow‑up actions or referrals—help ensure reliable decisions and smoother coordination with trades or specialists.
Relative vs. absolute moisture—what numbers really mean
Think of absolute numbers as a single snapshot and relative mapping as the real map of trouble. Take a dry baseline reading in an unaffected area first. Then sweep the meter across the job and compare every reading to that baseline. If a spot reads several points higher than the dry baseline, that’s where you focus. Don’t chase isolated numbers without the baseline.
Because meters use different scales, use this concrete mapping:
- Pinless (relative) units — establish a dry baseline on the same wall. Treat +0–3 points from baseline as normal; +4–7 points = investigate; +8+ = suspect and confirm promptly.
- Pin (wood‑equivalent % WME) — typical guidance: <10% = dry/normal; 10–15% = suspicious; >16% = red flag (substrate wetting likely). For wood sheathing, >20% typically requires immediate action.
- Concrete/masonry readings — pinless relative deltas are most useful; for drilled moisture tests or CM units follow manufacturer/concrete moisture standards (consult ASTM guidelines for absolute thresholds on concrete moisture content or RH testing).
Use the meter-specific numbers printed on your instrument and annotate which scale you’re recording. Example practical rule: mark any area for follow-up if pinless readings are >+7 points over baseline or if a pin probe reads >16% WME; treat pin readings >40% as an urgent structural concern requiring immediate remediation and professional assessment.
Also check the usual confounders mentioned earlier: surface salts, meter calibration, probe depth, and recent rain or HVAC runs. If readings don’t line up with visible signs, repeat with a different location, a different meter or deeper probe before demolishing anything. Quick rule: map first, confirm second, demolish last.
Substrate effects: foam, concrete, masonry, and coatings
Foam and soft insulation give you high, noisy readings because the meter senses the backing more than surface water. Concrete and masonry hold moisture deep and read lower at the surface unless they’re saturated. Painted or epoxy-coated surfaces can hide wetness entirely. Remember the earlier note on relative vs. absolute numbers when you judge these readings.
Don’t trust a single sweep. Make a few calibration spots by exposing the substrate (drill a small hole or scrape a patch) and compare that to the meter number. Do comparative scans across the same wall and between similar materials. If readings jump wildly, switch tools: use pin-type probes for thin coatings and shallow wetness, and pinless for bulk moisture in concrete.
Practical checks to do on site: peel or sand a small coated area if you suspect a false low. For foam, press the meter firmly and compare with a pin probe or bore a tiny test hole. For masonry, check at different depths or use a moisture hammer/drill probe. If in doubt, document your comparative readings and take photos. That saves headaches when you make repair decisions or argue with a contractor.
Confirming suspect readings and avoiding false positives
When a suspect reading appears, use a structured confirmation workflow so you don’t create false positives or unnecessary damage. Verify by re-scanning, testing a control, taking pin readings at edges and center, and using IR or borescope where helpful. If results remain inconsistent, perform a controlled invasive verification following the steps below.
Targeted follow‑up with pin meters and invasive verification
When a suspect reading pops up, don’t wander aimlessly—take pin readings at the edges and center of the affected area, plus a control reading on solid material nearby. Hold the pin steady and note depth and multiple readings across the same spot to confirm consistency. If readings jump around, that’s a red flag for surface moisture or poor contact, not necessarily a deep problem.
If pins keep indicating moisture where you expect a problem, remove a small test section or core a 1–2 inch plug to see what’s actually behind the surface. Recommended invasive-check specifics for DIYers:
- Drill bit and hole size: use a 5/16″ to 3/8″ masonry bit or a 1/2″ spade for soft substrate—small holes limit damage and make repairs easier.
- Location strategy: drill at the center of the hotspot and at one offset point 3–6″ away; avoid drilling through primary flashing or sealant beads if possible.
- Depth target: reach through the finish into the EIFS base coat or into the sheathing to expose the suspected wet layer (typically 1–3″ dependent on system).
- Sealing/repair: after inspection, plug holes with closed-cell backer rod if needed and seal with appropriate exterior-grade sealant or acrylic patch compatible with EIFS; for temporary sealing use non-corrosive stainless fasteners if reattachment is required. Always follow EIFS manufacturer’s patch guidance for long-term repair.
If you remove a plug, inspect for staining, mold, soft rot, or trapped moisture and photograph the exposed substrate with a ruler for scale. If the substrate is wet or soft, preserve any material sample in a labeled plastic bag for further lab testing if required.
Document everything. Take clear photos of each pin location, the removed plug, and a ruler for scale. Log the meter model, settings, time, and environmental conditions. Insurance or a contractor will want pictures, a short written timeline, and the retained sample. Don’t rely on memory—poor paperwork kills claims and makes repairs messier.
Using infrared, borescopes, and humidity sensors to corroborate results
Run a quick infrared sweep first to map suspect areas. Keep the camera steady, work a few angles, and compare suspect spots to nearby dry reference surfaces. Use the thermal image to confirm thermal hotspots and to decide where to look closer — don’t treat a lone hot or cool pixel as proof of moisture.
Follow thermal cues with a borescope to see inside cavities and behind trim without committing to big cuts. Probe only where the camera shows a consistent pattern. Remember a borescope gives a narrow view; it can confirm visible damage or staining but won’t replace moisture meters or invasive checks when you need to quantify the problem.
Put humidity or data-logging sensors in place when a suspect area isn’t obvious. Leave them long enough (24–48 hours) to capture diurnal changes and compare to a baseline in a dry area. Combine methods when results conflict: if IR and sensors match, you’ve got strong evidence; if they don’t, don’t guess—use targeted pin meters or a small invasive check to close the case and avoid chasing false positives.
Common user errors, troubleshooting, and quality control
Common user errors when using a pinless moisture meter on stucco and EIFS stem from inconsistent sensor-to-surface distance, uneven contact on textured surfaces, and neglecting the height at which the probe sits above irregular edges. Be mindful of true embedded moisture versus surface moisture on films or paints, with quick checks like readings at multiple depths and locations to avoid misinterpretation. Also plan for edge effects and grid coverage by taking measurements along seams and corners, and perform simple, repeatable calibration checks before each job to establish tolerance ranges.
A practical troubleshooting workflow helps when readings are inconsistent, spike near edges, or clash with visual cues or past history, guiding you to re-check contact, verify surface condition, or switch to alternative methods. Quality-control practices such as documenting measurements, photo mapping, noting environmental conditions, and cross-verifying with secondary methods help ensure reliable results and reduce misreads over the project. These steps keep DIY projects transparent, protect against moisture misinterpretation, and create a clear record for later discussion with clients or trades.
Quick checks and calibration routines before each survey
Follow this explicit calibration and verification routine before you scan:
- Choose two control spots on the same elevation: one known-dry (sheltered location) and one known-wet or damp reference (if available). If you can’t find a wet reference, use only the dry control and a manufacturer calibration block.
- Run three repeat readings on the dry control with the meter in the selected material mode, one minute apart. Acceptable repeatability: readings within ±1–2 relative units (pinless) or ±1% WME (pin) for hand meters. If outside tolerance, re-check contact, battery, and settings.
- If your unit includes a calibration block/pad, perform the manufacturer calibration procedure now and confirm the meter returns to the expected dry-control reading after calibration.
- Record the control readings in your field sheet (see Reporting section for downloadable field sheet). If calibration drifts more than the tolerances above after a short run, stop and service the unit.
Use firm, full-face contact on rough finishes and repeat the quick three‑read test on one additional control spot mid-job to verify no drift occurred during the survey.
How to interpret odd patterns and where to retest
Odd patterns fall into two camps: things that repeat and things that are random. If the same stripe, spike, or shadow shows up every pass, treat it as a sensor or setup issue. If the noise jumps around between scans, look at environment and motion. Before you retest, run the quick checks and calibration you already use so you’re not chasing a basic setup fault.
When you decide to retest, change one thing at a time. Move the scanner to a new angle or height. Increase or decrease distance. Scan from the opposite side or use a different mounting (handheld vs tripod). Try a different scan resolution or a second device if you have one. If a feature disappears when you change angle, that’s usually an angle/reflection artifact. If it stays put no matter what, treat it like real data.
Don’t waste time on obvious limits: wet or reflective surfaces, obstructions, wind, and vibration create predictable garbage. If you still see a persistent, unexplained anomaly after methodical retests, repeatable pattern that matches a structural line, or safety/ liability is on the line, call a pro. A pro will have controlled setups, ground-truth tools, and the experience to tell artifact from real damage.
Reporting, documentation, and next‑step decision framework
This section defines a clear, stakeholder-friendly package of deliverables: an annotated scan map, a standardized photo log, a moisture-reading log with coordinates and timestamps, and a concise findings summary that translates data into actionable next steps for repair plans, maintenance scheduling, and risk communication. It also sets a practical decision framework for when invasive testing or remediation is warranted, and when monitoring or owner notification is sufficient, with predefined criteria that teams can apply in real time on-site. Emphasis is placed on accessibility and shareability, with consistent labeling, templates, file naming, version control, and summarized visual evidence that make findings easy to review across teams, contractors, and owners.
By standardizing deliverables and thresholds, DIY readers gain a reliable, repeatable process that translates complex data into actionable steps, helping them justify next moves to clients or stakeholders and to document each decision for warranties or claims. The framework supports safer decision making, clearer risk assessment, and cost awareness, while providing a transparent trail for QA checks, supervisor review, and handoffs to contractors, inspectors, or insurance adjusters. Structured documentation helps avoid miscommunication and speeds approvals, warranties, and claims through a two-column executive summary, embedded maps, data exports, and clearly labeled evidence arranged for easy sharing with non-technical audiences.
Sample inspection workflow and deliverable template
Show up with the basics: site address, client name, weather, and equipment list. Do a quick walk to note obvious hazards. Run your scans and take photos from fixed points. If something looks wrong, stop and take extra images. Keep notes short and factual — date, time, location, and who was present.
On the map, mark each scan point and create a simple legend that explains symbols and measurement units. Label hotspots clearly and link each one to its photos and raw scan file names. For each hotspot give a concise description, a severity score, and the immediate risk (e.g., tripping, settlement, gas). Use one or two sentences per item — no fluff.
Deliverable should include site info, scan map legend, hotspot list with photos, and a short appendix with raw data file names. End the report with prioritized recommendations ranked by safety and cost, and a clear next action: monitor, repair now, or refer to a specialist. If the homeowner wants a plan, spell out the minimum work to make the site safe.
Don’t skip the checklist: confirm you recorded locations, attached photos, and noted who signed off. If you hear “we’ll fix it later” from the homeowner, be blunt — point out what can wait and what can’t. And if you need the decision framework from earlier, refer back to that section for how to escalate or defer work.
Monitoring plan (7–21 day protocol)
When you mark an area as “monitor,” follow this simple, repeatable protocol:
- Install a data-logging relative humidity/temp sensor or place a simple hygrometer in the adjacent cavity or interior return (avoid direct sun). Recommended logging interval: 1–4 hours.
- Record baseline readings daily for the first 7 days. If readings are stable and decline to within dry acceptance criteria (relative humidity <60% in cavity; pin readings <10–12% WME on follow-up), move to weekly checks for 2 additional weeks.
- If values climb or remain elevated after 72 hours of dry conditions or after repairs, escalate to invasive testing or professional remediation.
- Acceptance criteria: sustained cavity RH <60% and pin probe <12–15% WME on repeat checks after 7 days of drying (adjust for material per manufacturer’s guidance).
Document placement, sensor serial number, and removal date in your field sheet so results are defensible.
Cost guidance: meter rental vs. buy, inspection pricing, and ROI
If you only need a one-off check, rent the gear. Typical rental details and expectations:
- Pinless moisture meter rental: $20–$60/day; deposit $50–$150. Expect to be shown calibration status on pickup.
- Pin/probe meter rental: $15–$40/day. Probe sets (stainless pins) often rental extras.
- Thermal camera rental: $40–$150/day; deposit $250–$500 depending on model.
- Local rental vendors: national chains (Home Depot Tool Rental, Sunbelt Rentals), specialty test-equipment hire shops, or local building-science suppliers. Always request recent calibration and a quick demo.
Inspection pricing examples (estimates):
- Single-window / small-method check (pinless sweep + 1 invasive verification): $150–$350.
- Whole-façade non-destructive mapping with photo log (no cores): $300–$700.
- Full documented moisture map + invasive verification + report: $600–$1,500 depending on size and report depth.
Bottom line: rent for occasional use, buy if you’ll use the tool several times a year. A full scan often prevents a major repair that costs thousands.
Frequently Asked Questions about using pinless meters on EIFS and stucco
Pinless moisture meters can help assess moisture in EIFS and stucco, but results vary by material (foam-backed EIFS vs traditional stucco) and should be read as a range, not a single absolute value, because different substrates store moisture differently. Expect typical readings to indicate moisture above a dry baseline when there is intrusion, and understand that calibration, angle, contact pressure, and surface condition affect accuracy, so consistent method is essential. Note that foam-backed EIFS may dry differently than solid stucco, and readings near edges or corners can differ from flat areas, so compare multiple spots and look for patterns.
Test after rainfall or irrigation following a waiting period of several hours to a couple of days, depending on drying conditions; avoid testing on actively wet surfaces, and prefer dry, ambient conditions with low wind to minimize evaporation artifacts. Paint, texture, sealants, or recent re-coating can hide or distort moisture signals, so readings should be interpreted with surface condition in mind and, when needed, moved readings and/or additional inspections considered. Consistent trending, thresholds for concern, and professional evaluation or moisture mapping may be warranted if readings remain elevated or show growing moisture over time, especially near joints or where coating has failed, and keeping a simple log with dates helps support any remediation plan.
How soon after rain can I scan?
Short answer: it depends on the finish and the weather. For hard‑coat stucco you can often scan after 12–48 hours if it was a light shower. For EIFS or synthetic finishes plan on 24–72 hours after light rain and 48–120 hours after heavy rain. Cold, humid, or low‑wind days stretch those times; hot, sunny, windy days shorten them.
Don’t trust a single quick pass. Start low and scan control areas that didn’t get direct splash. If readings drop materially over 24–48 hours, you were mostly detecting surface wetting. If high readings persist in the same spots after waiting and dry weather, you’re more likely looking at deeper intrusion.
Quick checks you can do on site: run a hand over the surface to feel for dampness, look for splash patterns or drip lines, and repeat scans after another drying window. If you’re within 48–72 hours of heavy rain, expect more false positives—either wait longer or plan repeat scans before making repair decisions.
Can paint, salt, or efflorescence cause false readings?
Yes. Surface films and deposits change what a pinless meter “sees.” Thick paint, salts from de-icing or sea spray, and white powdery efflorescence all can raise apparent moisture or hide real wet spots. Dirt, mortar smears, and loose texture from EIFS can do the same.
Quick checks you can do: look closely and scrape a small spot with a putty knife or fingernail. If a powder or crust comes off, that’s a surface contaminant. Wipe the area with a damp cloth and re-scan. If readings drop after you wipe or brush the surface, the trouble was on the surface, not deep in the wall. For paint, test in an inconspicuous spot or remove a small paint chip before relying on the meter.
If cleaning doesn’t change the numbers, the moisture is likely deeper. When you do clean, rinse and let the surface dry, then clean and retest. Also compare readings to a nearby clean area or an uncovered trim piece to compare to a clean spot. If you’re unsure, use a secondary check like a pin meter or probe in a small drilled hole before making repair decisions.

Conclusion and when to hire a professional
A pinless moisture meter helps you detect hidden water behind stucco and EIFS by focusing on reliable moisture indicators rather than surface appearance. Use this to guide a simple decision framework: if readings are persistently elevated, showing rising trends across multiple areas, or accompanied by cracking, staining, efflorescence, or unusual moisture patterns, escalate to a certified EIFS/stucco inspector, and document location, area measurements, and historical readings to support timely decisions. Otherwise, for isolated, stable readings with no visible damage, you may pursue cautious DIY follow-up and targeted remediation under safe guidelines.
A professional inspection should cover scope, certifications to look for, typical steps, and deliverables such as moisture mapping and clear remediation recommendations, helping homeowners understand risks and costs, plus next steps, potential remediation options, and estimated timelines. To stay practical, document measurements daily, photograph affected areas, note dates, prepare questions for inspectors or remediation pros, and factor in costs, timeframes, safety considerations, and practical advice for ventilation, moisture control, and financial planning to avoid delays.
Red flags that require professional remediation
If you see widespread high moisture readings across large areas or multiple rooms, treat it as an emergency. Don’t patch one spot and ignore the rest. Stop using the area, turn off forced-air systems that could spread spores, and isolate the space until a pro assesses the scope.
Visible delamination, bubbling or soft spots in floors and walls, active mold growth, or dark structural staining are beyond DIY fixes. Take photos, note which materials are affected, and avoid sanding or scrubbing—those actions spread contamination and make the problem worse.
Call a certified remediator when structural materials are compromised or the issue is widespread. While you wait, run dehumidifiers in adjacent clean areas and close doors to limit spread. A professional will test, document, and recommend containment and removal, plus any repairs needed to prevent recurrence.
Specific triage triggers — when to stop DIY and call a pro
Use these clear thresholds to escalate immediately to a professional:
- Persistent elevated readings after 72 hours of dry weather or active drying attempts (dehumidifier/heat).
- Contiguous hotspots larger than 2 ft² on a façade or evidence that moisture tracks across multiple panels.
- Pin probe readings >40% WME or any readings showing structural substrate saturation (soft/crumbly sheathing).
- Visible delamination, expansive blistering, or sections where insulation is exposed and wet.
- Active mold odor or visible mold on structural materials (use P100 and containment if disturbing these areas).
- When invasive verification would require removing large sections (>1 panel) or work at heights you cannot safely manage.
If you hit any of the triggers above, stop DIY attempts and hire a certified EIFS/stucco inspector or remediator for targeted destructive testing and containment.
Resources and further reading
Start with the paperwork you can actually use on the job: download the manufacturer’s installation instructions and product data sheets for the materials you plan to use. Those documents tell you the tolerances, adhesives, and cure times that matter. If something in the field doesn’t match the manual, don’t guess—follow the manual or call the manufacturer.
For technical standards and testing criteria, look up the relevant ASTM and ITCA references for your material type. These standards show the measurable requirements—compaction, thickness, bond tests—that separate a decent job from a failing one. If you need to know exactly how to measure or test something, the standards are the place to go.
If you’re serious about doing it right, take a hands-on course or certification from a reputable trade school or industry group. Learn how to check base compaction, read reports, and interpret test results. And remember the red flags and when to hire a pro—if you see structural issues, persistent water, or repeated failures, call an experienced contractor rather than patching it yourself.
2. moisture meter
A pinless moisture meter lets you check bulk moisture in EIFS, stucco, and underlying backerboard without punching holes. It measures surface and near-surface moisture and provides quick readings with typical accuracy that varies by material and substrate. Used correctly, it supports non-destructive screening to flag areas that may require closer investigation or remediation.
For best results, choose a meter with appropriate sensor types for concrete and EIFS layers, and calibrate with suitable materials for gypsum or foam substrates. Plan test locations in high-risk spots—around penetrations, flashings, balconies, and gutters—and use a grid and careful numbering to map readings later, while documenting with photos. Interpret readings by separating surface moisture from trapped moisture, establishing action levels (monitor, re-check, repair, or call a pro), and noting any coatings or insulation that might skew results for safety and accuracy.
Choosing the right pinless moisture meter for EIFS and stucco
Pick a meter that lets you change the substrate or material setting and shows the sensing depth. EIFS has a foam layer and thin finishes, so you need a meter that can handle low-density materials and shallow depths. If the meter only has a concrete mode, you’ll get misleading numbers on EIFS. Look for one with a selectable mode for masonry, plaster, or lightweight panels.
Before you scan, calibrate on a known dry spot and check the meter’s coupling to the rough surface. Use firm, full-face contact and slow sweeps. Textured stucco can trap air gaps—press the sensor plate flat and repeat the pass. Take multiple readings on a grid and compare patterns rather than trusting a single number.
Always verify suspicious low or high readings. A pinless meter is great for quick mapping, but it can miss pockets or read through thin coatings. If you see elevated areas, confirm with a pin or probe or remove a small sample. Also account for surface temperature and recent rain—wait for surfaces to equilibrate when possible for reliable results.
How to perform a pinless moisture sweep on stucco and EIFS
Put on eye protection and a dust mask. Use a stable ladder or lift and watch for power lines. Walk the wall first and look for cracks, stains, soft spots, sealant failures and any obvious roof or flashing issues. Don’t start the meter until the surface is clean enough to get good contact with the sensor plate.
Hold the pinless meter flat against the wall and sweep in overlapping passes. Start at the perimeter and work inward in horizontal bands so you cover the whole elevation without gaps. Move at a steady, slow pace — too fast and the meter averages out hotspots. When you see higher readings, mark hotspots and re-sweep them with shorter passes. Edges, control joints and penetrations often show elevated numbers; compare those edge readings to the center of the panel to spot through-wall wetting.
Use thresholds as a practical guide, not a rule book: typical background numbers are low, readings that are moderately higher warrant monitoring, and anything clearly elevated across several readings is cause for intrusion investigation. Verify suspicious areas with a confirmatory method (small probe or invasive test) instead of punching holes everywhere. Photograph and log locations and readings. If you get widespread high readings or zones that track down from cladding joints, stop and call a specialist — don’t start demo based on a sweep alone.
Common mistakes and result verification
These are the mistakes I see on jobs all the time. Avoid them and you’ll save time and false alarms. Short, practical tips below.
- Trusting a single reading — One high or low value doesn’t prove anything. Re-sweep the area in a grid, take multiple readings, and compare patterns. If values jump around, you likely have a surface anomaly or probe contact issue.
- Confusing surface with substrate — Pinless meters read near-surface moisture and can be fooled by damp finishes or recent rain. Verify suspect spots with a controlled invasive check (small core or probe hole) to confirm substrate wetting before starting repairs.
- Ignoring meter calibration and settings — Wrong material setting or an uncalibrated unit gives false highs or lows. Check the meter’s material/program mode on a known-dry control area and recalibrate if needed before testing the wall.
- Skipping control comparisons — Never test only the problem area. Measure a nearby known-dry control surface and a known-wet spot if possible. Controls tell you whether readings are normal for that job and ambient condition.
- Poor documentation of findings — Vague notes don’t help the contractor doing repairs. Photograph each test location, note meter model/settings, date/time, ambient conditions, and label control points. That paper trail prevents rework and disputes.
Double-check these points on every job: multiple reads, a dry control, verification into the substrate when needed, and clear photos/notes. Do that and you’ll cut down on false calls and costly rip-outs.
Eifs inspection checklist
This section defines the scope of an EIFS inspection by outlining what to visually check—cracks, delamination, staining, and discoloration—and where moisture tends to hide, such as behind flashing, at penetrations, corners, and bottom edges, while introducing the pinless moisture meter workflow with recommended measurement patterns and target substrates like polymer-modified EIFS, base coats, and sheathing. It also covers interpreting readings with baseline values and elevated spikes to distinguish suspect moisture from normal variability, and it identifies critical surface and edge areas to scan first. Finally, it describes essential steps for non-destructive scanning, surface prep, high-risk zones, and the need to re-check after rain or drying cycles to confirm persistent moisture conditions before remediation planning.
For a DIY or jobsite reader, this emphasis translates into practical, actionable guidance on prioritizing inspections, documenting findings, and communicating urgency, including how to log caulk failures, flashing gaps, EIFS seams, edge joints, and transitions around windows, doors, soffits, and roofs. It clarifies how to approach safety and access—ladder choice, height safety, PPE, electrical considerations, and permissions for roof or scaffold access—so workers stay compliant and reduce risk. It also connects findings to remediation logic, from sealant and flashing fixes to moisture barrier repair, while outlining a simple pass/fail or severity scale and pathways to escalate issues when a licensed professional is warranted.
Visual inspection and accessibility for EIFS prior to meter use
Walk the exterior first and look for obvious trouble. Check for staining, bulging, cracks, soft spots at window sills, separation at control joints, failing sealant, and any fastener pops or blistering. Don’t probe the cladding with a meter until you note these signs — they tell you where moisture is likely hiding and where testing will be useful.
Do a quick interior check where the wall lines up with the suspect exterior. Look for water stains, peeling paint, damp odor, and soft drywall or insulation behind returns. Note locations and heights so your meter readings match what you see inside and out.
Set up access safely. Use a properly angled and tied-off ladder, keep three points of contact, wear a harness if above one story, and never stand on the EIFS surface — it’s not a walking platform. Have a second person on site to spot and hand tools. Clear the base area of trip hazards and keep the testing work slow and deliberate.
Conducting a pinless moisture test on EIFS: procedure and interpretation
Start from the areas you already visually checked and work methodically. Hold the pinless meter flat against the EIFS surface and sweep in overlapping passes about the width of the sensor. Focus on penetrations, window and door perimeters, control joints, roof-to-wall transitions, and any low-slope or sheltered areas where water can sit. Keep the sensor movement steady and slow so the meter has time to read through the finish into the substrate.
Set the meter to the manufacturer’s recommended EIFS or masonry setting if it has one; if not, use a mid-range sensitivity and run a quick check on a known dry spot for a baseline. Record each reading with location, time, and a short note on the substrate (e.g., near window head, behind scupper). I prefer a simple grid: label rows and columns as you go, write down the highest reading in each grid square, and note any readings that spike above the baseline by a clear margin.
When you get elevated readings, mark those spots physically with non-permanent tape and take multiple re-checks around the mark to map the wet zone. If spikes are scattered, suspect surface contamination or sensor error; if they form a patch or follow a joint, suspect moisture penetration. Document suspected zones on a photo or sketch and include meter model and settings — that record is what a contractor or adjuster needs to decide if invasive testing or repairs are next. Strong tip: don’t rely on one pass. Re-check and confirm before you call for cuts or repairs.
Documenting findings and next steps after testing
Write everything down as you go. Record the exact location, date, time, ambient conditions, and the meter reading or units from each test point. Take photos with the test point marked or a quick sketch of the wall and note any visible defects from the earlier visual inspection. That paper trail makes decisions later a lot easier and keeps contractors honest.
Turn your notes into a simple wall-by-wall moisture map: mark dry baseline areas and highlight clusters of elevated readings or adjacent suspect spots. If elevated readings form a pattern near windows, sills, penetrations, or at the base, create a moisture map that shows the spread — not just single points. Where readings step up gradually toward an area, plan to probe deeper at the source rather than trusting one high number alone.
Decide on action by combining map, probe results, and what you can see or feel. Probe or remove siding when elevated readings are clustered, the substrate is soft, or you find delamination or mold odor. If the problem is limited and you’re comfortable with small repairs, patch and monitor. If you see structural rot, extensive delamination, widespread high readings, or anything past a small patch job, call a professional for remediation and structural assessment — don’t gamble with concealed damage.
1. visual inspection
Visual inspection grounds the pinless moisture workflow in real-world signs that often precede or accompany meter readings. Look for exterior cues like staining, efflorescence, algal growth, surface delamination, bubbling, crack patterns, and unusual sheen or texture changes that hint at moisture intrusion, as well as interior signs such as drywall staining, musty odors, soft or warped walls, blistered paint, and lingering dampness near suspected areas. Use these observations to frame where noninvasive scans are most needed and to clarify what counts as hidden moisture behind stucco or EIFS, so readings can be interpreted with context.
This approach matters because careful visuals help prioritize zones for pinless scans, distinguish interior- from exterior-driven moisture, and guide subsequent invasive or noninvasive checks. Coupled with proper ladders or lifts, PPE, and a simple inspection notebook or app, it supports a reliable map of suspected zones with approximate locations and photos. Documenting high‑resolution images, location markers, color or texture changes, and baseline conditions from dry areas makes later meter readings easier to interpret and reduces false positives. By separating true moisture from dirt or weather stains and planning around seasonal factors, DIY and jobsite readers can work more safely and efficiently toward effective remediation decisions.
Prepare the inspection area and safety gear before you start
These are the items you’ll want on site before doing any visual checks or touching meters. They cover PPE, ladder safety, fall protection, and keeping the work area clear so you can work quickly and safely.
- Basic PPE kit — Hard hat, safety glasses, and high-vis vest protect your head, eyes, and visibility during access. Buy mid-range gear ($30–$100) or borrow if needed. Skimping here risks head injuries or being missed by machinery operators.
- Work gloves — Leather or cut-resistant gloves let you move debris and handle rough edges. Get gloves rated for cut resistance if you expect sharp metal; $10–$30 for decent pairs. Using thin cloth gloves can give a false sense of safety and cause hand cuts or punctures.
- Fall harness & lanyard — Full-body harness with a shock-absorbing lanyard for elevated work. Look for gear rated to 5,000 lb and a current inspection tag; rent if you only need it occasionally ($20–$50/day). Wrong or worn harnesses can fail in a fall and cause severe injury.
- Ladder & stabilizer — Choose a ladder with proper load rating (Type IA 300 lb for most jobs) and use a stabilizer or stand-off on gutters. Extension ladders for height and a stepladder for low work; $80–$300 to buy, cheaper to rent for one-off jobs. A flimsy ladder or wrong angle will slip and leads to bad falls.
- Broom, shovel, vacuum — Clear dust, leaves, and loose debris so walkways and panels are safe to access. A stiff push broom and shop vac ($50–$200) are usually enough; leaf blower works for dry debris. Leaving debris increases trip hazards and can hide damage you need to see.
- Headlamp or flashlight — Bright, hands-free light for dark panels and crawl spaces; aim for 200+ lumens. Keep spare batteries or a USB-charged unit ($10–$60). Poor lighting hides faults and increases the chance of accidental contact with live parts.
- Non-contact tester / multimeter — Use a non-contact voltage tester for quick live checks and a CAT-rated multimeter for basic measurements. Non-contact is essential for a fast safety check (cheap models $10–$40); multimeter optional if you’ll take readings ($30–$150). Using the wrong tester or a low-category meter can give false readings and cause shock or equipment damage.
- Camera or phone with zoom — Document conditions and suspect areas before you touch anything. Any modern phone works; a small zoom camera or pole mount helps for hard-to-reach spots. No photos means no record and disputes later; dropping an expensive camera is a real risk, so use a strap or case.
Pro tip: Combine tools where possible—wear your harness while checking ladder stability, use a headlamp instead of holding a flashlight, and take photos before you move any debris. If you don’t own specialty fall gear, rent it: cheaper and far safer than improvising.
Conduct a focused visual scan for common moisture indicators in stucco and EIFS
Start with the basics you already handled — safety gear and cleared work area — then walk the elevation slowly. Keep your eyes level with the wall and again from a few steps back. Look for obvious differences: areas that stand out in color, texture, or shape. If something looks off from a distance, go closer and inspect.
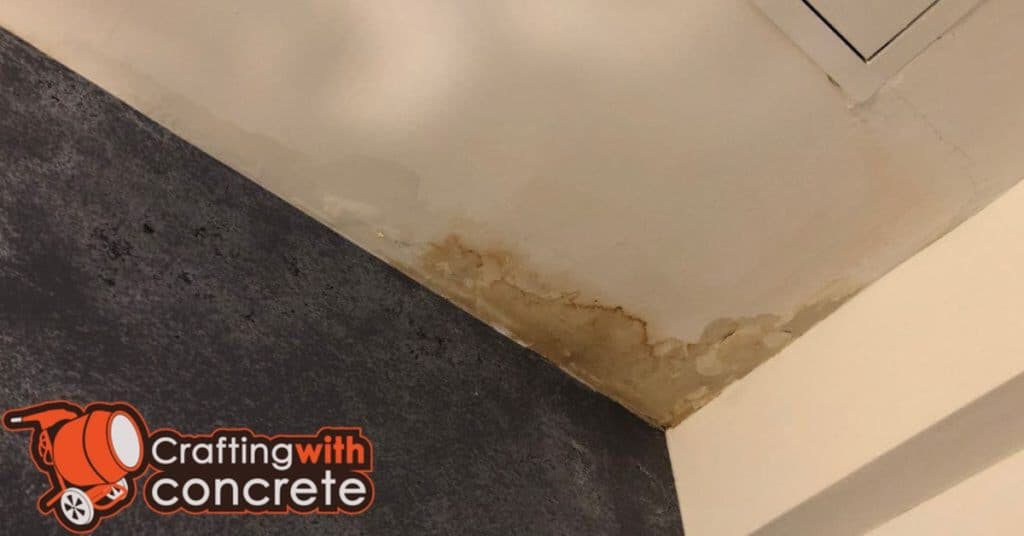
Move systematically. Look for bulges or soft spots by sight and gentle pressure at the edge (don’t pry or force). Hairline cracks and surface crazing are common weathering. Wide cracks, cracks that go through the render, or edges that crumble when you touch them point toward moisture problems. Check around penetrations and flashing for gaps. If you see white powder or salt stains, that’s efflorescence — a clear sign water has been moving through the wall.
Inspect seal lines and transitions carefully. Check sealant joints for shrinkage, detachment, or hard, brittle caulk that pulled back from the joint. Distinguish weathering from intrusion by pattern: weathering is usually uniform, faded, or chalky across exposed faces. Moisture intrusion is localized, often under joints, around windows, or at the base, and shows dark staining, algae/mold growth, or recent water streaks after rain. If you’re unsure, mark the spot and recheck after the next wet weather to confirm active leakage.
Systematically log findings with a moisture meter plan and photo map
Start by drawing a simple elevation plan of the wall layout on paper or a tablet. Divide the façade into numbered zones and mark zones on a plan before you touch the meter. You already did your visual sweep and safety prep, so now work methodically: left to right, top to bottom. Don’t skip corners, window jacks, or terminations — those are where problems hide.
For each zone, take one consistent photo from the same distance and angle so you can compare later. Hold the camera at roughly waist or eye level and note the orientation (e.g., north face, near corner). Write the zone number on the photo file name or put a small temporary tag in the frame so the picture ties instantly to the plan.
Use the moisture meter and record an approximate reading for each zone directly on the plan and in the photo file name if possible. Note the probe type and settings, surface vs. in-situ method, and any suspicious spikes. Label zones that need follow-up or core sampling clearly as “CORE” or “FURTHER.” If readings are borderline, mark them for re-check after drying or for a scheduled core. Practical record-keeping now saves hours of guessing later.
2. moisture detection
Pinless meters reveal hidden water in EIFS and stucco by measuring moisture through non-penetrating scans, helping you distinguish surface dampness from genuine substrate moisture and guiding where to calibrate baseline readings on known dry areas. You’ll establish the right settings, map a grid over suspect zones, and focus on flashing, edges, penetrations, and prior damage to build a practical detection workflow. Understanding how elevated readings relate to both surface moisture and embedded water is essential for interpreting results accurately, even when overlays or foam complicate the picture.
This approach matters on real jobsites because it translates into actionable steps: non-destructive behind-finish scans, cross-checks with visual cues or temperature changes, and a clear plan for dry-out or repair. Logging GPS/grid references, photos, and readings creates a traceable action plan that supports decisions about when to pause DIY and call a pro, while keeping safety and limitations front and center for elevated work in confined or-weathered conditions.
Tools, setup, and safety checklist for EIFS moisture scanning
These are the actual tools you’ll want on the wall before you start scanning EIFS. Each item says what it does, when you really need it, and one short jobsite tip or warning from years of doing this work.
- Pinless moisture meter — Non‑destructive scan for subsurface moisture across the EIFS. Look for one with a probe depth of 1–2 inches and a calibration for building materials. Essential for routine surveys; cheap models (~$80–$300) work, but avoid toy meters—wrong choice gives false negatives and wastes time.
- Pin (needle) moisture meter — Confirms moisture depth and exact location by piercing the substrate. Optional: use when pinless flags a hot spot; choose stainless pins and check range (0–100% WME). Rent or borrow if you don’t want to own one; misuse (driving pins in wrong spots) can damage EIFS and create leak paths.
- Smartphone camera — Document visual defects, staining, and probe locations with photos. Use the highest resolution and record a quick video of any suspicious areas; timestamp or geotag if possible. Always back up photos—poor photo records make repair bids harder to justify.
- Ladder or stable platform — Safe access to the scan area; pick height to reach upper walls without overreaching. Use an A-frame or extension ladder rated for your weight and keep three points of contact; scaffolding or a rental aerial lift is recommended above 12–15 ft. Working from an unstable platform invites falls and ruined inspections—don’t cheap out.
- Moisture maps & documentation — A clipboard, printed elevation diagrams, or a phone app to mark meter readings and photo locations. Use a consistent grid or landmark system and record meter settings with each reading. Bad documentation is the fastest way to lose credibility with clients and miss the root cause of problems.
- PPE: gloves, eye protection, respirator — Protects against dust, insulation fibers, and chemical residues when probing or removing small samples. N95 or P100 respirators for dusty probing, cut‑resistant gloves when using pins, and safety glasses. Skipping PPE saves nothing if you end up with respiratory irritation or an eye injury that halts the job.
- Extension pole & inspection light/mirror — Reach higher spots without ladder moves and inspect gaps, flashings, and returns. Use a sturdy pole rated for the weight of the camera or mirror; bright LED flashlight helps identify staining beneath coatings. Using flimsy poles leads to dropped gear and damaged EIFS—buy a decent one or rent.
Pro tip: Combine a pinless meter sweep with targeted pin checks and photos, and map everything immediately. If you don’t own a pin meter or lift, rent them for the day—cheap tools are fine, but cheap choices for access or meters cost more in rework and safety down the line.
Step-by-step moisture scanning protocol for EIFS
This sequence gives you a repeatable way to map moisture across EIFS and stucco so you can see wet spots, suspect joints, and where to focus repairs. Follow the grid, record consistently, and stop if readings look substantially high or confusing.
- Lay out a grid over the wall face at 24″ x 24″ (60 x 60 cm) for flats and 12″ x 12″ (30 x 30 cm) around windows and joints. This forces even coverage so you don’t miss small wet areas. Check: you have a labeled grid map and measured spacing on the wall. Stop and call a pro if the wall is unsafe to reach or crumbling.
- Take baseline surface relative readings with your non-invasive meter at the grid intersections before probing. That gives you a reference for normal vs. elevated moisture across the system. Check: baseline values are logged and low/consistent across dry areas. Call a pro if baseline readings are wildly erratic across a small area.
- Scan every grid point in a consistent pattern (left-to-right, top-to-bottom) and log the number, depth mode, and exact grid coordinate. Consistent order prevents missed points and makes mapping easier. Check: your log shows consecutive coordinates and values; missing or duplicate entries mean re-scan that row.
- Scan all horizontal and vertical control joints, window/door perimeters, terminations, and through-wall penetrations at 6″ intervals. Joints are the most common moisture entry paths and often show higher values than the field. Check: joint readings are higher than adjacent field readings; if you see very high sustained readings (>20–30% on pin meters or manufacturer high on non-inv), stop and call a pro for destructive inspection.
- If non-invasive readings show hotspots, confirm with a pin-probe or small test-drill in the insulation or behind the cladding at 2–3 locations per hotspot. This verifies true moisture versus surface contamination. Check: pin readings match elevated non-inv readings; if pin readings are extremely high (>40% wood-equivalent) or you hit rot/soft substrate, stop and call a pro immediately.
- Create a color-coded map from your log (wet/moderate/dry) and mark exact locations on a sketch of the wall, noting probe depths and meter types. A visual map tells you where to focus repairs and where drying will be effective. Check: mapped hotspots align with physical signs (staining, efflorescence, soft spots); if mapping shows inconsistent pockets, bring in a pro for infrared or invasive survey.
- After any local repairs or drying, repeat scans on the same grid at 24–72 hours and again at 7 days to confirm decline in moisture. Moisture can rebound — repeat checks prove the repair worked. Check: readings trend downward; if values stay flat or climb, stop DIY work and get a professional moisture remediation and destructives assessment.
Pro tip: Use the same meter settings, same grid spacing, and the same operator if possible — meter-to-meter and operator differences give false hotspots. If your readings don’t make sense, re-check a known dry control spot before trusting the whole map.
Interpreting readings and determining next actions
Look at the meter readings and the pattern, not just single numbers. A quick spike over a small area usually means surface wetness from rain or cleaning. Consistent high readings across several scans, or a steady gradient moving inward, point to embedded moisture and a problem behind the EIFS.
Set simple thresholds you will act on: if non-invasive meter values hit your wet-zone number (use the same scale you used during setup), schedule a deeper probe. If numbers are only slightly elevated and dry out within 48–72 hours, you can monitor. If readings stay high after drying or you see repeated hot spots, plan for removal of the cladding to inspect and repair the substrate.
Decide fast but sensible: small, isolated, surface-only issues — dry and seal; widespread or persistent readings — remove and repair. Document every reading location, time, and weather, and take photos before and after any work. Clear notes save headaches if you need a contractor or an insurance claim.
Frequently asked questions about eifs inspections
This FAQ for EIFS inspections guides DIYers through practical, bite‑sized steps: what pinless moisture meters measure, how to interpret readings, and the typical moisture thresholds for stucco and EIFS, so you can decide when a reading is normal, elevated, or suspicious. It also clarifies when DIY readings are useful and when to call in a pro, highlighting signs of hidden water and safety considerations with ladders and roof access. The aim is to give you a clear, actionable framework rather than vague guidance.
Contextualizing these readings matters because the substrate—whether stucco, foam, or metal lath—affects accuracy, and readings should be collected thoughtfully: test at wall corners, around penetrations, near window and door flashings, with multiple readings and both scan and spot tests, and track results over time. You’ll learn the practical limits of pinless meters on EIFS, how to document measurements, and how to pair meter data with visual checks for a reliable picture. The simple decision tree helps you decide when to map moisture, schedule inspections, or pursue moisture barrier repairs based on normal, elevated, or persistent high readings.
Interpreting moisture meter readings for EIFS: what counts as a red flag and what doesn’t
Keep it simple: take several readings across the same wall and compare. A single high number doesn’t prove a leak. If most readings are low and one spot spikes, that spot is worth a closer look. Use both a surface (pinless) meter and a probe meter when you can. If the probe reads much higher after a small test drill, you’ve found moisture in the substrate, not just on the surface.
Numbers to watch for: readings under about 10% (pinless relative scale or %MC on wood) are typically safe for the EIFS face. Readings in the 10–15% range are suspicious and call for follow-up testing. Anything consistently above ~16% is a red flag for wet sheathing or trapped moisture and needs repairs or further invasive inspection. Example: a 9% reading on the foam with a 17% reading on the sheathing edge means the water is in the wall, not just the surface.
Watch how the meter behaves across materials. Expect a “bounce” when you move from foam to wood trim or masonry—compare similar materials, not just numbers. To separate surface moisture from deeper moisture, do a simple wipe test, then re-check after an hour; if the number drops quickly, it was surface wetting. If it stays high, or if a small drilled access followed by a probe shows higher values, treat it as trapped moisture. And don’t rely only on the meter—visible stains, soft spots, or bad flashing at window sills still matter more than a single reading.
Step-by-step moisture detection workflow for EIFS inspections
This sequence gets you from a quick look to confident moisture flags and a decision to repair or hire a pro. Follow the steps in order so you don’t miss hidden wet spots or cause needless damage.
- Do a focused visual inspection of the cladding and details. Look for stains, efflorescence, soft spots, and cracked sealant because these are often where moisture enters. Check that you’ve walked the perimeter and photographed each issue so you can compare later. Stop and call a pro if you see large delaminated panels or exposed insulation—those aren’t DIY fixes.
- Run pinless exterior scans over broad wall areas with a calibrated meter. This finds areas with elevated moisture without puncturing the EIFS, so you can narrow where to test more deeply. A successful scan shows consistent low readings across sound areas and spikes at suspect zones. If the pinless meter gives wildly inconsistent results across a short distance, re-check calibration and repeat scans before proceeding.
- Mark all high readings and suspicious details on a simple elevation sketch. Marking saves you time and prevents random poking later. A correct map matches your photos and meter spikes. If you can’t clearly match meter spikes to specific wall features, pause and rescan—don’t start invasive testing blind.
- Do targeted pin tests through the EIFS at the marked spots, using the smallest probe possible. This confirms whether moisture is in the substrate or just in the outer coat. You’ve done it right when pin readings are higher exactly where the pinless meter spiked. Stop and call a pro if you’re forced to make large holes or the substrate feels mushy—those are signs of serious failure.
- Probe joints, terminations, and penetrations with non-destructive and small invasive checks. These are the most common leak paths and often show moisture first. A correct check finds higher moisture at these details compared with adjacent field areas. If water is pooling inside cavities or you encounter active leaks, stop and get a contractor—DIY won’t fix a compromised drainage plane.
- Document every reading, location, and photo in a simple report and compare to earlier readings. Clear records show trends and prevent arguments during repairs. You’ve done this right when each suspect spot has a photo, a pinless value, and a pin value where applicable. If readings are borderline and you can’t decide, allow 24–72 hours of dry weather and recheck before deciding on repairs.
- Decide next steps: monitor, schedule repairs, or escalate to a moisture specialist. Use the documented pattern: isolated low-level moisture can be monitored; widespread or structural wetting needs repair. A good sign to proceed yourself is a single small detail with low pin readings and no active leak. Call a specialist when moisture is widespread, penetrations show wet insulation, or if you can’t locate the source after this workflow.
Pro tip: Don’t start invasive testing until you have a clear map from your pinless scans and photos. Random drilling just creates more problems and weakens the EIFS; work methodically and only drill where your scan points to trouble.
Common mistakes that skew EIFS moisture results and how to avoid them
These are the real-world screwups I see on jobs that give you bogus moisture readings. Avoid them and you’ll save time and false alarms. If you need interpretation tips, refer back to the moisture meter section earlier in the article.
- Not calibrating meters — Meters drift. If you skip a quick calibration check against a known block or the manufacturer’s test pad, your numbers can be off. Calibrate at the start of the day and after drops or extreme temp swings.
- Reading through metal or flashing — Metal and flashing mask the substrate and give falsely low or erratic readings. Move probes or pins to an exposed EIFS area or test at a joint where the substrate is reachable behind the cladding.
- Cold or hot surface bias — Extreme surface temps will alter meter behavior and moisture migration. Avoid testing right after sun exposure or in freezing temps; allow the wall to normalize for a few hours or retest during milder conditions.
- Poor probe placement — Shallow pins, angled probes, or placing sensors on the finish coat only reads the surface, not the substrate. Drive pins to the correct depth and target the EIFS base or sheathing as called for by your workflow.
- Testing over sealants/finishes — Thick sealants or multiple finish layers hide moisture and give misleading low readings. Where possible, test at a removed finish edge or perforate a small, controlled spot to reach the underlying layers.
Double-check these items before you trust a reading. Fix the setup first, then the numbers will make sense.
Recent posts
Recent posts highlight highly relevant, actionable content that complements pinless moisture meter use in stucco and EIFS projects, with a focus on practical DIY steps and common pitfalls. Each entry prioritizes moisture detection techniques, EIFS inspections, visual indicators of hidden moisture, and maintenance steps, while emphasizing recency, usefulness, and cross-link potential to boost workflow on site. Expect concise summaries, clear takeaways, and internal connections that invite readers to learn more by following CTAs like “Learn more in our EIFS moisture guide.”
This approach matters on the jobsite because it translates technical concepts into repeatable steps you can apply while you work, reducing guesswork and costly rework. By pairing each post with thumbnail imagery, quick-checklists, or micro-infographics, the content becomes easier to scan between tasks and to reference during inspections and maintenance. The interlink strategy keeps readers engaged, strengthens topical authority, and supports safer, more informed use of pinless moisture meters for DIYers.
Gather tools, PPE, and prepare the survey area
Lay out a few reliable tools and mark the scan path before you start. The right gear keeps readings honest, keeps you off your back, and prevents avoidable mistakes.
- Pinless moisture meter
Reads moisture below the surface without puncturing materials. Look for one with a calibrated depth (commonly 0.5–1.5 inches) and a clear wood/CM scale. Essential for fast, non-destructive scans; cheap units (~$50–$200) work for homeowners but a dead or uncalibrated meter gives false negatives. - Pin-type moisture meter (optional)
Confirms spot readings by piercing the material for exact moisture percent. Use stainless pins and check the temperature compensation setting if present. Optional—rent or borrow (~$30/day) if you need verification; using a cheap corroded pin will ruin readings and can stain surfaces. - Ladder or stable platform
Lets you reach high walls and ceilings safely for consistent scanning height. Choose a ladder rated for duty class and use a level or wide top cap as a steady platform. Essential on multi-story jobs; a wobbly ladder causes bad scans and a fall—don’t cheap out, hire or rent a good one ($50–$150 rental/day or cheap buy ~$40). - Flashlight/headlamp
Lights low-contrast spots and helps you follow a repeatable scan line. Pick a bright, focused beam and hands-free headlamp for one-person work. Cheap lights are fine, but a weak beam hides staining and leads to missed trouble spots. - Reflective tape/markers
Marks the start, end, and regular intervals of your scan path so you can repeat it exactly. Use bright, weatherproof tape and place markers every few feet or at changes in plane. Essential for repeatability; skipping markers causes inconsistent passes and false readings when you compare scans later. - PPE kit
Gloves, safety glasses, and an N95 or better respirator protect you while inspecting damaged or dusty areas. Buy durable nitrile or leather gloves and a rated respirator for moldy or old insulation work. Always wear PPE—cuts, dust inhalation, and eye injuries are common if you skimp on protection.
Pro tip: Combine the pinless meter for fast mapping and a rented pin meter for spot checks. Mark a single straight scan path with reflective tape, wear PPE, and keep your ladder footed—consistency beats fancy gear every time.
Step-by-step pinless moisture survey for EIFS and stucco
This sequence gives a practical route to scan exterior EIFS and stucco with a pinless meter, record readings, mark suspect spots, and decide when to escalate. Follow it in order for consistent, repeatable results.
- Power on and calibrate the pinless meter against a known dry reference surface near the work area. Calibration ensures the meter’s baseline matches local materials and conditions. Check that the meter shows the expected low reading on the dry spot; if readings are erratic, re-calibrate or swap batteries. Stop and call a pro if the meter won’t stabilize after calibration.
- Divide the wall into a grid using chalk or removable tape roughly 2–3 ft squares. A grid forces even coverage and prevents missed zones. Confirm squares are visible from ground level and note them on a simple sketch or photo. No wait time; move to scanning immediately.
- Scan each grid square with the meter held flat against the surface in the same orientation and pressure. This gives consistent depth and repeatable readings for comparison. A good check is seeing similar background values across dry areas; sudden spikes mark suspects. If you hit continuous high readings across many adjacent squares, stop and consider a professional invasive check.
- Record peak and average readings for each square on your sketch or a spreadsheet, noting date and conditions (temperature, recent rain). Recording lets you spot patterns and track changes later. Verify entries by repeating the scan quickly on any square with an unexpected value; matching numbers confirm reliability. No curing delays; record as you go.
- Inspect and mark suspect squares with painter’s tape or numbered tags where readings exceed your chosen threshold or jump sharply from neighbors. Marking highlights where invasive tests or repairs may be needed. A quick check is that tape is visible and tags match your recorded list. If suspect areas line up with flashing or penetrations, call a pro before cutting into finishes.
- Perform a secondary check around edges, openings, and changes in material where moisture often concentrates. This targets common failure points missed by flat-field scans. Confirm by getting consistently higher readings within a few inches of the edge; irregular spikes may mean surface contamination or meter error. If you suspect trapped moisture but the meter is borderline, schedule a professional destructive test—don’t guess.
- Photograph each marked spot with its recorded reading and time-stamp, then store the photos and notes together. Photos provide evidence and help a pro assess severity remotely. Quick verification is that each photo clearly shows the tape/tag and a readable meter screen or your recorded number beside it. If documentation is poor or readings contradict visible staining, stop and get an expert opinion before proceeding.
Pro tip: Use conservative thresholds for “suspect” readings and mark more rather than fewer spots; catching a small wet area now saves a lot of demolition later.
Avoiding common mistakes and verifying readings
These are the usual screw-ups I see on site. Avoid them and you’ll stop chasing false alarms and wasted repairs.
- Poor surface contact — Holding the probe off-angle or leaving debris under the sensor gives low or wildly inconsistent readings. Clean the area and press flat and steady; retest the same spot twice to confirm.
- Ignoring temperature effects — Cold or hot walls change readings enough to mislead you. Let instruments and materials reach ambient temperature or note the temp and compare to a control area before trusting numbers.
- Skipping control checks — Not taking a dry reference reading on an unaffected area hides drift and calibration issues. Always record a nearby known-dry spot so you can judge relative wetness.
- Trusting single spots — One high reading doesn’t prove a leak. Scan a pattern around the mark to map moisture. If only one tiny spot reads high, it could be localized damage or a sensor glitch.
- Poor documentation — Vague notes or no photos mean you can’t track changes. Log location, time, conditions, instrument used, and a quick photo so follow-ups actually show whether things improved or worsened.
Double-check these points every time you survey. A few extra control readings and solid notes save hours and keep repairs honest.
Conclusion
You now have a practical way to spot hidden water in stucco and EIFS without cutting into the wall, protecting the substrate, appearance, and your budget. The goal is to catch trouble early, avoid damaging the surface, and decide fast when to act rather than guess.
Right now, apply this by doing a quick, methodical check: select the right pinless meter, prep your area, scan in a logical pattern across suspect zones, compare readings against built-in thresholds, confirm any high spots with repeat scans, document the results, and plan next steps based on solid data. Start small, test a known dry patch first, then expand to likely problem areas, and keep notes so you can track changes over time.
Common mistakes trip people up: rushing the scan, treating readings as absolute instead of relative, ignoring surface texture or coatings that skew results, and skipping safety steps or re-testing after a suspected reading. Stay safe by wearing eye/hand protection, avoiding wet weather windows, and never pushing the meter hard into soft or damaged stucco. Do not force readings—if something feels off, back off, dry the area, and re-test after cleaning dust or efflorescence that might mask true conditions.
If the readings are questionable or you encounter extensive damage, it’s smart to call a professional rather than forcing a DIY fix. A professional can confirm moisture, assess EIFS integrity, and outline a proper repair plan. Stay disciplined, keep your data tight, and you’ll keep the job moving forward with confidence and fewer costly mistakes.
FAQ
What is a pinless moisture meter and why do I need one for stucco or EIFS?
A pinless meter senses moisture from the surface without poking holes. It helps you find hidden water behind stucco or EIFS without destroying the finish. If you’re chasing leaks, this tool saves time and rough guesswork.
How do I prep the surface before testing?
Clean the area and dry it as much as you can. Remove loose paint or debris so the readings aren’t thrown off. Don’t test over shiny or glossy coatings that can trick the meter.
Where should I take readings and how do I interpret them?
Test along seams, corners, and areas above suspect leaks. Compare readings to a dry baseline; higher numbers mean moisture, but don’t panic at one high spot. Look for a pattern—consistent high readings near flashing, cracks, or damage indicate a leak path.
What are common mistakes that ruin the readings?
Avoid pressing too hard or dragging the meter; that can give false highs. Don’t ignore wet insulation or interior staining, since moisture can travel. Calibrate if your model asks for it and recheck suspicious spots from different angles.