
Introduction
Flat drywall is a long-standing base, but texture trends have shifted how homes look today. This intro explains why some spaces read as smoother or more textured and what to test before choosing a finish. You’ll get a plain‑language sense of what to expect and how a skim coat can change a wall’s feel.
Testing for texture readiness is about looking for consistent absorbency and spotting any uneven spots, dents, or seams that would show through. If you’re leaning toward a smoother look, plan for tools like a wide taping knife, sanding block, and skim coat material, plus primer after you finish. For best results, check manufacturer instructions and local rules to confirm acceptable finishes and step-by-step skim coating procedures.
Key takeaways
- Smooth walls finish hide seams and imperfections; plan for proper corner and joint prep.
- Level 5 skim coat requires dust containment, masking, and cleanable work area.
- Test moisture before texture to avoid future peeling; use a simple drywall check.
- For DIY skim coats, invest rasp, trowels, and sanding screens; use per manufacturer.
- Texture choice should match room function and lighting; consult local codes.
- Safety: wear PPE, containment, dust control; start on small area first.
Table of Contents
- Introduction
- Key takeaways
- Why Smooth (Flat) Drywall Is Trending — or Not
- Common Problems Associated with Flat Drywall
- The Full Range of Texture Types and Historical Context
- How to Test and Diagnose Problems in Smooth Vs. Textured Walls
- Fixes and Remediation: DIY and Professional Solutions
- Skim Coating and Level 5 Finishes — Process, Tools, and Common Mistakes
- Safety, Cost, and Roi Considerations
- Planning Your Project: Timeline, Permit, and Contractor Checklist
- Conclusion
- FAQ
Why Smooth (Flat) Drywall Is Trending — or Not
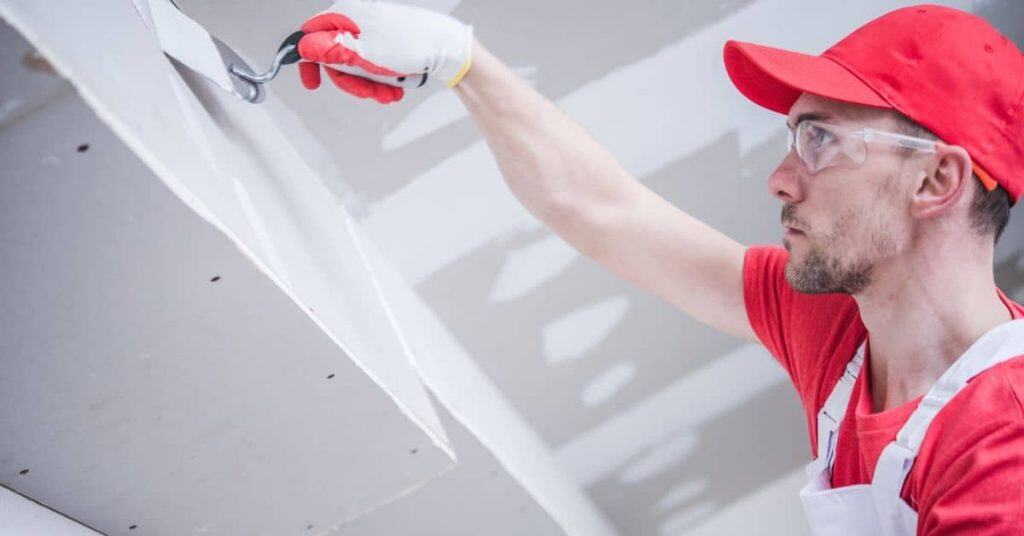
Flat, smooth walls are a hallmark of modern interiors, emphasizing light reflection, clean lines, and a minimalist feel. Homeowners often want the clean look for brighter rooms and easier touch-ups. Yet texture remains in places where warmth, acoustics, or traditional style matters.
Pros include easier painting, visible imperfections easier to hide with skim coats, and potential resale appeal in contemporary layouts. Cons cover finish quality, maintenance of uniform sheen, and how smoothing can reveal hidden damage. Best-fit spaces include rooms with high-contrast lighting and small spaces, while high-traffic kitchens or moisture-prone areas may benefit from texture or more forgiving finishes.
Aesthetic and resale considerations
Smooth, flat drywall is trending due to its clean, minimalist look. It reflects light well, making rooms feel brighter and more spacious.
Perceived space: Flat walls create a seamless, uninterrupted flow from one area to another, making small spaces feel larger.
Light reflection: Smooth surfaces reflect natural and artificial light better than textured ones, enhancing visibility and ambiance.
Resale appeal: Many buyers prefer the versatility of smooth walls. They can be easily painted to match any decor style. In contrast, heavy textures like popcorn or knockdown may limit design options and date a home’s look.
When texture still makes sense
While smooth walls are trending, there are situations where textured finishes remain practical or desirable.
Hiding imperfections: Textures like orange peel or knockdown can disguise minor wall defects, hairline cracks, or uneven surfaces. They’re great for older homes with minor wear and tear.
Historic authenticity: In historic homes or renovations aiming to maintain period details, certain textures may be necessary to preserve the home’s original character.
Budget constraints: Textured finishes often require less material and labor than smooth ones. For example, applying a skim coat over existing texture is faster and cheaper than starting from scratch with new drywall.
Common Problems Associated with Flat Drywall
Visible seams, tape bubbling, and cracking along joints are common when mud coats aren’t built up or properly sanded. Telegraphing of paper and mesh can show through if the mud is too thin or uneven. Nail pops or underlying damage can become obvious after smoothing.
Sheen differences from lighting and paint absorption can make flat walls look uneven. Subsurface issues like prior water damage or gaps between boards often reveal themselves after smoothing. Use a simple inspection and documentation routine to guide repairs and quotes before you repaint.
Structural and Environmental Causes
Cracks and joint failures in flat drywall aren’t always due to poor workmanship. Sometimes, it’s Mother Nature or the house settling.
Settling: Houses settle over time. This can cause cracks along joints. If you notice new cracks after a few years, it might be settling.
Framing movement: Movement in the framing can also cause drywall issues. Check if doors or windows are sticking – that could indicate framing movement.
Humidity and temperature swings: Big humidity changes and temperature swings can cause drywall to expand and contract, leading to cracks. Keep your home’s environment consistent to minimize this.
Surface-Prep and Application Errors
Many smooth finish issues stem from mistakes in surface prep or application. Here are some to avoid:
- Insufficient mud coats: Not applying enough joint compound can lead to visible seams and tape bubbling. Make sure you’ve applied enough mud.
- Poor sanding: Inadequate or improper sanding can cause a rough, uneven surface. Sand lightly and evenly between each coat.
- Wrong primer: Using the wrong primer can lead to sheen differences and poor paint absorption. Always use a primer designed for drywall.
- Improper mudding technique: Applying mud too thick or not feathering edges properly can cause visible seams and cracking along joints.
Remember, patience and careful application are key to a smooth finish. Don’t rush the process.
The Full Range of Texture Types and Historical Context
A concise texture taxonomy includes smooth, orange peel, knockdown, popcorn, skip trowel, stipple, and comb styles, each with quick visual cues. Describe textures by touch or sight to help identify them on site. This helps plan repairs or replacement more accurately.
Textures map to eras of popularity and renovation trends, with some still favored in traditional spaces and others considered dated. Practical guidance covers where textures appear (ceilings vs walls, modern vs traditional homes) and how textures affect maintenance and repair. Use this to decide when to test, skim coat, or skip-trowel based on aesthetic goals and budget.
Which textures hide what and why they were used
Textures serve a practical purpose – hiding imperfections. Smooth walls reveal every bump and dent, while textured surfaces can mask drywall joints, nail holes, and minor wall defects.
Orange peel, for instance, conceals small flaws with its bumpy surface. It was popular in the 1970s due to its affordability and ease of application.
Knockdown texture, on the other hand, hides joints and seams effectively. It gained popularity in the 1980s for its modern look and soundproofing properties.
Popcorn ceilings, prevalent in the 1950s-1970s, were used to hide imperfections and reduce noise. However, they’re now often removed due to aesthetic reasons and potential asbestos content.
Health and safety history (asbestos, lead)
Older homes may contain hazardous materials like asbestos and lead in their textures. Asbestos was commonly used in textured paints and plasters until the 1970s due to its fire-resistant properties.
Asbestos exposure can cause serious health issues, including lung cancer and mesothelioma. If your home was built before 1980, consider testing for asbestos before any texture removal or renovation work.
Lead, once used in paints, can also be present in older textures. Lead poisoning is a serious health risk, especially for children. If your home was built before 1978, test for lead before disturbing any surfaces.
Always wear appropriate safety gear and follow local regulations when dealing with these materials.
How to Test and Diagnose Problems in Smooth Vs. Textured Walls
Visual inspection should note finish level, evidence of skim coats, tape joints, mud bleed, and irregularities that hint at older textures. Take photos for reference and to share with a pro. This sets a baseline for repairs.
Do a light tap test to gauge solidity, listen for hollow sounds, and use a moisture meter where damp areas are suspected. If asbestos or lead paint is possible, follow safety protocols and consider professional testing to confirm hazards before disturbing surfaces.
Step-by-Step Process
Follow these practical steps to test and diagnose problems in smooth vs. textured walls.
- Preparation: Gather tools (flashlight, ruler, screwdriver, moisture meter, GFCI-aware drill), wear safety gear (gloves, goggles).
- Visual inspection: Check finish level, skim coats, tape joints, mud bleed, irregularities. Take photos.
- Tap and sound test: Lightly tap walls; listen for solid or hollow sounds, dull or sharp.
- Moisture testing: Use moisture meter on suspected damp areas; visually check for staining, efflorescence, mildew.
- Safety checks: If asbestos or lead paint is possible, safely sample and send to lab. Clean up dust and debris.
DIY Inspection Checklist and Visual Checkpoints
Use this checklist during your visual inspection of walls.
- Cracks: Look for hairline or larger cracks; confirm with straightedge.
- Telegraphing: See if imperfections on the surface match studs or framing behind.
- Flaking/Peeling: Check for paint or texture flaking off; use flashlight to inspect edges.
- Bubbling: Feel and look for bubbled areas; press gently with finger.
- Sagging/Warping: Inspect for warped or sagging drywall; use straightedge to confirm.
- Mold/Mildew: Look for dark spots, musty smell; confirm with moisture meter.
- Efflorescence: Check for white, powdery deposits; indicates moisture intrusion.
- Tape Joints: Inspect tape joints for gaps or cracks; run finger along edge.
Quick rule: If unsure about any findings, err on the side of caution and consider professional help.
When and How to Order Professional Testing
Know when to hire a pro for thorough diagnostics:
Asbestos/Lead: If your home was built before 1980, consider testing for asbestos or lead paint. Professionals use specialized equipment and follow strict safety protocols.
Structural Inspection: For extensive damage or if you suspect structural issues, hire a structural engineer. They’ll provide a detailed report outlining problems and recommended repairs.
Moisture/Roof Leak Diagnostics: If your moisture tests are inconclusive or you suspect roof leaks, consider hiring a professional. They can perform infrared scans or other advanced diagnostics to pinpoint the source of moisture intrusion.
Fixes and Remediation: DIY and Professional Solutions
Assess problem severity to choose spot repair, skim coat, or full refinishing. Create a quick DIY vs professional decision checklist to guide the plan. Expect different timelines and tool needs for each path.
Follow a step-by-step workflow for each remedy tier, covering surface prep, patching, skim coating, leveling, and finishing. Include surface priming strategies and notes on moisture considerations to protect the substrate long-term.
Quick DIY Fixes
For small to moderate issues, quick DIY fixes can save you time and money. Here’s how:
Patching cracks: Use a setting-type joint compound to fill narrow cracks. Apply with a putty knife, let it dry, then sand smooth.
Feathering compound: For wider areas, apply compound in layers, ‘feathering’ the edges so they blend into the surrounding wall. Let each layer dry before sanding and applying the next.
Sanding tips: Use a fine-grit sandpaper (120 or 150) to avoid leaving marks. Wipe off dust with a damp cloth between coats.
Once patched, prime with a stain-blocking primer and paint as usual.
When to Hire a Pro and What to Request
Know when to call in the professionals. Here’s why:
Widespread damage: If more than 10% of your walls are affected, it’s likely easier and cheaper to hire a pro.
Asbestos or structural issues: If you suspect asbestos or have structural problems, do not attempt repairs yourself. Hire licensed professionals immediately.
When hiring, specify the finish you want:
Level 4 finish: Request this for low-light areas or if you prefer a flat sheen. It’s less reflective and hides imperfections better.
Level 5 finish: Ask for this in well-lit rooms or if you prefer a semi-gloss or gloss sheen. It reflects more light but shows imperfections easily.
Skim Coating and Level 5 Finishes — Process, Tools, and Common Mistakes
Skim coating and Level 5 finishes aim for a flat, ultra-smooth look with minimal texture and durable paint surfaces. They differ from other finishes in flatness, sheen control, and long-term durability. Use this if you want a truly seamless surface.
Outline the step-by-step process: prep, patch, apply skim coat, sand between coats, and finish with final polishing. A tools and materials checklist helps plan the job and keeps DIYers aligned with best practices.
Tools, materials, and mixing tips
First off, gather your tools. You’ll need:
- Trowels: 6″, 12″, and 24″ for applying and smoothing the compound.
- Mud pan: To hold your mixed compound.
- Mixing paddle: For blending your compound in a bucket or mixer.
- Power drill with mixing attachment: To speed up the process.
- Sponge float: For leveling and smoothing the final coat.
Now, let’s talk materials. You’ll need joint compound, typically a ready-mixed all-purpose variety for skimming and leveling. Always check the label to ensure it’s suitable for your job.
Mixing is crucial. Start with a small batch – around 5 lbs (2.3 kg) of compound per 1 gallon (3.8 L) of water. You want a consistency like thick cake batter. Too thin, and it won’t stick; too thick, and it won’t spread. Use your drill on low speed to avoid air bubbles.
Step-by-step application and finishing tips
This sequence will guide you through applying skim coats and achieving a Level 5 finish, ensuring a smooth, professional-looking surface.
- Apply the first skim coat: Use a 12″ or 14″ wide trowel to apply the first layer of joint compound. Spread it evenly across the wall, working from top to bottom in small sections. Why: This initial coat fills minor imperfections and provides a base for subsequent layers. Check: The surface should look smooth and even.
- Let it set: Allow the first coat to dry according to the manufacturer’s instructions, typically around 24 hours. Why: Proper curing prevents delamination and ensures a strong bond for the next layer.
- Sand the first coat: Use a pole sander with 120-grit sandpaper to lightly sand the entire surface, removing any high spots or imperfections. Why: Sanding ensures a smooth base for the final coats and helps achieve a Level 5 finish. Check: The surface should feel smooth and even.
- Apply the second skim coat: Using a 14″ or 16″ wide trowel, apply the second layer of joint compound, working in small sections from top to bottom. Why: This coat builds on the first, further smoothing out the surface and filling any remaining imperfections.
- Let it set: Allow the second coat to dry according to the manufacturer’s instructions. Why: Proper curing ensures a strong bond between coats and prevents delamination.
- Sand the second coat: Lightly sand the entire surface using 150-grit sandpaper, removing any high spots or imperfections. Why: Sanding ensures a smooth, even surface for the final finish. Check: The surface should feel very smooth and even.
- Prime the surface: Apply a high-quality primer using a paint roller or sprayer. Why: Priming seals the surface, promotes better paint adhesion, and helps prevent tannin bleed (if working with drywall).
- Let it set: Allow the primer to dry according to the manufacturer’s instructions before proceeding with painting. Why: Proper curing ensures a strong bond between the primer and paint.
Pro tip: Always use a damp cloth or sponge to wipe away any sanding dust before applying the next coat or primer. This helps ensure a smooth, dust-free finish.
Safety, Cost, and Roi Considerations
Identify hazards like asbestos or lead paint in older homes and manage silica dust with proper PPE and containment. Know when professional abatement is required based on your inspection results.
Weigh material costs, tool needs, and labor time when comparing smoothing versus leaving texture. Consider how a smoother finish may impact paint coverage and resale value, with attention to budget and neighborhood expectations.
Cost comparison and budgeting guidance
Smoothing walls can cost between $1 to $3 per square foot, depending on factors like square footage, asbestos removal needs, and the requirement for a Level 5 finish. Here’s how:
Materials: Patching compounds ($20-$40/gallon), skim coats ($30-$50/gallon), primers ($15-$30/gallon), sealants ($10-$20/quart).
Tools: Trowels, paddles, mixers can be rented or purchased. Rental costs vary; purchasing can range from $20 to $100 per tool.
Labor: DIY saves labor costs but requires time and skill. Professionals charge $30-$60/hour.
Safety protocols for removal and renovation
Containment: Seal off work area with plastic sheets to prevent dust spread. Use negative air machines to keep dust in.
PPE: Wear respirator, goggles, gloves, and protective clothing. Respirators should be NIOSH-certified for silica dust (N95 or P100).
Asbestos removal: If asbestos is present, hire a licensed professional for abatement. DIY removal is unsafe and often illegal.
Silica dust: Wet sanding and proper ventilation can reduce silica dust exposure. Regularly clean up spills to minimize risks.
Planning Your Project: Timeline, Permit, and Contractor Checklist
Define typical project timelines by scope and include buffers for weather, inspections, and subcontractor availability. Know which steps may trigger delays or require added permissions.
Use a contractor vetting checklist with licensing, insurance, references, and warranty terms. Plan material choices early, and run simple in-house tests (moisture, adhesion) to confirm substrate readiness before work starts.
Timeline examples by project scope
Use this checklist to estimate timelines for common drywall projects.
- Spot repair (1-2 areas): 1-2 days, plus drying time (1 day).
- Whole-room skim coat: 3-4 days, plus drying time (2-3 days per coat).
- Ceiling texture removal/replace: 2-3 days for removal, 1 day for new texture, plus drying time (1 day).
- Structural repairs (framing): 2-5 days, depending on damage.
- Drywall installation: 1-3 days per room, plus taping and sanding.
- Texturing/finish work: 1-2 days, plus drying time (1 day).
- Priming and painting: 1-2 days, depending on color change.
- Buffer for weather, inspection holds, subcontractor availability: Add 1-3 extra days per phase.
Quick rule: Always add buffer time for unexpected delays and inspections.
Contractor vetting and scope-of-work template
Use this checklist to vet contractors and create a detailed scope of work.
- Licensing: Check state license board for valid credentials.
- Insurance (liability & workers’ comp): Ensure coverage protects both parties.
- References: Contact 3-5 recent clients to verify quality and professionalism.
- Previous similar projects: Review photos or visit sites to confirm expertise.
- Project timeline commitment: Ensure they can start and finish on your schedule.
- Change-order procedures: Clearly outline change-order process in contract.
- Warranty terms: Ensure warranty covers both labor and materials.
- Finish level requested: Specify desired finish level (e.g., Level 5).
- Prep steps: Include prep work like priming, sanding, or asbestos abatement.
- Asbestos testing/abatement clause: If applicable, include testing and safe removal procedures.
- Cleanup expectations: Specify who’s responsible for cleanup at the end of each phase.
Quick rule: The more detailed your scope of work, the fewer surprises you’ll face during the project.

Conclusion
Start with a clear plan and test a small area first to size up texture, damage, and drying times. Prioritize safety and don’t push through if you see cracking, loose plaster, or moisture behind the wall.
Roughly this is the flow: assess what you have, pick a path (smooth, skim coat, or texture), gather the right tools, do a small test patch, then expand once you’ve proven the approach works. Check moisture, patch and skim in a controlled sequence, and keep a steady pace to avoid creating new problems. If you’re unsure about permits, timelines, or when a finish is beyond DIY, bring in a pro and get a written plan before you cut another corner.
Avoid these traps: rushing a skim coat without proper adhesion or drying time, skipping a moisture check on damp walls, and using the wrong texture technique for the room. Always ventilate, wear a mask and eye protection, and test a hidden area before you commit to the full wall. If results aren’t settling after the first patch or test, stop, evaluate the underlying issue, and adjust your approach.
If you’re weighing the risk versus reward and a higher-end finish like a Level 5 or extensive skim coating seems mandatory, it makes sense to call in a pro sooner rather than later. The right plan, done safely, gets you a durable surface that looks right and lasts. Get your plan, pick a clean starting point, and move forward with confidence.
FAQ
Why are smooth walls often preferred over textured walls?
Smoother walls look cleaner and are easier to paint evenly. They reflect light more uniformly and make rooms feel bigger. If you want a modern, low-maintenance backdrop, smooth is usually the easiest to keep looking sharp.
What does a Level 5 finish mean for skim coating and how to approach it?
A Level 5 finish is the highest, meaning the wall surface is ultra-flat with minimal texture. It requires multiple skim coats, careful sanding, and attention to dust control. Check the manufacturer’s instructions and local guidelines before starting, and be prepared for more time and patience than a basic finish.
What tools and materials are commonly needed for a skim coat?
You’ll typically need joint compound, a wide drywall knife, sanding tools, a mud pan, a sanding block or belt sander, and a mud mixer. Have a tarp for dust, a shop vacuum, and proper PPE. Always verify product labels for mixing ratios and application tips.
What’s the basic step-by-step for a practical skim coating process?
Apply a thin coat to smooth the joints and fastener heads, then let it dry. Lightly sand to keep the surface flat, wipe down with a tack cloth, and repeat with a second thin coat if needed. Finish with a final light skim and a very smooth sanding pass for a flat look.