

Introduction
Knockdown texture is a drywall finish where a sprayed-on joint compound is knocked down with a trowel to create a flat, mottled look. You’ll see common flaws like uneven patterns, noticeable ridges, or spots that didn’t set right. This guide walks you through practical, DIY-friendly checks and fixes you can do with basic tools.
Start by inspecting for moisture damage, peeling paint, or loose patches, and address those first. Patch any damaged areas with a compatible compound, let it dry, and re-spray or re-smooth to blend with the surrounding texture. Always follow the product label and local rules for mixing, drying, and recoat times, and test a small area if you’re unsure of the finish you’ll get.
Key takeaways
- Always follow manufacturer labels for mixing and application directions precisely.
- Wear eye protection and dust mask when spraying or sanding texture.
- Inspect ceiling drywall for cracks before applying knockdown to prevent uneven finish.
- Test a small area to verify texture contrast before full coating.
- Ventilate work area and control dust to protect occupants.
- Proper surface prep reduces rework and speeds successful repairs.
Table of Contents
- Introduction
- Key takeaways
- What Knockdown Texture Is and Where It’s Used
- Visual Checkpoints — Identifying Specific Flaws
- Root Causes of Knockdown Texture Problems
- Tools and Materials Checklist
- Fix-by-Flaw: Step-by-Step Repair Methods
- Surface Prep and Refinishing Workflow
- Preventive Measures and Quality-Control Tips
- When to DIY and When to Hire a Professional
- Conclusion
- FAQ
What Knockdown Texture Is and Where It’s Used
Knockdown texture is a drywall finish where a splatter of joint compound is lightly troweled to flatten peaks. It creates a low-relief, mottled surface with soft edges and a casual look. This style is popular for its warmth and ability to hide minor surface imperfections.
Typically applied on interior walls and ceilings, it suits living spaces, hallways, and rooms where a bit of texture helps with acoustics and lighting. Homeowners choose knockdown over smooth finishes to balance character with easier maintenance, but always check the product label or manufacturer instructions to confirm suitability for your project.
Definition and visual characteristics
Knockdown texture is a type of interior wall and ceiling finish created by spraying joint compound onto the surface and then flattening it with a trowel or knife.
The finished look is a semi-smooth, slightly textured surface with small indentations. It’s not as smooth as an orange peel texture but not as rough as a popcorn ceiling either.
Genuine knockdown has a distinctive ‘flattened’ appearance, unlike other textures that are merely sprayed on and left to dry.
Typical locations and surfaces
Knockdown texture is commonly applied to interior walls and ceilings made of drywall or plaster. It’s often used in living rooms, bedrooms, hallways, and kitchens.
It’s not typically recommended for bathrooms due to the risk of moisture damage. Also, it may not be suitable for high-traffic areas like entryways as it can show wear over time.
For ceilings, knockdown is a good choice when you want to hide imperfections but still maintain a semi-smooth look.
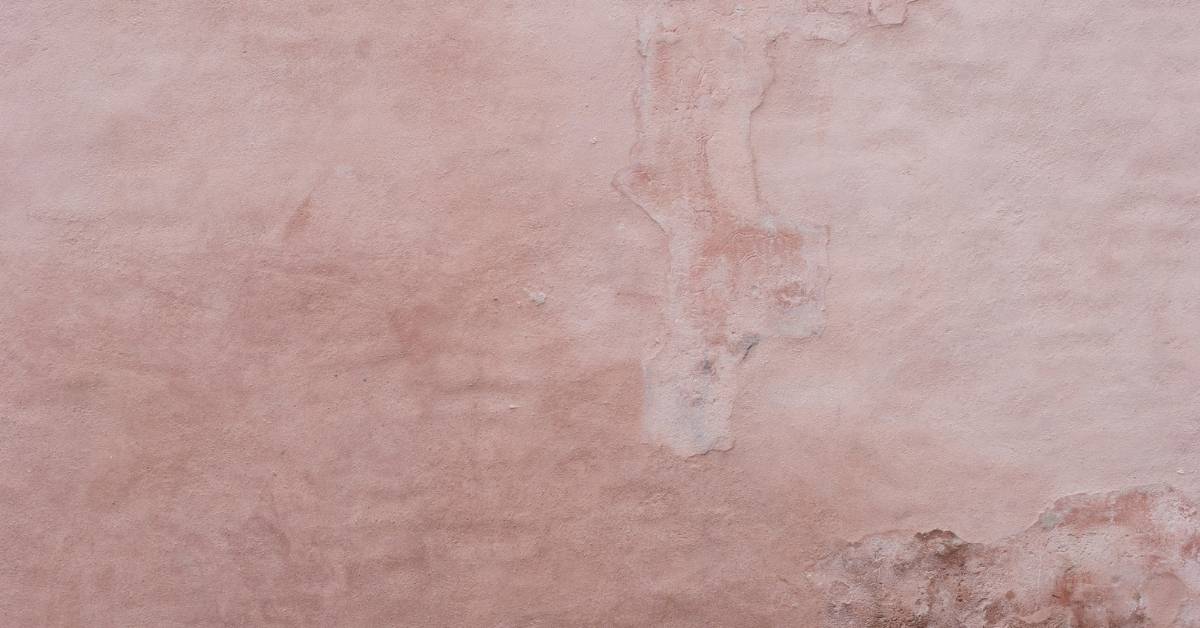
Visual Checkpoints — Identifying Specific Flaws
Start with a walk-around to spot obvious issues like bubbles, sags, or missing texture spots. Look for uneven patterns where the knockdown spread is inconsistent or has sharp edges that look glued on. Photograph any suspect areas for reference during repairs.
Document cracks or hairline separations carefully and note their location before touching anything. If you’re unsure about a flaw, verify with the product data sheet or manufacturer guidance and note relevant labels on the can or bucket.
Common symptoms and what they mean
Before you start repairs, use this checklist to identify common knockdown texture flaws. It’ll help you understand what went wrong and how to fix it.
- Peeling: Check for loose or detached areas. This could be due to poor adhesion or moisture issues.
- Blistering: Look for raised, bubble-like spots. These often indicate trapped moisture or improper surface preparation.
- Ridges: Feel for uneven surfaces. This might be caused by trowel marks not being fully knocked down.
- Orange peel: Inspect for a textured, bumpy appearance. This is usually due to applying the finish coat too thickly or at the wrong consistency.
- Splotches: Check for discolored spots. These can indicate contamination, improper mixing, or moisture problems.
- Cracks: Inspect for hairline fractures. These often signal underlying structural issues or shrinkage due to drying too quickly.
- Sags: Feel for soft, sunken areas. This usually means the texture was applied too thickly in those spots.
- Inconsistent patterns: Check for varying textures. This could be due to inconsistent trowel pressure or not allowing each layer to dry properly.
Quick rule: If you find any of these symptoms, don’t just patch over them. Address the underlying cause to prevent recurrence.
Cosmetic vs structural problems
Use this checklist to determine if issues are purely cosmetic or indicate deeper, structural problems that need further investigation.
- Size of cracks: Small hairline cracks are usually cosmetic. Wide, deep cracks may signal structural issues.
- Crack pattern: Random cracks are often cosmetic. Cracks following a pattern (like walls or ceiling) might indicate movement or settling.
- Wet spots or stains: These can indicate moisture problems, which need to be addressed immediately to prevent further damage.
- Sagging or soft spots: These often signal underlying structural issues, like rotting wood or crumbling concrete.
- Discoloration: While this is usually cosmetic, it can also indicate mold or mildew growth, which needs immediate attention.
- Peeling or delamination: This often indicates moisture problems or poor adhesion. It’s not just a cosmetic issue.
Quick rule: If you suspect any structural issues, don’t attempt repairs yourself. Consult a professional immediately.
Root Causes of Knockdown Texture Problems
Common causes fall into four buckets: application technique, material quality, substrate readiness, and environmental conditions. Rushing the knockdown pass or applying too thick a layer often leads to pull-off or sagging. Poor mud consistency can also produce irregular edges.
Substrate issues like dust, oil, or moisture at the wall or ceiling can prevent adhesion. Environmental factors such as humidity and temperature swings before curing are frequent culprits; cross-check multiple potential causes rather than assuming a single fault.
Application and technique errors
Mistakes during application can lead to common defects in knockdown texture. Avoid these pitfalls:
- Incorrect spray distance: Too close, and you’ll get drips; too far, and it’s patchy.
- Overworking the trowel: Excessive troweling can remove texture and cause an uneven finish.
- Improper knockdown timing: Knockdown too early, and you’ll have a weak bond; too late, and it’s difficult to work with.
- Inconsistent application: Varying spray distance or trowel pressure leads to inconsistent texture.
Consistency is key. Practice your technique before starting the job.
Material and mix issues
The right material makes all the difference in knockdown texture. Watch out for these:
- Wrong compound consistency: Too thick, it won’t spray; too thin, it drips.
- Expired product: Old compound can cause weak bond and poor adhesion.
- Improper thinning/accelerators: Incorrect mix ratio can lead to cracking or staining.
- Low-quality product: Cheap compound may not cure properly, causing a weak finish.
- Incompatible materials: Using the wrong primer or sealant can affect texture performance.
Always check the product’s spec sheet and use fresh, high-quality materials.
Environmental and substrate causes
External factors can also impact your knockdown texture. Here’s what to watch for:
Humidity: High humidity can cause slow curing, leading to a weak finish.
Temperature: Extreme temperatures can affect the compound’s workability and cure time.
Wet or dusty substrates: Moisture or dust on the surface can prevent proper adhesion and bonding.
Joint compound not fully cured: Applying texture over uncured compound can cause lifting and delamination.
Tools and Materials Checklist
Prepare a DIY-friendly set: a trough or bucket, scraping tools, putty knives, trowels, and a spray bottle for workable mud. Include a sanding block, vacuum or broom, and a clean cloth for prep work. Safety gear should cover eye protection, a dust mask, and gloves.
When selecting materials, verify labels for open time, workable thickness, and cure instructions. If you’re unsure about a product or need specialty gear, note whether it makes sense to rent versus buy and consult the manufacturer data sheet.
Essential tools for diagnosis and repair
Before you start, make sure you have the right tools to inspect, prepare, and apply knockdown texture. Here’s a checklist:
- Flashlight: Inspect hard-to-reach areas and check for hidden damage.
- Moisture meter: Detect moisture issues before applying new texture.
- Sandpaper (120-grit): Prepare surfaces by sanding down high spots and smoothing edges.
- Sanding block: Ensure even pressure when sanding large areas.
- Spray equipment: Choose between airless sprayers, high-volume low-pressure (HVLP) sprayers, or rent a texture spray machine for larger jobs.
- Knockdown knives: Vary blade sizes to create different textures and smooth out edges.
- Protective gear: Wear safety glasses, gloves, and a respirator to protect from dust and debris.
- Drop cloths/tarps: Cover floors and furniture to prevent damage during sanding and spraying.
Quick rule: Always inspect your tools before starting. Damaged or poorly maintained tools can lead to subpar results and potential injuries.
Materials and what specs to check
Gather the right materials for your knockdown texture project. Here’s a checklist to help you:
- Compound type: Choose between premixed or powder compounds, depending on your application method.
- Manufacturer mix ratios: Follow the recommended ratio for optimal results and avoid waste.
- Primer compatibility: Ensure the primer you’re using is compatible with the knockdown texture compound to promote better adhesion.
- Recommended drying times: Allow adequate time between coats and before painting to prevent damage or improper curing.
- Texture additive: Consider using a texture additive for larger knockdown effects, but be aware of potential longer drying times.
- Sandable sealer: Apply a sandable sealer after texturing to create a smooth surface for painting and protect the texture from damage.
- Cleaning supplies: Have soap, water, and rags ready to clean tools and surfaces during and after application.
- Tape (painter’s or masking): Protect adjacent areas from overspray and create clean lines around edges.
Quick rule: Always check product labels for specific usage instructions, warnings, and safety precautions to ensure a successful application and your personal safety.
Fix-by-Flaw: Step-by-Step Repair Methods
For bubbles or blisters, lift the loose area with a knife, re-mud the patch, and retexture to match the surrounding area. Clean the surface first to remove dust and paint residues before applying fresh material. Allow proper drying between steps and re-check edges for uniformity.
Cracks and separations should be cleaned, filled with compatible compound, and feathered thinly. Recreate the knockdown texture using a controlled pass, then allow it to dry before inspecting and finishing with primer and paint as needed.
Step-by-Step Repair Process
This sequence will guide you through fixing common concrete issues, from prep to finish.
- Inspect and Prepare: Check the damage, ensure it’s safe to work on. Clear debris, remove loose pieces. Why? A clean surface helps repairs bond better. Check by: Seeing a clear, stable working area.
- Gather Tools and Materials: Have everything ready – repair mix, trowel, brush, gloves, safety gear. Why? Efficient work, no delays. Check by: Having all items laid out, within reach.
- Mix Repair Material: Follow package instructions for water-cement ratio. Why? Correct mix ensures strength. Check by: Consistency – it should hold together when squeezed but not runny.
- Apply Repair Material: Fill damaged area, smooth with trowel. Why? Even application prevents cracking later. Check by: Smooth surface, no gaps or voids.
- Finish and Cure: Level off, let it cure as per manufacturer’s instructions. Why? Proper curing prevents early failure. Check by: Following recommended wait time before using the area again.
Pro tip: Keep the repaired area moist (but not wet) during curing to prevent cracking due to rapid drying. Use plastic sheeting or keep it damp with a spray bottle.
Repairing peeling, flaking, and delamination
First off, don’t just hack at the problem with a hammer. You’ll make it worse. Instead, follow these steps to fix your concrete right:
Start by removing loose material. Use a chisel or a wire brush to scrape away any flaking pieces. Be careful not to damage the sound concrete underneath.
Next, assess bonding. Check if there’s still good adhesion between the old and new layers. If it’s solid, you’re in luck. If not, you’ll need to start from scratch.
Now, patch and feather compound. Use a concrete repair mortar that matches your existing concrete. Apply it thick enough to fill the voids, then use a trowel or a float to feather the edges. This blends the new with the old so it’s not obvious where you made the repair.
Before you retexture, give it a good prime. This seals the patch and gives your new texture something to stick to. Use a concrete primer that’s compatible with your chosen finish.
Fixing bubbling and blistering
Bubbles and blisters on your concrete surface are signs of trouble. They’re usually caused by trapped air or moisture, which can weaken the structure over time. Here’s how to fix ’em:
First, identify the cause: Check for any standing water around the affected area. If it’s there, you’ve got a moisture problem. If not, it might be trapped air from improper mixing or placement.
If it’s moisture, dry it out. Use fans and dehumidifiers to speed up the process. If it’s trapped air, you’ll need to replace the affected section. Cut out the bubbled area, clean it up, and pour new concrete.
Once dry or replaced, stabilize the area by letting it cure properly. Then, retouch the texture to match the surrounding concrete. Use a concrete texturing tool or broom to mimic the existing pattern. Don’t go overboard with the sealant – a little goes a long way.
Correcting uneven patterns, heavy ridges, or missed spots
First, identify the problem areas. Walk your slab in different lights to spot high and low spots. Don’t rely on just one pass; catch missed spots by checking from various angles.
To remove high spots, use a concrete scraper or rented walk-behind planer. Work carefully, keeping the tool level and steady. Scrape or plane off excess material, but be gentle to avoid damaging the underlying surface.
For heavy ridges or uneven patterns, you might need to use a concrete grinder with diamond blades. Start with a coarse grit (e.g., 30-grit) to remove bulk material, then switch to a finer grit (e.g., 80-120) for smoothing.
Once you’ve leveled the surface, it’s time to blend and feather. Use a spray nozzle on your concrete cleaner or sealer to spot-spray problem areas. Knockdown any raised edges with a stiff-bristle broom or brush. For transitions, use a soft-tipped squeegee or trowel to ‘feather’ the edge, blending it into the surrounding surface.
Surface Prep and Refinishing Workflow
Begin with thorough cleaning, removing any oils, dust, or loose material. Lightly sand high spots if needed, then vacuum the dust away. Prime the area to seal the surface before retexturing to improve adhesion.
Apply texture in controlled passes, then let it dry completely. Plan a staging and drying window that avoids traffic and humidity changes, before applying the final paint coat when ready.
Cleaning, sanding, and priming best practices
Start by removing any contaminants from the surface. Use a degreaser to tackle grease spots, and a mild detergent for general dirt.
Sanding is crucial to ensure paint adhesion. For knockdown texture, use 120-grit sandpaper. It’s coarse enough to scuff up the surface without damaging it.
After sanding, vacuum and wipe down the area with a damp cloth to remove dust. Let it dry completely before priming.
When choosing a primer, opt for one that’s designed for textured surfaces. It’ll promote adhesion and help paint absorb evenly into the texture.
Retexturing and blending techniques
Start by spraying your knockdown texture. Work in small sections, keeping a wet edge to avoid lap marks.
Once sprayed, let it sit for about 10-15 minutes before you knockdown. This gives the texture time to set but not dry completely.
Use a knockdown knife or trowel to smooth out the high points. Work in long, steady strokes, following the direction of your spray lines.
For edges that don’t need texturing, use painter’s tape to protect them before spraying. After knocking down, carefully remove the tape while the texture is still wet for a clean edge.
Paint and finish considerations
When choosing paint, opt for one with good hiding properties. This will help you achieve even coverage over the textured surface.
As for sheen, a flat or eggshell finish works best with knockdown texture. They won’t highlight imperfections like glossier paints might.
When applying paint, use a roller with a thick nap cover. This will help it hold more paint and distribute it evenly over the textured surface.
To avoid highlighting imperfections, apply paint in thin, even coats. Let each coat dry completely before sanding lightly with 220-grit sandpaper to remove any raised grain. Wipe off dust and apply the next coat.
Preventive Measures and Quality-Control Tips
During install, keep environmental conditions stable and follow manufacturer guidelines for mud consistency and application thickness. Use proper joints and tape to reduce future cracking. Maintain a clean, dust-free substrate for best results.
Before declaring the job done, perform a quick QC: consistency of the texture, edge cleanups, and uniform color after priming. Note any deviations to address before finishing, and rely on local rules or product instructions for curing recommendations.
Application best practices to reduce flaws
Consistency is key when applying knockdown texture. Spray at a consistent distance from the wall – around 12-18 inches away. This helps ensure an even coat and reduces the risk of heavy ridges or missed spots.
Mix your texture compound well before application to avoid lumps and inconsistencies in the mix. A good rule of thumb is to mix for at least 5 minutes, ensuring all ingredients are fully incorporated.
Timing is crucial when it comes to knocking down the texture. Wait until the texture has started to set but is still soft – usually around 10-15 minutes after application. Knocking down too early can result in a smooth wall, while waiting too long can lead to a rough, uneven finish.
Environmental controls and curing guidance
Temperature, humidity, and ventilation play a significant role in the success of your knockdown texture job. Aim for an application temperature between 50°F (10°C) and 80°F (27°C). Applying texture outside these parameters can lead to issues like cracking or poor adhesion.
Humidity should be kept below 60% during application and drying. High humidity can cause the texture to dry too slowly, leading to problems such as bubbling or blistering. Use a dehumidifier if necessary to control humidity levels.
Proper ventilation is crucial to allow for even drying. Ensure there’s adequate airflow in the room – open windows and doors if possible, or use fans to circulate air. Avoid applying texture in sealed-off rooms as this can trap moisture and cause issues.
When to DIY and When to Hire a Professional
If defects are minor, you can likely handle the repair and retexture, following instructions and safety steps. For widespread cracking, sagging, or moisture-related issues, consider bringing in a pro. Evaluate your comfort with tools and the required drying times before deciding.
Collect information for quotes by noting room dimensions, observed flaws, substrate conditions, and any environmental concerns. Verify with a contractor about materials, label instructions, and expected curing windows using the product data sheet or manufacturer guidance.
DIY-friendly fixes and required skill checklist
Before you grab your tools, check if the repair is within your skill level. This list helps you decide.
- Small patches: Check if the damaged area is less than 1 sq ft. Skipping this may lead to more damage.
- Spot retexture: Ensure the issue is isolated and not part of a larger problem.
- Basic sanding: You should be comfortable using sandpaper (60-80 grit) to prep surfaces.
- Priming: Know how to apply primer to seal and prepare the surface.
- Retexturing: Familiar with using a knockdown texture sprayer or hopper gun?
- Time commitment: Can you dedicate 2-3 hours for the repair?
- Safety gear: Own safety glasses, gloves, and a dust mask?
- Cleanup: Ready to clean up sanding dust and dispose of materials properly?
Quick rule: If you’re unsure about any step or the damage is extensive, consider hiring a pro.
Signs you should call a professional and what to ask
Some repairs are best left to the pros. Here’s when to pick up the phone.
Large moisture damage: Widespread water stains, bubbling, or blistering may indicate a serious leak that needs expert attention.
Structural concerns: If you notice cracks in the ceiling or walls around the damaged area, it could be a sign of underlying structural issues.
Widespread delamination: If more than 10% of the surface is peeling or flaking, it’s time to call a pro. They have specialized equipment and techniques to handle extensive repairs.
When hiring, ask these questions:
- Warranty: What kind of warranty do they offer for their work?
- Methods: How will they match the existing texture? Ask about their process and experience with knockdown textures.
- Experience: How many years have they been in business, and can they provide references?
Conclusion
Getting knockdown texture to look right is about solid prep, steady technique, and respecting the material. Do it right and you’ll have a durable, even finish that ages well and doesn’t draw attention for the wrong reasons.
Start with a dry, clean surface and test a small patch first; mix a consistent batch, apply in controlled sections, allow proper cure time, inspect against the visual checkpoints, then sand lightly and seal before final finish. Keep safety gear on, test patches, and never rush through curing or sanding—these steps keep damage out and results predictable.
Avoid common missteps like over-wetting the surface, skipping prep, or applying too thick a coat; never mix or thicken texture without keeping proportions in check, and always work with good ventilation and protective gear to prevent dust inhalation and skin irritation. If you’re unsure about patch size, substrate issues, or how a repair will blend with the rest of the room, don’t push it—consult a pro when you hit awkward corners, large areas, or suspect structural concerns.
When the job crosses into ambiguity, or you’re tackling a high-visibility space or tricky substrate, calling a professional is wise and will save time, money, and frustration. Stay steady, follow the workflow, and you’ll finish with a solid, clean look you can trust for years to come.
FAQ
What quick checks should I do before starting a knockdown texture repair?
Look for peeling or loose areas and rough spots that show through. Tap the surface gently to hear hollow sounds, which can indicate poor adhesion. Check dust, oil, or silicones on the wall and clean or spot-prime as needed.
Which flaws are easiest to fix, and which signal bigger issues?
Small pinholes and minor texture mismatches are usually fixable with a light skim and touch-up spray. Large, ongoing cracking or bubbling often means a structural or substrate problem that needs a closer look before retrying texture work.
How can I test adhesion and prevent future flaking after a repair?
Roughen the surface slightly and use the manufacturer-recommended primer before the texture. After repair, let the primer dry as advised, then apply a test patch to judge texture match and adhesion before finishing the whole wall.
How do I blend a repaired area with the existing knockdown texture?
Match the spray technique and pressure you used originally, and adjust the knockdown blade to avoid over-smoothing. Feather the edges by keeping a light touch and working from the repaired zone outward to blend with the surrounding texture.