
Introduction
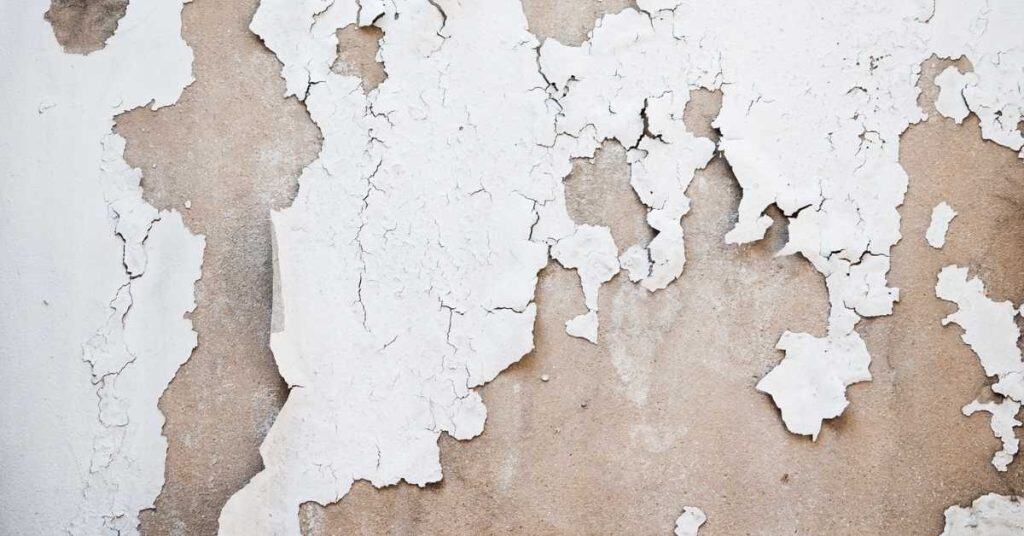
Peeling bathroom ceiling paint happens when moisture gets behind the coating and the film loses adhesion. In a DIY fix, you must cut away loose paint, dry the area, and prep for fresh coating. Always check local rules and follow label directions when choosing cleaners and primers.
Ventilation is the first line of defense. Before repainting, inspect for moisture sources and address leaks or poor airflow, and choose a mildew-killing prep that is approved for bathrooms. Read the label for application steps and safety, and if in doubt, consult manufacturer instructions or local rules.
Key takeaways
- Identify root cause: paint failure, moisture, or mildew before repairs.
- Protect occupants: seal doors, cover floors, and wear respirator during cleaning.
- Improve ventilation: run exhaust fans and open windows to reduce humidity.
- Measure humidity and track moisture sources before proceeding with prep.
- Use mildew-safe cleaners and follow label directions for safe biocide use.
- Surface prep: remove peeling paint, dry thoroughly, and protect surrounding surfaces.
Table of Contents
- Introduction
- Key takeaways
- Quick Diagnosis: Is It Paint Failure, Moisture, or Mildew?
- Safety and Prep: Protecting the Room and Yourself
- Ventilation Checks: Diagnosing and Improving Airflow
- Measuring Humidity and Tracking Moisture Sources
- Mildew-Killing Prep: Safe Cleaning and Biocide Options
- Surface Prep and Paint Removal Method
- Materials, Tools, and Product Selection Checklist
- Step-by-Step Repair and Repainting Workflow
- Conclusion
- FAQ
Quick Diagnosis: Is It Paint Failure, Moisture, or Mildew?
Start with a visual scan of the ceiling. Look for glossy or peeling areas, flaking patches, and any staining around joints or light fixtures. A simple test can help you tell if moisture is the driver of the issue.
Check for condensation on cool surfaces and note whether peeling worsens after hot showers or steam. Also assess if there is visible mildew growth or musty odor, which points to mildew or ongoing moisture problems before you repaint.
Visual checkpoints and patterns
Before you start poking around, grab a flashlight and take a close look at your bathroom ceiling. This checklist helps you spot trouble spots.
- Blistering: Paint bubbling like bubble wrap? That’s moisture trapped under the paint.
- Peeling in sheets: Large pieces of paint falling off? Could be a sign of poor prep or moisture.
- Discoloration: Yellow, brown, or black spots? Might be mildew or mold.
- Texture changes: Paint feeling spongy or soft? That’s excess moisture.
- Water stains: Brown rings or lines? Could be from leaks or condensation.
- Mold/mildew: Green, black, or white fuzz? That’s biological growth.
- Cracking around joints: Cracks where walls meet ceiling? Might be a sign of moisture damage.
- Warping: Ceiling sagging or warped? That’s serious water damage.
Quick rule: If you see any of these signs, don’t just paint over it. Find the cause first.
Simple moisture tests to try
Now that you’ve done a visual check, let’s confirm with some simple tests. Start by touching and pressing on the affected areas.
Feeling damp? That’s excess moisture. Press harder – if it feels spongy, there’s too much water trapped in the ceiling.
Next, give it a sniff. Smell something musty? That’s mildew or mold. If you’re unsure, use a hygrometer to measure moisture levels. An infrared reader can also help pinpoint hotspots.
Remember: These tests are low-effort, but they won’t replace proper inspection and diagnosis. If you find high moisture levels, track down the source before fixing the paint.
When staining means mold vs. cosmetic staining
Stains on your bathroom ceiling can be tricky to decipher. Here’s how to tell if it’s mold, mildew, or just a cosmetic issue.
Mold/mildew: Green, black, or white fuzz with a musty smell? That’s biological growth. It needs to be treated and removed before painting.
Water stains: Brown rings or lines with no smell or fuzz? Those are likely just water stains from leaks or condensation. They can usually be sanded, primed, and painted over.
Rusty stains: Orange or red stains with a metallic smell? That’s rust. It might be coming from pipes or fixtures. Fix the source, then clean and paint.
Rule of thumb: If you’re unsure about any stain, err on the side of caution. Test for mold/mildew before proceeding with repairs.
Safety and Prep: Protecting the Room and Yourself
Ventilation comes first. Open any available doors or windows and use a fan to move air toward an exterior opening. Wear PPE such as gloves, goggles, and a fitted respirator if mold is present.
Protect fixtures, floors, and adjacent surfaces with drop cloths and painter’s tape. Dispose of moldy material and paint chips according to local guidelines and manufacturer instructions for cleaners and biocides.
Personal Protective Equipment
Protecting yourself is the first step before you start any work.
- Dust Mask: Covers your nose and mouth. Use for scraping paint and cleaning. $1-$5 each.
- Respirator: Offers better protection against mold spores. Use when dealing with heavy mildew. $20-$60.
- Gloves: Protect your hands from chemicals and debris. Disposable or reusable options available. $1-$5 per pair.
- Safety Glasses: Shield your eyes from dust, paint chips, and splashes. $5-$20.
- Coveralls: Optional but recommended to protect your clothes. $10-$30.
Containment and Cleanup Setup
Protecting the bathroom and minimizing cross-contamination is crucial to prevent further damage and keep your workspace clean.
Start by laying down drop cloths on the floor. They should be large enough to cover the area you’ll be working in, plus some extra for any overspray or debris.
Next, use plastic sheeting and tape to seal off any vents, exhaust fans, and other openings. This helps contain dust and prevents it from spreading to other parts of your home.
Finally, cover any fixtures, such as the toilet, sink, or bathtub, with plastic sheets secured with tape. This protects them from paint chips, mold spores, and cleaning solutions.
Ventilation Checks: Diagnosing and Improving Airflow
Evaluate whether the bathroom has a dedicated exhaust fan that runs long enough to move humid air outdoors. Listen for unusual fan noises or a lack of air movement during use signals a problem.
Check routing of ducts and any bends or blockages that could slow air. If ducts are crushed or blocked, plan fixes or upgrades before repainting to reduce future moisture buildup.
Inspecting the exhaust fan and ductwork
The first step in diagnosing ventilation issues is checking your bathroom’s exhaust fan. Here’s how:
Fan operation: Turn on the fan and listen for it running smoothly. If it’s noisy or weak, it might need cleaning or replacing.
Ductwork inspection: Locate the duct leading from the fan to the outside. Ensure it’s securely attached at both ends with no loose connections. Check for any blockages by shining a flashlight into the vent while someone else turns on the fan. If light is visible outside, your duct might be leaking.
Improper termination can cause backdrafts, so ensure the duct exits the house through a wall or roof, not into an attic or crawlspace.
Calculating effective run time and behavior changes
Understanding how long your fan runs is crucial. Here’s a simple test:
Take a timer and note down the start time when you turn on the shower. After 15 minutes, turn off the water but keep the fan running. Time how long it takes for the mirror to clear of steam. This is your effective run time.
If it’s less than 30 minutes, consider extending fan run time by installing a timer or humidity sensor switch. You can also make simple behavioral changes like running the fan before and after showers.
Temporary ventilation solutions
While planning permanent upgrades, consider these temporary fixes to improve airflow:
Window ventilation: Open a window during and after showers. If privacy is an issue, use a window with high glass or install a frosted film.
Portable dehumidifier: Place one in the bathroom to remove excess moisture. Empty the water tank regularly.
Booster fan: Use a portable fan to help circulate air and speed up drying. Position it so it blows out, not into, the room.
Measuring Humidity and Tracking Moisture Sources
Use a simple hygrometer to monitor relative humidity over several days. Place the instrument away from direct water sources to get representative readings.
Look for patterns tied to showers, baths, or leaks and note any recurring high humidity. Use the data to decide if a more robust ventilation or fixed moisture source is needed.
Tools to measure humidity and moisture
To effectively monitor your bathroom’s humidity, you’ll need the right tools. Here are some reliable options:
- Hygrometer (Humidity Meter): Measures relative humidity. Place it near the ceiling, away from direct sunlight or heat sources.
- Moisture Meter: Detects moisture in materials. Use it to check walls, ceilings, and floors for hidden leaks.
- Infrared Thermometer: Measures surface temperatures. Helps identify cold spots where condensation may form.
- Thermohygrometer (Combined Meter): Measures both temperature and humidity. A versatile tool for under $50.
- Data Logger (Optional, Rentable): Records readings over time. Around $100 to rent, it provides detailed trends but isn’t necessary for basic monitoring.
Logging observations and isolating sources
Keeping a simple log of humidity readings will help you understand patterns and identify moisture sources. Here’s how:
Record daily highs: Note the highest relative humidity reading each day.
Correlate with activities: Make note of when showers, baths, or other moisture-generating activities occur. This will help you understand how they impact your bathroom’s humidity.
Check cold spots: Use an infrared thermometer to find cold spots on walls, ceilings, or floors. These areas are prone to condensation and could indicate hidden leaks or poor insulation.
Isolate the cause: Once you’ve identified patterns and cold spots, address the underlying issues. This might mean fixing a leak, improving ventilation, or installing insulation.

Mildew-Killing Prep: Safe Cleaning and Biocide Options
Begin with a thorough cleaning to remove visible mildew. Scrub with a suitable cleaner and follow the label directions for contact time. Use a non-abrasive pad to avoid damaging the surface.
Choose a biocide appropriate for bathrooms and ensure proper ventilation during use. Rinse and dry the area completely to prevent quick recurrence after repainting.
Effective cleaners and safer alternatives
To tackle mildew, you’ll need a cleaner that kills it at its roots. Commonly used are bleach-based solutions or specialized mildew removers.
Bleach is effective but harsh. It’s best for severe cases and when you’re sure there’s no color bleeding from your surfaces. For less toxic options, consider:
– Detergent with borax: A gentler alternative, it’s great for mild to moderate mildew and won’t damage most surfaces.
– Vinegar solutions: Safe and non-abrasive, vinegar can kill up to 82% of mold species. It’s ideal for small areas and minor issues.
How to apply, scrub, and neutralize treatments
Start by applying your chosen cleaner liberally onto the affected areas. Let it sit for 10-15 minutes to allow the biocide to work.
Next, use a soft-bristled brush or a sponge to gently agitate the solution into the mildew. Be careful not to damage the surface.
After scrubbing, rinse thoroughly with clean water. This removes any remaining cleaner and loosened mildew. Use a squeegee or cloth to wipe away excess moisture.
Finally, allow the area to dry fully. Open windows and use fans for better ventilation during this process. Keep the room closed off until dry to prevent cross-contamination.
When mildew might be hidden or recurrent
Mildew can hide in hard-to-reach places, like behind fixtures or under wallpaper. If you’re seeing recurrent growth after treatment, it’s a sign that the moisture source hasn’t been addressed.
Before repainting, document the severity of the mildew. Take photos and note any recurring areas. This will help you track progress and ensure the problem is truly resolved.
If mildew keeps coming back, it’s crucial to find and fix the moisture source. Otherwise, your efforts will be in vain, and you’ll end up with a recurrent issue that could lead to more severe problems down the line.
Surface Prep and Paint Removal Method
Scrape loose paint first, working feathered edges to minimize noticeable ridges. Avoid digging into the drywall or creating gouges that require patching.
Sanding should be light and focused on smoothing edges, then remove all dust before priming. Protect surrounding finishes and avoid over-sanding delicate gypsum board edges.
Safe scraping and sanding techniques
Start by scoring the failing paint with a utility knife to break its bond. Then, use a wide-bladed putty knife or a paint scraper to gently loosen and remove the paint.
Avoid gouging the ceiling substrate. If the paint is stubborn, use a heat gun to soften it before scraping. For sanding, use a drywall sanding sponge with fine grit paper (120-150) to smooth out any remaining bumps.
Be careful not to over-sand and damage the drywall or plaster. Always wear safety goggles and a dust mask when sanding.
Repairing damaged drywall or plaster
If there are small holes or cracks, use joint compound to patch them. For larger areas, you might need to replace a section of drywall.
To patch, apply the compound with a wide putty knife, feathering the edges to create a smooth transition between the repair and the surrounding surface. Let it dry according to the manufacturer’s instructions, then sand it smooth.
If you’re replacing a section, use drywall screws to secure the new piece, then apply compound to the seams and let it dry. Sand the entire area before painting.
Materials, Tools, and Product Selection Checklist
Compile a DIY-friendly kit with scraping tools, sandpaper, a mold resistant primer, and a bathroom grade paint. Include a quality mildew resistant coating and a suitable ventilation upgrade if needed.
Check product labels and manufacturer instructions for bathroom use and ventilation requirements. Match finishes to ceiling needs and confirm compatibility with any moisture barriers in place.
Choosing the right primer and paint
Before you start painting, it’s crucial to choose the right primer and paint for your bathroom ceiling. Here’s a checklist to help you.
- Stain-blocking primer: Use when existing paint is peeling or there are stains from water damage. It seals the surface and prevents further absorption of moisture.
- Mildew-resistant primer: Ideal for areas with high humidity. It inhibits mildew growth on the surface.
- Moisture-tolerant paint: Opt for 100% acrylic latex paints that can withstand damp conditions without peeling or blistering.
- Avoid oil-based paints: They don’t breathe well and can trap moisture, leading to more peeling.
- Check label for mildew resistance: Look for labels stating ‘mildew resistant’ or ‘mildew proof’.
- Consider sheen: Flat or matte finishes are better for ceilings as they hide imperfections. Gloss can be used in areas with high humidity to make cleaning easier.
- Avoid low-VOC paints: While eco-friendly, they may not perform well in humid environments.
- Check manufacturer’s guidelines: Follow the recommended application and drying times for best results.
Quick rule: Always use a primer before painting. It improves adhesion and seals the surface, preventing peeling and mildew growth.
Tools and consumables list
Having the right tools and supplies on hand will make your painting job easier and more efficient. Here’s a checklist to help you.
- Scrapers: Use to remove loose paint. A 6-in-1 scraper set is versatile for various surfaces.
- Paintbrushes: Choose synthetic bristles for water-based paints, and natural bristles for oil-based paints. A 2-inch brush is ideal for ceilings.
- Rollers: Use a roller with a 3/8-inch or 1/2-inch nap cover for smooth surfaces. For textured surfaces, use a 3/4-inch nap cover.
- Sandpaper: Medium-grit sandpaper (120-150) is suitable for smoothing surfaces before painting.
- Masking supplies: Use painter’s tape and drop cloths to protect areas you don’t want to paint.
- Cleaners: Have a mild detergent or TSP (trisodium phosphate) solution ready for cleaning the surface before painting.
- Patching compound: Use to repair any holes or cracks in the ceiling before painting.
- Tapes: Painter’s tape and duct tape are useful for various tasks during the painting process.
Quick rule: Always have safety gear on hand, including gloves, goggles, and a dust mask, to protect yourself from paint fumes and debris.
Step-by-Step Repair and Repainting Workflow
Follow a logical sequence from diagnosing to the final coat. Start with surface prep, then prime, and finish with the top coats chosen for bathrooms.
Include drying time checks between steps and use proper brushing or rolling technique to avoid new peeling. Adapt the pace to your space and verify the area stays dry before applying subsequent coats.
Step-by-Step Repair Process
Follow this clear, numbered sequence to repair and repaint your bathroom ceiling effectively.
- Preparation: Put on safety gear – goggles, gloves, and a mask. Tape off the area with painter’s tape.
- Check for moisture: Use your hygrometer to measure humidity levels. If it’s over 50%, consider calling a pro to address the root cause.
- Main work: Scrape off peeling paint using a scraper, then sand the surface smooth with fine-grit sandpaper.
- Repair damage: Fill any holes or cracks with spackling compound. Let it dry, then sand smooth.
- Clean up: Wipe down the area with a damp cloth to remove dust. Inspect your work – if it’s not smooth, repeat steps 3-4.
- Prime: Apply a coat of primer designed for moisture-prone areas. Let it dry according to the manufacturer’s instructions.
- Paint: Use a high-quality paint suitable for ceilings and moist environments. Apply at least two coats, allowing proper drying time between each.
- Final check: Ensure there are no signs of peeling or bubbling before removing tape and admiring your work.
Drying and environmental controls before painting
Proper drying is crucial for a lasting paint job. Here’s how to ensure your ceiling is ready:
After cleaning and patching, let the surface dry at least 24 hours. For faster drying, use fans or open windows. If humidity remains high, consider using a dehumidifier.
Keep the area well-ventilated during this time to prevent mildew growth. Check for dryness by touching the surface – if it’s cool and dry to the touch, you’re good to go.
If the room is still damp after 48 hours, consider calling a professional to address the underlying moisture issue before painting.
Priming and painting tips for ceilings
Applying paint correctly is key to preventing future peeling. Here are some tips:
Use a high-quality primer designed for moisture-prone areas. Apply it evenly with a roller or brush, following the manufacturer’s instructions.
For painting, choose a roller with a 3/8-inch nap for smooth ceilings. Cut in along edges using a paintbrush first, then roll on the paint in ‘W’ or ‘M’ patterns to ensure even coverage.
Apply at least two coats of paint, allowing proper drying time between each (usually 2-4 hours). This ensures full coverage and better adhesion, helping to prevent future peeling.
Conclusion
The repair plan only works if you lock down airflow and clean safely, or the paint will peel again and mold will keep coming back. Fix the ventilation first, then follow the step-by-step workflow to keep the ceiling dry, durable, and looking right.
Check in this order: confirm what’s driving the issue, improve airflow, measure humidity, clean with mildew-safe methods, prep the surface properly, remove loose paint, and then select and apply the right materials according to the documented workflow and safety rules.
Common mistakes to avoid are skipping this ventilation step, using improper cleaners or shortcuts, and skipping a small-test area or patch test before a full repaint. Always protect yourself and the room with appropriate coverings, use tested products, and work in a controlled, well-ventilated space.
If moisture or safety concerns persist after you’ve followed the plan, it’s wise to call a pro rather than push ahead. Stay steady, follow the steps, and you’ll finish with a solid, long-lasting result.
FAQ
How do I confirm where the moisture is coming from after the paint peels?
Look for damp spots and follow them back to the source. Check for a leaky pipe, roof leak, or high humidity from the bathroom fan. If you’re unsure, inspect attic or ceiling above for signs of water intrusion and track it to the fixture or vent.
What should I do if I find active mildew on the ceiling?
Stop and treat the mildew with a product labeled for mildew elimination. Ventilate the room well and wear gloves and eye protection. Always follow the product label instructions for use and safety.
How should I protect the room and prep the ceiling before cleaning?
Cover the floor with plastic or drop cloths and tape off nearby fixtures. Remove or cover light fixtures and ceiling fans if you can. Keep pets and kids out of the room during cleaning and drying.
When is it safe to prime and repaint after cleaning and mildew treatment?
Let the surface dry completely and follow the product’s dry-to-touch or recoat guidance. Check the manufacturer’s instructions for any waiting times and test a small area first to ensure adhesion.