
Introduction
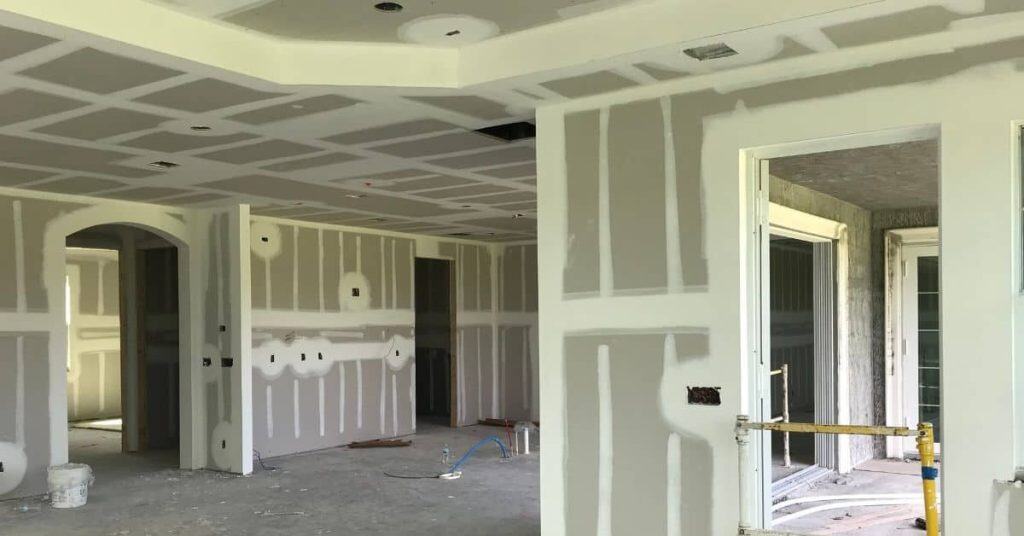
Drywall installation is the process of hanging and finishing gypsum boards to create smooth, ready-to-finish walls.
Do it with careful planning and steady hands, and you’ll move faster without sacrificing results. Start by measuring, cutting, and staggering panels so seams don’t line up on the same wall.
To speed things up, keep panels oriented the same way and fasten at consistent intervals without overdriving. For flatness, check each row with a straightedge and adjust as you go before mud goes on. If you see gaps or cracks, use the right tape and setting mud and always follow the product label and any local rules.
Key takeaways
- Plan layout, access routes, and material staging to speed installations and reduce errors.
- Seal joints and corners with proper backing and steady, level hanging blocks.
- Use straightedge checks and chalk lines to maintain flat, even drywall planes.
- Apply trowel or knife finishing consistently to minimize sanding and cracking.
- Taping technique matters: embed tape fully and smooth joints to avoid cracks.
- Wear eye protection and masks when sanding or mixing compounds indoors.
Table of Contents
- Introduction
- Key takeaways
- Planning and Job Setup for Speed and Quality
- Tools and Materials Checklist
- Hanging Drywall Quickly Without Sacrificing Flatness
- Achieving Flat Surfaces: Techniques and Visual Checkpoints
- Taping and Finishing to Minimize Cracks
- Cracks Prevention and Long-Term Durability
- Speed-Oriented Advanced Techniques Pros Use
- Quality Assurance, Troubleshooting, and Finishing Touches
- Conclusion
- FAQ
Planning and Job Setup for Speed and Quality
Start by laying out the whole project before hanging any panels. Mark rough lines for stud centers, electrical cutouts, and ceiling joints so panels can be cut to fit in one pass. Decide crew roles and workflow now to avoid bottlenecks once work begins.
Check product labels and manufacturers’ instructions for allowable tolerances and installation sequences. Confirm any local requirements that affect plaster or drywall finishing. Plan the sequence to minimize rework and ensure flat surfaces from the first hang.
Pre-job checklist and layout planning
Before you start hanging drywall, use this checklist to ensure a smooth, efficient process. It’s best to complete these steps before any materials arrive on site.
- Measure room dimensions: Accurately measure length and width of each wall to determine how many sheets are needed. Check twice to avoid ordering errors.
- Calculate waste: Estimate the amount of drywall that will be cut off, typically around 5-10% of total footage. This helps in ordering the right quantity and reduces waste.
- Plan delivery staging area: Designate a clean, flat area for unloading and storing materials. Keep it away from doorways or high-traffic areas to prevent damage and tripping hazards.
- Mark control lines: Using a level, mark horizontal lines on the walls where each drywall sheet will be placed. This ensures sheets are hung straight and at consistent heights.
- Check for obstacles: Inspect walls for outlets, switches, pipes, or other obstructions that may require cutouts. Mark their locations on the control lines.
- Determine sheet direction: Decide which way sheets will run (lengthwise or widthwise) based on wall height and sheet size. Changing directions mid-job causes inconsistencies.
- Check for structural issues: Inspect walls for any signs of damage, such as cracks or bulges. These may need to be addressed before hanging drywall.
- Gather tools and materials: Ensure you have all necessary tools (tape measure, level, drywall saw, etc.) and materials (drywall screws, joint compound, tape, etc.) on hand before starting.
Quick rule: Always double-check your measurements and marks. Skipping this step can lead to sheets not fitting properly or being cut incorrectly, causing expensive rework.
Sequencing and panel workflow
Start by planning your work zones. Keep them small to minimize travel time. Prioritize areas with the most panels, like living spaces over closets.
Next, sequence your walls and ceilings. Do ceilings first, then exterior walls, followed by interior partitions. This way, you’re not working under freshly poured slabs or walls.
For each zone, batch your cuts. Group similar panels together to minimize handling and reduce seams. Check your layout plan and measure twice before cutting once. Remember, you can’t un-cut a panel.
Lastly, keep your work area tidy. Piles of panels slow you down and increase the risk of damage. Keep your workspace clean and organized for speed and quality.
Site conditions and framing inspection
Before you start mixing concrete, use this checklist to inspect your site and framing. This ensures a smooth finish and prevents costly rework.
- Check for level: Use a straightedge or laser level to ensure the surface is within 1/4″ per 10′ tolerance.
- Inspect framing spacing: Verify that joist spacing is consistent (typically 16″ or 24″ O.C.) and none are bowed or twisted.
- Check blocking: Ensure blocking is securely fastened, aligned, and at least 16″ O.C. to support concrete’s weight.
- Inspect substrate for cracks: Fill any hairline cracks with a suitable patching compound before pouring.
- Check for voids or hollow spots: Tap the surface; listen for dull thuds indicating potential voids that need filling.
- Verify formwork alignment: Ensure forms are square, level, and properly braced to maintain their shape during pouring.
- Inspect rebar placement: Check that rebar is correctly placed, aligned, and secured within the concrete’s middle third.
- Check for proper drainage: Ensure the site slopes away from the structure to prevent water buildup behind or under the slab.
Quick rule: Always check framing, blocking, and substrate before pouring. Skipping this can lead to uneven finishes, cracking, or structural issues down the line.
Tools and Materials Checklist
Gather a focused kit of basics: straight edges, utility knife,精神T-square, a light for visibility, and a reliable screw gun with appropriately sized bits. Include quick-release blades and impact-ready bits for faster cuts and fewer tool changes. Stock commonly used tapes and joint compounds for your chosen finishing method.
Maintain tools and keep blades sharp; dull blades slow you down and roughen cuts. Check manufacturers’ recommendations for mud types, setting compounds, and exposure times. Have extra fasteners and spacers on hand to avoid trips to the toolbox mid-work.
Essential tools for fast, flat installation
Before you start hanging drywall, ensure you have the right tools to speed up the process and achieve a smooth finish.
- Tape measure: Accurate measurements prevent waste and rework. Check it against a known length to confirm accuracy.
- Level: A 4-foot level ensures panels are straight. Use it at both ends of each panel.
- Utility knife: Sharp blades cut drywall cleanly. Change blades often to maintain sharpness.
- Drywall saw or oscillating tool: For cutting out holes and notches. Keep blades in good condition for smooth cuts.
- Drywall lift/stilts: Reach high panels safely. Securely attach the lift to avoid accidents.
- Screw gun: A powerful, variable-speed gun drives screws quickly and smoothly. Test it on scrap drywall first.
- Drywall hammer: For tapping panels into place and setting screws. Use a rubber mallet for gentle persuasion.
- Straight edge: A long, straight 2×4 or level helps align panels and find studs.
Quick rule: Invest in good-quality tools to save time and effort.
Preferred fasteners and adhesives
Using the right fasteners and adhesives ensures strong, long-lasting drywall installations.
- Drywall screws: Use coarse-thread, bugle-head screws. Drive them just below the surface for easy taping.
- Nails (for old work): Use ring-shank nails to prevent popping. Space them 6-8 inches apart.
- Construction adhesive: Apply a bead along studs and joists for added holding power. Follow manufacturer’s spacing guidelines.
- Drywall anchor screws (for old work): Use toggle bolts or sleeve anchors in hollow walls. Drive them just below the surface.
Quick rule: Always follow manufacturer guidance for spacing and depth to avoid weak spots.
Joint compounds and tape types
Choosing the right joint compound and tape can speed up finishing and reduce cracks.
- Setting-type compound: Use for initial coats. It sets quickly, allowing faster sanding and finishing.
- Ready-mix compound: Use for top coats. It’s easier to sand and provides a smooth finish.
- Paper tape: Use for straight, narrow joints. Apply it with setting-type compound for strong adhesion.
- Fiberglass mesh tape: Use for wide or angled joints. It’s stronger and more flexible than paper tape.
Quick rule: Match the tape to the joint width and use the right compound for each coat to minimize cracks.
Hanging Drywall Quickly Without Sacrificing Flatness
Cut panels with care to fit around doors, windows, and openings so you can butt joints neatly. Start with full sheets on less visible walls to reduce seams and stretching time. Align edges tightly before fastening to minimize gap reopening during mudding.
Use a straightedge to sweep a line along the stud plane and keep panels flush as you screw. Drive fasteners in a consistent pattern and depth to avoid wavy surfaces. Verify that each sheet sits flat before moving to the next panel.
Cutting, fitting, and edge alignment
First off, you wanna cut your drywall panels to size quickly and cleanly. Use a utility knife with a sharp blade and a straightedge. Mark your cuts, then score both sides before snapping the panel.
For edges that don’t snap cleanly, use a drywall saw or multi-tool to finish the cut. Always check for obstructions like wires or pipes before cutting.
Now, fitting and aligning those panels. Start in a corner, work your way out. Butt joints are strongest, so aim for them. If you’re using screws, drive them in at an angle, about 1″ from the edge. Keep ’em tight to avoid raised seams.
When it comes to aligning factory edges, don’t be lazy and just slap ’em together. You’ll get raised seams that way. Instead, use a straightedge or level to ensure they’re flush. If there’s a gap, fill it with joint compound before taping.
Fastening strategy and screw depth control
To hang drywall quickly without compromising flatness, you need a consistent fastening pattern. Aim for every 12 to 16 inches along the studs, and every 8 to 10 inches around openings like doors and windows.
Setting screws at the correct depth is crucial to prevent dimples or pops. Here’s how:
Use drywall screws, not nails. They hold better and won’t pop later. Aim for 1-1/4″ to 2″ screws, depending on your wall thickness.
Drive screws in at a slight angle, then back them out slightly until the head is just below the surface. Use a drywall screw gun set to drive screws flush. This gives you consistent depth and prevents dimples.
Ceilings and awkward cuts: tips to save time
Hanging drywall on ceilings can be a pain. Here’s how to make it quicker without sacrificing flatness.
Use a lift. It’s worth the rental cost. Keeps your back safe and hands free for positioning.
Partner up. One lifts, one guides. Make sure you’re both clear on signals before starting.
Pre-cut where possible. Measure carefully, then use a drywall saw or utility knife to cut before lifting. Around fixtures, trace the outline first, then cut along the line.
Achieving Flat Surfaces: Techniques and Visual Checkpoints
Establish a baseline by checking the longest runs with a straightedge and level, then address high or low spots early. Use light refracting across joints to spot misalignment before mud goes on. Treat corners and ceilings with special care to avoid forced camber later.
Make small adjustments as you work: shim low edges, re-seat panels, and re-screw where necessary. Perform a tactile drag test with your hand over each panel edge to feel for high spots. If you see light gaps, plan for proper tape and mud placement to correct them.
Framing and substrate prep to ensure flatness
Before hanging panels, check and prep your framing and substrate. This ensures a consistent plane for flat walls and ceilings.
- Check for bows: Use a level to find any bowed studs or joists. Plane them down if necessary.
- Shim problem areas: Shims can fix minor low spots. Insert between framing members and sister if needed.
- Sister bowed studs: If a stud is severely bowed, sister it with a new piece to create a flat surface.
- Back-block corners: Ensure corners are square and flat by back-blocking them if necessary.
- Check ceiling framing: Make sure ceiling joists are level and flat. Plane or sister as needed.
- Avoid warped panels: Check your drywall for warp before hanging. Send it back if it’s not flat.
- Inspect OSB/plywood: If using OSB or plywood, check for delamination and flatness before hanging.
- Check fire-stopping: Ensure all fire-stopping is done properly to avoid low spots.
Quick rule: Fix framing issues before hanging panels. It’s cheaper and faster than fixing them later.
Fast flatness checks (straightedge, level, light test)
Regularly check your work for flatness using these quick methods.
- Straightedge runs: Use a long straightedge to check walls and ceilings. Look for gaps between it and the surface.
- Level checks: Use a level to ensure studs, joists, and panels are plumb and level.
- Light tests (shadowing): Hold a flashlight at an angle to cast shadows. High spots will have smaller shadows; low spots will have larger ones.
- Check corners: Ensure all corners are square and flat using a level or straightedge.
- Inspect seams: Check for any gaps or low spots at panel seams. Fill if necessary.
- Ceiling checks: Use a long straightedge to check ceiling flatness. Look for dips or humps.
Quick rule: Stop and fix any issues as soon as you spot them. It’s easier now than later.
Fixing high and low spots efficiently
If you find high or low spots, fix them quickly with these methods.
- Scab panels for highs: If a panel is too high, scab it down using screws driven into the framing. Fill and tape seams.
- Skim-coat low spots: For minor low spots, apply joint compound with a wide taping knife. Let dry and sand.
- Refasten for lows: If screws are too low, refasten them using longer screws or by sistering framing members.
- Replace panels if needed: If a panel is severely warped or damaged, replace it. It’s faster than trying to fix it.
- Check for voids: Tapping seams can reveal voids under the tape. Fill with compound and retape.
Quick rule: The sooner you fix highs and lows, the less joint compound you’ll use later.
Taping and Finishing to Minimize Cracks
Choose the right tape for joints and apply with even pressure to avoid bubbles. Apply a thin coat that fills gaps without sagging, then let it set before adding the next layer. Use proper joint compound consistency to reduce shrinkage and cracking risk.
Work coats in sequence and maintain a steady pace between steps to prevent mud pull or line telegraphing. Feather edges wide enough to blend into the wall texture and shape. Observe the product’s cure times and avoid sanding too early or too aggressively.
Tape selection and embedding techniques
Choosing the right tape is crucial. Use paper tape for most joints, fiberglass for high-moisture areas.
Embedding: Press tape firmly into compound using a taping knife. Work from one end to the other in one smooth motion. Avoid bubbles and ridges.
Correct embedding reduces future cracking by ensuring tape adheres well to both sides of the joint.
Compound layering and drying strategy
Apply three thin coats for best results. First, embed tape with a thin layer (all-purpose compound). Let dry.
Second coat: Lightly sand first, then apply wider, thinner layer. Feather edges to blend with wall. Let dry.
Third coat: Sand lightly again, apply final thin layer. Let dry before sanding and painting.
Setting compounds: Use for speed on second or third coats where quick drying is needed.
Corner beads and stress-point reinforcement
Use corner beads to protect inside and outside corners. Apply with compound, let dry, then sand lightly.
Installation: Align bead with corner, press firmly into compound. Ensure no gaps or ridges.
Reinforce joints at door/window heads and long runs with mesh tape and extra compound. Let dry before sanding.
Cracks Prevention and Long-Term Durability
Identify common crack sources like framing movement, temperature swings, and improper fastener spacing. Reinforce problem areas with proper fastener patterns and preferred joint compounds. Consider additional blocking or resilient channels where required by structure and code guidance.
Address environmental factors such as humidity and settling, and plan finishing steps to accommodate them. Document any structural considerations and verify with labels, datasheets, or local rules. Check building codes and manufacturer recommendations for long-term durability practices.
Causes of cracks and how to eliminate them
Drywall cracks can be a real pain, but understanding their causes is the first step to preventing them. Let’s dive into the three main culprits:
Movement: Drywall isn’t flexible, so any movement in your walls or ceiling can cause cracks. To combat this, ensure your framing is square and plumb before hanging drywall.
Improper Fastening: Screws that are too long or not driven deep enough can cause drywall to move and crack. Always use the right screw length and drive them just below the surface for a tight, secure hold.
Poor Taping: Inadequate embedding of tape or applying compound too thickly can lead to cracks as the joint dries. Make sure you’re embedding your tape well and applying compound in thin, even coats.
Control joints and movement accommodation
Control or expansion joints are crucial for managing building movement without causing cracks. Here’s when and how to use them:
Install control joints every 8-10 feet along studs, both horizontally and vertically. This allows the drywall to move with the structure rather than against it.
Also, separate assemblies at corners, doorways, and other natural breaks in your walls. This helps prevent cracks from forming where two different sections of drywall meet.
Remember, control joints aren’t just for new construction. If you’re renovating an older home, you might need to install them to accommodate existing movement.
Moisture, temperature, and house settling considerations
Your home’s environment plays a big role in keeping your drywall crack-free. Here are some tips to consider:
Moisture Control: In bathrooms or laundry rooms, use moisture-resistant drywall and keep the area well-ventilated to prevent excess humidity from causing cracks.
Temperature Fluctuations: Wide temperature swings can cause your walls to expand and contract, leading to cracks. Keep your home’s temperature consistent year-round to minimize this movement.
House Settling: Even new homes settle over time. To accommodate this, install control joints as described above. If you notice cracking after moving in, don’t panic – it might just be your home settling into place.
Speed-Oriented Advanced Techniques Pros Use
Introduce rapid hanging and finishing methods that preserve flatness, like pre-cut staggered seams and efficient mud schedules. Employ helper tools that reduce trips and rework, but only where you’re comfortable with the technique. Prioritize safety and stay within your skill level when attempting faster methods.
Assess each technique for applicability to DIY vs professional use, and verify any special ventilation or personal protective equipment requirements. Use advanced techniques only after mastering the basics and checking local guidelines. Always follow manufacturer instructions for any specialized tools.
Setting-type compounds and when to use them
Quick-setting compounds are a pro’s secret for speeding up taping and finishing. They’re not your everyday all-purpose mud, but they’ve got their place.
Benefits: These compounds set fast – we’re talking 15 to 30 minutes. That means you can tape ‘n’ finish a room in half the time. No more waiting around for the mud to dry.
Cautions: They’re not always the best choice. Check your base compaction first. If it’s not solid, quick-set won’t save you. It’ll just crack and fall off. Also, they can be tough to sand. You might need a pro-grade sander.
When to use: Quick-sets are great for small jobs or when you’re on a tight schedule. But for big areas or where strength matters (like load-bearing walls), stick with all-purpose mud. Always check the label and manufacturer’s instructions to be sure.
Use of tools that speed work (lifts, power tools, boxes)
Pros know their tools can cut hours off a drywall job while keeping results consistent. Here’s what you need to consider:
- Drywall Lifts: These save your back and speed up installation. Check the lift’s capacity matches your sheet size (4’x8′ or 4’x12′).
- Long-Bed Taping Tools: Pros use these for faster, smoother taping. They’re easy to adjust; just check the box’s size fits your needs.
- Automatic Screwdrivers: These drive screws quickly and consistently. Make sure you’ve got the right bit (usually #8 or #10) for drywall.
- Banjo-Style Finishers: These tools apply joint compound in one smooth motion. They’re a pro’s best friend; just check your local rules if you’re working on a permit job.
Remember, using the right tool is only half the battle. Always follow manufacturer instructions and safety guidelines. And don’t forget to clean up as you go – it’ll save you time in the long run.
Prefabrication and off-floor prep tactics
Pros know that the key to speed is minimizing work on the wall. Here’s how:
Batch corner bead cuts. Before you start mixing, cut all your corner beads to size. It’s faster than cutting them one at a time while mudding.
Pre-tape cabinets and doors. Tape off cabinet faces and door edges before they’re hung. This way, you won’t have to tape around them later, saving you time and tape.
Stage your panels properly. Lay out your drywall panels on the floor, cut them to size, then number each one for where it goes. This way, you’ll spend less time measuring and cutting on the wall.
Quality Assurance, Troubleshooting, and Finishing Touches
Establish a final QA flow that includes surface checks, edge alignment, and joint integrity before painting. Note any areas that need touch-up or extra mud and plan a quick correction pass. Keep a list of potential fixes and confirm their feasibility with the materials you’re using.
Verify that you’ve met manufacturer and local code requirements for finishing steps. Document what you checked and any deviations from the plan. Do a hands-on walkthrough to ensure the project is ready for primer and paint.
Visual & tactile inspection checklist before paint
Before you grab your paintbrush or roller, take a few minutes to inspect the concrete surface. This checklist helps catch issues that could affect your finish and lead to cracking down the road.
- Seams: Check for any gaps or overlaps between poured sections. Use a straight edge to confirm they’re within 1/8″ tolerance.
- Fastener heads: Ensure all embedded fasteners are flush with the surface, not proud or recessed. Feel them with your fingers if needed.
- Bead lines: Inspect control joints and expansion cuts for proper tooling. They should be clean and uniform, not ragged or filled with debris.
- Cracks: Look for any hairline cracks that may have formed during curing. Fill them with a concrete crack filler before painting.
- Surface contaminants: Check for dirt, grease, or other substances that could prevent paint adhesion. Clean the surface if necessary.
- Moisture content: Ensure the concrete is dry enough to paint (typically 7-14 days after pouring). Use a moisture meter to confirm it’s below 15%.
- Surface profile: Feel the surface with your hand. It should have a slight texture for good paint adhesion, not too smooth or rough.
- Previous repairs: Inspect any patched areas to ensure they’re well-bonded and level with the surrounding concrete.
Quick rule: If in doubt, err on the side of caution. Addressing issues now prevents costly rework later.
Common problems and how to repair them quickly
Concrete’s a tough beast, but it ain’t perfect. Here’s how to fix common issues fast:
Nail/screw pops: These happen when something underneath pushes up. First, check base compaction. If it’s good, cut off the pop with a chisel, fill with concrete patch, and trowel smooth.
Small cracks (hairline to 1/8″): These are usually easy fixes. Clean, seal, and let dry. Then use a concrete crack filler or epoxy, following package instructions. Sand smooth once cured.
Tape ridges: These happen when tape wasn’t pressed down well. Scrape off loose material, sand smooth, vacuum, and apply a skim coat of fresh concrete mix. Trowel smooth and let cure.
Skim coat failures (flaking, peeling): This is usually due to poor prep or curing. Remove failed coating, clean surface, and check for moisture. Apply a new skim coat, following the same steps as before but ensure proper curing this time.
Material specs and standards explained
Choosing the right materials for your concrete work is crucial. It affects durability, appearance, and longevity of your project.
- Type N mortar: Used for most masonry work. Look for ASTM C270 standard on label. It’s versatile, strong, and affordable. Avoid in areas with frequent freeze-thaw cycles as it can crack.
- Type S mortar: High strength, used where extra bond is needed (e.g., retaining walls). Check for ASTM C270 standard with ‘S’ rating. More expensive but worth it for heavy-duty jobs.
- Concrete mix (ready-mix): Look for strength class (e.g., 3000 psi, 4000 psi). Choose based on your project’s needs. Cheap mixes can cause problems later with cracking and weak bond.
- Water reducer/retarder: Helps control setting time. Check compatibility with your cement type. Avoid using too much as it can weaken the mix.
- Fiber reinforcement (optional): Adds strength, reduces cracking. Look for ASTM D7472 standard. Cheap fibers may not work well and can cause issues later.
Pro tip: Always buy materials from reputable sources. Check seals and packaging before purchasing. Store cement in a dry place to prevent setting. Mix only what you need to avoid waste.
Conclusion
Getting drywall installed right is about steady planning, good setup, and careful finishing. It protects your walls and your budget, and it shows in the flat, crack-free look that lasts.
Before you start the next project, confirm your plan, lay out the tools and materials, hang for speed without sacrificing flatness, batten down with proper tape and mud, and check for cracks or high spots as you go. Make a simple sequence: set up safely, hang panels in dry runs if possible, screw every sheet, run a quick visual check for level and alignment, tape, apply finish coats, and test for long-term durability in a small, controlled area first.
Common mistakes to avoid: rushing the layout, skipping a proper joint treatment, or over-mudding and hiding bumps instead of addressing them. Always wear eye protection and a dust mask, test techniques in a small area, and keep a clean, dry workspace to prevent damage and costly rework. If you’re unsure about long runs, heavy ceilings, or unusual framing, call a pro rather than forcing it and risking cracks or sagging.
FAQ
When drywall feels wavy after hanging, what’s the first thing I should check?
Check for high spots or uneven backing behind the board. Run a straight edge or a long level along the seams and edges. Fix any obvious high or low spots before taping.
Is there a recommended way to choose the right screws or nails for hanging drywall?
Use fasteners specified for drywall and your wall type. Follow the fastener spacing shown on the fastener package and local guidance from the manufacturer. If in doubt, check the product label for their recommendations.
How can I prevent cracks at the corners and joints during finishing?
Stagger joints and use proper corner beads or protection. Apply tape and compound smoothly, and don’t overwork the mud. If cracks appear later, check for movement in framing and re-tape if needed.
What should I look for to know finish work is durable and clean?
Inspect for a flat, smooth surface without ridges or gouges. Ensure joints are well taped and mud is fully sealed before priming. If you see repeat cracking or texture issues, re-evaluate mud application and drying time per the product instructions.