

Introduction
A drywall butt joint hump is an uneven bump along a seam where two panels meet. It happens when compaction or framing flex creates a little bulge that catches the eye. This article covers how back-blocking and simple repair steps can keep seams flat.
Back-blocking involves inserting solid material behind the joint to help keep the edge straight. For repairs, clean the seam, apply joint compound, and feather it out, checking for flatness as you go. Always check product labels and manufacturer instructions for mud, tape, and backing materials and follow local rules.
Key takeaways
- Ensure back-blocks span multiple studs and are securely fastened before taping.
- Mark joints and inspect for protrusions before applying joint compound and sanding.
- Use proper mudding technique over back-blocks to maintain flush seam without ridges.
- Do a thorough sanding test with a straightedge to confirm flatness.
- If humps appear, recheck block alignment and consider reworking entire joint area.
- Safety: wear dust mask, eye protection, and cover nearby surfaces during sanding.
Table of Contents
- Introduction
- Key takeaways
- What Drywall Butt Joint “Humps” Are and How to Identify Them
- Tools and Materials Checklist
- Back-Blocking Principles and Why It Prevents Humps
- Step-by-Step Prevention: Installing a Proper Back-Block
- Repair Options for Existing Humps (from Quick Fixes to Full Rework)
- Finishing, Sanding, and Visual Checkpoints to Ensure a Flush Seam
- Common Mistakes, Troubleshooting, and Long-Term Prevention
- When to Call a Professional and What to Expect
- Conclusion
- FAQ
What Drywall Butt Joint “Humps” Are and How to Identify Them
A drywall butt joint hump is a raised bump where two boards meet at a butt joint, not a smooth seam. You’ll see a ridge under the paint and you can feel a hard lump when you run your hand over it. It differs from a simple tape curl or surface crack because it sits up and catches light, not just a line in the mud.
The main risk is that a visible defect can telegraph through paint and finish, making the room look crossed-up. To diagnose, look for a persistent ridge and a stiff feel when you press with a finger, and compare to nearby joints; if you need specifics, check the label or datasheet for guidance.
Visual signs and tactile checks
A ‘hump’ at a drywall butt joint is easy to spot. Look for:
Raised ridge: You’ll see a noticeable bump along the seam, usually wider than other joints.
Shadow lines: Light hitting the wall casts distinct shadows on either side of the hump, making it stand out.
To confirm, run your hand over the seam. A hump feels like a small, firm bump under your fingers.
Common root causes
Humps usually happen due to:
Unsupported seams: If the seam isn’t properly supported with back-blocking or tape, it can bow out.
Differential board thickness: Boards of varying thickness cause uneven pressure on the seam.
Improper fastening: Inadequate screws or nails allow the boards to shift and create a hump.
Substrate movement: The wall itself moving (due to settling, for example) can push the drywall out at the seam.
How humps differ from cracks, nail pops, and tape ridges
Humps aren’t the only issue you’ll face with drywall seams. Here’s how to tell them apart:
Cracks: Unlike humps, cracks are narrow gaps that run along the seam. They don’t bulge out.
Nail pops: These appear as small, round bumps where a nail head has pushed through the drywall paper. Humps are longer and wider.
Tape ridges: Tape ridges are narrow, raised lines caused by excess joint compound or improper application of tape. They’re narrower than humps and usually run the entire length of the seam.
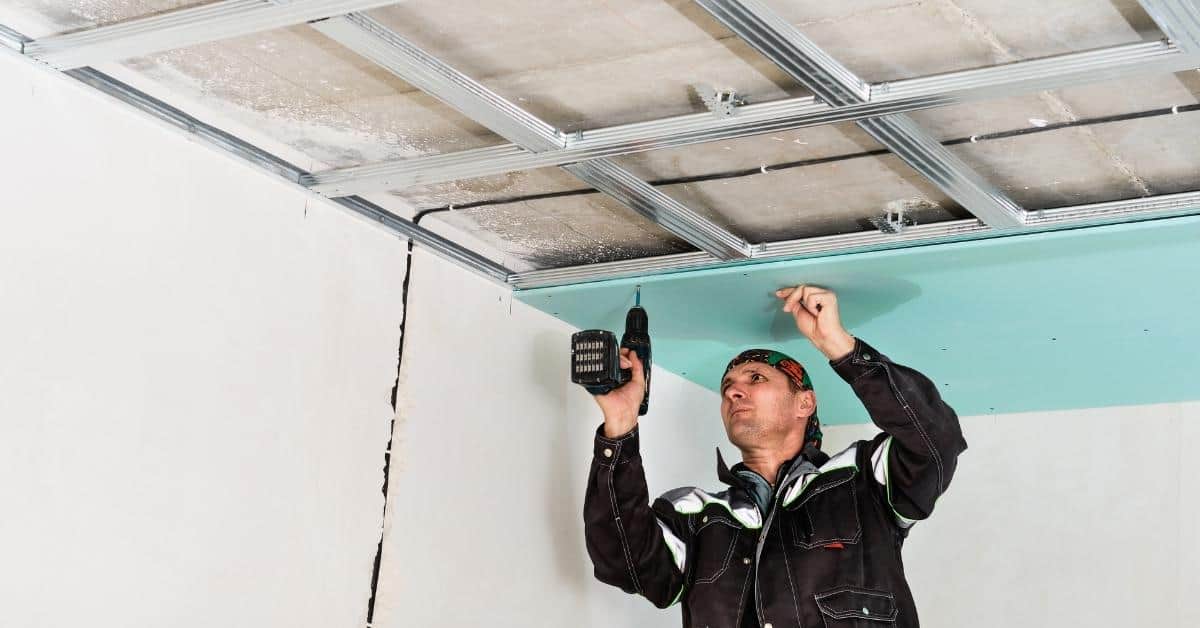
Tools and Materials Checklist
Start with the basics: a wide taping knife, sanding block, and cutting tools for precise back-blocks. Include joint compound, tape, and a proper backing material if you plan preventive work. Have a level, square, and measuring tools ready to verify alignment.
Optional items can speed progress, such as a pole sander, automatic mud mixer, and a stud finder. Always verify product labels and compatibility with your substrate and climate by checking manufacturer instructions or local rules before use.
Essential hand and power tools
Before you start any back-blocking or repair work, make sure you have all the necessary tools. Use this checklist to ensure you’re well-prepared.
- Tape Measure: Verify it’s in good condition and measures accurately up to your project’s required length.
- Level: Check that it’s straight and true. A wonky level can lead to crooked walls or floors.
- Utility Knife: Ensure the blade is sharp for clean cuts. A dull blade can cause damage and require rework.
- Taping Knife (6″ – 12″): Choose the right size based on your project. Too small, you’ll spend too much time taping; too large, you might miss spots.
- Sandpaper (80-120 grit): Check that you have both coarse and fine grit for prep work and final smoothing.
- Orbital Sander: Confirm it’s in working order. A faulty sander can cause uneven surfaces or damage.
- Cordless Drill (18V – 20V): Make sure it’s charged and has the right drill bits for your screws.
- Screw Gun (1/4″ or 3/8″): Check that it fits your drill and can handle the torque needed for your screws.
Quick rule: Always check your tools before starting work. A few minutes of prep can save hours of rework later.
Back-block materials and fasteners
Before you start applying your concrete mix, use this checklist to ensure you’ve got the right back-block materials and fasteners. This will help prevent common issues like delamination or structural failures.
- Check backing material: Inspect for any cracks, holes, or weak spots that could compromise your concrete. Use scraps, wood/metal backing, or backing compounds as needed.
- Verify backing compound type: Ensure it’s compatible with your concrete mix and follows manufacturer specs. Check the label to confirm it’s suitable for your application (e.g., interior/exterior, vertical/horizontal).
- Measure backing compound coverage: Calculate how much you need based on surface area. Follow the manufacturer’s guidelines to avoid under or over-applying.
- Check fasteners for expansion control: Ensure they’re designed to manage concrete expansion and contraction. Look for features like adjustable anchors or movement joints.
- Inspect anchor bolts: Check if they’re properly embedded in the backing material, with no exposed threads that could cause rusting or poor adhesion.
- Verify anchor bolt spacing: Ensure it matches your concrete mix’s requirements. Typically, this is 16″ to 24″ on center for most residential applications.
- Check fasteners’ corrosion resistance: Confirm they’re made of stainless steel, galvanized, or another suitable material to prevent rusting and maintain structural integrity.
- Inspect backing material’s bond strength: Before applying concrete, perform a simple pull test (e.g., using a hammer and chisel) to ensure it’s securely bonded to the substrate.
Quick rule: Always follow manufacturer specs for backing materials, compounds, and fasteners. This ensures your concrete has the best chance of success and longevity.
Joint compounds, tapes, and finishing supplies
Before you start taping and finishing your joints, use this checklist to ensure you have the right materials. This will help you avoid common mistakes that can lead to costly rework.
- Setting Compound: Check label for “setting” type. It’s used for initial coats on new joints and must be applied within 20-30 minutes after mixing. Confirm it matches your joint size (e.g., 1/4″, 3/8″).
- Ready-Mix Compound: Check label for “ready-mix” or “topping” type. It’s used for final coats and can be applied up to 90 minutes after mixing. Confirm it matches your joint size.
- Joint Tape: Visually inspect tape width to match your joint (e.g., 1-1/4″, 2″). Check if it’s fiberglass or paper-based, as each has different application and finishing requirements.
- Tape Primer: If using paper tape, check you have a primer. It improves adhesion and helps prevent bubbling. Ensure it’s compatible with your joint compound.
- Back-Buttering: Check if you have enough setting compound to apply a thin layer on both sides of the joint before taping (back-buttering). This ensures better tape adhesion.
- Sandpaper Grit: Ensure you have 120-grit sandpaper for final sanding. It’s fine enough to smooth joints without damaging paint, yet coarse enough to remove compound ridges.
- Finishing Tools: Check you have a wide taping knife (e.g., 6″, 8″) and a finishing knife (e.g., 10″, 12″). These are essential for applying and smoothing joint compounds.
- Protective Gear: Ensure you have safety glasses, gloves, and a dust mask. Joint compound dust can irritate skin, eyes, and lungs.
Quick rule: Always follow the manufacturer’s instructions on your joint compounds and tapes. They know their products best and provide guidelines to avoid common mistakes.
Back-Blocking Principles and Why It Prevents Humps
Back-blocking adds continuous support behind the butt joint to resist movement and reduce differential settling. With solid backing, mud and tape can sit evenly without creating a raised edge. It acts as a structural bridge that keeps the joint flat as the wall dries.
Back-blocking is most effective when the wall is new or when retrofits can be applied without compromising framing. In retrofit work, plan for access and cut blocks to fit behind the joint without creating additional gaps. Assess the wall condition and follow the backing method that suits your space.
What back-blocking does structurally
Back-blocking is your secret weapon to keep concrete slabs flat and hump-free. It’s not just about screwing down the forms, it’s about distributing those screw loads evenly across the slab.
Here’s how it works: When you back-block, you’re supporting the formwork from behind with strong, stiff blocks. This stops the forms from bending or moving under the pressure of the concrete and screws. Those blocks share the load, spreading it out so no one screw takes too much weight.
Think of it like this: If you’ve got a weak spot in your formwork, without back-blocking, that’s where the slab will hump up. But with back-blocking, even if there’s a weak spot, those blocks behind the forms hold everything in place, keeping the slab flush.
So, when you’re back-blocking, make sure your blocks are solid and level, and check they’re far enough away from the formwork to avoid pressure points. Get this right, and you’ll have a smooth, flat slab every time.
When to back-block versus alternative methods
Back-blocking is your best bet when you’ve got a solid, level base. Here’s why:
Check base compaction. If it’s not solid, fix that first. Back-blocking won’t save a poor base.
Shimming or face-taping might seem easier, but they’ve got their limits:
– Shimming: Only good for tiny gaps. Won’t hold up long-term like back-blocking.
– Face-taping: Can help with minor leveling, but it’s a temporary fix. Won’t prevent humps like back-blocking does.
Material specs and standards explained
The right materials ensure your back-blocking job lasts, looks good, and doesn’t crack. Here’s what you need:
- Type N mortar: Used for most masonry work, including back-blocking. Look for ASTM C270 compliance on the bag. It’s strong enough for most jobs and won’t cost you an arm and a leg.
- Concrete blocks (CMU): Standard 8″ x 16″ x 32″ size is fine. Check they’re ASTM C90 compliant. Avoid cheap, low-quality blocks that can crumble or crack over time.
- Reinforcement (rebar): #4 rebar is common for back-blocking. Look for ASTM A615 grade 60. It’s strong and affordable. Don’t skimp on reinforcement, it’s what keeps your wall from leaning or collapsing.
- Grout: Use a sanded grout mix for filling joints. Check the bag for ASTM C138 compliance. Avoid unsanded grouts that can crack easily.
- Expansion joint material: Neoprene or closed-cell foam strips are common. They prevent cracking due to temperature changes and settling. Don’t forget these, they’re crucial for long-term durability.
- Waterproofing membrane (optional): For below-grade walls, use a self-adhesive waterproofing membrane. It prevents moisture from seeping into your wall. Don’t skip this if you’re back-blocking a basement or retaining wall.
Pro tip: When buying materials, check the bag for expiration dates and storage instructions. Keep mortar and grout mixes dry until use to prevent premature setting. Always follow manufacturer mixing guidelines for best results.
Step-by-Step Prevention: Installing a Proper Back-Block
Begin with clean, dry surfaces and mark the joint location. Measure and cut a back-block that fits behind the butt joint without binding the studs. Secure the block firmly to the framing to provide solid support.
Apply tape and mud with steady, consistent passes, then set the joint flush and check fit before mud dries. Use light, careful pressure and avoid over-mudding to keep the seam level and ready for finishing touches.
Step-by-Step Installation Process
This sequence will guide you through installing a proper back-block for your concrete project, ensuring strength and longevity.
- Check your forms: Ensure all formwork is clean, secure, and properly braced. Why? A solid form ensures the back-block has support to set correctly. Check: Gently shake the form; it should feel rigid.
- Prepare your back-block material: Mix your back-block mix according to manufacturer’s instructions, usually a 3:1 or 4:1 ratio of sand to cement. Why? The right mix ensures proper strength and adhesion. Check: Consistency should be similar to thick peanut butter.
- Apply back-block: Using a trowel, apply the back-block mixture evenly onto the form’s surface where your concrete will be poured. Why? A consistent layer provides a strong bond between form and concrete. Check: Use a straight edge to ensure even application.
- Cure before pouring: Allow back-block to cure for at least 24 hours, or as recommended by the manufacturer. Why? Curing ensures the back-block is strong enough to support the concrete pour. Check: Back-block should feel firm and dry.
- Pour your concrete: Once back-block is cured, proceed with pouring your concrete mix. Why? Pouring on a cured back-block ensures a strong bond between the two materials. Check: Concrete level should be even and consistent.
- Vibrate to remove air: Use a vibrator or poker to remove any air pockets from your concrete. Why? Removing air pockets prevents voids that can weaken the structure. Check: Concrete surface should be smooth and even.
- Cure your concrete: Follow manufacturer’s instructions for curing, usually involving keeping the concrete moist for several days. Why? Proper curing ensures maximum strength development. Check: Concrete should not feel excessively dry or cracked.
Common mistake: Skipping the curing process can lead to weak, cracked concrete that won’t last.
Prep: measuring, cutting, and board fit
Before you start nailing, take a minute to ensure your back-block boards are ready. This step saves time and prevents mistakes.
Check butt gaps: Boards should be close but not tight. Aim for consistent 1/8″ to 3/16″ gaps. Too tight traps moisture, too wide lets in cold air.
Square edges: Ensure boards are straight and square. Crooked or twisted boards lead to poor fit and weak back-block.
Lay out your boards, check for alignment, then cut any pieces that don’t fit right. It’s easier now than after you’ve nailed them up.
Attaching the back-block: adhesives and mechanical fixes
Now that you’ve measured, cut, and fitted your boards (see prep section), it’s time to secure them. You’ve got two main methods here: adhesive and mechanical. Let’s dive in.
Adhesive: This is your best bet for a strong, smooth bond. Use a construction adhesive like Loctite PL Premium. Apply it evenly along the back-block, about 1/4″ from the edges. Press firmly and hold for a few seconds to ensure good contact.
Mechanical fixes: Screws or nails can work too, but they’re trickier. You don’t want to see those heads later, so use cabinet screws or nails with a nailset. Drive them in flush, then fill and sand any holes (see installation section). For extra support, consider using blocking – attach pieces of wood perpendicular to your back-block for added strength.
Taping and first coats after back-blocking
Now that you’ve installed your back-blocks, it’s time to prep the surface for your first coat of concrete. Here’s how:
First, check your tape. Use a high-quality, reinforced tape designed for concrete work. Apply it along your back-block joints, pressing firmly with a trowel or float to ensure good adhesion.
Next, mix and apply your first coat of concrete. Start at the bottom, working upwards in thin layers. Use a shovel or concrete rake to spread the mix evenly, then use a bullfloat to smooth it out. As you work, feather the edges to avoid creating a hard line that could crack.
Let your first coat cure for at least 24 hours before applying the next layer. During this time, keep the concrete moist using a sprinkler or covering it with plastic sheeting. This helps prevent cracking and ensures a strong bond between coats.
Repair Options for Existing Humps (from Quick Fixes to Full Rework)
For minor humps, sanding and a light skim coat can smooth the surface without major disassembly. This approach is suitable when the backing remains solid and the edge is already well seated. Consider timing and access to determine if a quick fix will hold long term.
More involved options include removing and re-backing or replacing affected boards if the hump is pronounced. Choose the path based on how severe the bump is and how easily you can reach the joint without causing new movement.
Quick Cosmetic Fixes and When They Work
For minor humps, quick fixes can save you time and effort. Here’s what you can do:
Spot-sanding: Lightly sand the hump with a fine-grit sandpaper to flatten it out. Be careful not to sand too hard or you’ll create a depression.
Thin skim coats: Apply a thin layer of joint compound over the hump, feathering it out on either side. Let it dry, then lightly sand and apply another coat if needed.
These fixes work best when the humps are small (less than 1/8 inch) and not too wide. They won’t solve major issues or prevent future problems, but they can tide you over until you can do a proper repair.
Rebacking and Re-mudding a Joint
If the hump is larger but not too wide, you might need to remove the finish layers and reinstall a back-block. Here’s how:
First, remove the finish compound from both sides of the joint using a utility knife or drywall saw. Be careful not to cut into the board.
Next, install a new back-block as explained earlier in this guide. Then, apply joint compound over the back-block and hump, feathering it out on either side of the joint.
Let it dry, then sand lightly and apply another coat if needed. This method works well for humps up to about 1/4 inch wide.
Board Removal and Full Replacement
For large, wide humps or those caused by damaged boards, you might need to remove the board entirely. Here’s how:
First, cut along both sides of the hump with a drywall saw. Then, use a utility knife to score and snap off the excess drywall.
Next, remove the damaged board and install a new one. Make sure it’s properly back-blocked to prevent future humps. Then, apply joint compound over the new joint as usual.
This method is more involved but necessary for severe cases. It ensures a solid, flat wall surface but may require some touch-up work on surrounding walls or ceilings.
Finishing, Sanding, and Visual Checkpoints to Ensure a Flush Seam
Plan a sanding strategy that follows a logical grit progression so you don’t gouge the surface. Sand evenly across the seam and avoid thinning the mud near the joint. Pause to reassess the texture as you go.
Check the seam under different lighting and angles to confirm flushness. Ensure the surface remains consistent before applying primer and paint, watching for remaining reflections that indicate a hump.
Sanding techniques and grit progression
Start sanding after the first coat of mud has dried. This helps you remove any excess material and create a smooth surface.
- Start with 120-grit: Remove major imperfections and high spots.
- Move to 150-grit: Smooth out the surface, eliminate swirl marks from 120-grit.
- Finish with 220-grit: Achieve a smooth, glass-like finish. Skip this step and you’ll have a rough surface that shows through paint.
Quick rule: Always sand in the direction of the seam to avoid creating depressions or glassy spots.
Visual and light-angle inspection tips
Before priming, inspect your work under different lighting conditions to ensure a flush seam.
- Use raking light: Hold a flashlight at an angle to cast shadows and reveal any residual humps or low spots.
- Check for feathering: Ensure the mud is evenly spread along the seam. Inconsistencies will show through paint.
- Feel with your hands: Run your fingers along the seam to check for any rough or high spots. Your touch can reveal imperfections that light might miss.
Quick rule: Never rely on just one inspection method. Use a combination of sight and touch to ensure a smooth surface.
Primer, paint, and final acceptance criteria
After sanding and inspecting, apply primer before painting. This helps reveal any imperfections you might have missed.
- Apply primer: Use a high-quality primer to seal the surface and help paint adhere better.
- Let it dry: Allow the primer to dry completely before painting. This ensures the paint adheres evenly.
- Check for imperfections: Inspect the primed surface under different lighting conditions. Any missed humps or low spots will now be visible.
Quick rule: Only accept the finished surface if it’s smooth, even, and free of any visible imperfections. Anything less will show through paint.
Common Mistakes, Troubleshooting, and Long-Term Prevention
Avoid over-sanding, which can expose tape or create new ridges. Use the right joint compound for the task and ensure proper backing to prevent future movement. If movement recurs, address the underlying framing or substrate issues first.
Document movement patterns and check for flex or settlement that may cause recurrence. Establish a routine inspection and proper maintenance plan to slow or stop humps from returning.
Mistakes that create or worsen humps
To avoid ‘humps’ in your drywall butt joints, steer clear of these common mistakes during installation and repair.
- Over-sanding: Sanding too much can remove the paper face, causing the joint compound to bond poorly with the board. Avoid over-sanding by using a light touch and checking frequently.
- Wrong compound use: Using setting-type compounds for taping can cause shrinkage and humps. Stick to lightweight or all-purpose compounds for taping.
- Inadequate backing: Skimping on back-blocking or using the wrong materials (like thin strips of drywall) can lead to weak support, causing humps over time. Always use proper back-blocks and adhesives as explained earlier.
- Improper taping: Applying too much compound at once or not feathering it out properly can result in humps. Apply compound in thin coats, feathering the edges for a smooth finish.
Remember, prevention is key. Careful attention to detail during installation and repair will help you avoid these mistakes that create or worsen ‘humps’.
Troubleshooting persistent or recurring humps
If you’re still seeing ‘humps’ despite your best efforts, it’s time to troubleshoot the problem. Start by checking for any underlying issues that might be causing movement in your walls.
Framing movement: Check if there are any gaps between the drywall and the studs. If so, you may need to reattach or reinforce the drywall. Also, look for any signs of structural movement in your home’s framing.
Moisture can also cause problems. Check for water damage: Look for water stains, warping, or soft spots on the drywall. If you find any, address the source of the moisture and repair the damaged area accordingly.
Misaligned studs: Sometimes, humps can be caused by studs that are not perfectly straight or aligned. To check this, use a level to ensure your studs are plumb and properly spaced. If necessary, shim or adjust the drywall to fit the studs correctly.
Long-term strategies to reduce future movement
To minimize ‘humps’ in your drywall joints over time, consider these long-term strategies:
Proper fastening patterns: Ensure that drywall screws or nails are driven into the center of each stud and spaced appropriately. This provides better support and reduces movement.
Humidity control is crucial. Maintain proper humidity levels: Keep your home’s indoor humidity between 30-50% to prevent excessive expansion and contraction of the drywall.
Use flexible finishes where applicable: In areas prone to movement, consider using flexible joint tape or adding a flexible additive to your joint compound. This can help absorb minor movements without cracking or humping.
When to Call a Professional and What to Expect
If DIY efforts don’t produce a flat, consistent surface, it is reasonable to seek professional help. A pro will assess backing, framing, and mudding technique and may rework the joint as needed. They will also address any hidden issues before finishing.
Prepare by gathering notes, photos, and measurements of the affected area and any past repairs. When you contact a pro, verify licensing, references, and local expectations rather than quoting prices or schedules.
Signs you should hire a pro
If your drywall humps are causing concern, here’s when to call in the pros.
Structural movement: If walls or ceilings are cracking or showing signs of movement, it could be a structural issue. That’s beyond DIY and needs pro attention.
Large-area humps: Small humps can often be fixed by the homeowner. But if you’re seeing large areas affected, it might be time to call in help.
Unseen substrate problems: If you suspect there are issues with the underlying structure or framing that are causing the humps, leave it to the pros to diagnose and fix.
Lack of access: If the areas with humps are hard to reach or involve removing other materials (like tile or cabinets), it’s safer and easier to hire a pro.
What a pro assessment and repair typically includes
A professional drywall contractor will start by assessing the damage. Here’s what you can expect:
Diagnostics: They’ll inspect your walls, check for moisture, and look at the framing. They might use tools like infrared cameras or moisture meters.
Repair scope: Based on their findings, they’ll outline a repair plan. This could range from simple mudding and sanding to full board replacement or even structural repairs.
Documentation: A good contractor will provide you with a detailed report outlining the problem, the proposed solution, and an estimate for the work.
Questions to ask and how to verify credentials
Before hiring, here are some questions to ask and checks to make:
Bids: Get at least three bids. Ask about their process, timeline, and what’s included in the price.
References: Always check references. Ask for before-and-after photos if possible. A good contractor will have happy customers.
Credentials: Make sure they’re licensed and insured. Insurance protects you if something goes wrong on the job. Local licensing ensures they meet your area’s standards.
Conclusion
Fixing drywall butt joint humps is about solid back-blocks, careful repair, and a flush seam that stands up to daily use. Do the prep right, test in a small area, and you protect the wall and your time from repeat fixes.
Check that you have the right tools and materials, then plan the work in a safe sequence: verify the area is clean and dry, install a proper back-block behind the joint, repair or replace any damaged paper or edge, apply mud in thin, consistent coats, sand smooth, and verify by eye and touch that the seam sits flush with the surrounding surface. If you’re unsure, start with quick fixes only on a small section to build confidence before moving to full rework.
Common mistakes to avoid are skipping back-blocks or using insufficient mud with too much buildup, rushing sanding and leaving ridges, and ignoring safety basics such as protecting adjacent surfaces and wearing a mask when sanding. Work in stages, test each step on a hidden area first, and keep lifts and power tools under control to prevent damage.
If the wall still shows a hump after careful attempts, it makes sense to call a professional—the right pro will confirm hidden issues, perform a clean back-block and rework, and deliver a durable, ready-to-paint finish. Stay steady, follow the checks, and you’ll end up with a smooth, long-lasting result you can be proud of.
FAQ
Will back-blocking alone prevent future humps on drywall butt joints?
Back-blocking helps align the joint and keep the two sheets pressed flat. It reduces the chance of a dip or bulge if the sheet edges settle. But you still need proper fastening, mudding, and sanding to keep it flush over time.
What should I inspect in the back-block material and screws before starting?
Make sure the backing is solid and sized to support the joint without wobble. Screws should seat below the surface without tearing the paper. Look for any loose blocks or staples and trim or replace as needed before mudding.
If I already have a hump, what is the best quick fix before re-skinning?
Apply patch compound to the hump area in thin, feathered coats, letting each coat dry before the next. Sand lightly between coats and keep the surface level with the surrounding drywall. If the hump keeps reappearing, rework the joint area or consider backing changes.
How can I tell if the joint is flush after finishing?
Run your hand along the seam to feel for a consistent surface. Look for even light reflection across the joint and use a straightedge or laser level if you have one. If you see a high spot or a low spot, sand and recoat as needed.