
Introduction
Concrete rebar shadowing is when the lines of embedded steel rebar show up as darker or lighter lines on the surface after curing. This happens as moisture, temperature, and the metal interact during the cure, with the surface sometimes mirroring the rebar pattern. Differences in finishing between forms or around the rebar can further exaggerate the effect.
To prevent it, check how the rebar is placed, how the surface is finished, and what is used to seal or cure the concrete. Keep the surface treatment consistent and avoid over-troweling to minimize texture differences that reveal the lines. If you already have visible lines, you can try texturing or a skim coat to blend the contrast, or consult manufacturer instructions for any repair products that are appropriate for your mix and environment.
Key takeaways
- Rebar shadowing is visible line patterns caused by embedded steel under cured concrete.
- Inspect form lines, concrete finish, and rebar spacing to identify shadow causes early.
- Use deeper covering or staggered rebar patterns to reduce line visibility.
- Plan joint locations and avoid high sheen finishes near exposed rebar surfaces.
- Remediate faded lines with patching or resurfacing following manufacturer instructions.
- Always document safety practices, wear PPE, and consult local codes and specs.
Table of Contents
- Introduction
- Key takeaways
- What Is Concrete Rebar Shadowing?
- Common Causes of Rebar Shadowing
- How to Identify and Diagnose Rebar Shadowing
- Prevention Strategies During Design and Construction
- Remediation Options After the Concrete Has Set
- Tools, Materials, and Standards to Consult
- Safety, Liability, and Cost Considerations
- Planning, Inspection Checklists, and Common Mistakes to Avoid
- Conclusion
- FAQ
What Is Concrete Rebar Shadowing?
Rebar shadowing is a translucent, dark band or line that appears on a concrete surface near embedded steel. It can resemble a stain, but it isn’t a surface defect by itself. The shadow comes from the interaction of the cement paste with the nearby metal and is influenced by geometry more than material failure.
Understand the mechanism and how conditions affect visibility: moisture movement, rebar position, concrete cover depth, curing, and any corrosion products can make shadows clearer. Timing of pours and formwork details also play a role in how sharp the lines look after finishing. Distinguishing shadowing from staining, efflorescence, or cracking helps prevent misdiagnosis and unnecessary repairs.
Definition and terminology
Rebar shadowing is a visual phenomenon where dark lines or bands appear on the surface of concrete, giving the impression that the rebar beneath is casting a ‘shadow’. This isn’t actually a defect but rather an aesthetic effect caused by the translucency of cement paste and the proximity of metal rebar.
You might also hear this referred to as ghosting, especially when it’s faint. In some cases, it can be mistaken for staining, but shadowing is distinct in that it follows the pattern of the rebar.
How shadowing differs from other surface defects
While shadowing is a normal part of concrete’s natural evolution, there are other surface issues that might look similar but have different causes and implications.
Efflorescence, for instance, appears as a white, powdery deposit on the surface. It’s caused by salts leaching to the surface due to moisture movement, unlike shadowing which is purely visual and not indicative of any underlying issue.
Cracking and hairline cracking, on the other hand, are signs of structural distress. They’re typically random or diagonal, whereas shadowing follows the straight lines of the rebar grid.
Common Causes of Rebar Shadowing
Placement-related factors include how close rebar sits to the surface, the overall concrete cover, bar alignment, and how formwork lines show up after finishing. These conditions can produce visible lines even when the concrete itself is sound. Material choice and condition—rust, coatings, mix design, and additives—also affect shadow intensity.
Construction practices matter too: curing method, vibration, and surface finishing techniques can imprint lines. Interaction effects occur when several factors combine, such as shallow cover with aggressive vibration and rust staining. Pre-pour checks and mock-ups help you monitor and limit shadow visibility on the actual slab.
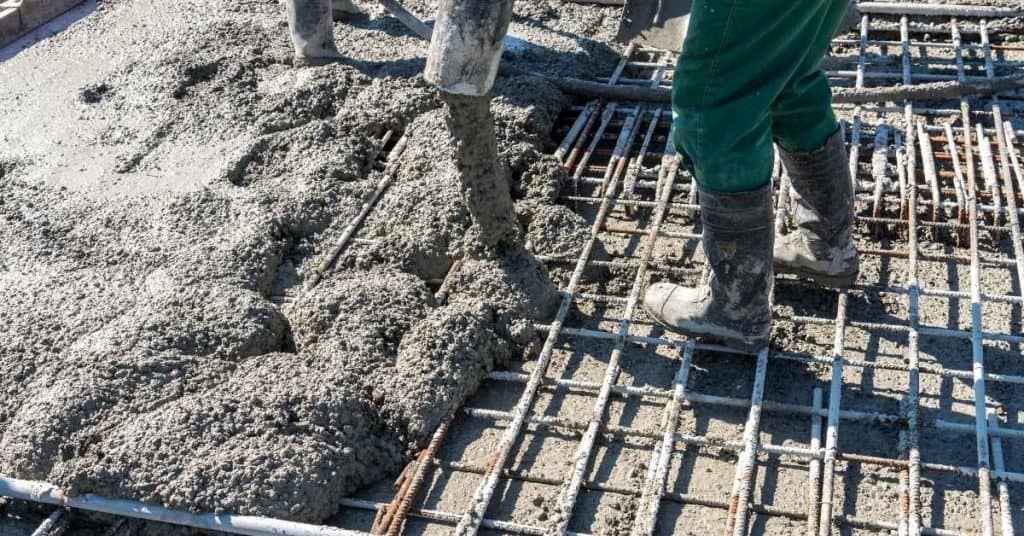
Rebar Placement and Cover Issues
Inadequate concrete cover over rebar is a common cause of shadowing. Rebar needs enough protection to prevent direct contact with air and moisture, which can lead to rusting and line formation.
Stacked bars or inconsistent spacing between rebars also contribute to thermal expansion and contraction lines on the finished surface. Ensure proper spacing and alignment during installation to minimize these issues.
Tip: Aim for a minimum cover of 2 inches (50 mm) for most applications, more for harsh environments.
Concrete Mix, Bleeding, and Curing Factors
The concrete mix design plays a role in shadowing. Larger aggregate sizes or poor workability can cause segregation, leaving voids around rebar that allow lines to form.
Improper curing methods or durations can also expose rebar outlines. Insufficient curing allows the surface to dry too quickly, pulling moisture away from the concrete-rebar interface and creating visible lines.
Tip: Use a mix with suitable aggregate size for your application and cure properly using wet burlap, plastic sheeting, or other appropriate methods.
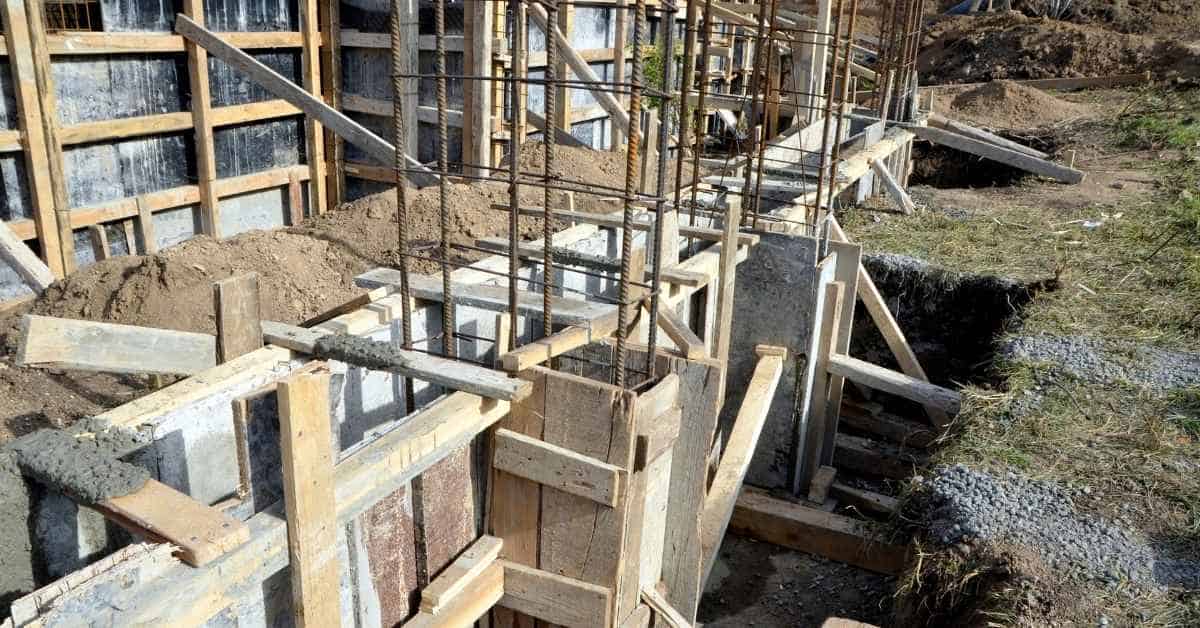
Formwork, Consolidation, and Vibration Problems
Poorly aligned formwork can imprint lines onto the concrete surface. Ensure forms are level, plumb, and properly braced before pouring.
Insufficient consolidation or over-vibration of concrete around rebar can create voids or variable density, allowing bar patterns to show through. Maintain proper vibration techniques and use appropriate vibrators for your mix.
Tip: Avoid under- or over-vibrating; strike the formwork gently with a hammer to help consolidate the concrete without disturbing rebar alignment.
How to Identify and Diagnose Rebar Shadowing
The core issue is to separate shadowing from curing ghosting, bleed, form markings, or coating defects. Practical visual clues include consistent lines that follow rebar spacing and edges that disappear after cleaning. On the surface, look for patterns that align with underlying reinforcement rather than random stains.
On-site steps include rough measurements of pattern spacing, inspecting cover thickness with available tools, and noting moisture or condensation that could exaggerate shadows. Use non-destructive tools sparingly and document readings with photos and measurements. Escalate if you suspect structural concerns or if shadows persist after standard surface cleaning.
Step-by-Step Process
The following steps will guide you through identifying and diagnosing rebar shadowing, ensuring your concrete structure remains safe and sound.
- Preparation: Ensure the area is clear of debris. Use a broom or leaf blower to remove any loose materials. This step is crucial for accurate diagnosis.
- Safety Check: Wear appropriate safety gear, including gloves and safety glasses. Rebar can be sharp, so protect your hands and eyes.
- Inspection Start: Begin at one corner of the concrete slab or wall. Run your fingers along the surface to feel for any cracks, lumps, or depressions that could indicate rebar shadowing.
- Visual Inspection: Look for visible signs of rebar shadowing, such as cracks, bulges, or discoloration. These can indicate that the rebar is shifting or corroding.
- Rebar Tapping: Use a hammer to gently tap along the suspected area. A hollow sound could indicate a void behind the concrete, which might be caused by rebar shadowing. If you hear a solid sound, move on to another area.
- Moisture Check: Use a moisture meter to check for excess moisture in the concrete. High moisture levels can lead to rebar corrosion and shadowing. If moisture is present, consider calling a professional for further diagnosis.
- Rebar Mapping (if necessary): If you suspect extensive rebar shadowing, use a rebar locator or GPR (Ground Penetrating Radar) to map out the rebar’s exact location. This step is crucial before any repair work begins.
- Document Your Findings: Take notes and photos of your findings. This will help you track progress and make informed decisions about repairs.
Pro tip: Always consult local building codes and manufacturer instructions before starting any repair work. Some cases may require professional intervention.
Visual indicators and pattern recognition
When you’re looking at a concrete surface and suspect rebar shadowing, here’s what to look for:
First off, look for lines. Rebar leaves distinct lines on the surface. These lines are usually straight or follow the shape of the reinforcement. They might be wavy if the rebar was installed poorly.
Next, check spacing. The lines should be evenly spaced. This is a good indicator that the rebar is consistent throughout. If the spacing varies greatly, it could mean there are issues with the reinforcement beneath.
Finally, examine the edges. Rebar shadowing often has distinct edges where the line ends abruptly. This can happen if the rebar was cut or stopped suddenly. It’s a sign that you might need to investigate further.
Non-destructive testing and investigative methods
When it comes to rebar shadowing, you can’t just start digging willy-nilly. You need to know what’s beneath the surface first. That’s where non-destructive testing (NDT) comes in.
Cover Meters: These are your basic tools for checking rebar depth. They’re cheap, easy to use, and should be your first stop. Just remember, they only give you a rough estimate. If you need precision, you’ll have to step up your game.
Ground-Penetrating Radar (GPR): This is where we start getting fancy. GPR uses radar pulses to map out what’s under the surface. It can tell you not just how deep the rebar is, but also its size and spacing. But here’s the thing – interpreting GPR results takes a specialist. Don’t try to do it yourself.
Sounding: This is an old-school method that still has its uses. You hit the ground with a sledgehammer (or a drop weight) and listen for the echo. It can give you an idea of what’s down there, but it won’t tell you much about rebar size or spacing. And it makes one heck of a racket.
Each method has its uses, so choose wisely based on what you need to know and how deep your pockets are. But remember, no matter which method you use, if the results don’t make sense, get a specialist to take a look. It’s better to be safe than sorry.
Prevention Strategies During Design and Construction
Implement design and detailing controls that enforce clear cover and uniform spacing. Use drawings that show rebar relative to formwork faces and potential shadow lines for review before approval. These practices set the stage for a consistent finish with less noticeable shadowing.
On-site, maintain precise formwork alignment and verify rebar chairs and spacers keep bars on the intended plane away from forming surfaces. Specify continuous bars when possible and avoid close joints near critical faces. Document shadow-risk zones in drawings and require pre-pour inspections to catch problem areas early.
Design and Detailing Best Practices
Adequate cover is crucial. Specify clear cover to protect rebar from corrosion and shadows. Use minimum cover requirements from project specs and codes.
Uniform spacing reduces long, continuous shadows. Use evenly spaced grids. Avoid large gaps between bars that can cause abrupt transitions.
Protective layers help. Use corrosion-resistant or coated rebar if it improves visibility and reduces shadow opacity.
Placement, Formwork Control, and Inspection Routines
Use this checklist before pouring to minimize shadows. Follow these steps:
- Check rebar chairs/spacers: Ensure they’re correct and well-placed for uniform cover.
- Verify formwork alignment: Check all corners, edges, and joints are square and level.
- Measure face dimensions: Consistent faces reduce shadows at joints.
- Check negative changes: Avoid rebar too close to form joints where shadows form.
- Inspect layout: Ensure bars follow intended grid layout with no misplaced or missing bars.
- Review CAD/bake-off checks: Confirm rebar relative to formwork faces and potential shadow lines.
- Document shadow-risk zones: Note areas where overlaps might create near-surface lines.
- Field photos with measurements: Capture evidence of correct placement and alignment.
Quick rule: Regular checks and documentation keep shadows at bay.
Mix Selection, Placement, and Curing Protocols
Choose mixes wisely. Low-slump mixes reduce bleeding and settling that cause shadows. Use appropriate mix designs for your project.
Control slump. Too much water can increase bleeding and settling. Keep slump within acceptable limits.
Proper curing matters. Even curing reduces concrete’s tendency to settle unevenly. Follow recommended curing procedures.
Remediation Options After the Concrete Has Set
Define the problem clearly to decide if the shadowing is cosmetic or indicates deeper issues. Use a decision flow that starts with the least invasive, testing-based approaches. Document severity with photos and notes to guide the chosen path.
Remediation options, ranked by invasiveness, start with cosmetic maintenance like cleaning and sealers. If needed, try surface repairs or micro-toppings, then overlays or coatings to even out appearance. For deeper issues, consider mechanical remediation or structural options, keeping corrosion concerns in view and involving a pro when necessary.
Surface treatments: cleaning, sealers, and cosmetic coatings
If the rebar shadowing is purely aesthetic with no signs of structural issues, consider surface treatments to minimize its appearance. Start by cleaning the concrete using a pressure washer or wire brush to remove dirt, stains, and efflorescence.
Penetrating sealers can help reduce the visibility of shadows by darkening the concrete surface slightly. Apply them according to the manufacturer’s instructions, ensuring even coverage and allowing adequate drying time between coats.
For color discrepancies, color-correcting sealers or stains may be used. These products can help blend the rebar shadows with the surrounding concrete. Always test these products on a small, hidden area first to ensure they match your desired outcome.
Mechanical and overlay solutions: grinding, patching, and overlays
When shadows are more pronounced but still not indicative of structural issues, mechanical methods or thin overlays can help. Gentle grinding can remove the top layer of concrete, reducing the visibility of rebar shadows. Be cautious not to grind too deep and expose the rebar.
For isolated areas with heavy shadowing, use thin patching compounds or micro-toppings. These products can be applied thinly to even out the appearance of the concrete surface. Ensure proper adhesion by cleaning and preparing the surface beforehand.
Polymer-modified overlays or epoxy/polyurethane coatings can also help evening out the appearance while providing protection against moisture intrusion. However, keep in mind that these solutions add thickness to the surface, which may affect the overall profile of your concrete.
When structural or invasive repairs are required
If rebar shadowing is accompanied by signs of corrosion, cracking, or moisture intrusion, it may indicate a more serious problem. Flaking concrete, rust staining, or visible cracks along the rebar lines are red flags that warrant further investigation.
In such cases, consider hiring a professional to assess the situation. They can perform non-destructive testing and determine if structural remediation is necessary. This may involve deeper repairs, rebar replacement, adding extra cover, or even removing and re-pouring the slab.
Always prioritize safety when dealing with suspected structural issues. If you’re unsure about any aspect of the repair process, consult a licensed professional to ensure your concrete structure remains sound and safe.
Tools, Materials, and Standards to Consult
Build an inspection toolbox with visual checks, calipers, straightedges, and non-destructive tools like a rebar locator or moisture meter. Thermography can help in some cases, but use it where relevant and practical on site. Keep the toolkit simple and functional for quick field checks.
Stock repair materials include patch mortars, epoxy or cementitious repair compounds, corrosion inhibitors, and protective coatings. Review applicable standards and project specs, such as local amendments and QA/QC plans. Maintain clear documentation and align with design and field teams for approvals.
Tools and materials checklist
Before starting any inspection or repair work on your concrete surface, ensure you have the right tools and materials at hand. This list will help you assess and perform small repairs efficiently.
- Visual aids: Flashlight, Magnifying glass – To inspect for hairline cracks and shadowing patterns.
- Measuring devices: Tape measure, Calipers – To confirm rebar size and spacing, cover depth.
- Non-destructive testers: Rebar locator, Moisture meter – To find hidden issues without damaging the surface.
- Repair materials: Appropriate patch mortars, Epoxy or cementitious repair compounds – For filling cracks and small voids.
- Corrosion inhibitors: – To prevent further rusting of exposed rebar.
- Sealants & coatings: Concrete sealers, Cosmetic coatings – To protect the surface and enhance appearance.
- Safety gear: Work gloves, Safety glasses – Always prioritize safety during inspections and repairs.
- Documentation tools: Camera, Notepad – To record findings, take photos, and make notes.
Quick rule: Having the right tools and materials saves time and ensures quality repairs.
Material specs and standards explained
Understanding material specifications and standards is crucial for achieving a durable, long-lasting concrete structure. Here’s what you need to know:
- Concrete mix design: Slump, Air content, Water-cement ratio – ACI 211.1, ASTM C942 – Wrong mix can lead to weak concrete with poor durability.
- Reinforcement specs: Rebar size, Spacing, Cover depth – ACI 318, ACI 301 – Incorrect reinforcement can result in insufficient strength and early failure.
- Curing guides: Curing time, Method (ponding, spraying) – ASTM D3280 – Inadequate curing causes surface scaling and reduced concrete strength.
- Testing standards: Compressive strength, Flexural strength – ASTM C39, ASTM C78 – Ensures concrete meets required performance levels.
- Local codes & project requirements: Always verify with local building codes and project-specific documents for exact values to follow.
Safety, Liability, and Cost Considerations
Outline immediate hazards when exposing or working near rebar: falls, cuts, dust, and utility conflicts. Identify required PPE, lockout/tagout where appropriate, and proper ventilation. Plan work to minimize exposure time and keep the site organized for safety.
Clarify structural versus cosmetic risk and involve a licensed engineer when needed. Discuss liability between homeowner, contractor, and manufacturer, and document decisions for insurance or warranties. Compare preventive costs to corrective work and use a simple risk assessment to decide if DIY is appropriate or a pro should be engaged.
Safety risks when exposing or correcting shadowing
Exposing or repairing rebar shadowing isn’t just about aesthetics. It’s a job that comes with its own set of safety hazards.
Cutting into reinforcement can cause sparks, which could ignite nearby flammable materials. It also risks damaging the rebar itself, weakening your concrete structure.
Dust control is crucial to prevent respiratory issues. Wear a proper dust mask or respirator. And don’t forget about fall risks and equipment hazards. Always use stable platforms and secure tools.
Wear appropriate PPE: safety glasses, gloves, steel-toed boots, and long sleeves. Follow controlled procedures, like lockout/tagout for power tools, to minimize risks.
Cost comparison: prevention versus repair
Preventing rebar shadowing is cheaper than fixing it. Here’s why.
Prevention costs include inspection, protective coatings, and early sealing. But these are one-time or low-frequency expenses that keep your concrete looking good and performing well over time.
Repair costs, on the other hand, can be much higher. They include downtime (while repairs are being made), spot repairs, full-depth patching, coring, and even structural strengthening if necessary. Plus, there’s the aesthetic cost – your concrete may never look as good as it did when new.
The typical ROI for proactive maintenance is high. It’s like getting a discount on every repair you don’t have to make. So, spend a little now to save a lot later.
Planning, Inspection Checklists, and Common Mistakes to Avoid
For pre-pour planning, confirm rebar size, spacing, cover, and chair placement. Set up a photo log for each area to track changes. Establish a simple pre-pour workflow to minimize shadowing risk.
Post-pour checks should verify uniform color and texture and look for dark lines that align with rebar patterns. Common mistakes include too-shallow cover, excessive vibration near rebar, and shifting chairs during pour. Practical mitigation includes consistent spacing, corrosion-inhibiting coatings, and documenting deviations with photos for rapid triage.
Pre-pour planning checklist and visual checkpoints
Use this checklist before pouring to minimize shadowing risks.
- Confirm shop drawings: Ensure rebar size, spacing, cover, and chair placement match plans.
- Inspect mock-ups: Check form tightness and alignment with plans. Any issues? Fix them now.
- Verify formwork: Inspect forms for cracks or damage that could cause shadowing.
- Check rebar embedment: Ensure all rebar is embedded at the correct depth, aligned with plans.
- Inspect subgrade: Check stability. Soft spots? Compact them.
- Examine rebar ends: Make sure they’re clean and capped if needed.
- Mark potential shadow zones: Identify areas where shadowing might occur, mark forms accordingly.
- Establish photo log: Take photos of each area for reference during and after pour.
Quick rule: Pre-pour planning isn’t a one-man job. Get your team involved.
Common mistakes and how to mitigate them
Learn from these common errors to prevent shadowing.
- Insufficient cover: Ensure rebar is properly covered. Too shallow? Add more concrete or adjust formwork.
- Poor vibration: Excessive vibration near rebar can cause lines. Train your team to vibrate carefully.
- Moving chairs: Loosening or moving chairs during pour causes misalignment. Keep them secure.
- Uneven compaction: Inadequate compaction around rebar leads to shadows. Ensure even compaction.
- Late form removal: Removing forms too late strains surface integrity. Stick to the schedule.
Quick rule: Regular training and clear communication can help avoid these mistakes.
Conclusion
Keeping concrete straight on shadowing matters for safety, durability, and appearance. Stay disciplined now to avoid costly repairs later and to keep the structure behaving as it should.
Check now in plain terms: verify real-time with the plan and field notes, walk the site with clean eyes for lines that hint at hidden rebar, confirm proper cover and spacing during form removal, test a small area if you’re unsure, and have your remediation options and costs mapped out before you commit to any fix.
Common mistakes to avoid are clear: don’t ignore early signs or assume cosmetic fixes will hold, don’t skimp on cover or misjudge spacing, and don’t push ahead with unapproved repairs or incompatible materials. Safety stays first—test, document, and follow the standard guidelines so you don’t expose yourself or others to risk.
If the problem looks bigger than a quick fix, or you’re uncertain about the diagnosis, call a professional before you proceed. When in doubt, pause, assess, and plan with a pro. Stay practical, stay safe, and you’ll finish strong.
FAQ
What exactly is concrete rebar shadowing?
Rebar shadowing is when the steel reinforcement inside concrete shows up as lines or dark marks on the surface. It happens because the rebar interrupts the surface texture or leaves a slight impression as the concrete cures. It can affect looks and sometimes surface finish.
What usually causes lines to appear on the surface?
Lines come from rebar being too close to the surface or not properly covered. They can also appear if the concrete surface flows around the bars or if vibration brings aggregate away near the rebar. Poor form removal timing and surface finishing can exaggerate the effect.
How can I prevent these shadow lines during pouring and finishing?
Keep adequate cover over the bars and plan rebar spacing before you pour. Use appropriate spacers and align bars consistently with the form edges. Manage vibration so it doesn’t pull fines away from the surface near the bars, and inspect form integrity before the pour.
What options exist to repair or reduce visible shadow lines after the concrete has set?
Assessment comes first. If lines are shallow, you may smooth or patch the area after curing. For more noticeable lines, consider surface retouching options or a compatible overlay, following manufacturer directions and local guidance. If in doubt, check label instructions and local rules before proceeding.