
Introduction
Concrete rust stains are reddish or orange marks that come from iron reacting with moisture.
This article explains how to treat the cause and clean the surface in practical steps you can try at home. Start by identifying moisture sources and what might be causing the staining so you can target the right approach.
Common DIY options include lemon juice with salt, or vinegar with baking soda, applied to the stain and rinsed as you work. For tougher stains you can consider a commercial rust remover, but always follow the label and test in an inconspicuous spot. Pressure washing can help lift softened rust on the surface, but avoid gouging the concrete and use the lowest effective setting.
Key takeaways
- Identify rust sources early by inspecting rebar, irrigation lines, and metal fixtures.
- Plan a test spot first; monitor for color change and material reaction.
- Lemon juice and salt: apply, scrub, rinse thoroughly, and repeat if stain remains.
- Vinegar and baking soda: apply, notice fizzing, scrub, rinse, and avoid metal contact.
- Commercial rust removers: read label, test inconspicuous area, follow safety PPE and disposal notes.
- Pressure washing options: use low pressure, keep nozzle at safe distance, and protect plants.
Table of Contents
- Introduction
- Key takeaways
- What Causes Rust Stains on Concrete and How to Identify Them
- Tools, Materials, and PPE Checklist
- Pre-Cleaning, Site Planning, and Test Spot Protocol
- Method 1 — Lemon Juice and Salt: Best Uses and Step-by-Step
- Method 2 — Vinegar and Baking Soda: How It Works and Application
- Method 3 — Commercial Rust Removers: Selection, Application, and Cost Tradeoffs
- Method 4 — Pressure Washing and Mechanical Removal Options
- Preventing Rust Stains and Long-Term Maintenance
- Conclusion
- FAQ
What Causes Rust Stains on Concrete and How to Identify Them
Rust stains form when iron in metal objects oxidizes in the presence of moisture and migrates into the concrete through its pores. The staining can appear darker where the concrete absorbs more moisture or iron particles deeper in the surface. As you observe, staining often follows water flow patterns or hairline cracks near metal sources.
Common sources include deteriorating rebar, outdoor fixtures or furniture, fertilizers with iron, and irrigation water with higher iron content. Porosity and curing depth influence how far color can penetrate as vapor movement and capillary rise carry iron deeper into the slab. Simple visual clues and quick tests help tell rust from other stains like oil, mold, or tannins.
Chemical and Physical Causes
Rust stains on concrete are a result of iron corrosion. Here’s how it happens:
Iron, present in metal fixtures, rebar, or even fertilizers, comes into contact with moisture. This moisture reacts with the iron, starting the oxidation process that turns iron into rust.
The porous nature of concrete draws these iron particles deeper into the surface. Moisture and pH levels can affect how quickly and deeply these stains form. High moisture and low pH accelerate the corrosion process, making stains more prominent.
Visual Checkpoints and Stain Severity Indicators
Before you start treating rust stains, use this checklist to assess their severity. It’ll help you decide if a simple cleaning or stronger treatment is needed.
- Stain age: Newer stains are usually easier to remove than old ones.
- Color intensity: Lighter stains can often be removed with mild treatments, while darker stains may require stronger chemicals.
- Size and spread: Small, isolated stains are simpler to treat than large, widespread ones.
- Surface vs. deep-set: Scrape the stain gently; if it comes off easily, it’s surface-level. If not, it’s likely deeper-set and may need professional help.
- Crack or joint following: Stains that follow cracks or joints could indicate a more serious underlying issue.
- Metal object proximity: Rust stains near metal objects suggest they’re the source. Move or remove these objects to prevent further staining.
- Water flow patterns: Stains following water flow paths may need additional prevention measures, like sealing cracks or redirecting water.
- Odor and texture: Rust stains should have a metallic smell and rough texture. If they’re smooth or smell differently, they might not be rust.
Quick rule: If stains are deep-set, widespread, dark in color, or accompanied by structural issues, consider hiring a professional to assess and treat them.
Tools, Materials, and PPE Checklist
Group items by method type to plan your approach, from household methods to commercial products and mechanical options. Prepare for surface cleaning first, then consider sealant compatibility and masking needs. Have your test patch plan ready before applying anything on the full area.
Get items like lemon juice, vinegar, baking soda, rust removers, cleaners, brushes, scrapers, sponges, buckets, spray bottles, gloves, goggles, and appropriate clothing. Include testing tools such as pH strips and painter’s tape, plus drop cloths and plastic sheeting. Always check labels for active ingredients, dilution, surface compatibility, and safety steps on SDS.
Household cleaners and DIY items
Before you reach for commercial products, try these common household items to tackle mild rust stains on your concrete.
- Lemon juice: Naturally acidic, it’s great for light surface stains. Check the stain severity first.
- Salt and vinegar: Together, they create a mild acid that can help lift rust. Not suitable for heavy-duty jobs.
- Baking soda: A mild alkali, it’s useful for removing light stains and preparing the surface for other treatments.
- White wine or apple cider vinegar: These can be used alone or with baking soda to create a paste for tougher stains. Be patient; results may take time.
Quick rule: If the stain doesn’t budge after 30 minutes, it’s time to consider commercial products or alternative methods.
Commercial products and material specs
For tougher rust stains, you’ll need commercial-grade rust removers. Here’s what to look for on the label:
- Acidic rust removers (e.g., muriatic acid): These are strong and fast-acting but can damage surfaces if not used correctly. Always dilute and test first.
- Chelating rust removers (e.g., oxalic acid, citric acid): These form a bond with the iron in rust, lifting it off. They’re safer for surfaces but may take longer to work.
- Rust converters: These change rust into a stable compound, preventing further damage. Not suitable for heavy stains; use as a final step after removing rust.
Quick rule: Always check the label for recommended dilution rates, surface compatibility, and required ventilation.
Protective gear and safe-equipment list
Safety comes first when dealing with rust stains. Here’s what you’ll need to protect yourself and your surroundings:
- Gloves: Chemical-resistant gloves are a must when handling strong acids or alkalis.
- Eye protection: Safety goggles or glasses with side shields will protect your eyes from splashes and fumes.
- Respirator or mask: Use when working with strong chemicals to avoid inhaling harmful fumes. Always follow manufacturer’s instructions for fit and use.
- Long sleeves/pants and footwear: Protect your skin from chemical contact and splashes.
Quick rule: Never skip protective gear, even when using mild household products. Always have a first aid kit nearby.
Pre-Cleaning, Site Planning, and Test Spot Protocol
Start with loose debris removal, thorough sweeping or vacuuming, and arranging the area so you can observe the stain clearly. Dry or slightly dampen the surface as needed to reveal stain extent and penetration depth. Protect nearby plants and drainage areas as you prepare.
Assess the site for potential obstacles like irrigation lines, electrical outlets, or sprinkler heads. Lay down barriers and consider plastic sheeting to shield landscaping. Document the stain with a photo and plan a discreet test spot following a stepwise protocol.
Surface prep steps
Start by removing any loose material from the surface using a stiff-bristle broom, wire brush, or even your hands. If grease is present, use a degreaser to clean the area.
Important: Determine if the concrete is sealed or unsealed. This affects how well the stain remover will penetrate and work.
If you’re unsure, perform a simple water test: Sprinkle some water on the surface. If it beads up, the concrete is sealed. If it soaks in, it’s unsealed.
How to perform and evaluate a test spot
Choose an inconspicuous area for your test spot. Apply the stain remover according to the manufacturer’s instructions or your chosen DIY method.
Let it sit for the recommended dwell time, then rinse off with clean water. Inspect the results carefully.
Evaluate: Look for signs of fading, discoloration, or other changes in the stain. Compare to the original color and absorption rate noted before application. If satisfied with the outcome, proceed with the full treatment.
Method 1 — Lemon Juice and Salt: Best Uses and Step-by-Step
Use lemon juice and salt for light, recent rust on unsealed or minimally sealed concrete. It is an eco-friendly option with limited depth control, so it’s not suited for heavy staining. If you choose this method, monitor for any surface changes during treatment.
Safety comes first: wear gloves and eye protection, ventilate, and test a hidden spot first. Assess the concrete’s porosity to judge absorption and the potential for etching on delicate finishes. Follow a simple sequence with application, paste formation, and light scrubbing, then rinse thoroughly.
When to use lemon and salt
The lemon juice and salt method is best for light, recent rust stains on unsealed or minimally sealed concrete. It’s eco-friendly but not a heavy-duty solution.
Don’t use it on: deep-set stains, delicate finishes like polished sealers, or stains older than a few weeks. For these, consider other methods mentioned in this guide.
Test the method first on a hidden spot to ensure it doesn’t dull or damage your concrete’s finish.
Step-by-step application
This sequence helps you remove light rust stains safely and effectively.
- Apply lemon juice directly to the stain. It acts as a natural bleaching agent.
- Dust salt over the wet stain, forming a paste. The salt enhances the lemon’s effect.
- Let it sit for 5-15 minutes. Longer isn’t always better; avoid letting acid dry on the surface.
- Scrub gently with a soft-bristle brush. Be firm but not aggressive to avoid damaging the concrete.
- Rinse thoroughly with clean water. Repeat once if needed, but don’t let acid sit too long.
Troubleshooting and time/cost expectations
If results are slow, repeat applications or increase dwell time up to 30 minutes. Patience is key with this method.
Labor: Minimal. It’s mostly waiting time.
Cost: Low. You likely have these ingredients on hand.
Expect to spend around 15-45 minutes per stain, plus drying time. If stains persist or worsen, consider consulting a professional.

Method 2 — Vinegar and Baking Soda: How It Works and Application
Vinegar’s acidity and baking soda’s foaming action can lift certain rust stains by interacting with iron oxide and providing gentle agitation. This method works best on fresh, light rust and on unsealed or porous surfaces. Avoid heavy rust or sealed finishes where it may struggle.
Plan a careful application with a test patch, prepare the area, then apply vinegar, sprinkle baking soda, allow foaming, scrub lightly, and rinse. Compare its performance to lemon, noting differences in acidity and ease of use. If results are insufficient, try an alternative approach or consult a pro.
When to choose vinegar and baking soda
The vinegar and baking soda method works best on fresh, light rust stains. It’s ideal for unsealed or porous concrete surfaces.
It won’t work well on heavy rust stains that have set in deeply, or on sealed or polished surfaces where the stain is locked in.
If your stain is dark red or brown, and has been there a while, consider alternative methods. For severe cases, consult a professional.
Step-by-step application
This method involves applying vinegar, sprinkling baking soda, letting it foam, scrubbing lightly, and rinsing. Here’s how:
- Test a small area first to ensure no adverse reactions.
- Clear the area around the stain. Protect adjacent materials with tape or plastic.
- Apply white vinegar directly onto the rust stain using a spray bottle or brush.
- Sprinkle baking soda over the wet stain. Let it foam for 10-15 minutes. The foaming action helps lift the rust.
- Lightly scrub the stain with a stiff-bristled brush in circular motions. Be careful not to damage the concrete.
- Rinse thoroughly with clean water. If the stain persists, repeat the process up to three times.
Troubleshooting and environmental notes
If stains persist after several attempts, consider using a commercial rust remover or consulting a professional.
Do not pour rinse water down drains as it may harm your plumbing. Dispose of it in a sealed container and take it to a hazardous waste facility.
Keep vinegar and baking soda away from plants, as they can damage foliage. Also, avoid using this method on metal fixtures, as the acidity can cause corrosion.
Method 3 — Commercial Rust Removers: Selection, Application, and Cost Tradeoffs
Commercial rust removers fall into categories like acid-based chelating blends and specialty rust converters, chosen based on stain severity and concrete porosity. Read labels to verify active ingredients, concentration, surface compatibility, and dwell time. Use neutralizers or rinsing steps as directed for safe results.
Apply with a patch test, mask surrounding areas, follow the recommended mixing (if required), and adhere to application and rinsing steps. Evaluate effectiveness, speed, and potential surface etching, keeping ventilation and odor in mind. Consider cost per area and additional supplies when planning the job.
How to choose a product (ingredient and label checks)
When selecting a commercial rust remover, look for active ingredients that target iron stains. Common ones are:
Chelating agents, like EDTA or NTA, which bind to iron ions and lift them off the surface. These are great for light to moderate stains on porous concrete.
Oxalic acid and phosphoric acid, which react with rust to form a water-soluble complex. They’re stronger and work well on heavy stains but can etch sealed surfaces if not used carefully.
Read labels for warnings about surface compatibility, pH (acids are typically low), required dwell time, and any needed neutralizers or rinsing steps. Always follow safety guidelines.
Correct application and neutralization
Start by performing a test spot to ensure the product works on your stain and doesn’t damage your concrete. Follow these general steps:
1. Mask surrounding areas using tape and plastic sheeting to protect them from the remover.
2. Mix the product according to label instructions, if required. Apply it evenly across the stain using a stiff-bristled brush or sprayer.
3. Allow dwell time. Leave the product on for the time specified on the label to give it enough time to react with the rust.
4. Rinse and neutralize if required. Some products need rinsing after use, while others may require neutralizing with a specific solution (like sodium bicarbonate) to prevent residual damage.
Cost comparison and pros/cons
Commercial rust removers typically range from $10 to $50 per gallon, with specialty products at the higher end. Consider these factors:
Effectiveness: More expensive products often work faster or on tougher stains.
Labor and time: While DIY methods are cheaper, they can take more time and effort. For large areas or stubborn stains, paying for a stronger product might save you time in the long run.
Environmental impact: Some commercial products have better disposal considerations or lower VOCs than homemade solutions, but this varies by brand.
Ultimately, the best choice depends on your specific situation. For light stains and tight budgets, DIY methods might be perfect. But for heavy stains or large areas, investing in a stronger commercial product could save you time and effort.
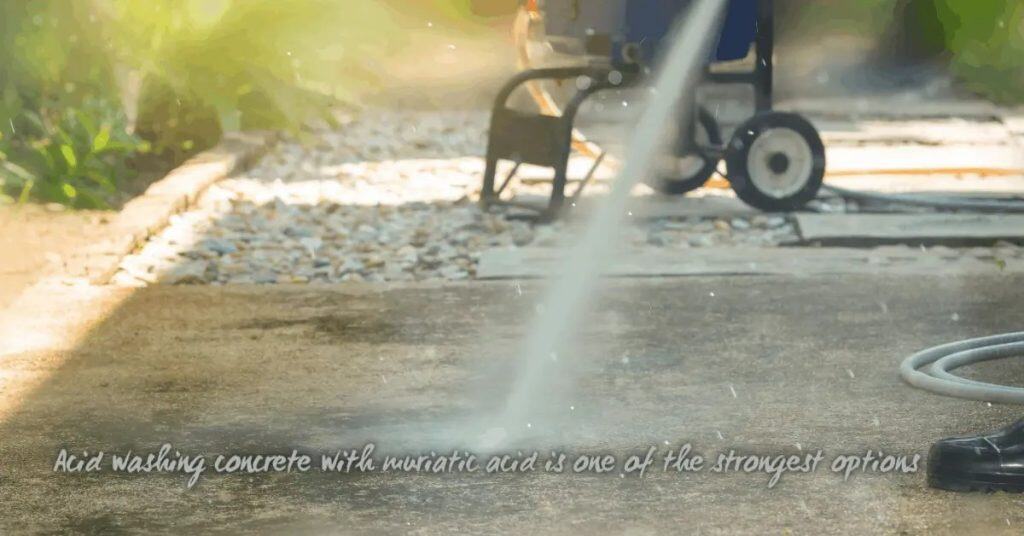
Method 4 — Pressure Washing and Mechanical Removal Options
Mechanical methods are best for large areas, heavy staining, or when chemicals are not suitable, but they carry a risk of surface damage. Concrete type, age, and whether the surface is sealed affect how hard you can work. Start with gentler options and test before escalating.
Use proper PPE and protect surrounding materials, collect rinse water, and follow up with proper rinsing. Understand that sealants or color can be affected, so monitor appearance and avoid aggressive settings without a test spot. Document results as you go and adjust your plan accordingly.
Pressure Washer Guidance and Nozzle Considerations
Before you start, consult your pressure washer’s manual. It’s your best friend for understanding its capabilities.
Start with a wide spray tip (like 40°) at the lowest pressure setting. This helps prevent etching or pitting. Test on a small hidden area first to ensure you’re not causing damage.
Gradually increase pressure if needed, but remember: too much force can harm your concrete surface. Keep it under 1200 PSI for unsealed surfaces and 800-1000 PSI for sealed ones.
Alternative Mechanical Options (Scrubbing, Grinders)
For heavily soiled surfaces or deep-set stains, consider manual scrubbing with stiff-bristled brooms or brushes. Use a circular motion to lift off rust.
Rotary brush attachments can help too. But be careful: they can cause damage if used improperly.
For serious stains, you might need to use grinders or diamond pads. Be cautious. Too much force or speed can gouge the surface. If in doubt, call a pro.
Risks, Surface Protection, and Repair Tips
Mechanical methods carry risks. Etching, gouging, or damaging sealers are all possibilities.
Pre-wet the surface to minimize dust and protect sealants. Use fans or drying aids afterwards to prevent water spots. Avoid direct sunlight or freezing temperatures during cleaning and drying.
After aggressive cleaning, reseal your concrete. This protects it from future rust stains and maintains its appearance. If you’ve caused damage, consider hiring a professional for repairs.
Preventing Rust Stains and Long-Term Maintenance
Prevention starts with choosing coatings and sealers that suit the concrete and weather exposure, balancing breathability with protection. Plan sealant compatibility with existing finishes and consider future maintenance needs. Regularly inspect and reapply as needed to minimize staining potential.
Protect metal fixtures and rebar by using rust-inhibitive primers and seal around exposed fasteners. Prompt cleanup after spills is important, with simple cleaners ready for use. Develop a seasonal maintenance plan and keep a concise checklist for quick reference on routine actions.
Best practices to prevent recurrence
Preventing rust stains is easier than treating them. Here are some best practices:
Install rust-proof hardware: Use stainless steel or galvanized metal fixtures that won’t rust.
Use barriers between metals and concrete: Install a barrier like a rubber gasket or washer to separate metals from the concrete, preventing direct contact.
Maintain good drainage: Ensure water doesn’t pool on your concrete. Slope surfaces away from buildings and keep gutters clean.
Seasonal and routine maintenance checklist
Regular maintenance helps catch rust stains early. Use this checklist:
- Spring: Inspect surfaces – Check for any signs of rust, cracks, or damage.
- Fall: Clean surfaces – Remove dirt, debris, and any salt residue with a mild detergent and water.
- Annually: Reseal – Apply a new layer of sealer to protect the concrete’s surface.
- Quarterly: Check vegetation – Ensure plants or trees aren’t causing moisture buildup near the concrete.
- Monthly (during wet seasons): Inspect drains – Make sure drains are clear and functioning properly.
- Annually: Inspect rebar – Check for any exposed or rusting rebar. If found, treat immediately.
- Every 2-3 years: Pressure wash – Clean the surface to remove any built-up dirt or stains.
Quick rule: Regular maintenance is key. Don’t skip checks or wait for problems to become severe.
Common mistakes to avoid
Here are some common mistakes and how to avoid them:
- Using incompatible acids: Don’t use muriatic acid on concrete with a sealer. It can damage the seal.
- Skipping test spots: Always test cleaners on a small, hidden area first to ensure they won’t damage the surface.
- Over-aggressive pressure washing: High-pressure washing can damage concrete. Keep the nozzle at least 6 inches away and use low pressure.
- Neglecting PPE: Always wear gloves, safety glasses, and other protective gear when handling chemicals or power tools.
By avoiding these mistakes, you’ll keep your concrete surfaces clean and stain-free for longer.
Conclusion
Rust stains on concrete respond best when you tackle the cause first, test a small area, and choose a proven method that fits your surface. Rushing can scar the finish or set stains in, and safety protects you from slips, fumes, and heavy equipment mishaps.
Run a quick, practical checklist in your head: confirm the stain origin and confirm it’s surface rust rather than something deeper, gather only the tools and PPE you actually need, pre-clean and dry the area, pick a method and test it in a small spot, then apply in the recommended order and rinse thoroughly before moving to the next area. If you’re using lemon juice, vinegar, or a commercial remover, follow the steps and timing exactly as you plan, and if pressure washing, set and test low power first. When in doubt, start small and work up, never work against the grain of the concrete or around edges that could crumble.
Common mistakes to avoid are not testing first, using too strong a remover on delicate finishes, and skipping proper PPE or masking nearby plants and surfaces. Always wear eye protection and gloves, keep a clear work zone, and stop if you see etching, discoloration, or material loss. If the stain persists after a couple of careful passes, or if the concrete shows cracks or spalling, stop and consider professional help—moving beyond your comfort zone on a stubborn stain can save you money and preserve durability in the long run.
When it makes sense to call a pro, do it for deep or widespread staining, suspect moisture behind the slab, or repeated failures after several cleanings. With careful testing, proper safety, and steady, planned steps, you can restore appearance and keep concrete looking solid for years to come. You’ve got this—stick to the plan, stay safe, and move methodically one area at a time.
FAQ
Is lemon juice and salt a safe and effective option for rust stains, and how should I test it first?
Yes, it can work on light stains, but it’ s not a universal fix. Do a small test spot on an inconspicuous area and follow up with a rinse to see if it lightens the stain without damaging the surface. If there’s no improvement, move on to other methods and check product labels for patience and compatibility.
When should I use vinegar and baking soda, and what are the practical steps and precautions?
Use vinegar and baking soda for mild rust spots and as a gentle cleaner. Apply vinegar, let it sit briefly, then scrub with a brush and rinse; if you see fizzing with baking soda, it’s likely helping lift stains. Avoid letting acids sit long and always rinse thoroughly to prevent surface etching.
What should I know about commercial rust removers, how to choose, and what safety steps to follow?
Read the label for material compatibility and application directions. Choose products designed for concrete rust and follow lining up with your surface type and any coatings. Wear eye protection and gloves, and test on a small area first before full use.
How can I prevent rust stains on concrete and maintain the surface long term, including safety tips?
Seal or reseal concrete after cleaning to reduce staining chances, and fix any rust sources nearby. Regularly rinse off minerals and debris, and use proper PPE when cleaning. If stains recur, re-evaluate water quality and nearby metal fixtures and follow manufacturer guidance for prevention.