

Introduction
Drywall details for a modern finish are the small, visible steps that define smooth walls and clean edges.
This article covers how to tape, mud, sand, and texture so seams disappear and corners stay crisp. Work with the drywall panels, joint compound, and sanding accessories as directed by the product labels and local rules.
Common flaws are treatable with timing, sealing, and proper repair technique. If you see cracking, pops, or dull texture, identify the cause, then follow safe repair steps and check the material instructions. Always verify compatibility with the existing finish and local building requirements before mixing or applying patch compounds.
Key takeaways
- Identify a modern drywall finish by smooth surfaces and crisp, uniform lines.
- Use proper joint compound application and feathering to avoid ridges along seams.
- Check framing for straight plumb and square before any mudding or taping.
- Sand lightly in stages with damp cloth to control dust and finish.
- Protect floors and occupants; seal dust; wear mask and eye protection.
Table of Contents
- Introduction
- Key takeaways
- What Defines a “Modern” Drywall Finish
- Tools and Materials Checklist
- Surface Preparation and Framing Details That Matter
- Joint Treatment Techniques for Seamless Seams
- Corners, Reveals, and Trim Details for Crisp Lines
- Surface Finishing Techniques: Skim Coats, Sanding, and Dust Control
- Paint, Primer, and Lighting Strategies to Hide or Show Flaws
- Identify and Fix Common Drywall Flaws — Diagnosis + Step-by-Step Repair
- Conclusion
- FAQ
What Defines a “Modern” Drywall Finish
A modern finish aims for smooth, consistent planes and crisp edges. It minimizes visible joints and keeps transitions clean as the eye moves across walls and ceilings. Lighting plays a big role in revealing texture and alignment, so plan for how the space will be lit during inspection.
Set quality targets before you start by checking that the surface reads as even from different angles and under typical room lighting. Use this as the benchmark for all prep and taping work, and document any areas that require extra attention.
Key visual characteristics to aim for
A modern drywall finish is all about clean, flat surfaces. Here’s what you’re aiming for:
Flatness: Walls and ceilings should be as smooth as possible. No waviness or dips.
Seamless joints: Joints between sheets should be barely visible, with no gaps or overlaps.
Tight corners: Corners should be sharp and crisp, with no ridges or unevenness.
Minimal texture: The surface should have almost no texture. No swirls, no orange peel effect.
How lighting and room design influence finish decisions
Lighting can make or break your drywall finish. Here’s how to use it to your advantage:
Natural light emphasizes flaws, so in south-facing rooms, consider light-colored paint to reflect light and minimize shadows.
Artificial lighting can create harsh shadows. Use indirect lighting or recessed lights to soften the effect.
Room design also plays a role. In large, open spaces, consider high-gloss paint to reflect light and make the room feel bigger. But in smaller rooms, it might be too much.
Tools and Materials Checklist
List essential tools, protective gear, and material categories you’ll need for modern drywall finishing. Include items for prep, taping, bedding, and finish coats, plus optional pro-level gear for the best skim and sand results. Always confirm compatibility by checking manufacturer guidance or product data sheets.
Keep safety gear handy and organize consumables so you can work efficiently without interruptions. If a tool or compound has a specific use, verify the label or instructions before proceeding.
Essential hand and power tools
Before you start mixing concrete, make sure you have all the necessary tools. This checklist will help you ensure nothing is missed.
- Trowels ( various sizes ): Check for straight edges and no bends. Trowels are used to spread, level, and smooth concrete.
- Concrete Knife ( 4-6 ft long ): Ensure it’s sharp and undamaged. It’s used to strike off excess concrete and create a smooth surface.
- Screed ( length matching slab size ): Verify it’s straight and sturdy. It helps level and consolidate the concrete.
- Float ( 4-6 ft long, with a wooden or magnesium float head ): Check for secure attachment of the float head. It’s used to bring cement to the surface and create a smooth finish.
- Edging Tool ( straight edge, 2×4 or metal ): Ensure it’s straight and undamaged. It helps shape and define the edges of your slab.
- Concrete Mixer ( capacity matching job size ): Confirm it’s in good working order. It mixes concrete ingredients together evenly.
- Dust Management Options ( vacuum, water spray, etc. ): Ensure they’re clean and functional. They help control dust during cutting and finishing.
- Tape Measure & Level: Check for accuracy. They’re used to ensure your slab is the correct size and level.
Quick rule: Always check your tools before starting work. Damaged or incorrect tools can lead to poor quality concrete and expensive rework.
Compounds, tapes, fasteners, and bead types
Use this checklist before starting any drywall joint work. It’ll help you gather the right materials and avoid common mistakes.
- Joint Compound: Check label for setting time (15-45 minutes). Longer set times allow more working time, but faster is better for quick repairs.
- All-Purpose Joint Tape: Ensure it’s 2″ wide. Measure to confirm before buying. Wrong width causes gaps or overlaps.
- Paper Tape vs Mesh Tape: Paper tape is easier to apply, mesh tape provides better strength but requires more compound. Choose based on joint size and strength needed.
- Fasteners (Screws/Nails): Check length (1-2″ usually). Too short won’t hold drywall, too long risks puncturing insulation/cabinets.
- Corner Bead: Choose 90° or 45° based on corner type. Measure angle to confirm. Wrong bead causes crooked corners.
- Bead Type (Straight/Coarse/Liteco): Straight for walls, coarse for high-traffic areas, liteco for fine finishing. Check room use and choose accordingly.
- Primer-Sealer: Ensure it’s designed for drywall. Apply before taping to improve adhesion and prevent mold/mildew.
- Sandpaper (120-grit): Check grit size. 120 is standard, but coarser may be needed for rough spots, finer for final sanding.
Quick rule: Always measure and check labels before buying materials to avoid costly mistakes.
Material specs and standards explained
Before you start mixing concrete or laying blocks, use this checklist to ensure your materials meet the required standards. This will help prevent costly mistakes and rework.
- Concrete Mix Type: Check the mix type (e.g., C12/15, C20/25) on the cement bag or supplier’s invoice. It should match your project’s requirements. Wrong mix types can lead to weak structures.
- Water-Cement Ratio: Verify the water-cement ratio (typically 0.4-0.6). Too much water makes concrete weak, too little makes it hard to work with and prone to cracking.
- Concrete Slump: Check the slump (workability) of your fresh concrete. It should be within the required range (usually 50-150mm). Too much or too little slump can cause placement issues and affect strength.
- Aggregates Size: Ensure aggregates (gravel, sand) meet local standards for size and grading. Incorrect sizes can lead to weak concrete and poor compaction.
- Admixtures: Check the type and dosage of admixtures (if any). They should be compatible with your cement type and project requirements. Wrong admixtures can cause strength loss or durability issues.
- Block Type: Verify block types match your project’s needs (e.g., solid, hollow, frogged). Using the wrong blocks can affect structural integrity and insulation properties.
- Mortar Mix Ratio: Check the cement-sand ratio of your mortar mix. It should be within the recommended range (usually 1:3 or 1:4). Wrong ratios can lead to weak joints and poor bond strength.
- Fire/Moisture Resistance: Ensure your materials meet the required fire/moisture resistance ratings for your project. Skipping this check could result in non-compliance with local building codes or premature failure of materials.
Quick rule: Always double-check material labels and invoices to ensure they match your project’s requirements. A few minutes spent checking can save hours of rework later.
Surface Preparation and Framing Details That Matter
Start with a thorough inspection of substrate flatness, stud alignment, and fastener spacing. Moisture checks are essential in areas prone to humidity or leaks. Address any bowing, loose fasteners, or uneven framing before you apply compounds.
Fixes that catch problems early save time during finishing and reduce call-backs. Record any deviations and plan corrections that keep subsequent coats clean and consistent.
Inspecting and correcting framing and substrate issues
Before you start pouring concrete, it’s crucial to inspect your framing and substrate. Here’s what to look for:
Uneven studs: Check each stud’s level with a long straight edge or laser level. If they’re off, shim the bottom plate to bring them into line.
Protrusions: Look for nails, screws, or other debris sticking out from the framing. Remove any you find to prevent them from causing voids in your concrete.
Gaps: Ensure there are no large gaps between studs that could cause weak spots in your slab. If you find any, install blocking to bridge the gap and provide support for the concrete.
Preparing drywall surfaces and joints before taping
Before you start taping your drywall, make sure your surfaces are clean and ready. Here’s what to do:
First, give your walls a good once-over with a broom or vacuum to remove any dust or debris. This might seem obvious, but it’s crucial for a smooth finish.
Next, check for and fix any nail or screw pops. These can cause bumps under your tape if not addressed. Use drywall screws or nails to secure loose paper and fill any holes with joint compound.
Now, it’s time to bevel the edges of your drywall sheets. This helps create a smooth transition between sheets and makes taping easier. Use a drywall knife to score the edge at a 45-degree angle, then snap off the excess paper.
Joint Treatment Techniques for Seamless Seams
Follow a clear workflow for taping, bedding, and finish coats, focusing on bedding to minimize ridges and ensure a smooth interface. Use technique variations that help the seams blend into the surrounding planes. Do not rely on one method for all situations; adapt to the joint and substrate.
Keep the joint widths and transitions readable by adjusting technique rather than guessing. When in doubt, consult the product instructions or manufacturer guidelines for recommended practices.
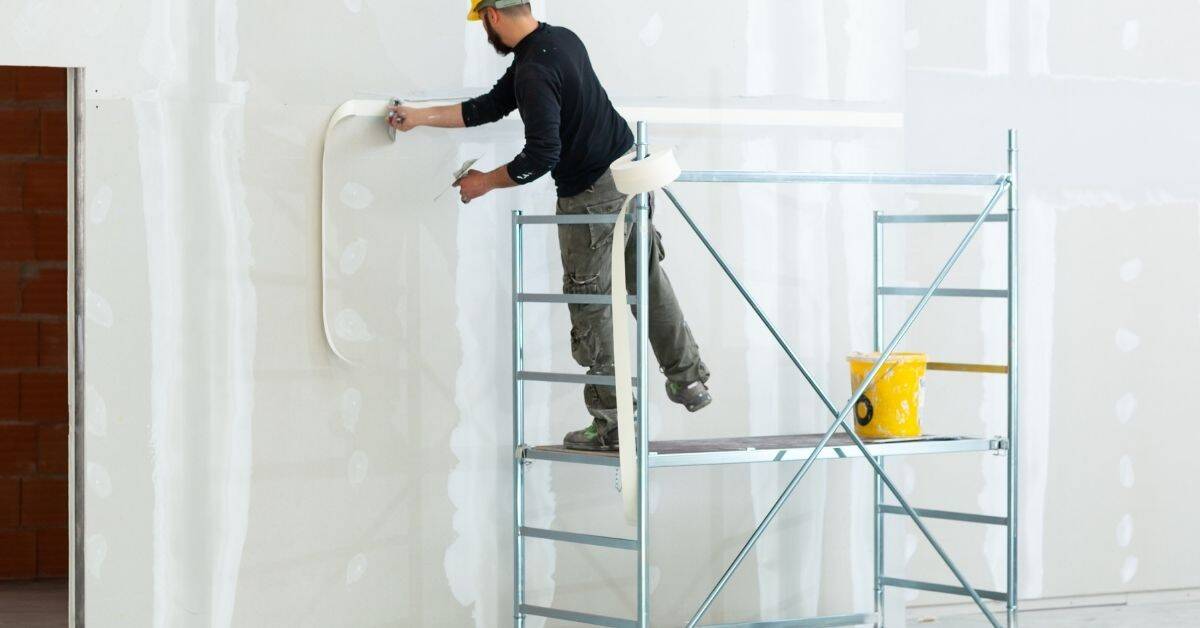
Choosing and applying tape correctly
First off, you’ve got two types of tape: paper and mesh. Paper’s good for thin coats, like skimping on the mud. Mesh is tougher, holds better for thicker applications.
Check your joint width. If it’s under 1/2″, use paper. Over that, go with mesh. It’s not rocket science.
Now, applying tape right is key. Here’s how:
Wet out the tape first. This means dampen it, don’t drown it. Too wet and you’ll get bubbles. Too dry and it won’t stick. Check product label for exact instructions.
Apply tape straight, no gaps or overlaps. Use a taping knife to press down firmly. Go from one end to the other in one smooth motion. No stopping halfway.
To avoid bubbles and ridges, keep your pressure even. Don’t press too hard on one spot, that’ll create a ridge. And don’t be a wimp, you need firm pressure to get rid of those bubbles.
Bedding and first-coat best practices
Now that you’ve chosen and applied your tape correctly, it’s time to embed it with the right amount of compound. Don’t skimp on this step – underfilled joints lead to cracks.
Check your compound mix. It should be creamy, not too thick or thin. Too thick, and you’ll have hollow spots; too thin, and it won’t stick to the tape.
Use a jointing trowel to apply the compound over the tape, pressing down firmly. You want the tape fully embedded, but no excess compound. Remember, less is more here. Too much compound can cause ridges and hollows when you smooth it out.
Smooth the compound with a straight edge or darby trowel, holding it at an angle to the joint. Work from one end of the joint to the other in one smooth motion. Be firm but not aggressive – you don’t want to dislodge the tape or create hollows.
Finish coats and feathering for invisible seams
Now that you’ve applied your tape and first coat (check here if you need a refresher), it’s time to finish off those joints with a smooth, seamless edge. Here’s how:
First, pick the right knife for feathering. A 6″ or 8″ taping knife works well. It should have a flexible blade (check before you buy). This lets you control the pressure and create that all-important graduated edge.
For your finish coat, use a joint compound with light sand texture. It’s easier to feather and sands smooth later. Apply it thin, using even strokes along the tape. Here’s where the magic happens:
Feathering is like painting a picture with mud. Start at one end of your joint, hold your knife at an angle (around 45°), and pull it towards you. As you do, gradually reduce pressure until you’re barely touching the wall at the other end. This creates that seamless edge.
Corners, Reveals, and Trim Details for Crisp Lines
Address inside and outside corners with methodical alignment to keep corners true and square. Bead selection and installation should support clean alignment with reveals and trim without creating jagged edges. Plan how reveals and shadow lines will read in the finished space.
Finishing tactics matter as much as the initial install; small refinements at corners transfer to a crisp, modern look. Verify that trim and reveal details meet the design intent by reviewing samples under typical room lighting.
Outside corners and bead installation
Selecting the right corner bead is crucial. For modern finishes, metal or vinyl beads work best.
Metal: Measure, mark, and cut to length. Use a utility knife to score, then snap. Fasten with drywall screws every 6 inches.
Vinyl: Similar process, but use a staple gun instead of screws. Bed the bead with joint compound, pushing it into the corners with a taping knife.
Feather the final coat to avoid ridges. Sand lightly for a smooth finish.
Inside corners and achieving a tight joint
For inside corners, you can either fold tape or use corner tape.
Folding: Fold the tape in half lengthwise. Apply it to the corner, crease side out. Bed with compound, feathering as you go.
Corner Tape: Apply like regular tape. Bed with compound, using a corner tool for crisp lines.
Avoid over-applying compound to prevent light-catching build-up. Sand lightly after final coat.
Creating clean reveals and trim transitions
For flush reveals: Install drywall flush with the face of the trim. Tape and bed as usual.
For recessed reveals: Set drywall back from trim face. Use a reveal strip to maintain consistency. Tape, bed, and feather compound.
To integrate trim: Measure and cut to fit. Apply with construction adhesive and brad nails. Fill nail holes with wood filler before painting.
Maintain consistent shadow lines by aligning trim pieces and using reveal strips where necessary.
Surface Finishing Techniques: Skim Coats, Sanding, and Dust Control
Compare skim coating approaches and choose one that preserves surface integrity while delivering a uniform field. Consider whether abrasive or wet sanding best suits the substrate and environment. Implement practical dust-control steps to keep the worksite clean and reduce rework.
Technique choices should align with the target finish; test a small area if you’re unsure. Plan for containment and cleanup so debris doesn’t cause new imperfections on nearby surfaces.
Skim coating for a truly flat plane
A skim coat is your final chance to achieve a perfectly smooth, flat surface before painting. It’s appropriate when you need to correct minor imperfections or level out high spots.
Apply the mud in thin, even passes using a wide trowel. Work in small sections at a time, feathering the edges to avoid lap marks. Keep your trowel clean and dry to prevent tool drag.
Tip: Use a light touch and let the mud do the work. Too much pressure can cause ridges or unevenness.
Sanding methods and avoiding over-sanding
Over-sanding can create depressions in your drywall, ruining the smooth finish you’re aiming for. Here are some mistakes to avoid:
- Starting with too high a grit: Begin with 120-grit sandpaper to remove major imperfections. Using higher grits first can leave ridges.
- Applying too much pressure: Sand lightly, using just enough pressure to remove the desired material.
- Not checking your progress: Regularly wipe off dust and inspect your work to ensure you’re not sanding too aggressively.
- Sanding in circles: This can create swirl marks. Sand in straight lines, following the direction of the joint tape.
Remember, less is more when it comes to sanding. It’s easier to remove a little bit at a time than to try and fix deep depressions later on.
Dust management and containment best practices
Drywall sanding produces a lot of dust, which can settle into every nook and cranny if not contained properly. Here are some practical tips:
Containment: Use plastic sheeting to seal off the work area from the rest of the house. Tape it tightly at the edges to prevent dust leakage.
Vacuum and filter system: Invest in a quality vacuum with a HEPA filter designed for drywall sanding. This will help capture most of the dust at the source, reducing cleanup time and preventing rework.
Workflow sequencing: Sand one room or area at a time, starting from the furthest point and working your way back to the exit. This helps contain dust within that space until you’re ready to clean it up.
Paint, Primer, and Lighting Strategies to Hide or Show Flaws
Primer selection and compatible paints affect how surface defects appear or vanish. Choose sheens that balance reflectivity with the ability to mask minor imperfections. Use lighting strategically to reveal flaws during inspection and adjust as needed.
Modern finish guidance should consider how lighting, color, and substrate work together. When selecting products, verify coverage, compatibility, and any surface preparation requirements on the label or data sheet.
Choosing primer and paint for a modern look
A good primer and the right paint sheen can make your drywall look flawless. Let’s break it down.
Primer: It seals the wall, blocks stains, and gives you a consistent base to paint on. Choose one that matches your final paint color for best results.
Paint sheen: Higher sheens reflect more light, showing every imperfection. For a modern look, consider semi-gloss or satin. But test first! A small patch can save you from a shiny mistake.
Inspecting under different lighting conditions
Lighting is your best friend when it comes to spotting flaws. Here’s how to use it right.
Use natural light during the day to see shadows and undulations. Move around, look at walls from different angles.
At night, use artificial lights. Point them directly at the wall for a harsh inspection, then angle them to mimic how light will hit once you’ve moved in your furniture.
Don’t forget to check ceilings and corners. Lighting can reveal issues you’d miss otherwise. Catch ’em while you can!
Identify and Fix Common Drywall Flaws — Diagnosis + Step-by-Step Repair
Provide a concise troubleshooting path for nail pops, tape ridges, cracks, bulges, and sanding marks, with clear clues to diagnose each. Present a logical repair sequence that prioritizes fixes to prevent recurrence. Emphasize approaches that minimize disruption to adjacent surfaces.
When a flaw is identified, follow the repair steps in order and verify each result under appropriate lighting. If a specification or method is unclear, check the product instructions or local guidelines before proceeding with the repair.
Step-by-Step Repair Process
This step-by-step guide walks you through identifying and fixing common drywall flaws, from preparation to final checks.
- Inspect the area in good light. Wear safety glasses and gloves.
- Gather tools: utility knife, sandpaper (120-grit), joint compound, tape, trowels, putty knife, damp cloth, and any necessary fasteners.
- For cracks or holes, cut V-shaped notches with a utility knife. For bulges, score the surface to control the repair area.
- Apply joint compound using a 6-inch trowel for large areas or a 3-inch trowel for smaller repairs. Let it dry according to the manufacturer’s instructions.
- Sand lightly with 120-grit sandpaper, then wipe clean with a damp cloth. Inspect your work and repeat if necessary. If you’re unsure, consult a professional.
Nail pops, fastener failures, and screw/nailed dimples
Identify if the issue is due to movement or shrinkage. If it’s a nail pop, use a hammer to recess the nail head below the surface.
For screw or nail dimples: Use a drill or screwdriver to recess the fastener, then fill with joint compound and re-tap or re-attach as needed.
If it’s due to shrinkage, you may need to replace the entire section. Always ensure fasteners are secure before proceeding.
Tape lines, ridges, and joint cracking
Causes include insufficient mud or shrinkage. Start by abrading the area with sandpaper to improve adhesion.
Apply a thin layer of joint compound using a 6-inch trowel, feathering out the edges. Let it dry, then lightly sand and re-inspect.
For cracking: Apply a skim coat, feathering well into the surrounding area to prevent future cracking. Sand lightly after drying.
Bulges, blisters, and uneven panels
Distinguish between moisture, loose edges, or framing issues. For trapped moisture, cut a small access hole and allow the area to dry.
For loose edges: Remove any old compound, reattach the panel using screws if necessary, then apply new joint compound.
If it’s due to framing issues, you may need to adjust or replace the framing. For uneven panels, targeted skim coats can help level the surface.
Conclusion
Sticking to clean, well-prepared work now pays off in safety, durability, and a clean, modern look that lasts. The right steps protect the structure and keep future repairs simple rather than costly.
First, verify the basics in plain language: surfaces are clean and dry, framing is straight and plumb, joints are treated with the proper tape and compound, and you have a clear plan for skim coats, sanding, and final paint. Check that dust control is in place, all tools and materials are ready, and you know the order of operations from joint treatment to finish coats. Don’t skip cure times, don’t rush sanding, and do a small test area first to confirm product compatibility and finish behavior before committing to the whole wall.
Common mistakes to avoid include over-sanding or under-sanding, skipping proper joint treatment on seams and corners, and painting with dust or tape still present. Follow the safety rule: work clean, keep dust contained, and protect yourself with a mask and eye protection. Test patches first, mark high-traffic areas for extra attention, and never mix products that aren’t compatible for the same job.
If you encounter visible structural cracks, large gaps, water damage, or complex reveals and trim that require precise alignment, call a pro rather than pushing on alone. You can handle the routine joint work and finishing, and when in doubt, stop, assess, and plan a professional assist. Stay practical, stay cautious, and you’ll finish strong with a professional-grade look.
FAQ
What should I do if a tape seam starts to show through the paint after finish coat?
First, don’t panic. Lightly sand the area, wipe off dust, and assess if another thin skim coat is needed over the seam. Re-tape if the joint still telegraphs, then re-sand and re-paint with a compatible primer and finish coat.
How do I fix nail pops or screw heads that’re sticking up after mud has set?
Find the raised fasteners, drive them a bit deeper if needed, and apply a thin layer of setting-type compound over the head. Re-drive a fastener if necessary, re-tape the area, and feather the mud out before finishing.
What’s the right approach when I see ridges or trowel marks catching the light?
Don’t chase big defects. Lightly re-sand the area with a fine grit and apply a very thin skim coat to smooth the surface. Feather the edges well and re-check under the lighting before priming.
How can I avoid sharp-looking edges showing up in corners or along trims?
Make sure the corner bead is tight and straight, then mud in small, even passes. Feather the edges smoothly and verify the line under different light to ensure a crisp, continuous reveal. If necessary, touch up with a fine skim and recheck.