
Introduction
Picture framing on drywall is when the edge of a wall surface shows a frame-like line where joints or tape peek through. That happens after you paint or texture and the details of the tape or joint compound show along the edge. Fixing it means rebuilding a clean, smooth edge before you repaint.
First, inspect the edge and remove loose paint or texture so the surface is flat. Apply a thin layer of joint compound, work it out toward the surrounding wall, and let it dry before sanding to a smooth finish. Then repaint and check for a consistent, edge-free look; if in doubt, follow the product instructions or local requirements and adjust accordingly.
Key takeaways
- Identify whether edges show through due to skim coat gaps or paper damage.
- Gather tools and materials before starting; keep containers closed and ventilation.
- Apply light skim coats, feathering beyond damaged area to blend with surrounding.
- Sand smoothly without tearing drywall paper; use light pressure and fine grit.
- Prime and paint to hide edges; match sheen and avoid bare spots.
- Safety: wear eye protection, mask dust, and unplug power tools during sanding.
Table of Contents
- Introduction
- Key takeaways
- What “Picture Framing” on Drywall Actually Is
- Diagnosing the Cause Before You Repair
- Tools and Materials Checklist
- Resetting the Surface: Skim Coat and Feathering Process
- Sanding, Smoothing, and Protecting the Drywall Paper
- Priming and Painting to Permanently Hide Edges
- Common Mistakes and Targeted Troubleshooting
- Preventing Picture Framing in Future Projects
- Conclusion
- FAQ
What “Picture Framing” on Drywall Actually Is
Picture framing on drywall is a visible outline where tape or joint edges show through the finish after painting or texturing. It isn’t just a seam or a texture detail; it reads as a border around the taped area. You can see it as a faint or sharp edge that seems to sit on top of the field texture or paint.
This effect differs from ordinary seams, where joints stay hidden with proper finish work, from texture show-through that blends with the wall, or from actual cracks in the substrate. The problem centers on how the edge is finished and how the surface accepts finish materials. Look for a defined line that follows the taped edge rather than a random crack or pattern in the texture.
Typical visual characteristics
Picture framing on drywall is easy to spot once you know what to look for. It’s usually visible as:
– Linear or rectangular shadowing along the edges of your walls and ceilings.
– Sometimes, it appears as edge ridges that catch the light.
You might also notice it under raking light, where you see a distinct contrast between the seam and the surrounding wall.
Cosmetic vs. underlying problems
Before you start fixing, understand that picture framing can be just a surface issue or something deeper:
– Cosmetic issues are usually due to improper sanding, not enough coats of paint, or low-quality tape.
– But if the problem is deeper, it might be caused by:
– Poor taping or gaps in the joint compound.
– Moisture problems, like high humidity or leaks.
– Movement in the framing, which can cause cracks and separations at the seams.
Diagnosing the Cause Before You Repair
Start with a simple visual check and a few basic tests to pinpoint the cause. Look for an edge that remains visible after priming or a finish that separates at the joint. Notice whether the problem shifts when you wipe or lightly sand a small area.
Tests can reveal if the issue is from taping technique, overly thin or feathered compound, mismatched paint and primer, or substrate problems. Use these observations to guide your repair plan and what to verify in product labeling or instructions. If in doubt, check the manufacturer instructions and local rules for recommended practices.
Visual and tactile checkpoints
Before you start repairs, use this checklist to identify problem areas. It’s best done in the evening with natural light behind you.
- Ridges: Feel for bumps or raised edges using your fingertips. These could be from improperly sanded compound.
- Hollows: Look for sunken areas, usually caused by not applying enough compound or sanding too much.
- Feathered edges: Check if the compound blends smoothly into the drywall. Inadequate feathering can cause show-through.
- Tape lines: Inspect for visible tape seams. This might indicate poor taping technique or insufficient embedding of tape.
- Nail/screw holes: Feel for any raised fasteners. These should be set flush with the wall.
- Cracking: Look for hairline cracks, which could worsen over time if not addressed.
- Moisture stains: Check for discoloration or dampness, especially around windows and doors. This might indicate water damage.
- Uneven surface: Use a straightedge to find any dips or bumps. Inconsistent compound application can cause this.
Quick rule: If you’re unsure about something, mark it with a pencil and come back later for a second look.
Useful diagnostic tools
These basic tools will help you understand the cause of your ‘picture framing’ issue.
- Flashlight: A simple flashlight helps reveal imperfections by casting shadows. Use it at different angles to get a better view.
- Straightedge: A long level or straight piece of wood helps you find uneven surfaces and out-of-plumb walls.
- Putty knife: A flexible, wide-bladed putty knife is useful for feeling along tape seams and checking compound application.
- Moisture meter (optional): If you suspect water damage, consider renting a moisture meter. It’s around $20-$30 per day to rent.
- Tape measure: Measure your walls to ensure they’re plumb and level. Any significant deviation could cause compound application issues.
Tools and Materials Checklist
Keep a compact set of essential knives, blades, and trowels, plus lightweight sanding tools and protective gear. Include a suitable joint compound or skim coat that matches your project, and a primer appropriate for drywall repairs. Have a damp cloth handy to wipe dust and a drop cloth to protect nearby surfaces.
Check product labels for drying times, recoat windows, and compatibility with the backing paper. Identify safe options for homeowners, and note any alternatives if you cannot access a specific item. When in doubt, consult the manufacturer instructions or a local supplier for guidance on substitutes.
Joint compounds and primers explained
Before you start, know your compounds and primers. They’re the backbone of your repair.
- Pre-mixed vs. setting compounds: Pre-mixed is ready-to-use, great for spot repairs. Setting needs mixing, ideal for heavy skim coats.
- All-purpose compound: Good for both tape and joint embedding. Use for most repairs.
- Lightweight compound: Less dense, easier to sand. Ideal for skim coats.
- Fast-setting compound: Dries quick, reduces downtime. Great for time-sensitive jobs.
- Primers: Seals and prepares surface. Essential before painting or wallpapering.
- PVA primer: Water-based, seals and sizes drywall. Good for new drywall or repairs.
- Shellac primer: Alcohol-based, seals and blocks stains. Use on repaired edges to prevent bleed-through.
- Check labels: Drying times vary. Plan your work around them.
Quick rule: Match compound type to repair size. Primer always before painting or wallpapering.
Sanding and finishing tools
Right tools make the job easier. Here’s what you need for sanding and finishing.
- Handblock sander: Small, light, ideal for small repairs or tight spaces. Use 120-grit sandpaper.
- Sanding pole: Extends reach, great for high ceilings or large areas. Use 80-150 grit depending on task.
- Sponge sander: Flexible, good for curves and irregular surfaces. Use 120-grit.
- 6-inch taping knife: Narrow, ideal for embedding tape and small repairs. Use for feathering edges.
- 10-inch taping knife: Wide, great for spreading compound over large areas or heavy skim coats.
- 12-inch taping knife: Extra-wide, perfect for very large repairs or textured surfaces.
- Check blade width: Wider blades hold more compound, but are harder to control. Choose based on repair size.
Quick rule: Match tool size to job size. Larger repairs need wider knives and bigger sanders.
Resetting the Surface: Skim Coat and Feathering Process
Begin by removing loose material from the edge and the surrounding surface so the new skim coat can bond. Apply one or more very thin coats, letting each coat dry as directed by the compound manufacturer. Feather the edges beyond the framed boundary to blend into the field texture or paint.
Follow the drying times specified on the product label or data sheet between coats. Build gradually rather than piling on thick coats, and keep the feathered transition smooth and wide enough to hide the joint later in the process. If you’re unsure, verify drying requirements with the product instructions before continuing.
Addressing tape and bedding problems
Before you start skim coating, check your drywall seams. Sometimes, the problem isn’t just a ridge, but poor taping or bedding.
If your tape is bubbling, peeling, or showing through, re-seat it. Cut away the damaged area, re-tape, and re-bed with compound.
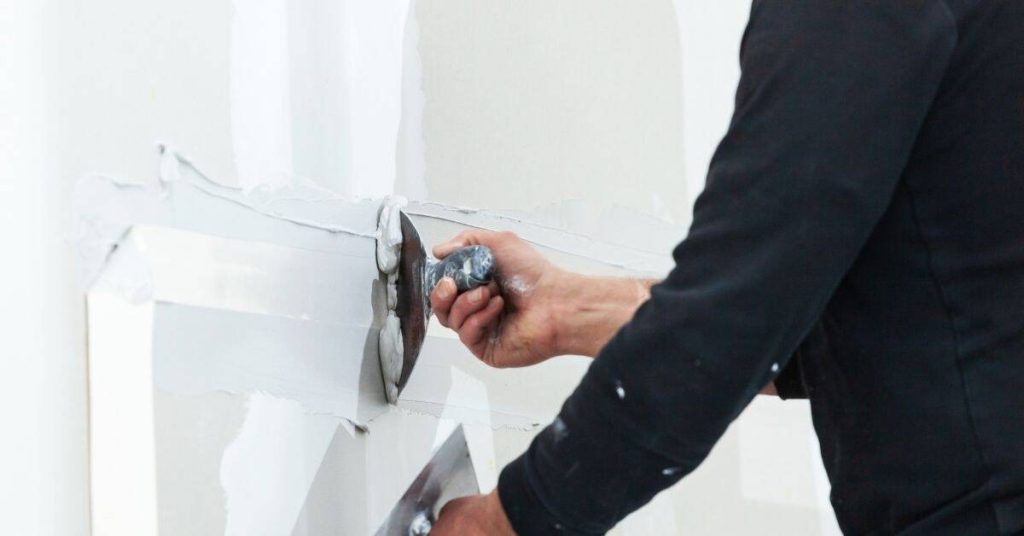
When bedding, use a 6-inch knife. Apply compound to both sides of the seam, then press the tape into it. Use a second coat to cover the tape completely.
If your seam is still visible or feels weak, remove and re-tape. Cut away all old tape and compound, clean the seam, and start fresh.
Feathering technique and blending tips
Feathering is key to making your skim coat blend into the field. Use a 12-inch knife for this.
Start at one end of the seam, hold your knife at a 45-degree angle, and pull it towards you. This will spread compound onto the wall, tapering it as you go.
Work in passes, overlapping each one by about half. Go further beyond the seam with each pass – aim for at least 2 inches past the visible edge.
After your final pass, step back and look at your work. You should see a smooth, tapering effect, not a new ridge. If needed, lightly sand before painting.

Sanding, Smoothing, and Protecting the Drywall Paper
Use light, even strokes with a suitable sanding tool to avoid removing too much paper. Keep dust to a minimum by using a vacuum attachment or a damp-down approach where appropriate. Mask surrounding areas to prevent scuffing or filling in texture you want to keep.
Consider wet-sanding or sponge-sanding as a gentler option to reduce paper damage. If you choose wet methods, follow up with a dry wipe and inspect the surface for uniformity before proceeding. Always check local guidance on dust control and protective measures.
Visual checkpoints after sanding
Before you move on to priming, use these checks to ensure your drywall surface is smooth and ready.
- Smooth under light: Check with a raking light. The surface should be mostly shadow-free, with only minor imperfections.
- No visible trowel marks: Run your hand over the area. You shouldn’t feel any ridges or grooves left by the trowel.
- Even texture: Ensure there are no raised edges or low spots that could show through paint.
- No dust: Wipe with a damp cloth to check for residual dust. If it’s present, sand and wipe again.
- No shiny spots: Shiny areas mean you’ve not sanded enough. Lightly sand and recheck.
- No deep scratches: These will show through paint. Sand more if necessary.
- Edges blend well: Check where the patched area meets the existing wall. It should be seamless.
- No nail or screw pops: If you feel any, they need to be set back and resanded.
Quick rule: If it feels smooth, looks good under light, and passes the wipe test, you’re ready for priming.
When to re-coat vs. move to primer
After sanding, it’s crucial to know when to apply another thin coat of joint compound or proceed directly to priming.
Re-coating: If you find any minor imperfections under raking light or by touch, a thin re-coat can help. This is especially useful if you’ve sanded too aggressively and exposed the paper face.
However, be careful not to over-repair. A thin coat should suffice; any more may lead to ridges that will show through paint.
Moving to primer: If your surface is smooth, free of dust, and has no visible imperfections under light, it’s time to prime. Priming seals the surface, preventing tannins from bleeding into your paint and providing a uniform base for better paint adhesion.
Priming and Painting to Permanently Hide Edges
Priming helps equalize porosity and sheen so the repaired area blends with the rest of the wall. Use a primer compatible with both the joint compound and the drywall surface you have repaired. Apply with an even coat to set the stage for paint.
Choose a painting method that suits the room and the repaired texture—roller, brush, or spray—and ensure you follow the primer and paint label directions for drying and recoat windows. If the edge still shows after priming, reassess the feathering and film thickness before repainting.
Choosing the right primer for repaired drywall
A high-build or sealing primer is crucial after skim-coating to seal and protect your repair. These primers fill microscopic pores, level out minor imperfections, and create a uniform surface for painting.
Check the label for adhesion capabilities to ensure it sticks well to your repaired drywall. Also, look for stain-blocking properties to prevent any remaining tannins from bleeding through your topcoat.
Some primers are designed specifically for new drywall or repairs. These often have better sealing and adhesion properties than all-purpose primers.
Paint application tactics to avoid re-showing edges
Applying paint correctly is key to keeping your repaired seams invisible. Here are some techniques to avoid common mistakes.
- Avoid heavy naps on rollers near the seam. Heavy naps can deposit too much paint, causing a ridge that highlights the repair.
- Use consistent film build. Apply thin, even coats instead of trying to cover in one thick pass. This helps maintain a uniform surface.
- Don’t overfill edges with paint. Too much paint on the edge can cause it to show through your topcoat.
- Feather out at the end of each stroke to avoid leaving visible lines or ridges.
- Let each coat dry completely before sanding and applying the next. This helps ensure a smooth, even finish.
By following these tactics, you’ll create a seamless, professional-looking finish that hides your repair edges permanently.
Common Mistakes and Targeted Troubleshooting
Avoid applying skim coats that are too thin or too thick, which can create new edge highlights. Over-sanding can thin the surface and reveal the paper again. Using the wrong primer can cause finish differences that make edges reappear after paint.
When setbacks occur, re-check your feathering plan, adjust coat thickness, and verify the product instructions for drying times and compatibility. You don’t have to start over; follow corrective steps to rebuild the transition and recoat as needed. If you’re uncertain, consult the label or manufacturer guidance for specific remedies.
Quick spot-fixes for minor framing lines
If you’ve got a small area with a light scuff or a thin feather coat that’s showing through, don’t worry. You can fix it without starting over.
First, lightly sand the area to remove any loose material and create a better surface for the next step.
Next, apply a thin skim coat of joint compound using your trowel. Make sure it’s thin enough that you can still see the lines underneath – we’re just trying to fill in any small gaps here.
Let it dry, then sand lightly again to smooth out any ridges or imperfections. Prime and paint as usual, and those minor framing lines should be history.
When to call a professional
While this guide is designed to help you tackle most drywall issues yourself, there are times when it’s best to leave the job to the pros.
If you’re seeing widespread board movement, it could be a sign of structural issues that need professional attention. Similarly, if you’ve got persistent water damage, it’s wise to call in a pro to ensure there are no hidden mold or rot problems.
If you’ve tried multiple repairs and the edges keep reappearing, it might be time to bring in someone with more experience. And finally, if you’re just not confident in your ability to do the job right, don’t hesitate to call a professional. It’s always better to spend a bit extra than to end up with a shoddy repair that’ll cost even more to fix later.
Preventing Picture Framing in Future Projects
Adopt consistent drywall installation and finishing practices: proper tape technique, controlled compound application, and a careful sanding sequence. Use compatible products and follow the recommended drying and recoat intervals. Build in a gradual transition from joints to field to reduce edge visibility.
Prepare surfaces and plan painting prep to minimize porosity differences and sheen mismatches in future work. If you’re unsure about a method, verify with product labels or local guidelines before proceeding to the next phase of your project.
Best practices during initial hanging and finishing
To prevent picture framing, start right from the get-go. Use high-quality drywall tape for a smooth finish.
When mudding, feather your edges. This means tapering your compound application so it’s thin at the edge and thicker in the middle of the seam. This helps hide imperfections and prevents edges from showing through.
Use consistent tool angles when applying tape and mud. This ensures a smooth, even surface that won’t show edges over time.
Maintenance and inspection tips
Regular checks can keep picture framing at bay. Here’s a simple checklist to follow:
- Check under raking light after paint: This helps you spot any imperfections that might become framed edges.
- Control humidity levels: Too much moisture can cause drywall to swell and show edges. Keep your home’s humidity between 30-50%.
- Quickly address small issues: Cracks or nail pops should be fixed promptly before they become bigger problems.
- Inspect seams for separation: If tape or mud is pulling away from the seam, it can cause edges to show through.
- Check for warping or buckling: This can happen if drywall was installed incorrectly or if there’s too much moisture in the room.
- Inspect corners for cracking: Corners are high-traffic areas and can crack over time. Fill any cracks promptly.
- Check for nail pops: Nails can pop through drywall, causing edges to show. Use a hammer or nail set to tap them back in place.
- Inspect around windows and doors: These areas are prone to warping and cracking due to temperature changes.
Quick rule: Make this checklist part of your regular home maintenance routine. Catching issues early can save you a lot of time and money in the long run.
Conclusion
Edges showing through drywall can be fixed with careful skim coating, feathering, and a solid prime-and-paint plan. Do it right and the surface becomes durable, safe, and the finished wall looks clean again.
First, inspect the cause and prepare the area: protect surrounding surfaces, clean the edge, then apply a thin skim coat in small passes, feathering well beyond the damaged zone; let each coat dry, lightly sand just enough to smooth without breaking the paper, wipe away dust, prime, and finish with paint that matches the rest of the wall.
Common mistakes to avoid: overworking the skim coat or sanding through the drywall paper, using too much water or a harsh scraper, and skipping primer or failing to test a small area first. Safety comes first—work in a well-ventilated space, wear a mask when sanding, and don’t rush cures or dry times.
If the edge damage is severe, or you keep seeing lines after multiple attempts, consider calling a professional instead of pushing on. Stay steady, follow the steps, and you’ll restore a flat, durable surface that won’t reveal the fix again.
FAQ
What causes picture framing to show through after painting?
It usually means the edge of the patch is still raised or the surface wasn’t feathered properly. Check the patch thickness and the transition with a flashlight for ridges and high spots, then re-smooth as needed.
How do I prevent edges from showing during the skim coat and feathering process?
Use a thin mix and apply in light coats, feathering far beyond the patch. Keep the tool at a low angle and gradually blend the patched area into the surrounding drywall so there’s no sharp line.
What should I do if edges still show after priming and painting?
Re-sand the affected area lightly and reapply a thin top coat, focusing on a smooth, consistent feather to the surrounding surface. Verify you’re not over-priming or applying too much paint in one pass.
What are common mistakes to avoid during patching and painting?
Avoid skipping surface prep or rushing the skim coat. Don’t reuse old joint compound if it’s cracked or hard. Always follow the product label and test a small area if you’re unsure about drying times or compatibility.