
Introduction
Scraping, feathering, or skim coating cracked paint are the three main ways to treat cracked paint before repainting. The choice depends on how deep the cracks are and how smooth you want the surface to be. Check labels and local rules if you need exact limits or product compatibility.
Use scraping when paint is loose or peeling and you want a solid edge; feathering for shallow cracks or lightly damaged edges; and skim coating for more irregular, deeper cracking. Gather a putty knife or scraper, a sanding block, a sharp utility knife, and a damp cloth to prep the wall. Start by cleaning the surface, removing loose paint, and lightly smoothing edges, then apply a primer that matches the topcoat and is suitable for cracked surfaces, followed by the chosen paint that is compatible with the primer. If you’re unsure, read the product label or manufacturer instructions to confirm the right primer and topcoat pairing for your wall type and environment.
Key takeaways
- Decide between scrape, feather, or skim based on crack depth and texture.
- Collect putty knife, sanding block, brushes, rollers, and mud for each method.
- Clean walls, remove peeling sections, and prime before repairs for a durable finish.
- Test for lead paint and ventilate; wear mask and goggles.
- Use compatible primer and paint with appropriate sheen for drywall.
- Skim for large repairs and feather edges first, then finish coats.
Table of Contents
- Introduction
- Key takeaways
- How to Decide: Scrape Vs Feather Vs Skim
- Tools and Materials Checklist
- Preparation and Safety
- Scraping Cracked Paint: Step-by-Step
- Feathering Edges and Spot Repairs with Joint Compound
- Skim Coating for Large or Textured Repairs
- Sanding, Priming, and Painting for a Durable Finish
- Planning, Costs, Maintenance, and Troubleshooting
- Conclusion
- FAQ
How to Decide: Scrape Vs Feather Vs Skim
Start with a simple severity check to guide your repair path. Look for visible cracks, delamination, and the depth of repair needed to categorize the work as scrape, feather, or skim. Use these signals to set your plan before you pick up tools.
Create a quick checklist that covers substrate type, extent of damage, moisture signs, and any mold or rot. Develop a decision framework or flowchart to decide when to remove, when to blend edges, and when a full skim is appropriate. Note risk factors that push you toward more robust repairs and when moisture first needs attention. Include required prep, primers, patch or skim materials, and safety notes for each branch. Add quick triage tips for common scenarios and guidance on substrate failure that may require replacement. Keep timelines and curing considerations in mind as you plan your steps.
Step-by-Step Process
Follow these steps to decide and perform the right repair approach for your cracked paint.
- Preparation: Gather tools (scraper, sandpaper, primer, patch compounds), safety gear (gloves, goggles).
- Inspect surface visually and tactically (see next section) to assess damage severity.
- Decide on repair method based on size, depth, and extent criteria (next section).
- Perform chosen repair: scrape, feather, or skim coat. Follow up with primer and paint.
- Cleanup: Wipe off dust, let dry before recoating if needed.
Visual and Tactile Inspection
Before deciding on a repair method, use this checklist to assess your paint’s condition.
- Visible cracks: Check for hairline or wide cracks. Hairlines may only need feathering; wider ones might require scraping.
- Paint delamination: Peeling or bubbling paint indicates adhesion issues, likely needing scraping and priming.
- Substrate movement: Flex the wall gently; movement could mean loose drywall screws or structural issues, requiring professional help.
- Moisture signs: Musty odor, discoloration, or soft spots suggest water damage, needing remediation before repair.
- Mold or rot: Presence of mold or wood rot dictates replacement rather than repair.
Quick rule: If unsure about any findings, consult a professional to avoid further damage.
Size, Depth, and Extent Criteria
Use these guidelines to decide between spot repair (feather), full paint removal (scrape), or drywall repair (skim coat).
Feathering: Suitable for small hairline cracks or isolated spots where damage is minimal and substrate is stable.
Scraping: Necessary when there are deep cracks, widespread delamination, or extensive damage. Remove all loose paint and prepare the surface for repainting.
Skim coating/drywall repair: Required when drywall is damaged, has holes, or needs evening out. This involves applying joint compound to create a smooth surface before painting.
When Substrate Damage or Moisture Dictates Replacement
Recognize these signs that indicate your substrate (drywall, plaster, wood) is compromised and needs replacement or professional consultation.
Drywall: Large holes, sagging, or crumbling tape signal drywall damage beyond repair. Consult a pro for replacement.
Plaster: Cracking at corners, ceilings, or walls that won’t hold paint may indicate structural issues. Consider consulting a professional.
Wood: Warping, rot, or significant cracks warrant replacement rather than repair. Address any moisture sources to prevent further damage.
Tools and Materials Checklist
List must-have hand tools and safety gear to keep on hand during the project. Include putty knives, heat or cold resistant scrapers, a broad squeegee or masonry trowel, sanding block or 120–180 grit sandpaper, utility knife, a respirator or mask, safety goggles, and drop cloths for containment. Have these ready before you start.
Outline primary coating and patch materials, surface prep items, and necessary primers. Include patch or skim-coat compounds, crack fillers, masonry caulk, bonding agents, stain-blocking primer if needed, and a topcoat suited to the surface. Add label checks and specs to review, and consider optional extras like a moisture meter or roller extensions for convenience.
Essential hand tools and power tools
Before you start your concrete project, use this checklist to ensure you have the right tools for the job. This will save you time, money, and frustration.
- Scrapers: Check blade length and stiffness. Longer blades are better for larger surfaces; stiffer blades are needed for tougher materials. What goes wrong if you skip this: Incorrect blade can lead to inefficient scraping and potential damage to the surface.
- Putty/Joint Knives: Ensure blade width matches joint size. A narrow blade (1/8″ – 3mm) is ideal for small joints, while wider blades (1/4″ – 6mm or more) are better for larger ones. What goes wrong if you skip this: Using the wrong blade width can result in improperly filled joints and potential cracking.
- Sanding Tools: Check grit size. Coarser grits (40-80) remove material quickly, while finer grits (120-220) provide a smoother finish. What goes wrong if you skip this: Using the wrong grit can lead to an uneven or incomplete finish.
- Utility Knife: Ensure blade is sharp and fits securely in the handle. A dull blade or loose fit can cause accidents or inefficient cutting. What goes wrong if you skip this: Dull blades or loose handles can result in injuries or poor cuts, leading to rework.
- Trowels: Check trowel size (12″ – 30cm is common) and shape. A larger, rectangular trowel is better for finishing large surfaces, while smaller, square trowels are ideal for edges. What goes wrong if you skip this: Using the wrong trowel can result in an uneven finish or difficulty reaching all areas.
- Power Trowel (if applicable): Ensure it’s in good working order with no leaks, proper tire pressure, and a smooth rotating head. What goes wrong if you skip this: A faulty power trowel can lead to an uneven finish or even damage to the concrete.
- Bull Float: Check float size (4′ – 120cm is common) and condition. A larger float is better for finishing large surfaces, while a smaller one is ideal for edges. What goes wrong if you skip this: Using an improperly sized or damaged float can result in an uneven finish.
- Edging Tool: Ensure it’s the right size and shape for your project. A straight edge is best for flat surfaces, while a curved edge is ideal for rounded forms. What goes wrong if you skip this: Using the wrong edging tool can result in improperly finished edges or difficulty reaching all areas.
Quick rule: Always check your tools before starting work to ensure they’re in good condition and suitable for the task at hand. This simple step can save you from expensive rework and potential injuries.
Compounds, primers, and paint explained
Before you start your drywall finishing project, make sure to check off this list. It’ll help you avoid common mistakes and ensure a professional-looking finish.
- Joint Compound: Check the label for ‘Setting Time’. You want one that’s not too fast (under 30 minutes) or too slow (over 2 hours).
- All-Purpose Joint Tape: Ensure it’s wide enough to cover your joint (usually 4″ for standard drywall). Check the edges; they should be smooth and free of defects.
- Corner Bead: Make sure it matches your wall and ceiling angles. Check if it’s zinc or vinyl; both are good, but zinc is heavier duty.
- Primer (Stain-Blocking): Look for ‘Stain Block’ on the label. This helps hide old stains and prevents new ones from bleeding through your paint.
- Primer (Sealer): Check if it’s a ‘Sealer Primer’. This type helps paint adhere better and reduces the need for multiple coats of paint.
- Paint (Emulsion): Ensure it’s water-based. It’s easier to clean up, safer, and most importantly, it won’t yellow over time like oil-based paints.
- Paint (Finish): Check the label for ‘Sheen’. For walls, eggshell or satin is usually best; they’re easy to clean and hide imperfections.
- Sandpaper: Make sure you have 120-grit sandpaper. It’s fine enough to smooth out joint compound but not so fine that it leaves scratches in your paint.
Quick rule: Always spot prime before painting. This helps ensure even coverage and better adhesion, preventing costly touch-ups later on.
Optional tools, rental options, and specialty items
When tackling larger concrete jobs or specific tasks, consider these optional tools. They can speed up work and improve results.
- Pole Sander: For large surfaces like garage floors or driveways. Check if the sander’s pad size matches your job’s area (e.g., 17″ for most garages). Rent for short periods to avoid storage issues.
- Taping Knives: For applying compounds and primers. Choose widths based on your task: 6″–12″ for common jobs, wider for special tasks. Ensure they’re straight and not warped before use.
- Texture Sprayer: For applying textured coatings quickly. Check if it’s suitable for your chosen product (check manufacturer instructions). Practice on scrap material first to get a feel for the spray pattern.
- Shotcrete Equipment: For spraying concrete onto forms or existing surfaces. Rent pumps and hoses, ensuring they’re compatible with your mix design. Safety gear is crucial when working with shotcrete.
- Concrete Polisher: For grinding and polishing large slabs. Check if the machine’s size fits your job (e.g., 20″–30″ for most residential jobs). Rent to avoid purchasing expensive equipment.
- Wet/Dry Vacuum: For cleaning up wet concrete or dust. Ensure it has a sufficient capacity and filtration system for your needs. Use with HEPA filters for better dust control.
- Concrete Cutter (Walk-Behind): For cutting large slabs or expansion joints. Check if the cutter’s blade size matches your job’s requirements. Rent to avoid storing bulky equipment.
- Concrete Mixer (Portable): For mixing small batches on-site. Ensure it has enough capacity for your needs (e.g., 3–6 cu ft). Rent to avoid purchasing and storing a mixer.
Quick rule: Always check equipment condition before use, and ensure you’re trained or have instructions to operate safely.
Preparation and Safety
Begin with a surface assessment to identify loose paint, cracks, and moisture sources. Decide whether scraping, feathering, or skim coating is needed based on damage extent. Let this guide your prep plan.
Establish a containment plan with plastic sheeting and drop cloths, and outline PPE and ventilation needs. Include cleaning steps to remove dust and debris, and address moisture, mildew, or lead concerns if applicable. List tools, materials, and disposal steps to keep the project orderly and safe.
Personal protection and dust containment
Safety’s your top priority. Here’s what you need:
Respirator: Use a NIOSH/OSHA-compliant one to protect against dust and fumes. A P100 is recommended for scraping, sanding, and compound work.
Goggles: Protect your eyes from debris with safety goggles or glasses.
Gloves: Wear gloves to protect your hands during scraping and cleaning.
Coveralls: Put on a set of coveralls to keep dust off your clothes.
Ventilation is key. If possible, use fans to blow dust away from you while working. Seal off other rooms with plastic sheeting and tape to contain dust.
Surface cleaning, masking, and protection
Start by removing contaminants:
Use a mild detergent and water to clean the surface. Rinse thoroughly with clean water and let it dry completely.
Remove dust before repair using a vacuum or damp cloth.
Mask off areas you don’t want to get paint on:
Use painter’s tape to protect floors, trim, and fixtures. Press down firmly to ensure a good seal.
Protect your hands with gloves while applying tape to avoid pulling off the adhesive.
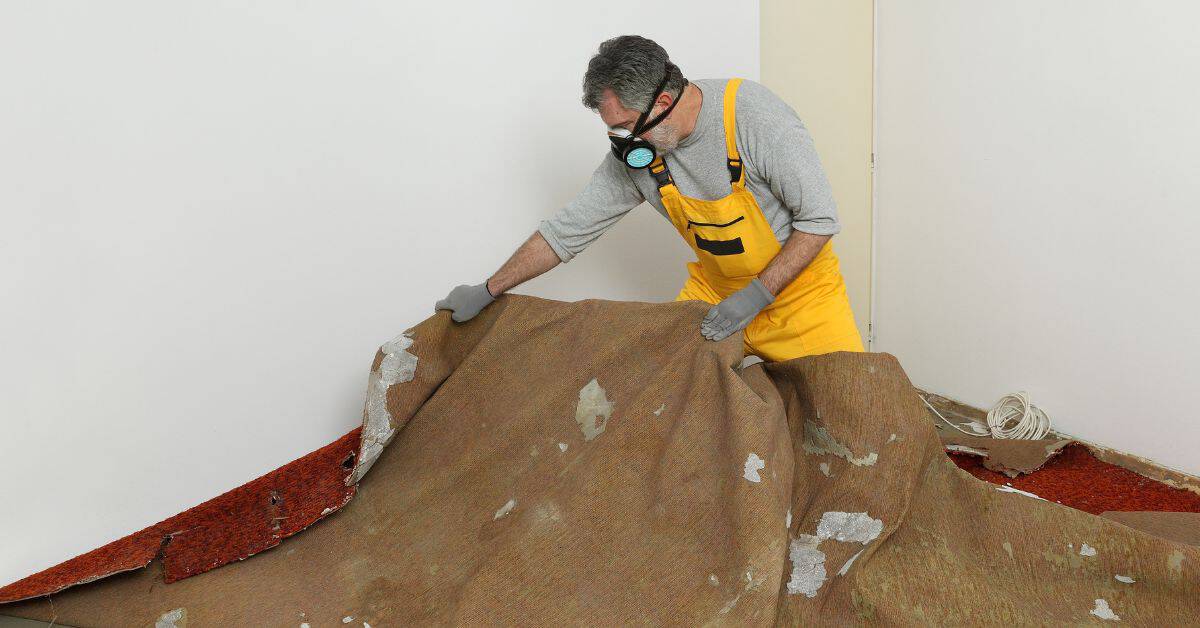
Scraping Cracked Paint: Step-by-Step
Assess the paint condition and hazards, noting delaminated areas and any lead-paint risk. Decide whether to proceed or call in professional help if lead is suspected. Use this to determine your scraping approach.
Plan containment and PPE, then gather the right tools. Prepare the surface by protecting outlets and trim, and dampen edges if using wet scraping. Work in small sections with controlled motions to lift loose paint without harming sound edges.
Step-by-Step Process
This section guides you through the practical steps of safely scraping cracked paint, from preparation to final checks.
- Assess paint condition and hazards: Identify delaminated or flaking areas. If the home is pre-1978, perform a quick lead-paint check. Decide whether to proceed with scraping or call a professional if lead is suspected.
- Safety and containment plan: Wear proper PPE including a respirator rated for paint fumes, goggles, and gloves. Isolate the work area with plastic sheeting, seal doors, and ensure adequate ventilation.
- Gather tools and materials: Collect putty knives, wall scrapers, utility razor, sanding block, painter’s tape, drop cloths, a bucket of warm water with mild detergent, and a stiff-bristle brush for cleanup.
- Prepare the surface: Cover outlets, trim, and floors. Dampen edges of cracked paint to reduce dust. Score edges with a utility knife to create clean boundaries.
- Scrape and inspect: Work in stable motions at a shallow angle to lift loose paint without damaging sound edges. Scrape in small sections, brushing away debris to maintain clear boundaries. After removing loose paint, feather the edges for a smooth transition. Recheck for any remaining delaminated areas and plan touch-ups.
Scoring, lifting, and removing loose paint
To effectively remove cracked paint without damaging the substrate, follow these techniques for scoring, lifting, and removal.
Start by scoring the edges of delaminated paint with a utility knife. This creates clean boundaries and helps prevent further damage to sound edges during scraping.
Use putty knives or wall scrapers of varying widths to lift loose paint. Work at a shallow angle, applying gentle pressure to avoid digging into the substrate. Start from one corner and work your way across in small sections.
If using strip tools or chemicals, follow the manufacturer’s instructions carefully. After removing loose paint, use a utility knife or scraper to feather the edges, creating a smooth transition between scraped and intact areas.
Handling hazardous paint (lead, asbestos concerns)
Before scraping, test for lead paint if the home was built before 1978. Lead paint is dangerous and requires special handling.
Use a lead test kit available at hardware stores. If positive, follow local disposal rules for lead paint waste. Consider safer abatement options like encapsulation or hiring a certified contractor for complete removal.
Asbestos can also be present in older homes. If you suspect asbestos-containing materials, do not disturb them and hire a professional for testing and safe removal. Always prioritize safety when dealing with hazardous materials.
Feathering Edges and Spot Repairs with Joint Compound
Define the repair goal as a near-invisible blend that matches surrounding paint and texture. Consider common crack origins and how they affect repair approach. Use this to frame your feathering strategy.
Assess substrate, choose appropriate joint compound and tape, and determine priming needs. Plan feather widths and coat count to prevent ridges, then apply with careful, even pressure. Sand between coats and finish with a thin skim for a seamless transition.
Feathering technique and layer strategy
The goal is to build thin, tapered layers that blend into the surrounding paint. Start with a sharp, flexible knife, typically 2–4 inches wide.
Apply the first coat, feathering it out from the repair area. Keep the width within 2–6 inches beyond the repair to avoid creating obvious edges. Maintain consistent pressure and use thin coats to prevent ridge lines.
For each subsequent layer, gradually widen the feather until it blends seamlessly with the wall surface. Allow proper drying time between coats for best results.
Tools, mixing, and curing tips for small repairs
Having the right tools makes all the difference. Here’s what you’ll need:
- Knife selection: Choose a sharp, flexible knife (2–4 inches wide) for feathering edges.
- Thinning pre-mixed compound: If needed, thin with water. Add small amounts at a time to avoid making it too runny.
- Drying times: Allow 24-48 hours between coats and before sanding or priming. This ensures the compound is fully set and ready for the next step.
- Optional tools: A multi-tool (around $30 to rent) can help with scraping and prep work. A sand pole sander ($15-$25 per day) is useful for larger areas.
- Curing time: Let the final coat cure for at least 7-10 days before painting to ensure optimal adhesion and durability.
Skim Coating for Large or Textured Repairs
Describe when a full skim coat is appropriate for large panels or heavy texture. Use this to decide whether to skim or pursue localized fixes. Aim for a smooth, paint-ready field.
Prepare the surface by removing loose paint and repairing deep gouges, then mask adjacent areas. Select a suitable skim coat product and tool setup for wide areas. Apply thin coats, sanding lightly between passes to minimize ridges and achieve uniform texture.
When to skim coat versus localized patching
Full-surface skim coating is your best bet when you’ve got widespread damage or texture mismatch. It gives you a clean slate, so to speak.
Here’s what tells you it’s time for a full skim:
- Widespread cracks: If they’re everywhere, patching each one is a losing battle.
- Texture mismatch: When new drywall meets old, or different textures meet, a skim coat evens things out.
- Deep gouges or holes: Lots of these mean you’d be spending hours on spot repairs. Skim coating’s faster.
Application method and visual checkpoints
Before you start sanding, use this checklist to ensure your skim coat is even and smooth. It’ll save you time in the long run.
- Spread evenly: Use a wide blade trowel or taping knife to spread the compound across the surface. Keep it thin for better control.
- Smooth out ridges: Work from the center outwards, flattening any ridges as you go.
- Check for missed spots: Step back and look at your work. Any bare spots need a little more compound.
- Feel for texture: Run your hand over the surface. It should feel smooth, not bumpy or rough.
- Look for holidays: Pinholes or thin spots let moisture in. Fill them before they cause problems.
- Check edges: Make sure you’ve feathered out any excess compound at the edges to avoid ridges.
- Inspect corners: Corners often need a little extra attention. Ensure they’re smooth and even.
- Wait for set: Let it sit as directed before sanding. Skimping on drying time leads to dust and poor adhesion.
Quick rule: If you can’t see any imperfections, you’re good to go. But if something doesn’t look right, trust your instincts and fix it before moving on.
Sanding, Priming, and Painting for a Durable Finish
Check substrate issues such as moisture and active cracks before choosing repairs that feather into the surface. This informs your adhesion plan for priming and painting. Make sure the repair work will hold up under coats of finish.
Outline a sanding plan that controls dust and prepares the surface for primer. Choose a bonding or concrete primer as appropriate, and follow broad guidelines for applying paint in thin, even coats. Note curing and recoat considerations to maximize longevity.
Sanding best practices and dust reduction
Start with a coarse grit (60-80) for rough patches, then finish with fine (120-150). Use long, steady motions – never circular. Stop when the surface feels smooth but not overly sanded.
Dust control: Wear a respirator and use a dust containment system or wet sanding. Wipe down thoroughly with a tack cloth to remove dust before priming.
Protect surrounding areas with drop cloths or masking tape to keep dust contained.
Primer selection and painting sequence
Sealing new compound with the right primer ensures adhesion, blocks stains, and improves paint durability. Look for primers with high solids content (at least 20%) and good reviews.
Properties to prioritize: Bonding agents for better adhesion, stain-blocking for preventing tannin bleed, and low VOCs for reduced odor and environmental impact.
Apply primer as soon as repairs are dry – don’t let the surface sit too long. Follow manufacturer’s timing for recoating with paint.
Planning, Costs, Maintenance, and Troubleshooting
Plan the project scope by assessing surface area, crack size, and overall paint condition. Use this to determine whether to scrape, feather, skim coat, or replace patches. Set objectives for aesthetics, durability, and drying milestones.
Outline a practical schedule and budget, including essential tools and containment needs. Add a maintenance plan for longevity and a troubleshooting flow to address common problems. Include simple alternatives for very small repairs to avoid over-engineering the job.
Timeline and project planning
Planning your paint repair project is key to success. Not all tasks can be done in one day due to drying or curing times. Here’s a practical workflow:
Day 1: Prep work – remove loose paint, clean surfaces, and set up containment.
Day 2-3: Apply patch compounds, skim coats, or joint compound for feathering. These need time to dry/cure before sanding.
Day 4: Sand lightly, prime, and paint. Allow drying time between each step.
Cost considerations and how to estimate materials
Choosing the right materials affects your result’s longevity and appearance. Here’s a list of items to consider:
- Primer: Use a high-quality, substrate-specific primer. Look for low-VOC emissions.
- Patch compounds: Choose a flexible, paintable compound rated for your surface type (concrete/gypsum).
- Skim coats: Opt for lightweight, fast-drying joint compounds for easy sanding.
- Sanders: Rent or buy orbital sanders for efficient, even sanding. Consider dustless systems.
- Tapes: Use painter’s tape for clean edges and masking paper for protecting areas.
- Containment: Plan for drop cloths, plastic sheets, and masking to minimize mess.
- Safety gear: Include respirators, gloves, goggles, and ear protection in your budget.
Common mistakes, fixes, and alternative methods for small areas
Avoiding these common pitfalls will save you time and money:
- Insufficient prep: Always clean, de-gloss, and prime surfaces to ensure paint adhesion.
- Over-sanding: Lightly sand to avoid removing too much material or damaging the surface.
- Skipping primer: Priming seals pores, improves paint adhesion, and enhances color vibrancy.
- Using wrong materials: Match repair compounds to your substrate for best results. Avoid using construction adhesive as a patch compound.
For tiny cracks or small areas, consider simpler alternatives like spot-patching with pre-mixed repair putty or touch-up paint.
Conclusion
Finish with confidence by picking the right path for each spot and sticking to a safe, simple process that keeps damage away and your walls looking solid for years. The core idea is clear: scrape where needed, feather when edges are uneven, skim only for large or textured problems, and always seal with primer before paint.
Check this as you move from repair to finish: inspect the surface and test a small area first, decide if you need to scrape, feather, or skim, gather the needed tools and materials, clean and protect the work zone, follow the step-by-step scraping or feathering or skim process, sand smooth, prime, and then paint with durable coats. Do the work in natural, daylight-like conditions, and work patiently in small sections so you see results and catch mistakes early.
Avoid these mistakes: don’t over-scrape or remove sound material, don’t skip primer after any repair, and don’t paint over a dusty or oily surface. Always wear eye and respiratory protection, and keep a plan to test a new step in a small area before committing to the whole project. If you’re unsure about a large textured area, or the cracks are extensive, slow down and reassess rather than pushing on with a quick fix.
If the repairs are beyond your comfort level or the framing shows water damage, call a pro. A smart call saves time and money when safety or structure is in question. Stay methodical, stay safe, and you’ll end with a durable, good-looking finish you can be proud of.
FAQ
When should I scrape, feather, or skim coat cracked paint?
Use scraping for loose, peeling, or powdery crust that won’t stick. Feathering is for cracks that are stable but have rough edges you don’t want to see after patching. Skim coating is for large, flat areas or textured surfaces where you want a smooth, uniform base.
What tools do I need for each technique?
Scraping needs a sturdy putty knife or scraper, and a scraper with a rigid blade. Feathering uses joint compound, a drywall knife, and a sanding block for feathered edges. Skim coating requires a wider trowel or flat spreader, multiple coats, and a fine sanding block for a smooth finish.
What steps should I take to prep walls before painting?
Clean any dirt, grease, or smoke marks with mild cleaner. Remove loose paint by scraping, then repair cracks with appropriate patching compound. Prime the repaired areas if you’re applying lighter paint or a different sheen, and let primer dry per the label.
What types of primer and paint work best for cracked paint repairs?
Use a high-build or bonding primer on patched areas to seal dust and improve adhesion. Choose a paint with the right durability for the room (eggshell for living spaces, satin for kitchens, matte for ceilings) and match it to the existing finish when possible. If you’re unsure, check the label for surface compatibility and recoat times.