
Introduction
Leave proper gaps at expansion and movement joints to accommodate building movement and prevent cracking.
This introduction explains how to choose appropriate gap sizes, where joints belong, and how to finish them cleanly with durable sealants and proper detailing.
You’ll learn practical tips, common mistakes to avoid, and a straightforward approach to creating joints that stay tight and perform long term.
Key takeaways
- Define expansion and movement joints; differentiate interior vs exterior applications.
- Leave predictable gaps during framing to accommodate shrinkage, expansion, and seismic shifts.
- Place joints at changes in plane, at room corners, and along long spans.
- Use appropriate filler depth and width; reference material specs and code guidance.
- Select sealants, mortars, or backer rods matched to substrate and movement.
- Document joint locations in construction drawings to prevent accidental future closures.
Table of Contents
- Introduction
- Key takeaways
- What are expansion and movement joints?
- Why leaving the right gap matters (risks and cost implications)
- Where to place joints — rules of thumb and exact locations
- How wide and deep should gaps be? Sizing formulas and examples
- Materials for filling and finishing joints
- Tools and materials checklist
- Step-by-step: leaving gaps during construction
- Step-by-step: finishing joints cleanly
- Best practices by material and assembly type
- Safety and site considerations
- Common DIY mistakes and how to avoid them
- Inspection and visual checkpoints
- Maintenance, resealing intervals and long-term care
- When to hire a pro — complexity triggers and warranty requirements
- Cost considerations and budgeting tips
- Conclusion
- FAQ
What are expansion and movement joints?
Expansion joints and movement joints are not the same thing. Expansion joints accommodate overall size changes in a material, while movement joints allow relative movement between two parts. For concrete slabs you see expansion joints at long spans; for masonry walls you use movement joints where sections meet. Floors, walls, and decks all need the right joints, with clear distinctions and real-world examples you can spot on site. Materials move from thermal expansion and contraction, moisture swelling, and live loads, all affected by slab thickness, substrate, and climate. Plan where joints are needed and how they will look with finishes, sealants, and cap systems.
This matters to you because improper joints wreak leaks, cracks, and maintenance headaches. Choose appropriate joints for floors, walls, facades, exterior decks, stairs, and material transitions, noting interior vs exterior needs and typical movement ranges. Finish with the right filler or sealant, or use a cap system; decide when to leave joints open vs filled, and how finishes like paint, stain, or grout will match. Align joints with doors, windows, and fixtures, coordinate with flashing and drainage, and avoid unsupported spots. Be mindful of local codes and set a reasonable maintenance interval so you don’t chase problems later.
How joints differ by material (concrete, wood, tile, masonry)
The type of joint you use depends on the materials around it. Concrete needs expansion joints to handle movement, while wood shrinks and expands with humidity changes requiring different solutions.
- Type N mortar: Used for brick laying in non-load-bearing walls. Look for a strength class of at least 20 MPa. Avoid using it on load-bearing structures; use Type S instead. Pro tip: Mix only what you can lay within an hour to avoid waste.
- Concrete joint filler: For concrete slabs, choose a flexible polyurethane sealant rated for outdoor exposure and UV resistance. Cheaper options crack easily in winter. Use it when gaps are 1/4 inch or larger.
- Mortar release agent: Essential for precast concrete panels to prevent sticking during curing. Look for one that’s compatible with the type of concrete you’re using. Avoid on-site mixing; use a premade spray can for consistent results.
- Wood expansion strips: These are thin metal or plastic strips placed between wood flooring planks to allow movement without buckling. Ensure they’re rated for moisture resistance if used in bathrooms or kitchens. Cheap alternatives may rust and need replacing often.
- Tape joint compound: For tile, use a flexible tape that can bend slightly but still seal gaps tightly. Look for one with high adhesion strength to prevent water leakage. Avoid using regular spackling paste as it will crack over time.
Pro tip: Always store materials like mortar and concrete joint filler in dry, cool places away from direct sunlight to maintain their quality.
Key terms and standards to know
Before you start cutting joints, make sure you understand a few key terms. A control joint, for example, is not the same as an expansion joint. Control joints are used in concrete to control where cracks will appear, while expansion joints let sections of concrete move independently without damaging each other.
Another important term is isolation joint. This type of joint separates a slab from another structure like a wall or column. It’s crucial for preventing damage when different materials expand and contract at different rates.
Always check your local building codes before you start cutting joints. Standards like ACI 302 (American Concrete Institute) provide guidelines on proper placement and spacing of these joints. Ignoring these can lead to big headaches down the road, so don’t skip this step.
Why leaving the right gap matters (risks and cost implications)
Gaps matter because concrete expands and contracts with heat, cold, moisture, and substrate movement, and if you pick the wrong gap size you’ll see early cracking, edge pops, and misalignment of adjoining pours or finishes. Small or poorly placed gaps let water and debris sit at joints, invite staining, and undermine adhesion of finishes, sealants, or overlays, so you end up paying extra for repairs that should have been avoided with proper gap planning.
Structural and performance risks go beyond looks: you can get mortar or sealant failure, edge spalling, or misalignment that affects doorways, floor transitions, and the overall stability of the slab, especially in vulnerable climates. Warranty and code effects matter too, because many manufacturers and insurers require specific gap widths, expansion materials, and installation methods, and deviating from those rules can void coverage or nullify your warranty. Budget smart by comparing upfront installation costs against the price of later repairs—patching, grinding, resealing, and possible re-pouring—then use a simple planning method based on climate zone, slab thickness, and expected movement, while always verifying manufacturer specs and local regulations before pouring.
Common failures from wrong gaps (cracking, buckling, squeaks)
If you don’t leave the right gap between concrete slabs, you’ll end up with problems like cracking and buckling. Cracks happen when the slab can’t move due to temperature changes or settling. This weakens your whole setup. Buckling is another issue where the slab bows out because it’s too tight, causing a real headache for repairs.
Squeaks are also common with wrong gaps. When you walk on improperly spaced slabs, they shift and make noise. It’s not just annoying; it shows that your concrete isn’t stable. To avoid these issues, check base compaction before pouring and ensure joints are placed correctly to allow for natural movement.
In the end, getting this right saves you money and hassle down the line. Fixing cracks or replacing buckled slabs is costly and time-consuming. So take your time setting up those gaps properly from day one.
Long-term maintenance and lifecycle impact
The right gap spacing is crucial for long-term care. Proper joints let you clean and reseal your concrete easily, extending its life. If gaps are too small or non-existent, dirt builds up, making cleaning a nightmare. This grime can also eat away at the sealant over time.
Wrong joint sizes mean more frequent resealing cycles. This adds up in costs and hassle. Plus, improper joints lead to cracks sooner, ruining your finish faster. So, check base compaction before pouring and ensure proper gap spacing for a job that lasts.
Where to place joints — rules of thumb and exact locations
Joints go where the slab moves and they should be planned from day one, not guessed after you pour, because movement happens and you will pay for ignored joints later. Perimeter joints need consistent expansion gaps around the entire edge, specify interior versus exterior gap sizes, and choose edge treatments such as caulk, backer rod, or preformed joint materials to prevent spalling, dusting, and edge damage at high-traffic edges. For doorways and transitions, align joints with thresholds where possible, keep a safe level surface at openings, account for voids or fillers without creating trip hazards, and lay out joints at corners and long runs to minimize visible cuts, using factory-edge or local control joints as appropriate and selecting between control joints or expansion joints based on subgrade, slab thickness, and climate.
Penetrations and fixtures get mapped joints around plumbing, electrical conduits, and vents, with sleeves, backer rods, and sealants that accommodate movement without leaking or cracking, and you should plan to wrap around fixtures with continuous sealant or compatible inserts. Finishing details matter too, so decide between caulked joints and exposed sealants, note compatible products and curing times, and plan to finish flush with adjacent surfaces for a clean, professional look that survives weather, vibration, and seasonal movement.
Perimeter and wall junctions
When pouring concrete around the edges of your project, always leave a gap at the perimeter. This gap should be about 1/2 inch wide. It’s there to allow for movement without cracking. Don’t forget to check base compaction before you pour.
At wall junctions, where two walls meet, install control joints every 10 feet or less. These joints help prevent cracks from forming at the corners due to stress and temperature changes. Make sure your formwork is tight and straight for clean lines.
Remember, proper joint placement around perimeters and walls isn’t just a suggestion—it’s crucial for long-term durability. Take the time to get it right or you’ll regret it later when cracks start showing up.
Transitions, doorways and thresholds
When pouring concrete next to different floor materials, always plan for transitions. Place control joints at least 6 inches away from the edge of any doorway or threshold. This helps prevent cracks where the concrete meets other surfaces like tile or wood.
Check base compaction around doorways and thresholds before pouring. Weak spots here can lead to uneven settling, causing your joints to crack over time. Use a tamper or vibrator to ensure everything is solid underneath.
For transitions between concrete slabs and other materials, use transition strips like aluminum or plastic. These strips allow for slight movement without damaging the edges of your new slab. Remember, proper installation of these strips is crucial; they should be flush with both surfaces to avoid tripping hazards.
Runs, bays and maximum spacing guidelines
When laying out your concrete slab, think of it in terms of bays, which are the sections divided by joints. Each bay should not exceed 15 feet in any direction for standard concrete in moderate climates. In hot or cold regions, reduce this to 10 feet to prevent cracking.
For runs—long stretches without a perpendicular joint—keep them under 30 feet if you’re using regular concrete mix. If your climate is extreme, shorten that to 20 feet max. Remember, the goal is to control where cracks happen by giving them an easy path out through planned joints.
Before pouring, check base compaction. A weak subgrade can cause your slab to crack regardless of how well you place your joints. Make sure everything under the concrete is solid and level before you start.
How wide and deep should gaps be? Sizing formulas and examples
For gaps, start by naming the material (concrete, epoxy, wood subfloor), the expected movement percentage, and the floor area, then use simple formulas: gap width = base movement allowance × area factor, with units in mm or inches and meters or feet. Depth guidance should be roughly 1/2–2/3 of the anticipated movement thickness, adjusted for the finish type. A tiny area with low movement might need a narrow gap, while a large, high-movement area needs a wider gap to prevent telegraphing and cracking.
In practice, work with quick examples: small rooms versus large floors, radiant-heat floors, and how finishes alter decisions. Practical tolerances matter: keep minimum practical widths for common finishes, and don’t cut depth so deep you weaken the edge. Use a simple decision idea—pre-formed joints when static, widen for contraction where movement is high—and verify your math in the field as you mark, cut, and seal with the right gap sealant and curing practices to avoid telegraphing.
Worked examples you can copy in the field:
- Example 1 — Small room (dry concrete slab): Floor area 6 m². Base movement allowance = 0.5 mm per m². Gap width = 0.5 × 6 = 3 mm. Choose a gap width around 3 mm (about 1/8 in) for a clean finish with standard sealant. Recommended gap depth: about 3 mm (roughly 1/3 of the movement thickness) to avoid weakening the edge. Finish with a compatible sealant and proper curing practice.
- Example 2 — Large radiant-heat floor: Floor area 20 m². Base movement allowance = 0.8 mm per m² due to added expansion from heating. Gap width = 0.8 × 20 = 16 mm (about 5/8 in). Depth around 9–11 mm (about half of the movement thickness). Use a high-temperature sealant or polysulfide for heat tolerance, and verify sealant compatibility with your finish.
Quick sizing cheat-sheet by material
The right gap size and material choice can make your project look great while preventing future issues like cracking or staining.
- Type N mortar: Used for brickwork. Look for high compressive strength on the bag label. Avoid in wet areas; it’s best for dry, load-bearing joints. Cheap homeowner drill is fine to mix this up.
- Concrete joint filler: For concrete slabs and sidewalks. Check for flexibility and UV resistance. Use when gaps are wide but not too deep. Expensive if you buy pre-made; DIY mix is cheaper.
- Silicone sealant: Ideal for tile, shower pans, or wet areas. Look for mold-resistant formula on the label. Best in narrow, shallow gaps to avoid cracking over time. Use a quality caulking gun and tube.
- Wood filler: For hardwood floors and trim work. Pick one that matches your wood type closely. Avoid using too much; it can look messy if not applied carefully. Good for small gaps but won’t last long in high-traffic areas.
- Laminate underlayment tape: Used to bridge gaps between laminate flooring pieces. Check the thickness and adhesive strength on the packaging. Works well with thin, uniform gaps; avoid using it in uneven or wide spaces.
- Screed joint compound: For screed floors and concrete toppings. Look for fast-setting formulas that don’t shrink over time. Best used when you need a quick fix but not ideal long-term solution due to wear.
Pro tip: Always store materials in dry, cool places before use to maintain their quality and performance on site.
Adjusting for climate zones and humidity control
In high-humidity areas, you need to adjust your gap sizes to prevent moisture from getting trapped between concrete slabs. This can lead to cracking and other issues down the line. Instead of sticking to a one-size-fits-all approach, increase joint spacing by 10-20% in humid climates.
For areas with extreme temperature changes, like freezing winters followed by hot summers, you’ll want to ensure your joints are wide enough to accommodate the expansion and contraction of concrete. This means checking that your current gap sizes can handle at least a 1/2 inch variation. If not, widen them accordingly.
Remember, proper joint sizing isn’t just about aesthetics; it’s crucial for maintaining a strong, durable concrete surface. Don’t skimp on this step or you’ll end up with costly repairs later on.
Materials for filling and finishing joints
Joints in concrete exist to absorb movement and keep edges clean, and each material plays a specific part. Caulks and sealants seal the joint and allow for slight movement, backer rods control depth and provide a backing, foam cushions gaps, epoxy fillers harden where joints must stay rigid, and metal or plastic profiles mask edges. Use backer rods with sealant for flexible joints, or compressible foam for larger gaps; epoxy fillers are for rigid, structurally important joints, and profiles keep finishes neat and durable. For best results, choose materials that are explicitly compatible with your substrate (concrete, masonry, or repaired concrete overlays) and with the finish you plan to apply (paint, stain, or topical coatings).
Choose based on joint width and depth, expected movement, exposure, and substrate, then follow a clear workflow from prep to cure. Older DIY jobs fail when you skip cleaning, mis-size backer rods, or use the wrong material for outdoor UV or moisture; match cure times and paintability to your finish. This matters because durability, maintenance intervals, and repair options hinge on correct material selection and workmanship. For a quick reference, see the material-specific sidebar under Materials for filling and finishing joints.
Sealant types: polyurethane, silicone, MS polymer, acrylic
When it comes to sealing joints in concrete work, you’ve got a few solid options. Polyurethane sealants are great for their flexibility and durability, but they can be tricky to apply and require clean surfaces. They’re best for outdoor projects where water resistance is key. Surface prep should include removing curing compounds, oils, and dust; mechanically abrade glossy surfaces to improve adhesion; and prime if the manufacturer specifies.
Silicone sealants, on the other hand, are easier to work with and offer excellent adhesion and weather resistance. They’re a go-to choice for bathrooms and kitchens due to their moisture tolerance. Just remember, silicone doesn’t stick well to oily or dirty surfaces, so clean your joints thoroughly. For non-porous substrates, silicone may provide a longer-lasting finish with less primer, but it can be less paint-friendly if you plan to coat.
MS polymer sealants are a newer option that combines the best of both worlds—flexibility like polyurethane and ease of use like silicone. They’re perfect for sealing gaps in concrete where you need something tough but not too rigid. MS polymers also handle moisture better than pure silicones, making them ideal for wet environments, and they tend to cure without the strong odor of polyurethanes. Check compatibility with any existing coatings.
Acrylic sealants are the simplest to apply and clean up after, but they don’t last as long or perform as well in extreme conditions compared to their counterparts. Use acrylics for quick fixes where you need a basic seal without high performance demands, and resist using them where movement is expected or in wet locations.
Backer materials and bond-breakers
The right backer rod and bond-breaker can save you from headaches down the road. They ensure your sealant joints look neat, stay watertight, and don’t crack. Plan for substrate prep, sealant type, and movement range when selecting backer materials.
- Backer Rod Sizes: Pick a rod that’s 1/4 inch smaller than your joint width. Too small or too big will mess up your sealant bead.
- Compressible Foam Strips: Use these for wider joints, around windows and doors. They keep the sealant from sagging and ensure an even bead.
- Bond-Breaker Tape: This stops three-sided adhesion which can cause your joint to crack under pressure. Always use it in corners or where two surfaces meet.
- Non-Compressible Rods: For joints less than 1/4 inch wide, these rods are a must-have. They keep the sealant from squeezing out and ensure proper depth for sealing.
- Waterproof Backer Rods: Look for UV-resistant materials to prevent degradation over time. Avoid cheap foam that will break down quickly in sunlight.
Pro tip: Always store backer rods and tapes away from direct sunlight to maintain their integrity until use.
Joint profiles, caps and edge trims
When it comes to high-traffic areas or where you want a sleek architectural finish, joint strips are your go-to. Metal or PVC options work great for both looks and durability. Make sure the base is compacted and level before installing these profiles. For concrete slabs, install profiles after proper curing and surface is clean, dry, and free of grease or curing compounds. If you’re adding profiles on an existing finish, prime and test fit before final setting.
For thresholds between different surfaces or materials, use threshold solutions that can handle the transition smoothly. These not only look good but also prevent water from seeping in where two concrete edges meet. Remember to pick a sealant type mentioned earlier—like polyurethane—that matches your joint profile material for best results. Ensure the sealant forms a continuous bead with no gaps behind the edge trims.
Edge trims are essential if you’re finishing up around walls or other structures. They protect the edge of the slab and give it that professional look. Just make sure everything is squared away before applying any trim to avoid having to redo work later on. When finishing, account for thermal expansion and select trims with adequate clearance or flexible mounting methods.
Tools and materials checklist
This H2 covers the essential tools for joint work, from cutters, joint saws, and backer-rod inserters to caulking guns, trowels, and primers, plus the right sealants for different joints. It also calls out safety gear you must wear, like eye and ear protection, gloves, a respirator if dust or solvents are present, and good ventilation.
Plan the job with surface prep, joint sizing, and a clear workflow: layout, cut, insert backer rod, prime if needed, apply sealant, tool off, and cure times. Getting this right keeps joints durable, minimizes leaks, and saves you time and money on rework.
Specialty tools for concrete and tile joints
This checklist helps you ensure you have the right tools before starting any joint work on your concrete or tile surfaces.
- Joint-cutting saw blades: Choose diamond-tipped blades designed for cutting through hard materials. Confirm they are sharp and undamaged to avoid jagged cuts. Skip this, and you risk uneven joints that won’t look neat.
- Grinder with wire wheels: Use for cleaning out old grout or smoothing rough edges. Check the wheel is securely attached and not worn down. A loose or damaged wheel can cause injury.
- Tuckpointing chisel set: For removing old mortar from joints. Ensure each tool fits snugly in your hand for control. Inadequate tools lead to rough edges and wasted time.
- Joint raker: Essential for creating clean, straight lines when cutting joints. Confirm the blade is sharp and aligned properly. A dull or misaligned tool results in sloppy cuts.
- Tape measure: For measuring joint widths accurately before cutting. Check it’s calibrated correctly to avoid mistakes. Mis-measurement can lead to costly rework.
- Joint filler applicator: Used for applying grout or sealant into joints neatly. Ensure the tool is clean and free of debris. A dirty applicator leaves marks in your work.
- Angle grinder: For cutting through concrete when necessary. Confirm it’s properly balanced with a sharp blade. An unbalanced grinder can be dangerous and inefficient.
- Tape cutter: Useful for marking straight lines on the surface before cutting joints. Make sure the tape is fresh and not frayed. A worn-out tape leaves inaccurate marks.
Quick rule: Always inspect your tools before starting work to ensure they are sharp, clean, and in good condition.
Consumables and cleanup supplies
This checklist covers the consumable items you’ll need for a clean finish on your concrete project. Use it before starting any work to ensure everything is ready.
- Cleaning solution: Choose a pH-neutral cleaner designed for concrete. Confirm by checking the label or manufacturer’s website. Skipping this can lead to residue that affects adhesion of sealers and paints.
- Masonry primer: Ensure it’s suitable for your surface type, as stated on the container. Check compatibility with other materials you plan to use. Missing this step can cause poor bonding between layers.
- Masking tape: Use high-adhesive blue painter’s tape that won’t leave residue. Test by removing a small piece after curing; no sticky residue should remain. Omitting masking tape can lead to messy edges and uneven finishes.
- Solvent for brushes: Have the right solvent for cleaning your tools, such as mineral spirits or acetone. Confirm it’s compatible with your paint or sealer by checking the manufacturer’s recommendations. Not using a proper solvent may damage your tools or leave residues on your project.
- Rags and paper towels: Keep plenty of clean rags and disposable paper towels handy for quick cleanup. Check that they are dry and free from dust before use. Running out can slow down the work process significantly.
- Squeegees: Have multiple sizes to remove excess water or sealant efficiently. Test by running a squeegee over your surface; it should glide smoothly without catching on bumps. Missing this tool can result in an uneven finish with puddles and streaks.
- Broom for sweeping: Use a stiff-bristled broom to sweep loose debris before applying any finishes. Confirm the bristles are sturdy enough by giving them a gentle tug; they should not come out easily. Not having this can lead to embedded dirt that affects adhesion and appearance.
- PVC sheeting: Have large sheets for protecting areas around your work zone from spills or overspray. Test by laying down a piece and checking it covers the area without gaps. Skipping this step exposes unprotected surfaces to potential damage.
Quick rule: Always have more consumables than you think you’ll need, especially for cleanup supplies.
Step-by-step: leaving gaps during construction
Start with pre-layout planning that accounts for slab size, expected concrete shrinkage, local climate, and interior use, so you can decide where expansion joints, control joints, or a combination are needed and note any code or manufacturer guidance to follow; mark the layout with chalk or string, then set temporary spacers or edge forms to hold even joint spacing and keep surfaces clean for accurate saw cuts later, coordinating joint placement with doors, walls, and columns to avoid misalignment. During pour, divide the work into logical sections that allow clean, continuous joints, stagger joints where required, and maintain consistent joint positions across slabs to prevent misaligned gaps, while considering reinforcement placement and dowel alignment where applicable and planning how you will cut joints after the concrete takes initial set.
Timing and method for cutting joints matter: determine the optimal time to saw-cut or router-cut after initial set, account for temperature, humidity, and slab type, and choose blade or router bit types suitable for the joint material, with dust collection and safety measures in place. Isolation strips and edge finishing should be planned where foam, plastic, or silicone gaskets will go, chosen to accommodate movement without telegraphing through finishes, and backed by backer rod, sealants, or cap finishes to achieve clean, durable edges. Keep a simple checklist, photograph each phase for future maintenance notes and warranty compliance, and insist on clean joints, proper spacing, and debris removal to prevent costly cracking and edge failures later.
On-site workflow and safety overview: To ensure repeatable results, follow this consolidated workflow from site prep through finishing joints. Use the printable checklist at the end of this section to verify each step.
Step-by-Step Process
This sequence will guide you through leaving proper gaps during construction to prevent future issues with concrete expansion and contraction.
- Action: Mark out your gap lines using chalk or spray paint. Reason: This ensures accurate placement of the control joints. Check: Lines should be straight and clearly visible on all sides. Professional call: If you’re unsure about where to place gaps, consult a professional before proceeding.
- Action: Use a cutting tool or concrete saw to cut along the marked lines. Reason: This creates clean edges for your control joints. Check: The cuts should be straight and deep enough to reach through the entire slab thickness. Professional call: If you’re working with reinforced concrete, seek professional help.
- Action: Clean out any debris from the cut lines using a broom or vacuum cleaner. Reason: Ensures proper joint formation and prevents water accumulation. Check: The cuts should be free of dust and loose material. Cure wait: No curing needed, proceed immediately.
- Action: Insert a flexible joint filler into the cut lines. Reason: This allows for movement without cracking. Check: The joints should be filled to just below the surface level of the concrete slab. Cure wait: No curing needed, proceed immediately.
- Action: Tamp down the joint filler using a rubber mallet or similar tool. Reason: Ensures proper seating and prevents future movement issues. Check: The filler should be firmly seated with no gaps visible around it. Cure wait: No curing needed, proceed immediately.
- Action: Finish the concrete surface as per your project requirements. Reason: This completes the structural integrity and aesthetic of your work area. Check: The surface should be smooth and free from cracks or imperfections along the joint lines. Cure wait: Follow manufacturer’s curing instructions for concrete before applying any finishes.
Pro tip: Always double-check your measurements and alignment of cuts to avoid costly mistakes later on.
Flooring (tile, hardwood, laminate) — staged workflow
Before laying flooring, make sure the base is compacted and level. Use spacers to maintain gaps for expansion. Don’t forget to check door clearance before installing trim.
For tile, hardwood, or laminate, use spacers during installation but remove them once you’re done laying the flooring. This keeps your joints neat until the final touches are in place.
When it’s time for baseboards and trim, measure carefully to account for any gaps left by your spacers. If you skip this step, your floors might look off or worse, cause issues down the line.
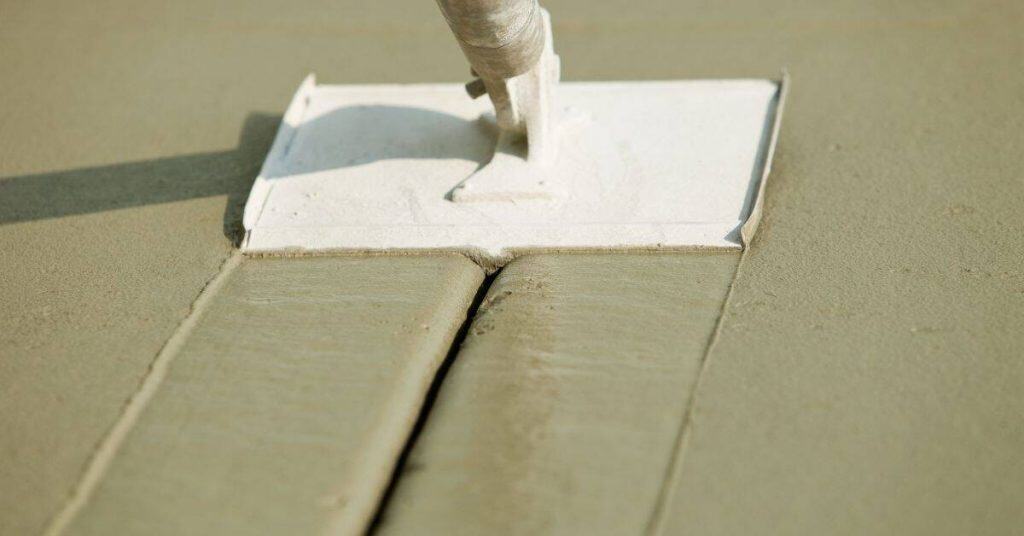
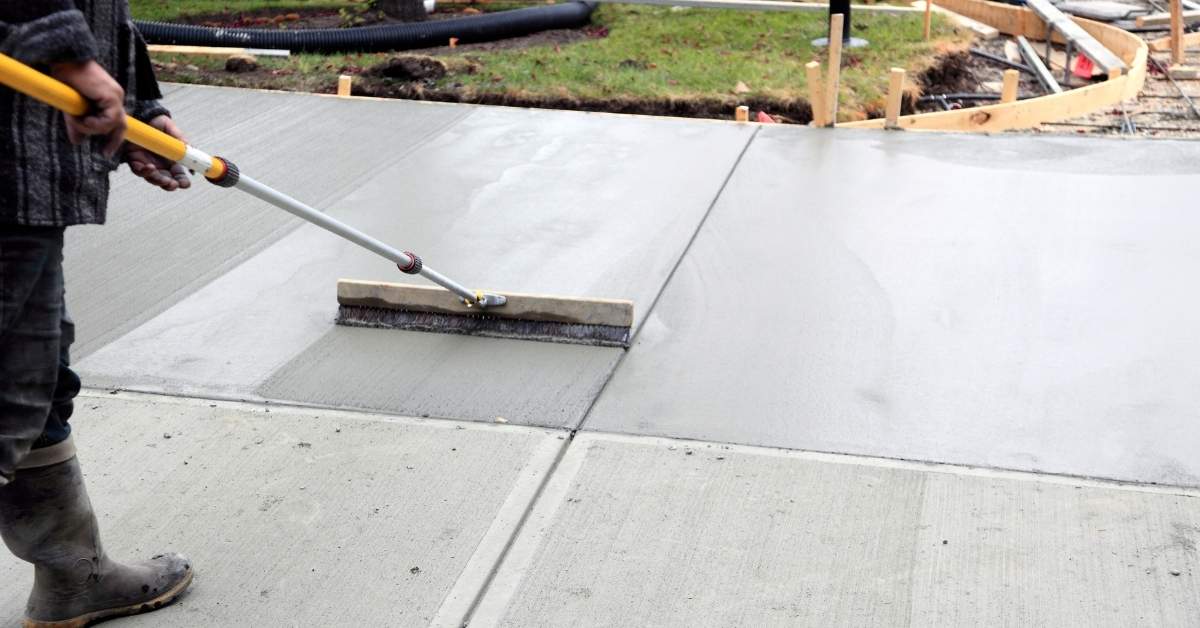
Concrete and screed timing — saw-cut vs formed joints
Timing is everything when it comes to leaving gaps in your concrete slab. For saw-cut joints, you need to wait until the concrete sets up enough to hold its shape but not so hard that cutting becomes impossible. Aim for about 4-6 hours after pouring, depending on weather and mix type. Check base compaction before starting.
For formed joint inserts, install them right away while the concrete is still wet. This method ensures a clean edge but requires precision in placement to avoid shifting or misalignment. Make sure your forms are sturdy enough not to budge under pressure from the fresh pour.
Random cracks happen when you don’t leave proper gaps. Don’t rush into cutting joints too early or waiting too long; it’s all about finding that sweet spot where the concrete is just right for the job. If unsure, consult a pro before making cuts.
Printable on-site checklist (convert to pocket-size printout)
Use this as a concise, repeatable reference from site prep to post-cut finishing. Check off each item as you complete it.
- Site prep: confirm slab dimensions, shrinkage expectations, climate considerations, and interior usage.
- Code/manufacturer guidance: review and note any requirements for expansion and control joints.
- Layout marking: chalk/string layout with clearly visible lines; plan joint locations relative to doors, walls, and columns.
- Temporary spacers/edge forms: install and verify even spacing; protect surfaces from concrete contact.
- Pour planning: divide into logical sections; ensure reinforcement and dowels are aligned with planned joint positions.
- Saw-cut/router-cut timing: determine optimal window post-set; plan dust collection and safety measures.
- Isolation and edge finishing: designate materials for movement accommodation (foam, plastic, silicone gaskets) and plan backer rod and sealants.
- Joint filling: select appropriate filler, fill to just below surface, and seat firmly.
- Post-cut cleanup: remove debris, verify joints are clean and free of loose material.
- Finish work coordination: confirm that surface finishes will not telegraph through joints; ensure proper curing before applying finishes.
- Documentation: photograph each phase for maintenance and warranty records.
- Safety check: confirm PPE, equipment guards, and dust management are in place for all tasks.
- Final inspection: ensure joints are clean, properly spaced, and ready for flooring or finishes.
Step-by-step: finishing joints cleanly
Finishing joints cleanly starts with a solid surface: clean, repaired, and profiled. Then backer rod, primer as needed, proper sealant depth, and careful tooling shape the bead. Follow through with final trim for a professional look.
Skipping steps invites cracks and adhesion failure. The right backer rod, primer, and sealant choice let the joint move with temperature and load. Tooling, masking, and trim finish prevent gaps and look sloppy.
Step-by-Step Cleaning Process
This sequence will guide you through cleaning concrete joints to ensure they look neat and professional.
- Action: Clear out any loose debris from the joint using a stiff-bristled brush or vacuum.
Reason: Loose dirt can interfere with the final appearance of your work.
Check: The surface should be free of visible dust and debris. - Action: Apply a concrete cleaner to the joint, following the manufacturer’s instructions for dilution.
Reason: Cleaner removes oils or stains that can affect bonding agents.
Check: The cleaner should visibly lift dirt when applied; rinse thoroughly after use. - Action: Rinse the cleaned joint with clean water to remove all traces of cleaner and debris.
Reason: Residual cleaner can prevent proper curing of sealants or coatings.
Check: The surface should be dry to touch, free from standing water. - Action: Inspect the joint for any cracks or damage that might require repair before sealing.
Reason: Addressing issues now prevents bigger problems later on.
Check: No visible cracks or signs of wear should be present; if found, patch with appropriate material. - Action: Allow the joint to dry completely after cleaning and repairing before applying any sealants or coatings.
Reason: Proper drying ensures adhesion and longevity of applied materials.
Check: The surface should be bone-dry, with no dampness felt when touched.
Pro tip: Always wear protective gear like gloves and goggles during cleaning to avoid skin irritation or eye injuries.
Achieving smooth, uniform sealant beads
To get a clean joint finish, you need to mask off the area around your joints before applying sealant. Use painter’s tape to create sharp edges and keep the sealant exactly where it should be. Make sure the tape is firmly pressed against the concrete so no sealant leaks underneath.
When tooling the sealant bead, aim for a 45-degree angle. This helps prevent ridges from forming as the sealant cures. Move slowly and steadily with your finger or a specialized tool to keep that clean line. Don’t overwork it once you’ve got the shape right.
Curing conditions are key too. Keep an eye on humidity and temperature. If it’s too dry, the sealant can crack; if it’s too wet, it won’t set properly. Check base compaction before sealing to ensure your concrete isn’t shifting or settling as you work.
Matching colors and textures for visible joints
To make your concrete joints look clean and professional, you need to match the sealant color with the surrounding concrete. Use a neutral gray or black sealant that blends well. If you’re working on light-colored concrete, go for a lighter shade of gray; darker concrete calls for a charcoal or black sealant.
For texture matching, apply your sealant in thin layers to mimic the surface finish of your concrete. A rough trowel finish needs a slightly textured bead, while smooth finishes should have a sleek, uniform look. Use a damp finger or tool to feather out any excess for a seamless appearance.
If you’re dealing with joints that are too wide and can’t be hidden by sealant alone, consider using trims or decorative strips to cover them up. These options come in various colors and styles to match your concrete’s aesthetic. Just make sure the trim is securely fastened to prevent water damage and ensure longevity.

Best practices by material and assembly type
Best practices vary by material and assembly type, so plan joint locations and sizes tailored to wood floors, tiles, concrete slabs, exterior decks, and masonry facades. Choose primary and secondary joints, backer rod, and sealants to handle movement and finish tolerances, and decide flush, recessed, or surfaced joints with proper edge trims.
Getting joints right protects against telegraphing, cracking, and moisture damage, saving time on repairs. A clear sequence and material notes mean you can prep, install, and maintain joints with fewer call-backs and longer colorfast, durable results.
Floating floors and fixed elements (kitchens, islands)
When dealing with floating floors in kitchens and around island cabinets, it’s crucial to manage the expansion of concrete under heavy fixed items. Check base compaction before pouring any concrete slab to ensure a stable foundation. This prevents future issues like cracks or uneven surfaces.
Isolate kitchen islands from the main floor with proper isolation details. Use foam board or plastic sheeting around the perimeter of the island where it meets the floating floor. This keeps moisture and movement separate, preventing damage over time. Don’t skimp on this step; it’s a small detail that makes a big difference in longevity.
Remember, when you have heavy fixed elements like kitchen islands or countertops, they can stress your floating floor if not properly isolated. Take the extra care upfront to avoid costly repairs down the line. It’s worth the effort to get this right from the start.
Exterior decking and balustrade penetrations
When it comes to exterior decks, the joints between boards and where they meet joists are crucial. Make sure your deck boards have a 1/8-inch gap for expansion and contraction. This prevents warping and ensures longevity.
The waterproof membrane under your deck needs to be properly sealed at all penetrations like posts, balusters, and railings. Use flashing or sealant around these areas to prevent water from seeping in and causing rot. Don’t skimp on this step; it’s the first line of defense against moisture.
For balustrades, ensure that any penetration through your deck boards is neatly sealed with silicone or another appropriate sealant. This not only keeps out water but also adds a clean look to your finished project. Remember, proper sealing here can mean the difference between a deck lasting years and one needing repairs soon.
Safety and site considerations
Safety starts with controlling dust when you cut joints, using water or mist, integrated vacuums, and local enclosures so you don’t turn the whole room into a cloud. Keep cross-ventilation in mind for sealants, and if you’re indoors, set up temporary exhausts and keep occupants away from fumes. Dress the crew properly with ANSI-rated eye protection, respirators or dust masks, chemical‑resistant gloves, hearing protection, and sturdy footwear, and verify the fit before you start; always check substrate moisture and stay within the moisture limits specified by the sealant vendor to avoid failures later.
That matters because poor dust control, bad ventilation, or low-quality PPE invites health risk, job-site chaos, and failed joints that cost you time and money. By planning the layout, keeping pathways clear, and properly storing and labeling sealants and solvents away from heat, you create a safer, faster workflow with fewer interruptions and a higher likelihood of a durable, long-lasting install.
Handling and disposing of old sealants and backer rod
When you’re dealing with old sealants and backer rods, safety comes first. Make sure to wear gloves and a mask when removing them—these materials can be toxic if not handled right. Check local regulations on disposal; some areas have special recycling centers for these items.
If you can’t recycle, look into hazardous waste facilities. Don’t just throw sealants in the trash or pour them down the drain—that’s a big no-no and could land you in hot water with local authorities. If you’re unsure about disposal rules, call your city hall or check their website for guidelines.
Once you’ve got the old stuff out of there, clean up any residue thoroughly before applying new sealants. This step is crucial to ensure a good bond and prevent future leaks. Don’t rush it—take your time to do it right.
Environmental and fire-safety issues
When working with concrete, you gotta keep an eye on the environment. Make sure your site isn’t leaking VOCs (volatile organic compounds). Use low-VOC sealants to stay green and legal. Also, check base compaction before pouring; a weak foundation can lead to big headaches later.
Fire safety is another must-do. Concrete itself won’t catch fire, but what’s around it might. Keep flammables away from the site, especially near electrical boxes or other penetrations where you’ll be working with materials that could ignite easily. Use fire-rated foam or other non-flammable backer rod when sealing gaps to meet safety codes.
Choose your sealants wisely. They need to match the fire rating of the surrounding area. Don’t cut corners here; a small mistake can lead to big problems down the road. Stick with products that are rated for your specific application and follow all manufacturer guidelines strictly.
Common DIY mistakes and how to avoid them
Common DIY expansion joints fail when you get the basics wrong: gaps too small or too big, backer rods buried or too shallow, and sealant trying to bond to three sides instead of staying isolated. Use the right gap targets for interior slabs and exterior drives, set backer depth to match the substrate and sealant you pick, and keep one face non-adhesive so the sealant can perform without tearing. Also prep surfaces, test moisture, and avoid three-sided adhesion by creating a proper backer path and priming only where the job calls for it.
This matters because the wrong sizing and adhesion habits lead to crack wandering, adhesive squeeze-out, and early sealant failure. A simple, consistent approach—clean, level surfaces; correct gap and backer specifications; appropriate interior versus exterior sealants; and proper masking and tooling—means longer life with fewer call-outs. You gain predictable performance, cleaner finishes, and real savings by doing it right the first time, even if you’re dialing it in on a residential slab or driveway project.
When a failed joint can be repaired vs when to replace
Fixing a cracked or failed concrete joint isn’t always as simple as slapping on some caulk. First, check base compaction. If the ground underneath is weak and shifting, you’re just wasting time and money patching up the surface.
If the base is solid but the joint has opened up due to settlement or freeze-thaw cycles, consider resealing it with a good quality concrete sealant. Make sure to clean out any debris from the old joint before applying new material.
But if you see cracks spreading beyond just the joint area—into the slab itself—it’s time for more serious action. You might need to cut out and replace sections of concrete, or even consider a full resurfacing job depending on how bad it is.
Inspection and visual checkpoints
This section is about checking joints before and after installation to make sure they are sized, placed, and finished correctly. Verify joint locations, surrounding movement, expansion material, and dimensions against the plan to avoid undersized or oversized gaps. Inspect substrate flatness and cleanliness, and confirm joints are straight, aligned with lines, and spaced and edged properly.
Doing these checks keeps the project from failing later. It helps you catch issues early, document conditions, and ensure consistent fill depth, color, and curing. A little discipline here saves rework and returns a cleaner, longer-lasting joint finish.
Signs of Impending Failure
This checklist helps you spot potential issues before they become major problems. Use it during regular inspections to catch signs early.
- Adhesive Bleed: Look for a white, powdery substance on the surface. Confirm by wiping with water; if it doesn’t wash off easily, there’s an issue.
What goes wrong: Can lead to weak bonding and structural failure. - Cracking Patterns: Check for cracks wider than 1/8 inch or those that run continuously across the surface. Confirm by measuring with a ruler.
What goes wrong: Cracks can worsen over time, leading to significant damage. - Debonding Edges: Inspect edges and corners for loose concrete. Confirm by gently tapping; if it sounds hollow or flakes off easily, debonding is present.
What goes wrong: Can cause instability in the structure. - Discolouration Spots: Look for areas that are darker or lighter than surrounding surfaces. Confirm by comparing to a known good area nearby.
What goes wrong: May indicate water intrusion or chemical contamination. - Surface Flaking: Check if the surface is breaking into small pieces when touched. Confirm by gently scraping with a tool; flaking should not occur in healthy concrete.
What goes wrong: Can lead to further deterioration and weakening of the structure. - Exposed Rebar: Inspect for any exposed metal bars or wires within the concrete. Confirm by looking at the surface closely, especially around corners and edges.
What goes wrong: Exposed rebar can rust and weaken the surrounding concrete. - Pitting on Surface: Look for small holes or depressions in the concrete. Confirm by running your hand over the surface; pitting should be smooth and even.
What goes wrong: Can lead to water penetration and further damage. - Inconsistent Texture: Check if the texture varies significantly across different areas of the slab. Confirm by comparing sections side-by-side.
What goes wrong: Inconsistency can indicate improper curing or application techniques. - Water Stains: Look for any signs of water damage, such as staining or efflorescence (white powder). Confirm by checking for wet spots after rain or watering.
What goes wrong: Water can weaken concrete and cause structural issues over time. - Uneven Settlement: Inspect the slab for unevenness. Confirm by using a level to check if it’s perfectly flat across its length.
What goes wrong: Uneven settlement can indicate underlying soil instability or improper foundation work.
Quick rule: If something looks off, measure it or test it; don’t assume everything is fine just because it seems okay at first glance.
Maintenance, resealing intervals and long-term care
Seasonal adjustments and monitoring
Keep an eye on your concrete slab as seasons change. In winter, watch for frost heave, which can lift the slab and cause cracks or uneven surfaces. Summer brings heat expansion, so check joints to ensure they’re functioning properly.
Maintain a log of any issues you spot—cracks, lifting edges, water pooling—and note when they appear. This helps with warranty claims if needed and guides future maintenance actions. Don’t wait for problems to worsen; address them early to save money and hassle.
Seasonal changes can also affect the sealant around your slab’s edges. Check these areas after winter and summer to see if resealing is necessary. A little attention now saves big headaches later on.
When to hire a pro — complexity triggers and warranty requirements
When you’re laying large slabs, making multi-area transitions, or dealing with elevated floors and substrates that move, DIY work invites misalignment, cracking, and costly call-backs. In these cases, complex joints, curb walls, stairs, pool decks, and penetrations demand precise design and movement allowances, plus warranty-mandated installers and conditions that only a qualified pro can reliably meet.
A pro should start with a site assessment, proper joint layout, material compatibility checks, and precise cutting, backing, and sealing to protect the finished surface. They should document installation requirements that keep warranties valid, and identify irregular or poor substrates, moisture challenges, or non-standard materials that trigger professional input. Plan for permitting, timelines, potential downtime, and verify contractor qualifications and references before you start.
What to ask a contractor and how to verify competence
When hiring a pro, make sure you’re not just getting someone who can swing a hammer. Ask about their experience with the specific job at hand—like check base compaction for concrete work—and see if they’ve done similar projects before. Don’t be shy to ask for references or past project photos.
Certifications are key too, but don’t just take a contractor’s word for it. Ask them to show proof of their credentials and licenses on the day you meet. If they’re legit, they’ll have no problem pulling out the paperwork.
Before signing any contract, make sure you understand all the warranty details. A good contractor will spell this out clearly without needing a lawyer to translate it for you. Remember, if something sounds too vague or complicated, it probably is.
Cost considerations and budgeting tips
Cost considerations for expansion joints come down to materials and labor. Typical material costs span sealants, backer rods, joint inserts, and curing compounds, with tools and labor for cutting, cleaning, priming, sealing, and finishing adding to the bill. Proper joint type and correct placement save money long term by reducing cracks, water intrusion, and reseals.
This matters for DIY folks because climate, outdoor exposure, and substrate drive choice and labor complexity, which in turn shape your budget. Plan for itemized line items, quotes from others, and a contingency of 5–15%, plus decisions on retrofit versus new pours and ongoing resealing maintenance. Knowing these factors helps you avoid over- or under-spending and keeps the project on track.
Value vs cheap fixes: choosing durable materials
Picking the right materials upfront saves you money and hassle down the line. Cheaper options might seem like a good deal now, but they can lead to costly repairs later.
- Type N mortar: Used for laying bricks or blocks in walls. Look for strength class 2000 psi minimum. Avoid using it for high-load areas; use Type S instead. Cheap mortars often crack and let water through, causing long-term damage.
- Concrete sealant: Protects concrete from moisture and stains. Choose a product with UV resistance to prevent fading. Apply within 24 hours of pouring or curing for best results. A cheap sealant might peel off after a year, costing more in the long run.
- Masonry cement: For repairing cracks and joints in masonry walls. Look for high compressive strength ratings. Use it when you need to patch up small areas quickly; avoid large-scale repairs. Masonry cement can be pricey but is worth it if you want a strong, lasting fix.
- Acid-resistant grout: Ideal for sealing joints in acid-sensitive materials like marble or limestone. Check the label for acid resistance ratings. Use this only on surfaces that come into contact with acids; regular grout will break down over time.
- Epoxy primer: Essential before painting metal structures to prevent rust and improve paint adhesion. Look for a product rated for high humidity environments if you’re in a wet climate. Don’t skimp on this step or your paint job won’t last long.
Pro tip: Store materials like mortar and cement in dry, covered areas to prevent moisture damage before use. This keeps them ready when you need them without wasting money on replacements.
Conclusion
Getting joints right isn’t decorative—it keeps floors and structures stable, prevents costly cracks, and protects against moisture damage. When you leave the right gaps and finish them cleanly, you reduce risk and extend the life of the job, especially in areas that move with temperature, humidity, or load.
Check the plan in plain terms: verify you’ve placed movement joints at the recommended locations, confirm gaps are sized to spec for the material, set and protect those gaps during construction, test a small area first, and finish with the proper filler, sealant, and curing method. Do the work in the right order: mark and cut joints, keep openings clear during pours, install filler or backer as you go, and then seal once the joint is stable. If you’re unsure, confirm tolerances with a quick test in a hidden corner or a mock-up before committing to the whole project.
Common mistakes to avoid include skipping backer material, overfilling joints, and ignoring movement direction or environmental changes. Never force a joint closed or seal it before the substrate has settled, and always wear eye and hand protection, follow manufacturer cure times, and test sealants in a small, inconspicuous area first. For safety, keep power tools guarded, ventilate when working with solvents, and keep kids and pets away from wet fillers and caulks until they cure.
If the project feels beyond your comfort level—complex movement patterns, unusual materials, or critical structural joints—consider bringing in a pro for a quick assessment or to address warranty requirements. With the right plan and careful steps, you’ll finish cleanly, stay within budget, and get durable results you can trust every day. Stay focused, and take it one precise step at a time.
FAQ
How much gap should I leave for expansion joints?
Leave about 1/4 inch to 1/2 inch for most indoor concrete or tile installs. For exterior decks, siding, or large slabs, go up to 3/4 inch if you have movement in the area. Don’t force the joints to close; they need room to breathe and move.
Where should I place expansion joints in a room or on a deck?
Put joints where the slab naturally ends or changes direction. Put one every 8 to 12 feet in long runs unless the slab design says otherwise. Don’t skip joints at corners or along stair runs just to keep a clean line.
What’s the best way to finish the joint so it looks right and stays durable?
Use a flexible sealant or foam backer rod in the gap, then seal with a color-matched caulk or polyurethane. Push the material level with the surface, not proud of it. Don’t mesh in hard caulk; it will crack with movement.
What are common mistakes to avoid with movement joints?
Don’t fill gaps with rigid material or shove epoxy in tight gaps. Don’t ignore changes in sun, heat, or moisture that can make slabs move. Don’t skip joints in high-traffic areas or around large appliances; movement won’t wait for a pretty finish.