
Introduction
Acrylic primers are generally cheaper and dry faster, while epoxy primers offer greater durability and chemical resistance for concrete floors.
This article helps you decide which type matches your project needs and explains practical considerations like substrate condition, cure time, and surface preparation.
You’ll learn through simple guidelines and examples how to apply the chosen primer for best adhesion and long-term performance.
Key takeaways
- Compare acrylic vs epoxy primers: acrylic for faster cure, epoxy for durability and moisture resistance.
- Prepare concrete: clean, dry, and mechanically deglossed before any primer coat.
- Moisture test: use CM tests; ensure RH ≤ 75% or per spec.
- Surface prep dominates adhesion; etch, grind, or priming after patching.
- Topcoat compatibility: confirm primer listed under expected topcoats in data sheets.
Table of Contents
- Introduction
- Key takeaways
- Quick comparison: acrylic vs epoxy primers at a glance
- What is an acrylic primer? Product types and characteristics
- What is an epoxy primer? Product types and characteristics
- Surface preparation: the critical first step for either primer
- Moisture guidance: testing, acceptable limits, and mitigation strategies
- Compatibility matrix: which primers work with which topcoats
- Cost comparison and sample budgets: materials, labor, lifecycle cost
- Safety, VOCs, and ventilation: what to expect with each system
- Detailed DIY planning checklist and step-by-step application guide
- Maintenance, expected lifespan, and troubleshooting long-term issues
- Review samples, request quotes, and choosing an installer
- Enjoy your new floor: post-install checks and first-use recommendations
- Conclusion
- FAQ
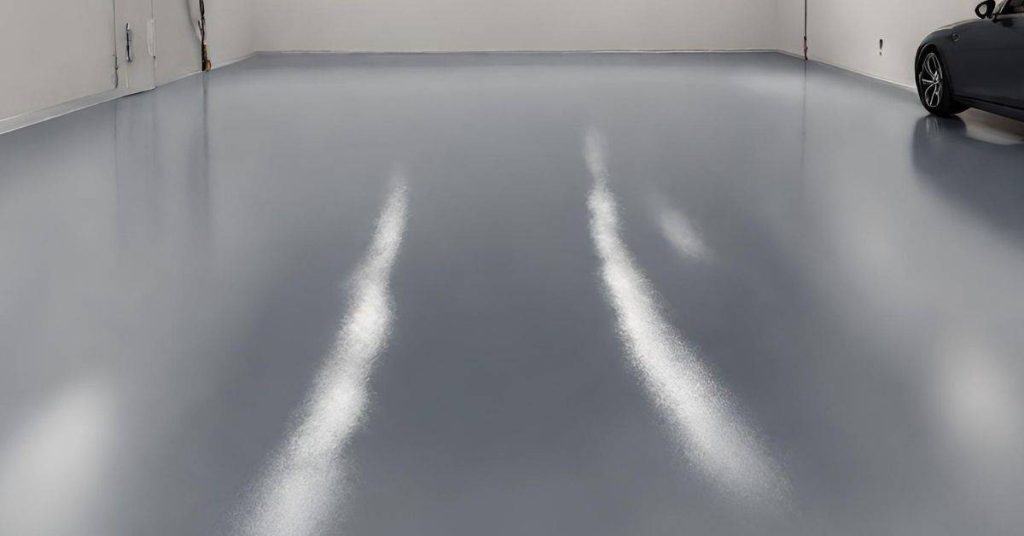
Quick comparison: acrylic vs epoxy primers at a glance
Acrylic primers, being water-based, form a relatively porous seal and cure quickly, which translates to fast recoat windows and lower odor, making them suitable for light-duty concrete floors where a gentle base is adequate and DIY timelines matter. Epoxy primers, by contrast, are a two-part resin system that yields superior chemical resistance, moisture barrier, and adhesion for tough substrates, but they come with higher VOC considerations, longer pot life, and more demanding surface preparation. In practical terms, acrylics shine for decorative toppings, thin seals, or light traffic areas, while epoxies are preferred under high-traffic, chemical exposure, or moisture-prone conditions where a tougher, more durable base is essential.
Cost, cure time, and prep influence choice as well: acrylics usually cost less upfront and require milder prep, whereas epoxies demand careful mixing, stricter ventilation, longer cure periods, and can raise total project timelines and budget. For performance outcomes, expect acrylics to provide adequate adhesion for simple coatings with moderate moisture transmission, while epoxies minimize vapor transmission and fill minor surface imperfections more effectively, though the exact results hinge on surface condition and coating lineup. A practical decision framework can be a quick, on-site test plan: assess substrate condition, run a small trial of each option, compare finish, odor, cure windows, and compatibility with your intended topcoat, then quote accordingly.
Key performance differences (adhesion, abrasion, chemical resistance)
Acrylic primers stick well to clean, dry concrete and painted surfaces, but they don’t grab like a two-part system. Epoxy primers give superior adhesion to bare concrete and to many topcoats, especially in heavy-use areas.
For abrasion and wear, acrylic holds up under light foot traffic and car tires for DIY garages. Epoxy beats it for heavy abrasion — forklifts, pallet jacks and constant traffic will wear acrylic faster.
Chemical resistance is where epoxies really pull ahead. Acrylic resists mild cleaners and occasional spills. Epoxy tolerates oils, solvents and many chemicals much better, so it’s the safer pick in workshops and commercial spaces.
Typical use cases (DIY, commercial, moisture-prone slabs)
For a homeowner doing a weekend garage floor refresh, an acrylic primer is often quicker and cheaper. It’s forgiving, easy to touch up, and fine for light vehicles and bikes. If budget and speed matter, acrylic is a practical choice.
In commercial or industrial settings where durability and chemical resistance matter, epoxy primers are the go-to. They handle heavy traffic, spills, and require less frequent recoating. That’s why warehouses and busy workshops use epoxy.
For moisture-prone slabs, don’t guess. Epoxy primers formulated for high-moisture environments or moisture mitigation systems will perform far better than standard acrylic. Refer back to the earlier chemistry and moisture notes when choosing a product for damp concrete.

What is an acrylic primer? Product types and characteristics
Water-based acrylic primers use acrylic copolymers and resin binders to create a film that adheres to concrete while moderating porosity and moisture migration. The formulations split into common types like copolymer primers and acrylic sealers, each serving distinct roles in adhesion, underlay performance, or moisture control, and they typically come in pint, quart, or gallon packaging with stated coverage per coat. These products emphasize easy cleanup, low odor, and compatibility with subsequent acrylic or epoxy systems, but may require attention to surface prep and cure-time constraints.
For DIY and job sites, the choice matters because primer type affects final coating adhesion, moisture barrier performance, and application timing, influencing project budgets and timelines. Understanding labeling basics, spread rates, drying/recoat windows, and substrate compatibility helps you pick the right primer for concrete floors, while packaging choices align with project scale. Safety, storage, and environmental considerations—such as VOC content and disposal—round out a practical, quick-fit framework for planning and executing the first coating layer.
Water-based acrylic sealers vs acrylic copolymer primers
Think of sealers as a surface treatment and copolymer primers as a bonding agent. Sealers penetrate or film the surface to reduce dust and absorption. Copolymer primers are formulated to promote adhesion between the substrate and a topping or paint.
Sealers are typically thinner in solids and won’t tolerate heavy coatings on their own. Copolymer primers contain specific polymers designed to bridge materials and handle stress from topcoats. If you’re prepping for tile, epoxy, or a cementitious overlay, reach for a copolymer primer rather than a basic sealer.
Quick rule: use a sealer for moisture control and dust suppression; use a copolymer primer when adhesion and long-term bond are the priority.
Common brand SKUs and example products
Brands often label products as “acrylic sealer”, “acrylic primer”, or “acrylic copolymer primer.” Look for SKUs that state coverage (sq ft/gal), recommended spread rate, and suitable topcoats on the label. Typical household names and pro lines will include both simple sealers and true primers—check the technical data sheet for solids and adhesion test results.
Watch the VOC rating if you work indoors, and note any restrictions like “not for use under solvent-based epoxy.” Examples you’ll see on pro shelves include water-based acrylic sealers for concrete, acrylic bonding primers for overlays, and copolymer primers for tile or epoxy systems. Read the label for coverage, recommended topcoat types, and cure times before you buy.
Tip: if the label references ASTM adhesion tests or lists compatible topcoats (epoxy, polyurethane, cementitious), it’s probably a true primer rather than a simple sealer.
What is an epoxy primer? Product types and characteristics
An epoxy primer is a two-part resin system applied to concrete to seal pores, improve adhesion, and form a moisture and chemical barrier before topcoats. It comes in several forms, notably 2-component primers based on a bisimust/epoxy resin system, high-penetration variants, and moisture-tolerant formulations. Each type has trade-offs: 2-component primers offer strong adhesion and chemical resistance but require precise mixing, longer pot life, and careful temperature control; high-penetration primers seal porous substrates and old coatings but can cost more and limit film build; moisture-tolerant versions perform in damp or hydrostatic conditions but may constrain recoat windows and coating compatibility.
Choosing the right primer depends on floor traffic, humidity, and future coatings; start with substrate prep, moisture testing, and compatibility checks with the intended topcoat. For DIY jobs, plan for thorough cleaning, mechanical profiling, and following manufacturer mix ratios and cure times, plus test before full application to avoid peeling or improper adhesion. Practical steps include concrete moisture testing, edge and corner prep, and documenting any observed issues to address before applying subsequent coatings.
High-penetration, water-based, and solvent epoxy primers
High-penetration primers are formulated to soak into very porous concrete or old screeds. Use them when the slab drinks the primer — they seal dust and bind friable surfaces so the topcoat goes on evenly.
Water-based epoxies are easy to work with and have lower odor. They dry fast and are good for interior jobs where ventilation or solvent restrictions matter. They don’t always perform as well on very damp slabs.
Solvent-based epoxies give stronger penetration and adhesion on marginal surfaces and when a tougher chemical resistance is needed. They handle slightly higher moisture and heavy-traffic topcoats better, but expect stronger fumes and longer cure times. For a patchy slab, consider a high-penetration solvent primer or a water-based primer followed by a moisture-tolerant topcoat.
Example epoxy primer SKUs and manufacturer notes
Sherwin-Williams Macropoxy 646 is a common 2-component epoxy used as a general-purpose primer on concrete and steel. It’s a solid choice when you need good adhesion and chemical resistance. For very porous substrates, pair it with a primer coat at a higher spread rate.
BASF/Chryso FE80-style systems (FE80-like) are formulated for fast penetration and low-viscosity priming of underlayments and self-levelers. They work well under cementitious toppings. For moisture-prone slabs, look at moisture-tolerant primers such as Sika Primer MB or products labeled for damp concrete — they’ll reduce failures from residual moisture.
Param-style primers (parametric penetration primers) are lightweight, low-viscosity epoxies used where you need deep substrate penetration rather than a build coat. Match the SKU to the job: porous concrete gets penetration primers; high traffic or chemical exposure needs tougher solvent-based systems; low-odor sites use water-based options.
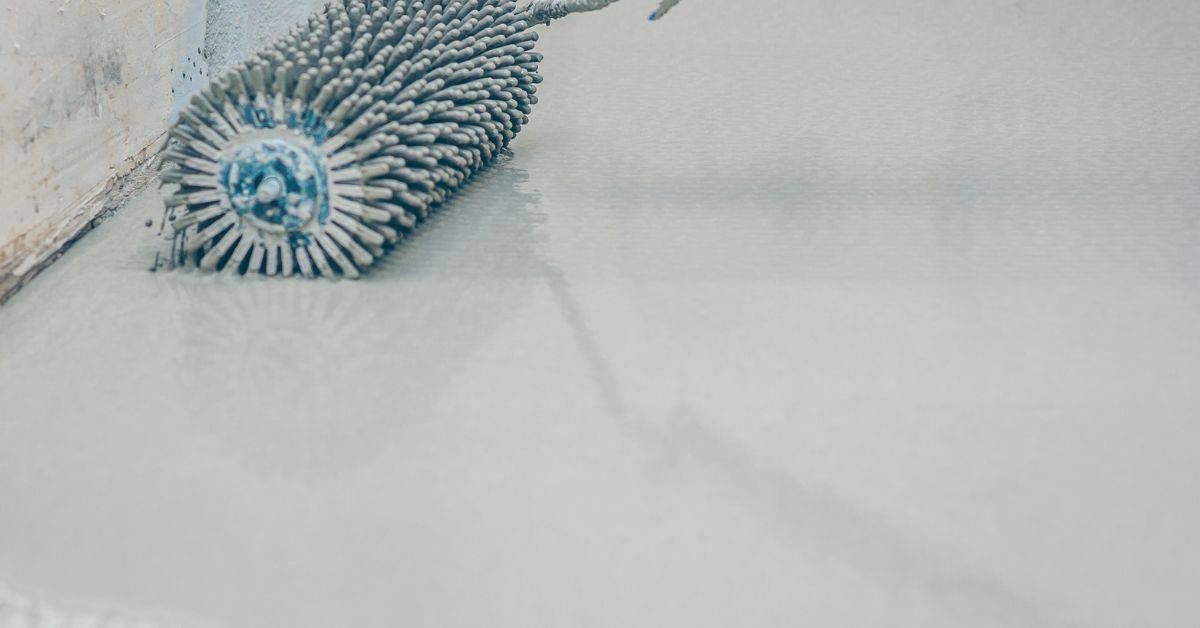
Surface preparation: the critical first step for either primer
Surface prep is the non-negotiable first step for primer adhesion on concrete, because the substrate’s pH, moisture level, and surface contaminants directly influence how well acrylic or epoxy primers bond, especially under varying environmental conditions. Cleaning, repair, and proper profiling set a uniform base, while moisture, salts, and old coatings are addressed to prevent later failures, enabling reliable performance in real-world jobs. By targeting a clean, repaired, and correctly profiled surface, you create the conditions that maximize adhesion and durability for the chosen primer system, across typical concrete substrates in garages, basements, and shop floors.
Begin with thorough cleaning to remove oils, grease, paints, dust, and loose debris using degreasers or detergents, then vacuum or wash as appropriate, leaving a residue-free surface ready for profiling. Follow with crack repair, spall treatment, and conditioning to ensure patches are compatible with the primer and the substrate presents a solid, uniform profile—select shot blasting for a robust microroughness or diamond grinding for sensitive surfaces, depending on substrate condition and project goals. Finally, run moisture and salt checks (MVER or RH, alkalinity, sulfate content) and outline mitigation steps if needed, then document the work with before/after photos and a substrate log while maintaining ventilation and safety.
Visual checkpoints and test spots
Walk the slab with purpose. Look for dark stains, oil spots, paint, loose dust and areas of flaky cement or laitance. These are the places that kill adhesion if you miss them.
Check the profile by running your hand across the surface. It should feel uniformly rough, not powdery. For contaminants, do a solvent wipe and a small water pond; if the water beads or the solvent lifts film, mark that as a problem spot.
Do a quick adhesion test before you commit. Roll on a 6″ test bead of primer or adhesive, let it tack per product directions, then try a crosscut peel. If it peels easily, you need deeper prep or a different cleaner.
Tools and materials checklist for prep
Bring the right kit. The tools below get the surface clean, profiled and safe to work on. I list typical specs and a practical tip for each.
- Concrete grinder — Aggressive profile tool with 4–6 grit diamond cup wheels. Use 1–2 passes for shotblast equivalent. Rent larger walk-behind units for big slabs; expect $70–150/day rental.
- Vacuum with HEPA — Collects dust and fines while you grind. Must be rated for silica; keep filters clean. Large-capacity units save time on commercial jobs.
- Shotblaster or scarifier — Fast for heavy coatings and contamination. Delivers uniform profile in one pass. Rent if you don’t use it often; costly to buy new.
- Patching compound — Cementitious or epoxy-specified patch for spalls and cracks. Match product to primer type and cure times. Fill low spots flush to prevent pinholes in the topcoat.
- Degreaser/etch cleaner — Breaks down oils and surface salts. Follow dilution and dwell times exactly. Test in a small area first to confirm it removes staining.
- Moisture and pH test kit — Measure moisture vapor emission and concrete pH/salts. Specs matter: follow primer limits. Test multiple spots, not just one.
- PPE and containment — NIOSH respirator, eye protection and gloves for grinding and chemicals. Use plastic sheeting to contain dust and runoff. Safety is non-negotiable on every job.
- Hand tools and brushes — Scrapers, wire brushes and stiff push brooms for detail work. Good for edges and small repairs. Keep extras; they wear out fast on rough jobs.
Moisture guidance: testing, acceptable limits, and mitigation strategies
Moisture testing clarifies when to test slab moisture, which methods to use (CM and RH), and how results drive primer selection at key project stages and milestones. Calcium chloride (CM) tests measure surface evaporation, while RH tests gauge in-situ pore moisture with probes or embedded sensors, each with typical timelines from pour cure to final flooring and different interpretation guidance for DIYers and professionals. Practical thresholds show when acrylic copolymer primers are acceptable, when epoxy primers are needed, and why aging concrete can shift those values, sometimes requiring re-testing as conditions change over time.
Mitigation starts with thorough surface prep, moisture barriers, and correctly timed primer application, with higher readings prompting additional adhesion primers or vapor retarders before finish floors go down and long-term stability is protected. Knowing the failure modes—bond failure, blushing, or pinholing—helps justify the effort, explains why primer choice matters under high moisture, cracking, or hydrostatic conditions, and underscores how proper prep reduces risk for both DIY and professional installations. A concise decision path translates test results into primer recommendations and highlights when DIY work should pause for pro installation or re-testing if readings drift between pours and installations, with a plan for re-evaluation after weather or season changes.
Interpreting CM vs in-situ RH tests
The calcium chloride (CM) test gives a quick surface moisture reading. It’s cheap and easy, but it only samples a small area and can under- or over-estimate deep slab moisture. In-situ relative humidity (RH) tests measure moisture inside the slab and give a more reliable picture for flooring decisions.
Use CM when you need a fast spot check; use in-situ RH for critical installations or larger areas. Typical pass/fail numbers: CM often uses manufacturer limits (commonly under 3 lbs/1000 ft2/24 hr) while RH is measured as a percentage (generally <75% RH for many adhesive systems, but check product specs). If results conflict, trust the in-situ RH for long-term performance.
Tip: Document both tests. If RH is high but CM is low, expect moisture to emerge later—plan mitigation or a moisture-tolerant primer before installing finish flooring.
Moisture-mitigation options and primers for high-moisture slabs
If RH tests show elevated moisture, you’ve got options. Surface topical barriers and two-part epoxy vapor barriers applied to the slab block moisture transmission into the flooring. In severe cases, a full membrane or moisture mitigation system is the right call—don’t skimp on coverage or dry-time requirements.
When you can’t fully lower slab moisture, use a moisture-tolerant epoxy primer or a specially rated primer-overlay system designed for higher RH. These products create a bond and a secondary barrier so adhesives and floor coverings perform. Follow the primer manufacturer’s RH limits and application notes closely.
Jobsite note: Surface preparation matters. Clean, profile, and patch before any primer or membrane. If unsure which system to use, pick a tested manufacturer system with documented RH tolerance rather than mixing products from different makers.
Compatibility matrix: which primers work with which topcoats
A compatibility matrix helps you pair primers with topcoats (epoxy, polyurethane, acrylic) so adhesion, curing times, and recoat windows align. Start with proven pairings: epoxy primer with epoxy topcoat, and acrylic primer with acrylic sealers. Flag risky combos such as epoxy primers with acrylic topcoats or polyurethane primers with water-based/topcoats, and note why they fail.
For DIY projects, this quick reference highlights what to check before coating, including substrate porosity, moisture, and alkalinity, which can affect compatibility. Use the guide to plan safer schedules, avoid failed adhesion, and choose the right primers for tricky substrates.
Common failure pairings to avoid
These are the pairings that show up on job sites as troublemakers. They usually end in delamination, blush, or wrinkling. Watch for them and skip the shortcuts.
- <strong= ”=””>Solvent primer + water-based topcoat Solvents in the primer can prevent the water-based topcoat from wetting out, causing adhesion loss; use a compatible water-based primer or fully flash off solvents per manufacturer instructions.</strong=>
- Uncured epoxy primer + polyurethane If the epoxy hasn’t fully cured it can react with the PU and cause blisters or soft spots; wait full cure and follow pot-life/overcoat windows.
- Acid-etch primer + acrylic sealer Residual acid can cause saponification and poor bonding with acrylics; neutralize and rinse thoroughly or choose a non-acid primer.
- Two-part primer + single-coat sealer A high-build two-part primer may trap solvents under a thin sealer layer, leading to blush or wrinkling; reduce film build or use a compatible topcoat designed for that primer.
- Incompatible chemistry mixes Epoxy primers under polyurethane or vice versa without tested compatibility can delaminate; always check technical data sheets and adhesion test a small area first.
Bottom line: if the chemistry doesn’t match or the primer isn’t cured/clean, you’ll get problems. Match products and follow manufacturers for trouble-free performance.
Primer selection for specialty toppings (self-leveling, urethane cement)
Specialty toppings like self-leveling mixes and urethane cement need primers that promote adhesion and control moisture. These underlayments are thicker and less forgiving than paint-grade systems.
Pick primers designed for the specific topping. Many manufacturers provide proprietary primers formulated to bond their underlayments. Using a generic primer is a gamble — the topping may not cure or could delaminate under traffic.
Check three things: substrate moisture limits, recommended primer type (epoxy or polymer), and pot life/working time. Do an adhesion test per the topping maker’s spec before full rollout.
Call out the topping manufacturer if you’re unsure. Their primers and instructions are the safest path to a long-lasting installation.
Cost comparison and sample budgets: materials, labor, lifecycle cost
This section compares acrylic and epoxy primers on a transparent side-by-side basis, breaking out materials, labor (DIY vs pro), prep work, cure times, and lifecycle estimates per 1000 sq ft. A concise cost table accompanies this discussion to show per-material costs, estimated labor, and expected lifespans for each option.
Understanding these costs helps plan budgets under varying conditions such as surface condition, moisture, and substrate type, and shows how maintenance, recoats, downtime, and failures affect total ownership. Practical budgeting tips include accurate surface prep, bulk purchasing, avoiding over- or under-application, and choosing primers aligned with job scope to reduce total cost.
DIY budget and time estimate
For a 1,000 sq ft slab expect to buy primer, topcoat, and basic repair materials. Typical coverage for acrylic primer is about 300–400 sq ft/gallon, and epoxy primer about 200–250 sq ft/gallon. Factor pot life: acrylics are forgiving with a longer open time; epoxies often have a 20–40 minute pot life once mixed. Cure times: acrylics dry to recoat in 2–6 hours; epoxies often need 6–24 hours before topcoat and up to 7 days for full cure.
Tools and rentals add cost: a decent floor grinder or diamond cup for prep rental runs about $60–$120/day, a quality airless sprayer or roller kit $40–$100/day, plus PPE and mixing gear. Material costs alone typically range from $150–$400 for acrylic systems and $300–$700 for epoxy systems per 1,000 sq ft, depending on primer choice and solids content.
Realistic timeline for a weekend job: Day 1 prep and repairs (8–10 hours). Night or early Day 2 primer coat and tack off (4–6 hours). Day 2 afternoon apply topcoat and allow touch dry; you’ll likely need to wait into Day 3 for light foot traffic and up to a week for full vehicle loads on epoxy systems. Plan for weather, cure windows, and an extra day for trouble-shooting.
Pro installation budget and value analysis
Contractor bids vary with prep difficulty, product choice, and crew size. Expect pro pricing per 1,000 sq ft to range from about $1,000–$2,500 for acrylic systems and $1,800–$4,500 for full epoxy systems with professional prep. Hard-to-remove coatings, deep cracks, or moisture mitigation add cost. Most pros include surface profile, repair, primer, topcoat, and a warranty in their quote.
Warranty and scope matter more than sticker price. A properly installed epoxy system with a 3–5 year workmanship warranty can reduce maintenance and recoat frequency, improving lifecycle cost versus cheap DIY or thin acrylics. Calculate ROI by comparing initial cost plus expected maintenance over 10 years; a higher upfront pro epoxy install often wins on total cost-of-ownership if heavy use or chemical exposure is involved.
Use the pro route if you need fast turnaround, guaranteed adhesion, or you don’t want to manage pot-life constraints and finish consistency. For light-duty or tight budgets, DIY acrylic can be sensible. For garages, workshops, or commercial use where durability matters, the pro-installed epoxy typically pays back through lower upkeep and longer service life.
Safety, VOCs, and ventilation: what to expect with each system
Safety around paint systems hinges on proper PPE, ventilation, and awareness of typical VOC levels, with clear steps for handling water-based acrylics versus solvent-based/epoxy primers. Expect gloves (nitrile), eye/face protection, and appropriate respirators or PAPRs where vapors are significant, plus coveralls as needed; fit testing and manufacturer SDS guidance should drive respirator use. Ventilation should include local exhaust ventilation, adequate air changes per hour, and isolated or outdoor work areas to minimize exposure, with tighter controls for solvent-based systems due to higher VOCs (roughly 300–500 g/L) compared with water-based primers (roughly 50–150 g/L).
Disposal and cleanup require proper labeling, waste segregation for used rags, solvents, and contaminated PPE, and adherence to local hazardous waste rules and solvent-specific cleanup solvents. Practical practices include managing spills promptly, limiting break times to reduce buildup of vapors, and storing materials at recommended temperatures with attention to shelf life and rust or chemical compatibility; always follow SDS references for each product. Monitoring and record-keeping help demonstrate compliance, and clear communication of safety expectations to DIY readers ensures consistent, safer jobsite habits from setup through cleanup.
Indoor use limits and odor concerns
Keep solvent primers and solvent-heavy epoxies out of occupied living spaces whenever possible. If you must use them indoors, restrict work to unoccupied rooms and ventilate aggressively — open windows, run fans, and use a forced-air exhaust if you can.
Water-based acrylics are the safer choice for indoor jobs. They still have odor but at much lower VOC levels. For people sensitive to smells, schedule work when occupants can stay elsewhere until strong odors dissipate.
Personal protection matters: respirators and gloves cut exposure. Follow the product label for recommended PPE and minimum cure times before re-entry.
Waste handling and cleanup
Treat mixed epoxy waste as hazardous until fully cured. Never pour leftover mixed epoxy down drains. Let small amounts cure in a disposable container, then dispose of the hardened mass per your local hazardous-waste rules.
Water-based acrylics clean up with soap and water before they dry. Rags and paper with acrylic should be allowed to dry and then thrown away; check local guidelines but they’re generally non-hazardous once dry.
Solvent waste and contaminated rags need to go to a proper disposal facility. Keep a waste log and use sealed containers for storage until you can drop materials at a hazardous-waste collection site.
Detailed DIY planning checklist and step-by-step application guide
This section offers a practical, DIY-friendly planning checklist that covers surface prep, primer selection, mixing, thinning, pot life, coverage rates, tools, and cure windows. It walks you through confirming substrate readiness (cleaning, degreasing, dust removal, laitance elimination, moisture testing, and pH checks) and choosing primers based on fast-dry acrylic copolymers or moisture-resistant epoxy, with basic mixing ratios and thinning rules. It also provides clear steps for batching, application order, and timing to prevent roller marks and thin spots.
Why it matters: a well-planned approach reduces trial-and-error on a DIY jobsite and helps you track safety, batch details, and cure progress. It clarifies when to use acrylic versus epoxy primers, defines batch sizes that fit typical workflows, and states environmental limits to avoid failures. With clear steps, you gain confidence, minimize roll marks and thin spots, and complete a durable, code-compliant finish while respecting cure windows and ventilation.
Step-by-Step Process
This sequence gets the job prepped, applied, and checked so the finish holds up. Follow each step in order and use the quick checks listed.
- Prepare the area and PPE. Clear the workspace, mask edges, and put on gloves and respirator. Check that ventilation and lighting are adequate.
- Surface prep and profile. Remove loose material, sand or abrade to the recommended profile so the coating bonds. A uniform dull profile is the sign you’re ready.
- Measure and mix exactly. Weigh or measure components per the product directions and mix for the full recommended time. Proper mix avoids soft spots and curing issues.
- Test pot life and a small patch. Apply a small test stripe to confirm flow and cure time before full application. The patch should level out and tack off in the expected window.
- Apply full coats per film-build targets. Use the recommended tool and maintain wet edge and consistent coverage. Check coverage with wet mil gauge or visual evenness.
- Cure and monitor conditions. Keep temperature and humidity within limits during the cure period and avoid traffic. A hard, uniform surface signals adequate cure.
- Finish checks and cleanup. Remove masking, inspect for defects, and clean tools before material hardens. Store leftover mixed material per instructions or dispose safely.
Coverage rates, pot life, and working tips
Typical coverage depends on film thickness and surface texture. Expect roughly 300–400 ft² per gallon at thin primer coats and 80–150 ft² per gallon at heavy build coatings; rough concrete will drop those numbers noticeably.
Pot life varies with temperature and product. At 70°F (21°C) many two-part coatings give 20–45 minutes pot life; at 90°F (32°C) that can drop to 10–20 minutes. Work in smaller batches if it’s hot, and always note the clock when you mix.
Don’t over-thin — thinning lowers film build and weakens the cured film. If flow is poor, use the manufacturer’s recommended reducer and keep thinning under the stated percentage. Check wet mils as you go to hit the target film thickness for proper coverage and cure.
Common application mistakes and remedies
These are the common problems you’ll see on jobsites and the quick fixes to prevent them.
- Pinholing and fisheyes — caused by trapped air or contamination. Degas mixed material if advised and clean the substrate of oils and release agents before coating.
- Blushing (milky finish) — moisture or high humidity in the film. Slow evaporation by lowering humidity or raise temperature; remove the affected film and recoat if cure is compromised.
- Bubbles in the film — overworking or too hot a substrate. Apply thinner coats, roll or squeegee at the right speed, and keep the material and surface at recommended temps.
- Delamination or poor adhesion — inadequate surface prep or wrong profile. Re-prepare the surface to the proper anchor profile and use a primer designed for the substrate; call a pro if extensive failure appears.
- Runs and sags — too heavy application or wrong tool. Pull back to even out while still wet and reduce coat thickness on the next pass.
Fix issues early and don’t rush curing. If structural adhesion or large-area failures occur, bring in a professional for assessment.
Maintenance, expected lifespan, and troubleshooting long-term issues
This section sets realistic durability benchmarks for acrylic copolymer and epoxy primers, outlines maintenance intervals for common topcoats, and maps signs that indicate when a recoating or repair is needed. It details typical service lifespans under garage, workshop, and light commercial use when paired with familiar topcoats, and it explains how to differentiate failures caused by primer, topcoat, or substrate. You will also find a concise workflow for surface prep, moisture testing, product compatibility checks, and staged recoat sequences with note on cure times and ventilation.
The guidance emphasizes environmental and substrate factors—moisture, temperature, slab age, curing residues, and existing coatings—and translates them into practical maintenance calendars and budget-friendly planning tips. Understanding early warning signs such as peeling, dulling, yellowing, delamination, and moisture staining helps DIYers prioritize repairs and avoid costly downtime. Knowing when and how to recoat, along with clear expectations for cleaning, sealing, and topcoat refresh cycles, makes long-term protection more predictable and achievable on real job sites.
Repair flowchart for delamination, wear, or chemical attack
Start by identifying the failure mode: soft or bubbling coating, surface powdering, visible wear, or chemical etch. Check adhesion with a simple pull test or scrape—if the coating lifts easily, you have adhesion failure; if it abrades away, it’s wear; if it’s pitted or discolored, suspect chemical attack. These quick checks point you to the next step without redoing everything.
If adhesion is the issue, remove loose material, profile the surface, and test a small patch with the recommended primer/topcoat. If the patch bonds and holds, feather the edges and proceed to spot repair or partial recoating. For severe chemical attack or extensive delamination, strip to sound substrate and inspect the concrete for contamination or damage; strip, repair, prime before reapplying the system.
When in doubt, document the condition with photos, note surface prep used, and run adhesion tests after repair. If repeated failures occur, revisit substrate moisture, primer compatibility, and chemical resistance specs—those are common culprits covered earlier.
Warranty considerations and installer matching
Primer choice often dictates the warranty. Manufacturers tie coverage to approved primer/topcoat pairings and certified prep methods. Ask the manufacturer which primers are allowed for a full warranty and get that in writing before work starts.
Choose an installer who is certified by the coating maker or has verifiable job references for the exact system you’re using. Request proof of certification, a copy of the manufacturer’s system spec that the installer will follow, and an installation checklist showing prep, temps, and materials used. That paperwork is what you’ll need if you ever make a warranty claim.
Also confirm who holds responsibility: contractor labor warranty versus manufacturer material warranty. Keep invoices, product batch numbers, and final inspection records. Those simple steps make the warranty usable if problems show up later.
Review samples, request quotes, and choosing an installer
This section guides you from requesting product samples through creating a clear scope for bids, vetting contractors, and comparing proposals to choose an installer, with milestones like sample receipt, quotes, interviews, and a start date mapped out. It emphasizes a sample strategy (acrylic vs epoxy, primers for concrete vs masonry, quantities, storage, and evaluation for adhesion, coverage, and compatibility with topcoats), plus a templated bid scope and bidder checklist to standardize material, preparation, quantities, curing times, warranties, labor, and delivery. It also lays out a contractor vetting workflow (licenses and insurance, portfolios, local availability, safety practices, and epoxy/acrylic experience) and a proposal comparison framework with a side-by-side rubric and a decision matrix to prioritize performance and value over price alone.
Following this approach helps you manage risk, justify decisions with objective criteria, and keep the project on schedule by identifying lead times and potential delays early. It gives DIY readers a practical, step-by-step framework to evaluate proposals consistently, align expectations with installers, and plan for concrete floor projects without overpromising results or omitting critical details.
What to include in an RFP for primer + topcoat work
Keep the request for proposal tight and specific. State the substrate, surface area, and existing conditions. Note any areas that need removal of old coatings or rust treatment so bidders price prep correctly.
Call out the primer and topcoat SKUs you prefer, or ask the contractor to propose products and list manufacturer data sheets. Require coverage rates, number of coats, dry and cure times, and recommended dry film thickness so quotes are apples-to-apples.
Spell out acceptance criteria and warranty terms. Ask for a timeline, mobilization plan, and verification steps such as adhesion or salt-contamination testing. That way you won’t be comparing vague estimates.
Questions to ask potential installers
Start with the basics: are you licensed and insured, and can you provide recent references? Ask for photos or addresses of similar projects so you can inspect workmanship in person or online.
Probe on technical methods: how will they prepare this specific substrate, what test methods do they use for adhesion or cleanliness, and which mixing and application equipment will they use? Get names and data sheets for the exact products they plan to use.
Also ask about crew experience and supervision—who will be on site, who inspects quality, and how will they handle unexpected conditions. Finally, confirm cleanup, protection of adjacent areas, and a written punchlist process before final payment.
Enjoy your new floor: post-install checks and first-use recommendations
After installation, perform a quick final visual and adhesion check: look for color uniformity, consistent gloss, and no pinholes or contour irregularities, then run a light adhesion test such as a tape pull or standardized cross-hatch in high-traffic zones to confirm the primer/topcoat bond. Note explicit cure windows before foot traffic, pallets, or forklifts enter the space, and plan any required recoat within its specified window while avoiding exposure to cleaners or moisture during the critical cure period. Keep the surface free from construction debris and follow minimal cleaning steps and immediate post-install routines to protect the fresh coating.
Documenting photos, environmental conditions, and any observed wear helps support warranty requirements and flags issues early, while outlining a clear post-install care plan improves long-term performance. This matters for DIYers and jobsite teams alike, because proper timing, compatible topcoats, and routine maintenance directly impact durability, ease of future rework, and the reliability of the final floor under real-use conditions.
First 24–72 hour do’s and don’ts
Keep foot traffic to a minimum for the first day. If you must walk on the floor, wear clean, soft-soled shoes and avoid dragging anything across the surface. That short walk can prevent dust outline and scuffing while the primer/topcoat finishes curing.
Do not introduce heavy wheel loads, pallet jacks, or forklifts for at least 48–72 hours depending on the product and jobsite conditions. Wheels concentrate load and can cause indenting or delamination before full cure. If you need to move equipment sooner, use wide, soft load-distributing skids and proceed slowly.
Avoid harsh chemicals, solvents, or acidic cleaners during cure. Keep temperature and humidity stable where possible; large swings can extend cure time. Check back to the earlier checklist for your product’s specific cure window and follow that manufacturer’s timeline.
Long-term care tips to maximize primer/topcoat life
Set a regular cleaning routine: sweep daily and mop with a pH-neutral cleaner weekly or as traffic dictates. Avoid abrasive pads and strong solvents that break down the topcoat. For best results, use soft microfiber mops and low-moisture methods when possible.
Inspect the floor monthly for high-wear areas, chips, or gloss loss. Document wear patterns and plan for touch-ups or reseal work before damage becomes structural. Small spot repairs are cheaper and faster than total recoats.
Reseal on a schedule based on traffic—typically every 2–7 years for commercial spaces, longer for light residential use. Use mats at entries and pads under heavy equipment to reduce point loading and abrasion. When in doubt, follow the product data sheet and schedule maintenance during low-use periods.

Conclusion
Put simply, choosing the right primer is the difference between a durable, good-looking floor and a project you regret. Prioritize moisture testing, surface prep, and proven compatibility, then follow the manufacturer’s guidelines to avoid costly failures down the road.
Make your plan with a quick, practical checklist: verify moisture and surface condition, pick a primer that matches your topcoat, estimate materials and labor, set up ventilation and PPE, test a small area first, follow the exact application and cure times, and inspect the surface at key intervals before moving to traffic. Keep notes on each step so you can reproduce or adjust as needed.
Common mistakes cost time and money: skipping moisture testing or ignoring acceptable limits, skipping or rushing surface prep, and not adhering to cure times or ventilation requirements. Safety rules are simple but non‑negotiable: wear a proper respirator or mask, use good ventilation, keep sparking tools away from coatings, and don’t mix products in unapproved ways.
If the project is large, or you’re dealing with complex substrates, high moisture, or repeated failures in the past, it makes sense to call in an approved installer. Otherwise, you’ve got the steps and the plan to do it right. Stay focused, follow the checklist, and you’ll enjoy a smooth install and a floor that lasts.
FAQ
Which primer should I use for concrete floors, acrylic or epoxy?
Acrylic primer is cheaper and dries faster. Epoxy primer sticks better and fills small imperfections. Pick based on the top coat you plan to use and the concrete condition.
Can acrylic primer be used on concrete that will be epoxy-coated?
Yes. Acrylic primer can work under an epoxy topcoat, but it must be compatible with the epoxy you choose. Follow the product data sheet for any required surface prep or sealers.
How thick should the primer layer be?
Apply a thin, even coat. Don’t flood the surface or puddle. A light, tacky film is all you need for good adhesion.
How long before applying the topcoat after priming?
Let the primer dry to the touch as directed on the label. Don’t rush it or you’ll trap solvents and ruin adhesion. When in doubt, give it extra time in cool or humid conditions.