
Introduction
Hard-troweled slabs risk later delamination if curing and finishing are not properly controlled.
This introduction explains why delamination occurs, and the guide walks through practical steps, tips, and rules of thumb you can apply to prevent blisters.
You’ll learn how to spot warning signs and adjust techniques on site to improve slab integrity.
Key takeaways
- Inspect surface for early blisters after initial set and before finishing.
- Control moisture: maintain consistent relative humidity and cementitious materials temperature.
- Use proper troweling sequence to minimize trapped moisture and micro-cracks.
- Select low-alkali, well-graded aggregates and balanced water-cement ratio.
- Apply curing compounds or moisture-retaining methods immediately after float pass.
- Establish monitoring protocol with flatness checks and delamination probes during cure.
Table of Contents
- Introduction
- Key takeaways
- What is delamination and how it appears on hard-troweled slabs
- Primary causes of blisters and delamination
- Best troweling and placement techniques to prevent blisters
- Material selection and mix design strategies
- On-site practices: curing, moisture management, and environmental controls
- Inspection, monitoring, and early detection protocols
- Repair methods for delaminated slabs and blisters
- Safety, costs, and long-term maintenance planning
- Conclusion
- FAQ
What is delamination and how it appears on hard-troweled slabs
Delamination is when a layer beneath the surface separates or lifts, creating blister-like pockets instead of a solid, even finish. It’s different from surface dusting (a dusty top layer), scaling (flaking from the surface), and popouts (voids beneath the surface). On hard-troweled slabs, moisture, trapped air, improper finishing timing, and how the aggregate sits can drive delamination and blistering, leading to raised or hollow‑sounding patches and visible surface patterns.
For DIY readers, quick checks can catch it early: tap the surface to listen for hollow sounds and perform a moisture check per the product label or datasheet. Prevention matters: manage bleed water and avoid overworking the finish, keep density consistent, and plan joints to minimize trapped air and blister formation as the slab cures.
Technical definition and mechanics
Delamination is a layer separation issue in concrete slabs. It occurs when the top layer of concrete, known as laitance or the hardened surface, separates from the underlying concrete due to a weak bond between them.
The process begins with moisture and trapped air during the finishing stage. If bleed water isn’t managed properly, it can rise to the surface and create a weak layer. Improper timing of trowel passes can also contribute by not allowing the concrete to set up enough before further manipulation.
Additionally, improper aggregate orientation can play a role. When aggregates are oriented horizontally instead of vertically, they create a weaker top layer prone to delamination.
Visual and tactile signs to recognize
Delamination often presents as blister-like pockets on the surface of hard-troweled slabs. These can be accompanied by waviness or a rippled appearance.
Raised or hollow-sounding areas are also telltale signs. To confirm your suspicions, perform a simple tap test. Gently tap the slab with a hammer. A dull, hollow sound indicates delamination.
Surface cracking can also be a sign of delamination, especially if it’s localized and follows the pattern of the blisters or waviness. Keep in mind that these signs may not always be visible immediately after pouring; they can develop over time as the concrete cures.

Primary causes of blisters and delamination
Blisters and delamination on new concrete slabs usually show up from five main causes: excessive troweling, finishing too early, bleed water getting trapped, an improper mix design, and curing problems. Each issue pushes air, water, or a weak bond into the surface, creating blisters or zones that peel apart. Understanding these helps you stop them before they ruin the finish.
Look for signs like a sheen, changes in trowel texture, or water on the surface and check your mix label for recommended limits. Plan on moisture control, proper timing for finishing, and a consistent curing approach; adjust once you verify with manufacturer instructions. If you suspect a problem, use a simple on-site checklist to decide whether to rework or protect and how to cure going forward.
Finishing and timing errors
Timing is crucial when it comes to finishing your concrete slab. Too early or too late can lead to trapped bleed water and weakened bonds, causing blisters.
- Premature Finishing: Finishing before the bleed water has fully risen to the surface traps moisture under the slab’s surface, leading to blisters.
- Overworking the Surface: Too many trowel passes can also trap bleed water and weaken the bond between the concrete layers, causing delamination.
- Insufficient Troweling: Not enough trowel passes may leave the surface porous, allowing moisture to escape and creating a weak top layer.
- Finishing in Hot or Windy Conditions: High temperatures and wind can cause the concrete to set too quickly, leading to improper finishing and trapped bleed water.
The key is to find the right balance: enough trowel passes to smoothen the surface without overworking it, and timing your finishing just right after the bleed water has risen.
Material- and environment-related causes
The materials you use and the environmental conditions can significantly impact your concrete slab’s quality and durability.
- Low Cement Content: Insufficient cement in your mix reduces the paste’s ability to coat and bind the aggregates, leading to weak bonds and potential delamination. Aim for a minimum of 200 kg/m³ (350 lbs/yd³).
- High Water-Cement Ratio: Too much water in your mix dilutes the cement paste, weakening its binding strength. Keep it below 0.45 to avoid excessive bleeding and weak bonds.
- Improper Admixtures: Using the wrong admixtures or incorrect dosages can affect the concrete’s setting time, workability, and final strength. Always follow the manufacturer’s guidelines.
- Temperature: High temperatures speed up the setting process, leading to improper finishing and weak bonds. Keep the slab temperature below 32°C (90°F) during placement and finishing.
- Wind: Strong winds can cause rapid evaporation of water from the surface, leading to a dry, weak top layer. Protect your slab from wind during the initial setting period.
- Sun Exposure: Direct sunlight can also accelerate water loss and weaken the concrete’s surface. Keep your slab shaded during the first few days after placement.
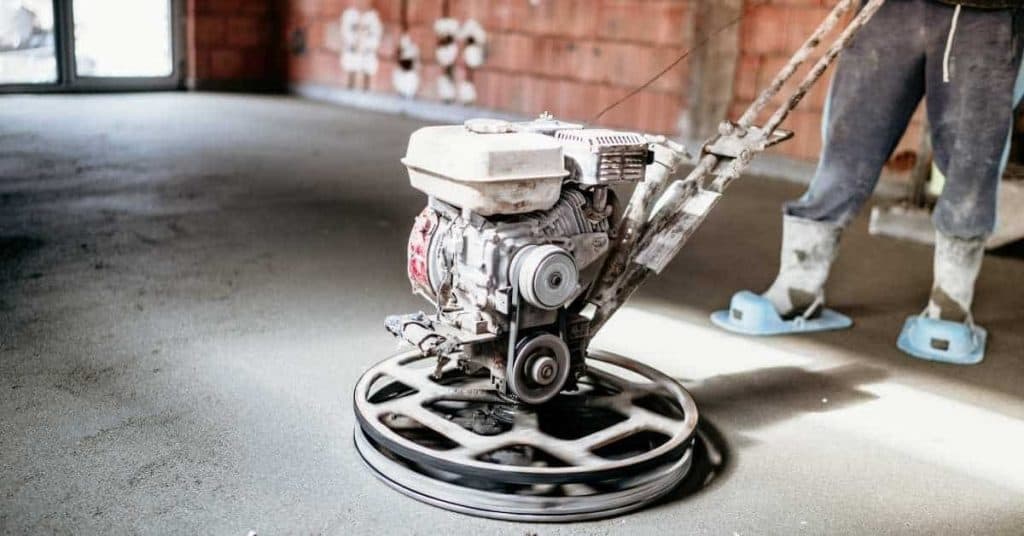
Best troweling and placement techniques to prevent blisters
Best troweling and placement comes down to timing, equipment, and steady technique to keep moisture from getting trapped and causing blisters. Start troweling only after you’ve checked bleed water and surface set, and choose the right trowels and blade angles for the job. Use consistent passes, proper edge handling, and watch for thin spots as you work through initial floating, edging, and finishing passes.
This matters for DIY readers because the wrong sequence or overworking the surface can trap air and cause delamination later. Plan your passes, watch humidity and temperature, and keep pressure even to minimize separation risk. If you’re unsure about mix design, slump, or bleed behavior, check the product label and manufacturer instructions to stay within safe ranges.
Recommended sequence and timing
The timing of your troweling operations is crucial to prevent blisters. Here’s a simple sequence:
Initial Floating: Start as soon as the concrete reaches 50-70% hydration (usually around 15-25 minutes after placing). Use a bull float or magnesium float to remove excess water and level the surface.
Power Troweling: Begin power troweling when bleed water stops rising to the surface (around 30-45 minutes). The surface should be firm enough that your thumb leaves a clear imprint but not so hard that it won’t take a light scratch.
Equipment settings and operator practices
Choosing the right equipment and using it properly is key to preventing blisters. Here’s what you need:
- Blade Type: Use pan blades for final finishing, and float blades for initial troweling.
- RPM Range: Aim for 150-250 RPM with power trowels. Too fast can cause excessive evaporation, too slow may leave marks.
- Avoid Excessive Passes: Make consistent passes without over-troweling. Each pass should remove a thin layer of laitance.
- Edge and Transition Handling: Use a hand trowel or edger for corners, edges, and transitions to ensure uniform thickness.
- Operator Training: Consistency is key. Train your operators to maintain even pressure, speed, and blade angle.
- Optional Tools: Consider renting a laser screed ($200-$500 per day) for larger slabs to ensure consistent thickness.
Material selection and mix design strategies
Choosing the right mix proportions, admixtures, and supplementary cementitious materials is the main lever to cut bleeding and boost bond strength in late-stage troweled slabs. Watch the water-cement ratio, how the aggregate is graded, and how additives and SCMs balance paste and aggregate for a smoother, more workable surface.
This matters because the mix design determines how easy it is to trowel, whether you’ll see surface blisters or delamination, and how the slab finishes under hot or humid conditions. Use your on-site checks—slump, fresh temperature, and bleed behavior—plus tool compatibility and quick adjustments to keep the surface solid and bonded. If in doubt, check the label or datasheet for guidance on compatible admixtures and SCMs.
Mix components that lower delamination risk
The right mix design is key to preventing blisters. Here’s what you need:
Cement content: Aim for 7-8% by weight of concrete. Too little can weaken the slab, too much increases shrinkage.
Water-cement ratio: Keep it low, around 0.45 to 0.55. High water content leads to excessive bleeding and weak bond.
Slump control: Target a moderate slump, around 3-5 inches. Too much makes troweling difficult, too little causes placement issues.
Air entrainment: Include 4-7% air by volume to reduce bleeding and improve durability. But be careful: too much air weakens the concrete.
Admixture use and compatibility
Admixtures can help, but they need to play nice with your mix. Here’s what to consider:
Superplasticizers: These increase workability without extra water. Use them sparingly; too much can cause excessive bleeding.
Retarders: They slow down setting time, giving you more troweling time. But they can also increase bleeding if not balanced with other admixtures.
Shrinkage-reducing admixtures: These help prevent cracking due to drying shrinkage. However, they can interact negatively with other admixtures, so test before use.
Always check compatibility with your cement and aggregates first. A quick trial batch can save you trouble later on.
On-site practices: curing, moisture management, and environmental controls
Curing methods matter for surface integrity and bleed water control. Focus on initial curing, continued curing, and finishing timing, and use appropriate measures to keep the surface from drying too quickly. Plan moisture control and environmental measures as part of the curing plan and check product labels for any timing or requirement notes.
Keep wind breaks, shading, and temperature management in mind to slow evaporation and reduce blister risk. Use moisture barriers or curing blankets when needed and choose evaporation retarders or misting carefully—always confirm compatibility with your slab type from the label or datasheet. Regular QA checks with visual cues, moisture readings, and timing logs help you adjust curing or evaporation control as weather changes.
Curing options and their timing
Hard-troweled slabs need proper curing to prevent delamination. Here’s when to use each method:
Wet Curing: Apply immediately after finishing, using sprinklers or misting. Keep slab wet for 7 days.
Curing Compounds: Spray on within 2 hours of finishing. They form a protective layer, slowing down moisture loss over 3-7 days.
Coverings (burlap, plastic sheets): Lay down within an hour after finishing. Remove after 3-7 days to allow slab to breathe.
Managing evaporation and ambient conditions
Rapid evaporation causes blisters. Here’s how to control it:
Misting: Use a fine mist to keep slab surface wet, slowing down evaporation rate.
Wind Screens: Set up barriers around the slab to protect from wind, reducing evaporation.
Scheduling Pours: Avoid pouring in hot, dry, or windy conditions. If you must, use extra curing measures and monitor closely.
Delay Finishing: In extreme heat or cold, delay finishing until conditions improve to prevent rapid drying.
Inspection, monitoring, and early detection protocols
The key is to set a simple, repeatable inspection rhythm and use a few practical checks you can do on the jobsite every week. Do daily visual checks, weekly spot checks, and an in-depth monthly survey, and assign tasks to the field crew, the site foreman, and the owner for accountability. Look for surface blisters, efflorescence, early pull‑apart signs, micro-cracking, color changes, and hairline cracks near joints; run a chain-drag test and a hammer tap/hollow core test to locate hollow sounds, and map high-stress zones like edges or near joints for quick reference.
This matters because catching delamination early lets you act before the problem spreads or worsens, saving time and money later. Keep a simple record: note dates, weather, slab location, test results, and any remedial actions, and maintain a labeled photo log of problem areas. Define triggers by visuals or test results rather than fixed numbers, and outline immediate steps such as re-checking mixes, adjusting curing, or calling in a professional assessment, plus PPE, zone lockout, and prompt stakeholder updates to keep everyone aligned.
Visual checkpoints during and after finishing
Conduct these checks as you finish and cure the slab to catch any issues early.
- Surface blisters: Look for raised, bubble-like areas. If present, they may indicate delamination.
- Efflorescence: Check for white, crystalline deposits. Excessive efflorescence can signal moisture issues.
- Micro-cracking: Inspect for hairline cracks near joints or control joints. They could widen over time.
- Color changes: Uneven coloring might hint at inconsistent curing or mix problems.
- Wet spots: Check for areas that remain wet longer than others. This can lead to blisters.
- Joints and control joints: Ensure they’re properly formed and not cracking prematurely.
- Edges and corners: These high-stress zones are prone to delamination. Inspect them closely.
- Protrusions or steps: Check around any projections for signs of stress or separation.
Quick rule: Regular visual checks help prevent small problems from becoming big ones.
When to call for testing and non-destructive evaluation
Use these indicators as a guide when deciding if further testing is needed.
- Persistent visual cues: If surface issues persist despite initial checks, consider further investigation.
- Worsening conditions: If problems seem to be getting worse over time, it’s time for a closer look.
- Large areas affected: When multiple blisters or cracks appear in a wide area, call for testing.
- Impact-echo test: This non-destructive method uses sound waves to detect delamination. It’s ideal for large areas.
- Ground-penetrating radar (GPR): GPR can map subsurface defects, helping locate delaminations without breaking the slab.
- Core testing: Drilling cores from suspect areas allows direct inspection of the concrete’s internal structure. It’s invasive but provides clear evidence.
- Hammer tap test: If you hear hollow sounds over a large area, it might indicate widespread delamination.
- Chain-drag test: This simple field test can reveal delamination propensity. If results are consistently positive, further testing is warranted.
Quick rule: Don’t wait for problems to worsen before seeking professional help and advanced testing.
Repair methods for delaminated slabs and blisters
Delamination is when a hard, dense surface traps a gap or bond break beneath it, while blisters are pockets that form under the finish as moisture or air push up from below. You’ll see hollow sounds, spalling, or cracking under load as clues that the concrete isn’t sticking where it should. To judge severity, map how much area is affected, estimate any thickness loss, test for moisture, check for safety hazards, and note whether the slab carries live loads or needs temporary support during repair, then plan around those realities. Use a simple decision framework: light surface blisters or shallow delamination may be handled with overlays or patches, while deeper or broader areas demand more substantial work, keeping weather and cure cycles in mind for best adhesion and timing.
Options range from temporary overlays and skim coats to surface patching with cementitious patches or non-shrink grout, epoxy or polyurethane injections for voids, and partial-depth or full-slab removals if warranted by the damage, always selecting based on how much material is affected and how the structure bears loads. Proper prep matters: clean the surface, manage moisture with checked tests and substrate prep, seal cracks, plan cure times, and use the right PPE and ventilation for the compounds you choose. This approach helps you avoid wasted effort, get the best adhesion, and extend the life of the repaired slab without guessing or jumping to the wrong method. Check product labels and manufacturer instructions, and tailor decisions to what you actually find on site and what your local conditions allow.
Surface repairs and overlays
For light surface blisters and shallow delamination, surface repairs and overlays can be effective. First, remove the delaminated concrete using a chipping hammer or diamond blade.
Prepare the substrate: Clean it thoroughly to remove dust and loose particles. Use a vacuum or brush to ensure no debris remains. Test for moisture – if it’s high, consider renting a moisture test meter.
Apply a bonding agent following manufacturer’s instructions. This helps the new overlay adhere properly. Then, apply your chosen overlay – polymer-modified overlays or skim coats work well here. Follow the product-specific application guidelines for best results.
Structural remedies and full-depth repairs
For deeper, larger areas of delamination or when structural integrity is compromised, full-depth repairs may be necessary. Remove the damaged concrete using a jackhammer or other heavy equipment.
Address reinforcement exposure: If you’ve exposed reinforcing bars during removal, clean them and apply a rust inhibitor to prevent further corrosion. Replace any damaged bars.
Prepare the substrate as before – clean, test for moisture, and address if necessary. Apply a bonding agent and then place new concrete following best practices from earlier in this guide. Ensure proper curing to maximize longevity and adhesion.
Safety, costs, and long-term maintenance planning
Safety comes first when you’re detecting and fixing potential delamination and other concrete issues. Use proper PPE, fall protection where needed, and lockout or tagout when machines or power could start unexpectedly, with good ventilation and dust control in tight spaces and clearly marked, lockable work zones for DIYers and small crews. The plan should compare upfront prevention steps—like sealer and moisture management, careful curing, and solid trowel technique—with the costs and disruption of remediation, plus a practical long‑term maintenance plan to extend slab life.
Diagnostics matter: learn the early signs, test moisture in sensible locations, and verify surface prep conditions before you plan any repair, escalation, or professional assessment. The context matters for DIYers who want to weigh prevention against repair—and it helps set expectations for downtime, surface restoration, and potential slab replacement without promising exact numbers. A simple maintenance calendar and routine checks for moisture, joints, cracks, and post‑care steps keep small problems from growing, while clear checklists and best practices help you stay on track and avoid triggering blistering or other damage).
Safety Precautions During Repair Work
When dealing with delaminated concrete, safety should be your top priority. Here’s what you need to know:
Personal Protective Equipment (PPE): Wear a hard hat, safety glasses, gloves, and steel-toed boots. For dust control, use a respirator or face mask rated for concrete dust.
Dust Control: Keep the work area wet using a sprayer to minimize dust. Seal off the work zone with plastic sheeting to contain any dust generated.
Equipment Operation: When cutting, grinding, or patching, ensure all equipment is in good working condition and follow manufacturer’s safety guidelines. Always use proper lockout/tagout procedures when applicable.
Cost-Benefit and Lifecycle Considerations
Preventing delamination is cheaper than fixing it. Here’s a cost-benefit framework to consider:
Upfront Prevention Costs: Invest in proper training for your crew, select the right mix design, use appropriate admixtures, and ensure proper curing and moisture management. These costs are minimal compared to repair expenses.
For instance, a high-quality sealer can prevent delamination by controlling real-time moisture, costing around $0.50 – $2 per square foot. Compare this with the $3 – $10 per square foot for delamination repair and surface restoration.
Lifecycle Costs
Consider the slab’s lifespan when comparing costs. Delamination can lead to downtime, structural damage, and even replacement, adding significant expenses over time. A well-maintained slab with proper prevention measures can last 30-50 years or more, making upfront investments worthwhile.
Conclusion
Protecting hard-troweled slabs from delamination keeps the floor safe, durable, and easy to finish. Stay practical, test ideas on a small area, and follow proven steps so a blisters problem doesn’t turn into costly repairs.
Follow this quick check in order: verify moisture and environmental conditions are within limits, confirm your mix design and materials meet the project needs, stage placement and troweling steps without rushing, implement proper curing and moisture management, then inspect and monitor for early signs of trouble before closing or decorating.
Avoid the common missteps of over-troweling, using incompatible materials, and skipping curing or moisture control. Always wear good PPE, test any change on a small area first, and don’t leave the slab exposed to drying winds or rain during cure. If the slab shows blisters or any delamination during curing or after, pause work, reassess moisture and mixing, and don’t push ahead with repairs without a solid plan and the right conditions.
If you’re not confident in the mix design, the on-site environment, or the repair options, call a qualified pro. A correct short-term adjustment now saves longer, costlier fixes later. With careful steps, you’ll land a solid, smooth surface that lasts.
FAQ
What causes blistering or delamination in hard-troweled slabs?
Water trapped under the surface or too much moisture in the slab can create blisters. Finishing too soon or too aggressively can push moisture up and weaken the surface. Poor curing or using the wrong mix can also lead to delamination.
How can I prevent delamination when finishing a hard-troweled slab?
Let the slab cure properly and follow the manufacturer’s curing guidelines. Control bleed water and avoid sealing the surface while moisture is still exiting the concrete. Use the right finish for the job and don’t fight the slab with heavy troweling when it’s not ready.
When should I use bonding agents or bond coats, and when not to?
Use bonding agents when you’re pouring over an old slab or applying a new finish that needs extra adhesion. Don’t rely on bonding agents to fix a slab that has moisture issues or poor curing. Read the product instructions and test a small area first.
What common finishing mistakes should I avoid?
Avoid timing the finish too close to when the slab is still wet or soft. Don’t over-trowel, which can squeeze water to the surface and trap it. Don’t ignore cracking, curing needs, or poor surface prep before finishing.