
Introduction
Back-buttering is essential for large-format tiles to prevent hollow spots and reduce lippage.
The guide explains when back-buttering matters, how to determine proper coverage, and practical steps you can apply to both large-format and small tiles.
You’ll learn how to mix and apply adhesive correctly, how to back-butter tile backs and substrates, and how to verify coverage and alignment in real-world installations.
Key takeaways
- Back-buttering ensures full coverage under large-format tiles to resist hollow spots.
- Use polymer-modified thinsets for large-format tiles to improve adhesion and stiffness.
- Substrate must be flat within 1/8 inch per 6 feet before tiling.
- Back-butter technique: apply butter on tile back and thinset on substrate.
- Lippage control: comb thinset and set tile with slight twist to align edges.
- Grout and sealing after proper cure to prevent tile edge staining later.
Table of Contents
- Introduction
- Key takeaways
- Why back-buttering matters for large-format vs small tile
- Substrate preparation: the non-negotiable foundation
- Choosing mortars: traditional thinset vs specialized large-format mortars
- Back-buttering technique step-by-step
- Tools and equipment for large-format tile installations
- Preventing and fixing lippage and warpage issues
- Grouting, sealing, and curing large-format installations
- Common mistakes and how to avoid them
- Cost, time, and material estimating for large-format projects
- Movement joints, climate, and long-term performance
- Quality checklist and acceptance criteria for installers and homeowners
- Conclusion
- FAQ
Why back-buttering matters for large-format vs small tile
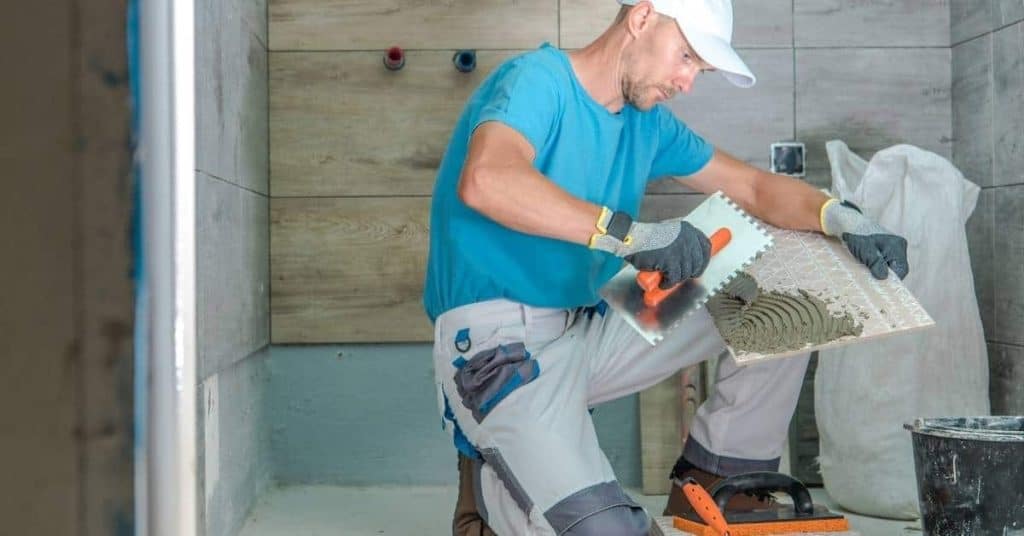
Back-buttering means applying a generous layer of mortar to the back of a tile so every square inch makes solid contact with the bed, preventing voids, debonding, and lippage on heavy, curved, or irregular tile surfaces. Large-format tiles demand near-perfect coverage, flatter substrates, and reduced tolerance for sag, because their bigger footprint magnifies gaps, while small tiles tolerate a bit more misalignment but still suffer hollow spots if coverage is uneven. ANSI/TCNA standards guide minimum coverage and testing methods to verify bond, with thresholds that shift by tile size, substrate type, and mortar system, so you tailor your approach rather than guess.
In practice, back-butter on unflat substrates, backs of tiles with concave or convex profiles, or when you’re using modern polymers or heavy mortars that don’t easily draw full contact. Apply a thin, even coat to the tile back, comb the bed on the substrate with the trowel, then press and twist to watch for continuous mortar contact and no air pockets. Understanding how tile size changes risk helps you plan substrate prep, mortar choice, and technique, so you finish with a flat, durable surface and avoid costly callbacks.
What back-buttering is and when to use it
Back-buttering means spreading a layer of thinset mortar on the back of each tile before setting it in place. This technique ensures better adhesion, especially for large-format tiles or heavy materials like gauged porcelain. Use it anytime you’re dealing with big tiles that need extra support.
Back-buttering is a must for exterior walls and floors too, where weather exposure can weaken tile bonds. It’s also crucial in wet areas like showers and bathrooms to prevent water from seeping behind the tiles and causing damage or mold growth.
Before you start back-buttering, check base compaction. A solid foundation is key for any tiling job. If your substrate isn’t stable, no amount of back-buttering will fix a poorly prepared surface.
Differences in behavior: large-format vs small tile
Large tiles are like big, flat sheets of glass. They’re rigid and don’t bend much, so any bumps or dips on the wall or floor show up as cracks or hollow spots. Small tiles, on the other hand, can flex a bit to cover minor imperfections. So when you lay large tiles, check base compaction extra carefully.
Mortar coverage is another biggie. Large tiles need more mortar underneath because they’re heavier and less flexible. If you skimp on the buttering, those big tiles will sag or crack over time. Small tiles can get away with a bit less mortar since they’ll naturally fill in small gaps as they set.
Warpage is also something to watch out for. Large tiles are more prone to warping if not installed perfectly flat. This means you need to make sure each tile sits level and square from the start, or it’ll look off and cause problems later on. With smaller tiles, a little wiggle room exists because they can adjust slightly during setting.

Substrate preparation: the non-negotiable foundation
Large-format tiles need a much stricter substrate. Floors and walls must be flat within a tight tolerance, deflection should be L/360 or better, and the surface must be stiff enough to resist movement that causes lippage or edge breakout. If the survey shows gaps, dips, or bend, you must use self-leveling compounds or structural reinforcement before you lay any tile.
Do the math on your jobsite: measure with a straightedge or laser, check moisture, and verify the surface is clean and ready. This matters because skipping those checks invites bond failure and cracked grout as soon as the tile goes in. Knowing the tolerances helps you decide where to pour leveling compound, add reinforcing mesh or stiffeners, and choose the right mortar or bonding membrane for floor versus wall installs.
Flatness and straightedge checks
Before you pour concrete, make sure your substrate is flat. Use a straightedge to check for high spots. A 4-foot level works well; run it across the surface in all directions. If there’s more than 1/8 inch gap between the straightedge and the ground, you need to fix that.
Laser levels are great too but can be pricey. They give precise readings for flatness, showing any dips or bumps clearly. Remember, concrete doesn’t hide imperfections; it highlights them. So get this right before moving on.
Also, make sure your forms and edges are straight. A plumb bob helps here to check vertical alignment. If things aren’t level, you’re setting yourself up for headaches later. Take the time now to get it perfect.
Common substrate fixes (self-levelers, patching, sistering joists)
If your floor is uneven after a flatness and straightedge check, you’ve got options. Start with self-leveling compound for minor dips or cracks. It’s quick but only works if the base is solid—check base compaction. For bigger issues, like large holes or broken concrete, go with patching. Patching requires more prep and a steady hand.
Sistering joists is for severe floor sagging. This fix is major work: cutting new wood to fit alongside old, weak ones. It’s not DIY-friendly unless you’re handy with carpentry tools. Hire pros if your floor feels bouncy or shows big dips.
Choosing mortars: traditional thinset vs specialized large-format mortars
Choosing mortars means selecting the chemistry that fits your tile size, weight, and the installation conditions you face on the job—because different tiles demand different backing systems, slumps, and open times. Polymer-modified and latex-modified mortars typically give stronger bonds, better slump control, and longer open times for large-format or gauged porcelain tiles, while unmodified mortars are still acceptable for small, light tiles when the substrate is clean, dry, and stable. For large-format, heavy tiles and exterior projects, you must follow the manufacturer data sheets and the relevant ANSI/ISO standards to ensure the mortar, any additives, and the cure regime are designed to perform under anticipated moisture, temperature swings, and substrate movement.
Additives, primers, and crack-isolation or waterproofing membranes can dramatically alter bond strength and movement compatibility, so verify that every product in your system works together and is rated for the substrate and tile system you’re using. The practical takeaway for a DIYer is to map tile type and location to a safe mortar choice, factor in climate and substrate moisture, and always consult the data sheet and installation limits; skip steps or mix blindly and you’re inviting bond failure, hollow tiles, or premature joint cracking.
Mortar coverage targets and why they differ
When laying tiles, you need to know how much mortar to spread. For most jobs with traditional thinset, aim for about 80% coverage. This means the mortar should cover roughly four out of five square inches under each tile. But when dealing with large-format tiles or specialized mortars, bump that up to a minimum of 95%. Why? Large tiles are more prone to cracking if they aren’t fully supported by mortar.
The 100% coverage rule applies in specific cases: like on balconies, patios, and other outdoor areas where foot traffic is heavy. Also, if you’re working with glass or mosaic tiles, go for full coverage to ensure stability and prevent cracking under pressure.
Remember, proper mortar coverage isn’t just about the tile size; it’s also crucial to check base compaction. A solid foundation means less chance of shifting during installation, which can save you a lot of headache later on.
How mortar open time and slump affect installation
Mortar open time, or pot life, is crucial for a smooth install. It’s the window when your mortar stays workable after mixing. Check the manufacturer’s data to know how long you have before it starts to set up. Slump, on the other hand, measures how fluid the mortar is. A higher slump means easier spreading but less stability.
Thixotropy plays a big role here—how your mortar thickens as you stop stirring and spreads out when you apply pressure. You want enough thixotropy to keep the mortar in place without it being so stiff that it’s hard to work with. This balance is key for achieving full coverage on your tiles or stones.
When handling large-format materials, a specialized mortar might be better due to its longer open time and tailored slump. Traditional thinset can dry out too fast, leaving you struggling to get the job done before it sets up. Always test your mix on a small area first to see how it behaves under real conditions.
Back-buttering technique step-by-step
Back-buttering large-format tiles means applying mortar to the tile backside to improve contact, coverage, and lippage control. You’ll follow a clear sequence: prep and prime the substrate, trowel the substrate with the chosen adhesive, back-butter each tile with a thin, even coat, then either back-butter or comb the tile face at the recommended size before setting. Use a high-traction polymer-modified mortar, a 1/2″ x 1/2″ square or 1/2″ x 1/2″ V-notch, and apply enough to fully coat the back with a consistent layer, while keeping excess mortar off the edges.
Plan for safe handling of heavy slabs with lifting helpers and equipment like clamps, suction cups, or dollies, plus proper PPE to prevent injuries during the lift and set. Note the wait time between substrate troweling and back-buttering, and honor open-time guidelines, adjusting for heat or humidity to avoid premature setting. This technique reduces waterline gaps, minimizes voids, and improves long-term performance, so checks for uniform thickness, edge-to-edge contact, and final lippage should be part of a quick, repeatable routine rather than a last-minute step.
Step-by-Step Process
This sequence will guide you through the back-buttering technique, ensuring your concrete joints are properly sealed and protected.
- Action: Start by applying a thin layer of mortar to the back side of the joint form. Reason: This ensures a tight seal against water and debris. Check: The surface should be smooth with no gaps or dry spots. Call pro if: Mortar is too thick, causing it to crack.
- Action: Insert the joint form into place, pressing firmly but not forcing. Reason: This creates a clean and tight fit for proper curing. Check: The form should sit level and straight without wobbling. Call pro if: Form is crooked or unstable.
- Action: Apply mortar to the sides of the joint form, ensuring it’s evenly spread. Reason: This seals the edges against water infiltration. Check: The mortar should be consistent and smooth along all sides. Call pro if: Mortar is uneven or missing spots.
- Action: Carefully remove excess mortar from around the form, using a trowel to clean up any spills. Reason: This prevents future cracking and ensures neatness. Check: The area should be free of loose mortar with no visible gaps.
- Action: Allow the back-buttered joint to cure for at least 24 hours before removing the form. Reason: Proper curing is essential for strength and durability. Check: The surface should feel firm when lightly touched but not set hard.
Pro tip: Use a damp sponge to keep the mortar moist during the initial curing phase, enhancing its bond and longevity.
Recommended trowel sizes and patterns by tile size
Choosing the right trowel is crucial for a strong bond between your tiles and the mortar. For small tiles under 6 inches, use a 1/8-inch notched trowel. This gives you enough grip without overloading the grout lines. Larger tiles from 6 to 12 inches call for a 1/4-inch notched trowel, which balances coverage and mortar thickness.
For tiles larger than 12 inches, go with a 3/8-inch notched trowel. This size ensures you can spread the mortar evenly without it drying out before you lay your tile. Remember, bigger tiles need more mortar to cover their surface area, so the wider notches help.
The pattern on the trowel also matters. For smooth-faced tiles, a straight notch works fine. But if your tiles have texture or are porous, opt for a V-notch instead. This helps lock in the mortar better and prevents it from sliding off during installation.
Collapsing ridges and achieving contact
After you’ve laid your tile using the back-buttering technique, the next crucial step is to collapse any mortar ridges that form between tiles. This ensures a solid bond and prevents future cracks or voids under the grout lines. Use the edge of your trowel or a special jointing tool to press down along each grout line.
Apply firm but controlled pressure as you move the trowel across, making sure not to lift tiles out of place. You want to see mortar squeezed up around all sides of each tile for full contact with the substrate and adjacent tiles. If you notice any voids or gaps after this step, add more mortar underneath immediately.
Remember, proper base compaction before laying your tiles is key here. A weak foundation can lead to uneven settling and compromised bond strength, no matter how well you collapse those ridges during installation.
Tools and equipment for large-format tile installations
Large-format tile work hinges on a core set of specialized tools that protect tiles from breakage and speed up the install. Suction cups and panel lifters handle heavy sheets without wringing your back, while straightedges and spirit levels keep flats and plumb in check from the first lift. Mixing drills with paddles ensure the mortar stays uniform, big notched trowels and back-buttering rakes lay down and spread adhesive cleanly, and leveling systems lock in a flat plane as you go.
These tools matter because they cut waste, reduce rework, and minimize the risk of injury on a demanding job. Use them with a clear workflow so you rent the right gear and buy only what you’ll reuse, keeping stock at baseline quantities for tile size and weight. Pre-use checks, battery care, PPE, and a simple storage routine will extend life and keep them ready when the substrate is prepped and mortar has curing time, while practical tips help you avoid mishaps and keep a steady pace on site.
Tile leveling systems and lippage prevention
When dealing with large-format tiles, getting the base right is crucial. You need to check base compaction before laying a single tile. If your subfloor isn’t solid, you’ll end up with uneven surfaces that show every bump and dip.
For leveling, there are two main systems: self-leveling compounds and mechanical clips. Self-leveling is great for small projects or when you have minor imperfections to smooth out. But for large-format tiles, go with mechanical clips. They give you better control over the tile’s height and prevent lippage issues that can ruin your floor.
Remember, no matter which system you choose, consistency is key. Make sure every tile sits at the same level as its neighbors to avoid tripping hazards or unsightly steps between tiles. If you’re unsure about any part of this process, it’s worth hiring a pro for advice or help.
Handling and safety gear for heavy tiles
When dealing with large-format tiles, safety comes first. You need to protect yourself from back injuries and ensure the tile doesn’t get damaged during installation. Start by wearing safety gloves, a hard hat, and steel-toed boots. These basics will keep you safe while handling heavy materials.
For lifting large tiles, use mechanical aids like hoists or forklifts if possible. If not, make sure to have at least two people on the job site to handle each tile together. Don’t try to lift alone; it’s a recipe for injury and wasted time due to dropped tiles.
Before you start laying any tiles, check base compaction. A solid foundation is crucial for preventing uneven surfaces and cracks later on. Also, lay out your work area with slip-resistant mats or plywood to avoid falls when moving around heavy materials.
Preventing and fixing lippage and warpage issues
Lippage is when tile edges sit higher than adjacent tiles, and warpage is a curved or twisted tile surface caused by tile warp, mortar inconsistencies, or substrate deflection, with large-format tiles being more prone.
Prevent it with solid prep: a flat substrate within tolerance, proper underlayment, latex-modified or polymer-enhanced thinset, back-buttering large tiles, the right trowel size, and a consistent mortar bed. On the job, grind or grind-and-back-butter for high spots, re-lay affected areas with fresh mortar, and re-check grout lines after cure; address warpage by trimming excess adhesive so edge tiles sit flush.
Good planning and the right tools save you time, money, and headaches by catching lippage before it shows and making localized rework easier.
Use a straightedge or laser level to verify flatness, and have a leveling system, grinder, notch trowels, and vibration-free adhesive on hand. If deflection or persistent warpage shows up, or the substrate has issues, call in a pro before throwing good material at bad groundwork.
Layout strategies to minimize visible warpage
To hide warpage, start with an offset pattern that spreads out the joints. A 50% offset means each row of pavers is shifted halfway over from the previous one. This looks neat but can highlight any unevenness in your base layer.
A safer bet might be a 33% offset, where you shift every third course by half a paver width. It’s less likely to show warpage, and it still gives that clean checkerboard look. Just remember, bigger joints can mask minor imperfections better than tight fits.
When deciding on joint size, go for 1/2 inch or larger if you’re not sure about your base layer’s stability. This extra space helps absorb any settling and keeps the pavers from locking together too tightly. But don’t overdo it—too big a gap looks sloppy.
On-the-spot troubleshooting during setting
When laying tiles, quick checks are crucial to catch issues before the mortar sets. Start with a pull test: gently lift each tile after placement but before it’s fully set. If it comes up easily, it means there’s not enough adhesive or the base isn’t compacted properly—fix this by adding more adhesive and ensuring the base is solid.
The tap test follows next: lightly tap tiles with a rubber mallet to ensure they’re seated firmly. If you hear a hollow sound, it means there’s air under the tile or insufficient mortar coverage—address this immediately by applying more mortar and reseating the tile.
If warpage is spotted during setting, adjust your layout strategy on the spot. Lift tiles that are out of line and reset them correctly. Remember, catching these issues early saves time and hassle later when fixing lippage becomes much harder.

Grouting, sealing, and curing large-format installations
In large-format installations the grout joint size, the grout type, and the curing timing drive the whole job, so start with a solid plan for movement joints, appropriate joint widths, and any groutless lines you may want to consider where applicable. Choose cementitious or epoxy grout based on movement, stain resistance, and maintenance needs, and size joints so they perform under traffic while allowing for subtle expansion. Seal porous substrates before or after grouting as the material demands, and plan realistic cure windows that reflect manufacturer guidance alongside your climate and use patterns.
This matters on the job because it sets up a smooth workflow and avoids costly mistakes, delays, and unsightly repairs. A clear sequence—surface prep, sealing, grouting, and re-sealing within the right cure windows—helps you stay ahead of issues like premature sealing, improper joint sizing, and neglected expansion joints. By understanding climate effects and traffic loads, you can schedule work around use patterns, monitor substrate moisture, and document cure progress so you don’t rush or skip critical steps that compromise finish and longevity.
Minimum joint sizes and why they matter
The American National Standards Institute (ANSI) has a rule for large-format tiles: the joints should be at least three times the thickness of your grout. This means if you’re using a 1/8-inch grout, your joint needs to be at least 3/8 inch wide. This helps prevent cracking and keeps your installation looking neat.
Absolutely no joints should be less than 1/4 inch. Smaller gaps can cause issues with expansion and contraction, leading to cracks or uneven surfaces. Always double-check the base compaction before laying tiles to ensure it’s solid enough for large formats.
If you’re working with extra-large tiles, like those over 2 feet by 2 feet, consider increasing joint sizes even more. This gives your installation room to breathe and move without breaking apart. Remember, proper spacing is key to a long-lasting job.
Curing times, traffic, and furniture placement
After grouting your large-format installation, curing is crucial. For typical mortars, you’ll need to wait at least 24 hours before walking on the surface lightly. This initial period allows the mortar to set without damage.
Once 24 hours have passed and you can walk around safely, it’s time to start thinking about furniture placement. Wait another 7 days before setting up light furniture like chairs or small tables. Make sure these items won’t shift much once placed. For heavier loads like sofas or cabinets, wait a full 14 days. This extra time ensures the mortar is strong enough to handle weight without cracking.
Remember, rushing this process can lead to cracks and voids in your installation. Take it slow, check base compaction regularly, and follow these timelines closely for best results.
Common mistakes and how to avoid them
Common mistakes in tile installs are skipping back-buttering, inadequate substrate checks, the wrong mortar, insufficient tile coverage, and missing movement joints. For each, apply practical prevention: back-butter the fully, level the substrate, choose the correct mortar blend, confirm full tile contact, and plan joints before you set a single tile. Large-format tile makes these issues worse, since weight, heat/moisture, and faster set times demand stricter prep and on-site QA.
A simple on-site workflow helps you stay out of trouble: pre-checks, material validation, careful execution, and post-install QA. If fallout happens, fix quickly with targeted steps—adjust substrate flatness, re-calc mortar mix, add back-butter or extra coverage, and install proper movement joints—then retest and document results for timing and safety. This approach saves time, avoids failures, and keeps your project moving with clear records for future maintenance.
How to inspect for proper mortar coverage during install
Mortar coverage is key for a solid tile job. Start with visual inspection. Look for gaps and uneven spots where the tiles aren’t sitting right on the bed of mortar. If you see too many, it’s time to dig deeper.
Next up, do some pull tests. Use a small crowbar or similar tool to gently lift a few tiles at random spots. If they come off easily with little resistance, there’s not enough mortar underneath. Aim for the tile to stick firmly but allow you to remove it without damaging the grout lines.
Finally, consider removing a sample tile here and there to check how thick the mortar layer is under each one. It should be about 3/8 inch thick or as per your project specs. If it’s too thin, add more mortar before laying down new tiles in that area.
When to stop and fix versus proceed
Knowing when to halt work is crucial. If you find issues like poor mortar coverage, stop immediately. Don’t risk the whole job for a quick fix. Check base compaction and ensure it’s solid before laying another stone.
If there are minor defects that won’t affect structural integrity, like small cracks in concrete edges, take photos and document them. Then proceed but plan to address these issues later without delaying your schedule too much.
Always prioritize quality over speed. A rushed job will cost more time and money down the line than a few extra hours spent getting it right now. If you’re unsure about something, consult with an expert or refer back to earlier sections on proper mortar coverage.
Cost, time, and material estimating for large-format projects
This section gives a practical cost and time breakdown for large-format tile projects, with clear categories for materials (adhesives, primers, membranes, backerboard if needed, grout and sealers, waterproofing, miscellaneous fasteners), prep (substrate flattening, crack isolation, moisture barriers, patching), and tools or rentals (notched trowels, wetsaw, tile leveling system, grinders, suction cups, mixers). Expect roughly 4–7 dollars per sq ft for materials, 3–6 dollars per sq ft for labor, 1–2 dollars per sq ft for prep, and 1–2 dollars per sq ft for tools, plus a 10–15% contingency for waste and minor surprises. A sample 100 sq ft total shows low/average/high ranges around $900, $1,350, and $1,800, respectively, with differences driven by tile price, substrate prep, and pattern complexity; time estimates run about 6–9 hours of crew labor per 100 sq ft, depending on layout and cutting.
This matters because it helps you budget accurately, spot high-cost drivers, and set expectations before the job starts. By understanding the breakdown, you can prioritize scope, plan for proper curing windows and handover buffers, and avoid nasty delays from underestimating prep, tool needs, or waste management that hits the project timeline hard.
Calculating mortar and grout quantities
To figure out how much mortar and grout you need for your project, start by measuring the area of your tiles. Remember, bigger trowels mean less waste but can be tricky if you’re not experienced. Use a trowel size that matches your tile size to get it right.
The joint width also plays a big role. A wider joint means more grout and mortar needed. For every square foot of tile, calculate the amount based on this simple formula: Area x (1 + Joint Width). This gives you the total coverage including joints. Don’t forget to add about 5% extra for waste.
Before you start laying tiles, check base compaction. A solid foundation means less chance of cracks and shifting tiles down the line. And always mix mortar in small batches; it dries fast and can be a pain to work with if it sets up too quickly.
Hidden cost factors: waste, breaks, and extra prep
When you’re working on a big project, it’s easy to overlook the little things that can eat up your budget. First off, don’t forget about tile breakage. You’ll need extras for mistakes or damage during installation. Aim for at least 10% extra material just in case.
Then there’s waste from pattern matching and cutting tiles to fit edges and corners. This can add up fast if you’re not careful with your layout planning. Make sure to factor in an additional 5-7% for these cuts when estimating materials.
Lastly, don’t skimp on the prep work. If your substrate isn’t perfectly level or needs extra reinforcement, that’s going to cost time and money. Before you start laying tile, make sure to check base compaction and any necessary repairs. This upfront effort will save you headaches later.
Movement joints, climate, and long-term performance
Movement joints are mandatory in large-format tile assemblies to control cracking from thermal movement and substrate shifts. Differentiate joints for movement versus expansion gaps, and plan grid patterns with perimeter gaps and gaps around fixtures; typical spacing follows your tile size, layout, and room geometry. Start with practical rules of thumb: space joints at regular intervals equal to about one tile width, align joints in the grid, and place extra joints at corners, edges, and near changes in substrate or fixture locations.
Climate factors like freeze-thaw cycles, humidity, and seasonal temperature swings drive material choices for mortars, sealants, and membranes, as well as their compatibility with movement joints. Proper planning reduces long-term cracking and membrane failures, and it clarifies what to expect over decades. A simple decision guide helps you choose backer materials and sealants that accommodate movement and moisture, plus a straightforward maintenance plan to inspect joints, reseal as needed, and watch for edge wear or substrate deterioration.
Designing and locating movement joints
Movement joints are crucial for preventing cracks in your concrete slab. They should be placed where the slab changes direction, such as at corners, or where it meets walls, sidewalks, or driveways. A good rule of thumb is to space them every 10 feet in all directions for a standard residential project.
When placing joints, check base compaction and ensure the ground beneath your slab is stable. Weak spots can cause uneven settling, leading to cracks that might look like they’re from improper joint placement. Also, avoid making joints too close together or too far apart—this can stress the concrete unnecessarily.
A common mistake is forgetting to place a movement joint where two different materials meet, such as between your garage floor and driveway. This oversight often leads to cracks that spread across both surfaces over time. Take your time with this step; it’s better to have too many joints than not enough.
Material compatibility for differing climates
The right mortar and grout can make your concrete work last decades, but pick wrong ones and you’ll regret it. Here’s what to look for.
- Type N mortar: Used in cold climates where freeze-thaw cycles are common. Look for high freeze-thaw rating on the bag. Tip: Avoid using Type S in super cold areas as it can crack easily.
- Mortar with low water absorption: Great for hot, dry climates to prevent cracking and staining. Check the label for low water absorption rate. Tip: Use this mortar if you live where rain is scarce but temperatures soar.
- High-strength grout: Ideal for variable climates that see both freezing winters and scorching summers. Look for high strength class on the bag, like C40/50 or higher. Tip: Don’t skimp here; cheaper grouts can break down over time.
- Acid-resistant mortar: For coastal areas with salt spray. Check if it’s acid resistant and has low chloride content. Tip: Avoid using regular mortar near the ocean as it will deteriorate quickly.
- Mortar with high flexibility: Good for all climates but especially useful in places with lots of movement due to temperature changes. Look for a flexural strength rating on the bag. Tip: This type prevents cracks from forming over time.
- Waterproof grout additive: Essential if you’re dealing with moisture-prone areas like bathrooms or basements. Check that it’s waterproof and has good bonding properties. Tip: Adding this can save a lot of headaches later on.
- Mortar for high suction surfaces: If your concrete is very porous, use mortar designed to handle high suction. Look for labels indicating low water loss or high retention. Tip: Using the wrong type here will lead to weak bonds and cracking.
Pro tip: Store mortar and grout in a dry place away from direct sunlight to keep it fresh longer. Mix only what you can use within an hour to avoid waste.
Quality checklist and acceptance criteria for installers and homeowners
This H2 boils down to a defensible, stepwise quality checklist that guides pre, during, and post installation with measurable acceptance criteria. It emphasizes substrate flatness (L/360 or 1/8″ over 10 ft), moisture and mold testing, and documented material acceptance before work begins, plus targeted metrics like backerboard condition and clear mortar, substrate, and tile performance standards. It also lays out real-time checks for setting, jointing, and curing that keep the job on track and make the handoff to the homeowner airtight.
During install, you verify back-buttering needs by tile size, specify mortar type and open time, and measure mortar coverage aggressively to hit manufacturer or 85–95% targets for large-format tiles. Post-install, you lock in grout joint width consistency, surface flatness after set, sealing or grout sealer where required, and documented curing times before foot traffic. This approach clarifies roles, requires dated checklists with photos or videos, and provides a clear, auditable path for QA reviews—and a DIY homeowner gains a defensible, measurable record that reduces surprises and blame when the project finishes.
Pre-installation sign-off items for substrate and materials
Use this checklist before starting your tile installation to ensure everything is ready and up to standard.
- Flatness Report: Verify the floor’s flatness meets specifications. Use a straightedge and feeler gauge; aim for no more than 1/8 inch variation over 4 feet. Skipping this can lead to uneven tile installation.
- Material Batch Checks: Confirm that all tiles are from the same batch for consistent color and texture. Look at several boxes side-by-side in natural light. Mixing batches can cause noticeable variations.
- Mortar Mix Consistency: Check mortar is not too wet or dry by squeezing a handful; it should hold its shape but release easily when pressed. Incorrect mix leads to poor bond and wasted material.
- Substrate Cleanliness: Ensure substrate is free of dust, dirt, and debris. Use a broom or vacuum cleaner. Contaminants can cause adhesion issues leading to cracks and tile failure.
- Mock-Up Approval: Confirm mock-up area matches final design intent. Check for correct layout, spacing, and grout color against samples. Discrepancies here mean redoing the entire project later.
- Substrate Levelness: Use a level to ensure substrate is even across its length and width. Uneven areas can cause tile cracking or lifting over time.
- Mortar Shelf Life: Check mortar has not expired; look for date on packaging. Old mortar may set too quickly, affecting workability and bond strength.
- Substrate Stability: Ensure substrate is stable with no cracks or loose areas. Tap surface gently to listen for hollow sounds. Weak substrates can cause tiles to crack or fall off.
- Tile Edges Squareness: Check tile edges are square by measuring diagonally; both measurements should be equal. Non-square tiles lead to misaligned patterns and wasted material.
- Mortar Temperature: Ensure mortar is at room temperature before use, especially in cold weather. Cold mortar can set too slowly or inconsistently, affecting bond strength.
Quick rule: Always verify substrate flatness and material consistency to avoid costly rework later on.
Final inspection checklist and documentation
Use this checklist right before final sign-off to ensure everything meets the quality criteria set earlier in your project.
- Concrete surface: Check for cracks, imperfections. Measure any gaps between concrete and forms or edges; should be minimal (< 1/8 inch).
- Level check: Use a long straightedge to ensure the surface is level across its length and width.
- Slope verification: Confirm proper slope for water drainage. Measure at least two points, ensuring water flows away from structures.
- Edge finish quality: Inspect corners and edges for smoothness and durability; should be well-finished without rough spots or chips.
- Joints properly installed: Ensure control joints are straight and evenly spaced. Measure spacing if necessary (typically 10-24 feet).
- Expansion joint gaps: Verify expansion joints have proper gap width, usually around 3/8 to 1/2 inch.
- Curb height consistency: Check curbs for uniform height and alignment. Measure at least three points along the curb.
- Drainage grates clear: Ensure all drainage outlets are free of debris, allowing water to flow freely.
- Surface texture: Inspect surface texture for consistency; should be smooth but not slippery.
- Color uniformity: Check for consistent color across the surface. Any significant variations may indicate issues with mix or curing.
- Water test: Pour water on a flat area to check for proper drainage and any hidden imperfections.
- Cleaning residue: Confirm no residual concrete powder, sealant, or other debris left behind.
- Photos of key areas: Take photos of all critical points such as corners, edges, joints, and curbs for documentation.
- Sign-off sheet completed: Ensure the sign-off sheet is filled out with signatures from both installer and homeowner.
- Warranty information: Confirm you have received warranty details and contact info for any future issues.
Quick rule: If it looks off or feels wrong, measure it. Don’t skip checks that ensure long-term durability.
Conclusion
Proper back-buttering underlines every large-format tile install: it protects substrate differences, controls lippage, and keeps edges tight for a durable, good-looking finish. Stay safe, follow the build order, and don’t rush the set or cure.
To move ahead, verify substrate integrity and flatness, mix and apply the right mortar per spec, back-butter the tile, press with steady, even pressure, bike through a careful layout to avoid thin spots, pull checks for lippage as you go, allow the mortar to cure before grouting, seal and cure in accordance with product data, and finally plan movement joints and climate considerations so the installation holds long term.
Common mistakes to avoid are skipping substrate prep, skimping on mortar coverage or back-buttering, installing over frozen or excessively damp surfaces, and rushing through cure times. Always wear eye and skin protection, vent the space, test a small area first, and never reuse adhesive from a previous job. If the area is large, or you face heavy lippage or unusual movement, don’t push past your limits—call a professional rather than risking costly damage. When you follow these steps, you’ll finish with a solid, safe installation and real confidence to move to the next project.
FAQ
Why is back-buttering more important with large-format tiles?
Large-format tiles have more surface area and tiny gaps can ruin a flat lay. Back-buttering helps push adhesive behind every notch and keep lippage down. Don’t skip it if you want a straight, durable surface. When dealing with large formats, back-buttering also helps compensate for slight variations in substrate flatness and reduces the risk of voids under the edges. Wear gloves and a mask if you’re mixing especially dusty thin-set, and work in a well-ventilated area. Plan extra working time for large formats, since you’ll typically set fewer tiles per session but need to verify full contact on each one. Budget a little more for adhesive if you’re using premium products that require longer open times to achieve full transfer.
Can I skip back-buttering small tiles?
Yes, you can skip it with small tiles, but it won’t hurt to do it. It can help in corners or if the mud bed is uneven. Don’t worry about overdoing it on small tiles; a light coat is fine. For maintenance, consider back-buttering in zones with recurring substrate irregularities or when you’re aiming for a perfectly flush overall surface. Keep costs down by focusing back-buttering on edge and corner tiles where lippage is most visible, and by using a consistent, thin application to avoid squeezing the mortar out excessively during setting.
What preparation matters before back-buttering?
Make sure the substrate is clean and dry. Mix your thin-set to the manufacturer’s spec. If you see high spots, fix them first; back-buttering won’t fix a bumpy surface. Also perform a substrate flatness check with a straightedge or laser level; fill low spots with leveling compound as needed and allow proper cure time. Remove any dust, oil, or paint residues, and cover near areas to prevent debris from settling on fresh adhesive. If you’re working over radiant heat or moisture-prone substrates, follow the tile manufacturer’s guidelines for temperature, cure times, and vapor barriers to prevent future failures.
How do I back-butter correctly for both tile sizes?
Spread a thin, even layer on the tile (or on the back of the tile) with a square-notched trowel. Use a flat trowel to burn it in and then press it firm into the mortar bed. Check for full contact in a couple of spots after setting. For large-format tiles, you may want to back-butter the entire back in addition to applying adhesive to the substrate to ensure consistent transfer and minimize edge voids. Use the same back-buttering technique on the second pass if you’re dealing with very flat substrates or tiles with pronounced back/pockets. After placing the tile, gently twist or wiggle to confirm full contact, then check several areas to confirm even bonding. Maintain a clean work area and wipe off excess mortar before it skins over. Remember to follow manufacturer guidelines for open time and grout joint width.