
Introduction
Self-leveling compound is a leveling overlay that smooths and flattens a concrete floor when mixed and poured correctly. It fills low spots and creates a ready surface for flooring, but preparation and timing matter. Prepare the subfloor, mix to the right consistency, and work before it starts to set.
Problems often come from improper priming, moisture, or uneven mixing, so check the substrate, follow product instructions, and work in the right temperature range. Testing with a straightedge or guide and using the recommended primer timing helps catch issues early. Costs vary by brand and area; check the label for coverage estimates and plan accordingly.
Key takeaways
- Definition of self-leveling compound and its purpose for flat, even substrate.
- Chill the substrate, mix to workable consistency, and pour in stages.
- Indentations, pinholes, or laitance signal surface prep or drainage issues.
- Estimate material coverage and plan waste; bulk purchases may reduce cost.
- Wear eye protection and respirator; follow local ventilation and curing guidelines.
- Leave a Reply Cancel reply prompts discussion and measurement clarifications.
Table of Contents
- Introduction
- Key takeaways
- What Is Self-Leveling Compound and How It Differs from Other Products
- When to Use Self-Leveling Compound — Best Use Cases and Limitations
- Preparing the Substrate for a Reliable Bond
- Mixing and Application — Step-by-Step How-to
- Drying, Curing, and Readiness for Flooring
- Troubleshooting Common Problems: Causes, Tests to Run, and Fixes
- Cost, Materials Planning, and Tools Checklist
- Safety, Maintenance, and Long-Term Performance Tips
- Conclusion
- FAQ
What Is Self-Leveling Compound and How It Differs from Other Products
Self-leveling compound, or SLC, is a cementitious leveling material designed to create a flat, stable base for floor coverings. It typically mixes with water to form a flowable slurry that can seek its own level across minor surface imperfections. Its purpose is to provide a thin, smooth layer that bonds well to prepared substrates while filling small voids and low spots.
Key characteristics to watch for include flowability and work time, curing behavior, and the range of acceptable thicknesses for different applications. SLC differs from traditional concrete in its thinner profile and greater flow, from epoxy coatings in its cementitious makeup and moisture sensitivity, and from patch compounds in its bonding strength and long-term performance. Before use, verify substrate prep requirements, moisture testing, priming needs, and temperature/humidity limits as specified by the product label or manufacturer instructions, then assess chalky or damaged slabs for proper surface preparation and repairs.
Types and common formulations
Self-leveling compounds (SLCs) come in various types, each suited to different jobs. Here’s a quick rundown:
Cementitious SLCs are the most common. They’re made from cement, sand, and water. They’re great for creating flat surfaces on concrete slabs.
Gypsum-based SLCs use gypsum instead of cement. They’re lighter, easier to handle, and ideal for interior floors with low traffic. But they’re not suitable for outdoor or heavy-duty areas.
Polymer-modified SLCs have added polymers for enhanced performance. They offer better flowability, faster curing times, and increased strength. They’re often used where extra durability is needed.
Typical performance specs to check
Before you start, check the manufacturer’s datasheet for these key performance specs:
Pot life tells you how long the SLC remains usable after mixing. Too short a pot life can lead to waste.
Flow rate/viscosity indicates how easily the SLC will spread and level. Higher flow rates are better for thicker applications, but too high can cause excessive bleeding.
Compressive strength shows you how much force the SLC can withstand before breaking. Higher strength is crucial in areas with heavy traffic or loads.
Recommended thickness guides you on how thick to apply the SLC. Too thin and it won’t level properly; too thick and it may crack during curing.
When to Use Self-Leveling Compound — Best Use Cases and Limitations
Use cases for SLC include uneven slabs that need leveling, thin underlayment for tile or vinyl, and installations over radiant-heat systems where a uniform surface is essential. Confirm substrate compatibility, moisture levels, and the required prep steps before applying any product to avoid bond failures later. If movement or cracking is suspected, address those issues first or consult the product instructions for suitability.
Limitations to respect are avoiding very deep fills, active structural movement, large cracks, or substrates with poor integrity. Check the manufacturer guidelines for max per‑pour depths and when multiple pours are appropriate, and perform moisture and porosity tests to determine if additional mitigation is needed. Prepare the surface by cleaning, drying, and priming as recommended, then plan your mixing, application, and cure steps around the specified working time and environmental bounds.
Underlayments and finished floor compatibility
The self-leveling compound is a great underlayment for various finished floors. Here’s what you need to know:
Tile: After application, allow the compound to cure for at least 24 hours before installing tile. Ensure the surface is clean, dry, and free of any residue.
Vinyl: For vinyl flooring, let the compound cure for at least 72 hours before installation. Make sure the surface is smooth and even to prevent any imperfections from showing through.
Engineered Wood: Before installing engineered wood flooring, allow the compound to cure for a minimum of 48 hours. Ensure the surface is clean, dry, and free of any dust or debris.
Depth limits and alternative solutions
Self-leveling compounds are not suitable for very deep fills. Here’s when to consider alternatives:
Patching Mortar: Use patching mortar for small cracks or holes up to 1/2 inch deep. It’s quick-setting and ideal for minor repairs.
Layered Fills: For fills deeper than 1 inch, consider layered fills using a combination of sand-cement screeds and self-levelers. This approach allows you to build up the depth gradually.
Pourable Screeds: If you need to fill depths greater than 2 inches, consider using pourable screeds specifically designed for deep fills. Always check product data for safe thickness ranges.
Preparing the Substrate for a Reliable Bond
Start with a thorough assessment and cleaning of the substrate. Remove dust, oils, loose paint, and laitance, ensuring the surface is dry and sound. Any contamination can hinder adhesion and lead to failures down the line.
Check moisture and alkalinity levels, repair active cracks, and route joints if needed. Use backer rods for large gaps to control movement and polymer performance. Mechanically profile or scarify the surface to remove laitance and create a better bonding substrate, then choose and apply a compatible primer with proper tack-free time before the SLC goes down.
Moisture testing and mitigation
Before applying any self-leveling compound, you must test for moisture. Excessive moisture can weaken the bond and cause your floor to fail.
Relative Humidity Test: This is a simple, non-destructive test. Ideal RH levels are between 35-60%. If it’s higher, consider using a moisture vapor retarder or barrier.
Calcium Chloride Test (MVER): This involves placing calcium chloride on the substrate and covering it with plastic. After 72 hours, if there’s no condensation, your slab is safe. If there is, you’ll need to mitigate moisture using barriers or specialized primers.
Surface repair and contamination removal
Your substrate must be clean and free of contaminants for a strong bond. Here’s how:
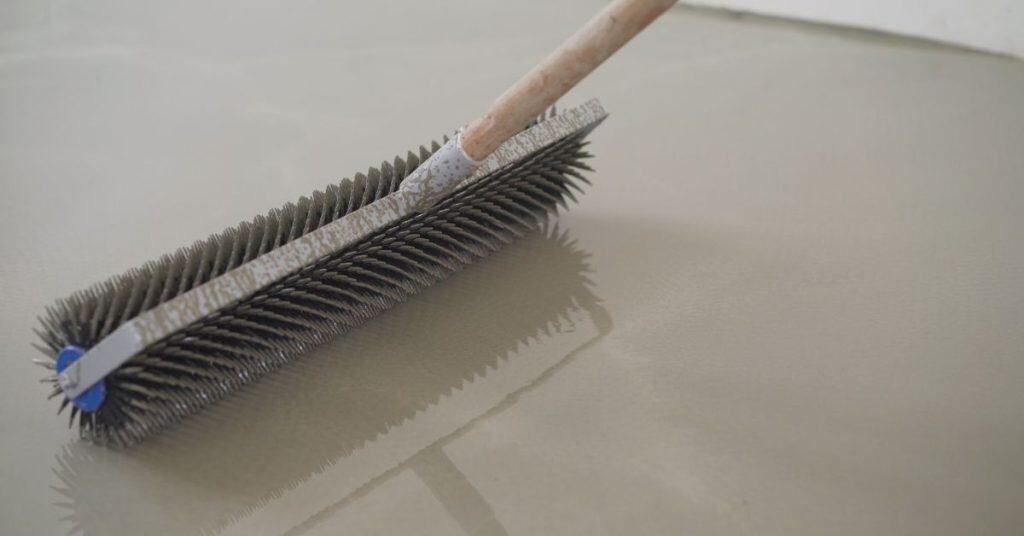
Use a stiff-bristled broom or vacuum to remove dust. For oils, use a degreaser or mineral spirits. For laitance (a weak surface layer), use a scarifier or shot blaster.
If you find loose material, remove it with a chisel or scraper. If there are active cracks, repair them using a bonding primer or repair mortar before applying the self-leveling compound.
Mixing and Application — Step-by-Step How-to
Before you start, confirm the substrate is clean, dry, and sound, and gather primers or sealers if required. Verify the base mix ratio from the manufacturer and plan batch sizes that fit the area without creating waste. Wear PPE and set up ventilation as needed.
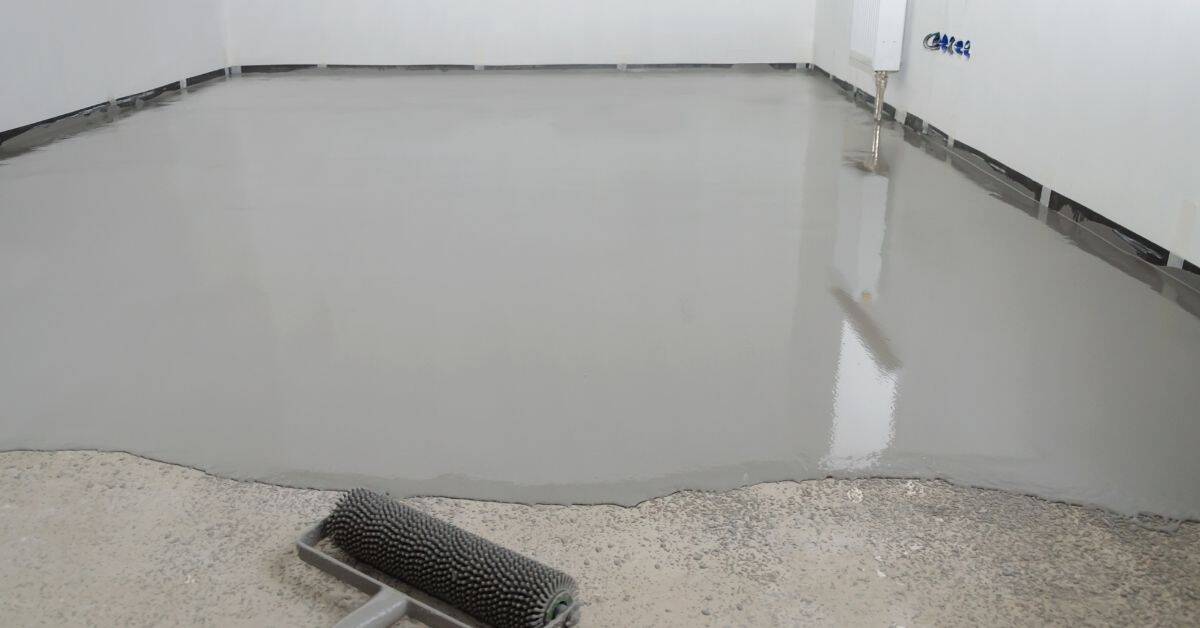
Mix with a low-speed drill, adding powder to liquid gradually to reach a lump-free, pancake-like consistency. Pour evenly in sections, use gauge rakes to control thickness, and smooth with a finishing trowel to close pinholes. Track working time and recoat windows, then protect the surface from rapid drying or traffic until cured.
Step-by-Step Process
Follow this clear, numbered sequence for mixing and applying self-leveling compound correctly.
- Preparation: Ensure the surface is clean, dry, structurally sound, and compatible with the compound. Gather primers, sealers, PPE, and mix ratio information from the manufacturer.
- Measure materials: Accurately measure base mix quantities and account for any additives or primers. Plan batch sizes based on area coverage.
- Mixing technique: Use a drill with a paddle or low-speed mixer. Gradually add powder to liquid, mixing until lump-free and pancake-like. Avoid over-mixing to prevent air bubbles.
- Pouring and spreading: Pour evenly or in manageable sections. Use gauge rakes and screeds for uniform thickness, then smooth with a finishing trowel or roller to close pinholes.
- Working time and recoat: Note pot life and recoat window under current temperature and humidity conditions. Work in small sections if needed, protecting from rapid drying and foot traffic until cured.
Environmental controls during application
Temperature, humidity, and airflow significantly impact flow and curing of self-leveling compounds. Maintain the following conditions for optimal results:
Temperature: Ideal range is 70-85°F (21-29°C). Avoid applying when temperatures are below 60°F (15°C) or above 90°F (32°C).
Humidity: Maintain relative humidity between 40% and 70%. High humidity can cause excessive curing time, while low humidity may lead to rapid drying and cracking.
Airflow: Minimize drafts and airflow during application and curing. This helps maintain consistent moisture levels and prevents premature drying or uneven curing.
Common application mistakes and how to avoid them
Learn from these frequent errors to achieve a successful self-leveling compound application.
- Overwatering: Adding too much liquid can result in an improperly mixed, weak compound. Always follow the manufacturer’s recommended mix ratio.
- Under-mixing: Inadequate mixing leads to lumps and inconsistencies. Ensure a lump-free, pancake-like consistency before application.
- Late priming: Priming too late can cause poor adhesion and increased risk of delamination. Prime the surface as soon as it’s clean, dry, and structurally sound.
- Applying too thin/thick: Incorrect thickness can lead to uneven surfaces or premature failure. Follow manufacturer guidelines for recommended depth limits and batch sizing based on area coverage.
By understanding and avoiding these common mistakes, you’ll achieve a successful self-leveling compound application that lasts.

Drying, Curing, and Readiness for Flooring
Understand the difference between surface set, walkability, and full cure, and relate these stages to when flooring can be installed. Use the product instructions to gauge when the surface is ready for primers or adhesives, and when to recheck moisture levels. Do not rush the process beyond what the product allows.
Identify factors that speed up or slow curing, such as ambient temperature, humidity, substrate moisture, and pour thickness. Perform moisture tests and slab RH checks as recommended, then follow a practical readiness timeline with clear decision points for moving to the next coating or finish. Keep a pre-flooring checklist handy to confirm flatness, lack of sheen, and compatible surface conditions before proceeding.
Flooring installation times and checks
Before you start laying your tile, vinyl, or wood flooring, make sure the self-leveler is fully cured. This usually takes around 72 hours, but check the product label for specifics.
Once it’s cured, here are some checks to run:
- Moisture levels: Use a moisture meter to ensure the slab isn’t too damp. Aim for readings below 4% for most flooring types.
- Flatness: Walk across the surface. If it feels bouncy or uneven, you might need to grind and level it again.
- Bond strength: Perform a pull test by gluing a piece of wood to the slab and pulling on it. It should feel solid, not weak or crumbly.
Now you’re ready for flooring installation:
- Tile: You can install directly over cured self-leveler once it’s dry and flat.
- Vinyl: Most vinyl planks or tiles can go down after the slab has dried, but check manufacturer instructions for specific requirements.
- Wood: Engineered wood and solid hardwood need a stable, flat surface. Make sure your self-leveler meets these criteria before installation.
Visual and tactile checkpoints
Before you lay down your flooring, use this checklist to ensure your concrete is properly cured and ready. Perform these checks after the recommended curing time (check manufacturer instructions or local rules).
- Check surface moisture: Use a non-contact moisture meter (available at hardware stores) to measure the slab’s surface moisture content. Aim for 75-90% relative humidity (RH) or less.
- Inspect for cracks: Walk the area and visually inspect for any hairline cracks. Even small ones can cause issues with your flooring.
- Feel for warmth: Concrete should feel cool to touch, not warm. Warm concrete may still be curing and could affect your flooring’s adhesion.
- Perform the knock test: Gently tap the surface with a hammer or mallet. Fully cured concrete will sound solid; uncured concrete will have a hollow sound.
- Check for efflorescence: Look for white powdery deposits on the surface, which can indicate excessive moisture. If present, clean and let it dry before proceeding.
- Scratch test: Lightly scratch the surface with a coin or nail to ensure no loose material comes off. This confirms proper curing and adhesion.
- Rebound test: Drop a rubber ball (like a small exercise ball) onto the surface from about 3 feet high. If it bounces back, your concrete is likely cured enough for flooring.
- Check for levelness: Use a long straight edge and feeler gauges to ensure the slab is within acceptable tolerances (usually L/360 for residential work).
Quick rule: Always check with your flooring manufacturer’s guidelines before proceeding, as some may have specific requirements or additional tests.
Troubleshooting Common Problems: Causes, Tests to Run, and Fixes
Common failure modes include debonding, cracking, bubbling, pinholing, and a lack of level. Each issue has typical pathways such as poor prep, substrate movement, or incorrect mix/water ratios, and recognizing them early helps prevent widespread failures. Use a simple diagnostic approach to identify the root cause.
Run tests for moisture, adhesion, porosity, and leveling during planning and after application to validate readiness. For fixes, follow sequence-dependent steps like cleaning, priming, crack filling, patching, and re-leveling, then ensure proper curing. Maintain best practices with a thorough substrate prep checklist, moisture mitigation, and appropriate temperature and humidity controls to minimize recurrence.
Debonding and delamination
Debonding occurs when the self-leveling compound peels off from the substrate. Delamination is similar, but it happens within the compound’s layers. Both are serious issues that need immediate attention.
Causes: Poor surface preparation, high moisture content in the substrate, or using incompatible primers can lead to debonding and delamination.
Tests: Use a knife test – insert a sharp tool at the edge of the compound and try to lift it. If it lifts easily, you have debonding. Also, re-check moisture levels with a calcium chloride test or a hygrometer.
Fixes: If moisture is high, mitigate it using the methods mentioned earlier in this guide. If prep was poor, clean and grind the surface again. Apply a compatible bonding primer before re-applying the compound.
Cracking, curling, and shrinkage
Cracks, curls, and shrinks are signs of movement or rapid drying in your pour. They can lead to more serious issues if not addressed.
Causes: Environmental factors like temperature changes and humidity fluctuations, as well as improper mix ratios, can cause these problems. Rapid drying due to high temperatures or low humidity can also lead to shrinkage cracks.
Tests: Check for movement by tapping the surface with a hammer – a dull thud indicates movement. Also, look for signs of rapid drying like quick set times and excessive shrinkage.
Fixes: For cracks, use a flexible membrane or patch with an appropriate concrete repair material. If curling is severe, you might need to remove the compound and re-pour with proper environmental controls in place. Always ensure your mix ratios are correct and follow the manufacturer’s guidelines for water addition.
Surface defects (bubbles, pinholes, uneven finish)
Bubbles, pinholes, and an uneven finish can make your floor look unprofessional and may lead to further issues. Here’s how to identify and fix these problems.
Causes: Entrained air during mixing or pouring, contaminants on the surface, or improper pouring techniques can cause these defects.
Fixes: For bubbles and pinholes, you can use a broadcast sand to fill them in. A skim coat may also help even out the surface. If the problem is severe, you might need to grind down the surface lightly and recoat. Always ensure your substrate is clean and free of contaminants before pouring.
Cost, Materials Planning, and Tools Checklist
Break down typical cost factors by product bags, coverage per thickness, primers, moisture remediation, and site prep to build a realistic budget. Plan quantities with area, depth, waste factors, and edge handling in mind, and identify any special handling or disposal considerations for the materials you choose. Use the product data sheet to align expectations with what you actually purchase.
Outline the material sequence from primer to self-leveling compound and any sealers, noting compatibility between brands and any required moisture mitigation steps. List essential tools and PPE, plus optional items like laser levels or flow-control devices. For labor, estimate hours by task and plan around weather, then add a contingency for fixes and potential remediation costs as you verify project scope.
Tools and consumables you’ll need
Before you start, make sure you have all the necessary tools and materials on hand. This will save you time and trips to the store.
- Electric mixer: To ensure a smooth mix of your self-leveling compound.
- Gauge rake: For checking and maintaining consistent depth during application.
- Trowels (1/8”, 3/16”, 1/4”): For spreading, leveling, and edging your compound.
- Primer: To prepare the surface and improve adhesion. Check compatibility with your chosen self-leveling compound.
- Tapes (polyethylene or paper): For edge containment and protecting walls from overspill.
- Sand (if needed): For adding to your mix if a heavier, denser finish is required.
- Moisture test kit: To check for excess moisture in the substrate before application.
- Personal protective equipment (PPE): Includes safety glasses, gloves, and respiratory protection.
Quick rule: Always double-check your tools and materials before starting. Missing something can lead to delays or poor results.
Budgeting for contingencies
Unexpected issues can arise during any project. It’s wise to set aside a contingency fund to cover these potential costs.
- Moisture mitigation: Allocate funds for moisture barriers or primers if your substrate tests positive for excess moisture.
- Additional repair materials: Set aside money for extra patching, backer rod, or other repair materials to address any unexpected surface defects.
- Rework budget: Plan for the possibility of needing to redo sections due to application errors or unforeseen substrate issues.
- Coverage check: Ensure you’ve accurately calculated how many bags you need. Underbuying can lead to delays and additional costs.
Quick rule: A good rule of thumb is to set aside 10-15% of your total budget for contingencies. This should cover most unexpected expenses.
Safety, Maintenance, and Long-Term Performance Tips
PPE should include gloves, goggles, and a respirator with appropriate filters; ensure good ventilation and use temporary containment or fans during mixing and application. Be mindful of uncured material handling and skin or eye protection, and have spill response plans ready. Follow SDS guidelines for disposal of cured versus uncured material.
Develop a maintenance plan that includes periodic sealing, moisture monitoring, and releveling or patching as needed to extend surface life. Track primer intervals and surface cleaning to maintain performance, and document safety checks, local code considerations, and a maintenance log for future reference. Ensure compatibility and proper ventilation when reapplying primers or coatings and keep a clear pre-work safety checklist on hand.
Preventive maintenance and inspections
Regular checks help keep your self-leveling compound floor in top shape. Here’s a quick checklist to follow.
- Check for moisture: Use a moisture meter to test the slab every 6 months. Excessive moisture can cause delamination.
- Inspect edges: Check where the compound meets walls or other surfaces. Reseal if needed to prevent cracking and curling.
- Monitor minor cracks: Small hairline cracks are normal, but widening ones need attention. Fill them promptly to avoid bigger issues.
- Examine surface defects: Look for bubbles, pinholes, or an uneven finish. Address these early to maintain a smooth surface.
- Check primer/coat compatibility: Ensure your primer and coats are compatible with the compound. Incompatibility can lead to debonding.
- Monitor substrate movement: Check for any structural movement that could stress the compound and cause cracking.
- Clean surface periodically: Remove dirt, dust, or debris every 6-12 months to maintain adhesion and prevent defects.
- Inspect reapplication areas: Before applying a new layer, ensure the old one is sound. Poorly cured or incompatible layers can cause problems.
Quick rule: Regular checks and prompt action on minor issues save you big repairs down the line.
When to call a professional
While DIY is great, there are times when it’s best to leave it to the pros. Here are some scenarios where you should consider calling in an expert.
Structural movement: If you notice significant cracks or movement in your slab that could be due to structural issues, don’t DIY – call a pro immediately.
Unknown moisture sources: If you can’t pinpoint the source of excessive moisture, it’s best to get professional help. They have tools and expertise to find hidden moisture problems.
Large commercial pours: For large-scale projects like commercial buildings or warehouses, it’s often safer and more efficient to hire professionals with the right equipment and experience.
Warranty-sensitive work: If your flooring is under warranty, any DIY repairs could void it. In such cases, always consult with a professional first.
Conclusion
Take control of the result by sticking to tested steps, checking your work at every stage, and never rushing through the cure. A solid bond and smooth finished floor come from careful prep, accurate mixing, and patient drying, all done with safety in mind.
Proceed by confirming the substrate is truly ready, mix to the manufacturer’s guidance, apply evenly to avoid low spots, clean as you go, and verify the compound has reached the proper dryness before installing flooring. If possible, perform a quick test area first, then scope the whole project in logical steps and keep notes on mix ratios, cure times, and environmental conditions.
Avoid common missteps: over-wetting or under-mixing the compound, skipping substrate prep, and moving doors, vents, or heavy items during cure. Always wear eye protection and a dust mask, keep pets and kids away, and ventilate the space. If the surface is questionable, or you see continued cracking, or you’re unsure about cure times, stop and call in a pro instead of pushing ahead. When you know the rules and follow the process, you’ll end up with a durable, level floor that lasts—start with a small area, plan your steps, and stay safe as you work.
FAQ
What exactly is self-leveling compound and how does it work?
Self-leveling compound is a cement-based product designed to flow into low spots and create a smooth, level surface. It cures to a rigid, hard layer that bonds to the prepared substrate. Always follow the manufacturer’s instructions for mixing and application specifics.
What are practical tips for applying self-leveling compound successfully?
Work in small batches and pour where you intend to spread quickly. Use a gauge rake or smoother to help initial distribution, then back-roll with a long, clean broom or glide to achieve a flat surface. Keep the area well-ventilated and avoid drafts that can cause rapid drying.
What common problems can show up during application and how do I fix them?
Typical issues are ridges, pinholes, or unintended pooling. Check substrate moisture, temperature, and humidity; rework or patch only after following the product’s guidelines. If in doubt, test a small area and consult the label or manufacturer instructions before proceeding.
How do I estimate cost and coverage for a DIY project?
Estimate by area and thickness required, then compare product coverage claims on the label. Include priming or bonding agents if recommended. For accurate planning, check the product’s coverage per unit and adjust for waste and odd shapes.