
Introduction
Preventing moisture problems stops mold and rot by tackling humidity, leaks, and ventilation.
You’ll learn practical steps, tips, and simple rules of thumb to identify moisture sources, fix common issues, and keep spaces dry.
Key takeaways
- Control indoor humidity to below 60 percent during peak seasons.
- Fix roof leaks and gutter clogs promptly to prevent moisture intrusion.
- Seal gaps around windows and doors to reduce damp drafts.
- Use a dehumidifier in damp rooms during humid months, especially basements.
- Improve drainage away from foundations with properly pitched soil and gutters.
- Inspect insulation for moisture damage and promptly repair to prevent rot.
Table of Contents
- Introduction
- Key takeaways
- Why Moisture Causes Mold and Rot
- Identifying and Assessing Mold Problems Safely
- Simple DIY Fixes to Stop Moisture at the Source
- Materials, Products, and Tools That Help Prevent Moisture Damage
- Mold Cleanup Guidelines and Safety Measures
- Preventive Maintenance and Inspection Plans
- Cost-Effective Planning and When to Hire Experts
- Conclusion
- FAQ
Why Moisture Causes Mold and Rot
Moisture moves through a home from leaks, humidity, condensation, and groundwater. Temperature and air movement drive moisture toward surfaces, where it can linger. When moisture is present, mold spores can germinate and wood rot can begin, feeding on damp materials like wood, drywall, and carpets.
That matters because condensation, damp spots, and leaks show up as musty odors, staining, peeling finishes, or soft wood. Keeping humidity in check, fixing leaks, and improving ventilation interrupts mold growth and slow rot before it weakens structure. Look for recurring foggy windows, damp walls, or hidden moisture behind walls.
How moisture gets into homes
Moisture can enter your home through several common pathways. One of the most frequent is roof leaks, where water seeps through damaged shingles or flashing and drips down to walls and ceilings.
Poor drainage around your foundation can also be a major issue. When rainwater doesn’t flow away from your house fast enough, it can soak into porous materials like concrete or wood, leading to damp basements or crawl spaces. Plumbing leaks are another source; even small drips behind walls can create ideal conditions for mold and rot.
Another factor is vapor drive, where warm indoor air moves through tiny gaps in your home’s envelope—like around windows or doors—and condenses on cooler surfaces inside the building. This process can be especially problematic during cold weather when exterior temperatures drop sharply.
If you have an Exterior Insulation and Finish System (EIFS), failures in this cladding system can also introduce moisture into walls, causing hidden damage that’s hard to spot until it’s too late. Regular inspections are key to catching these issues early.
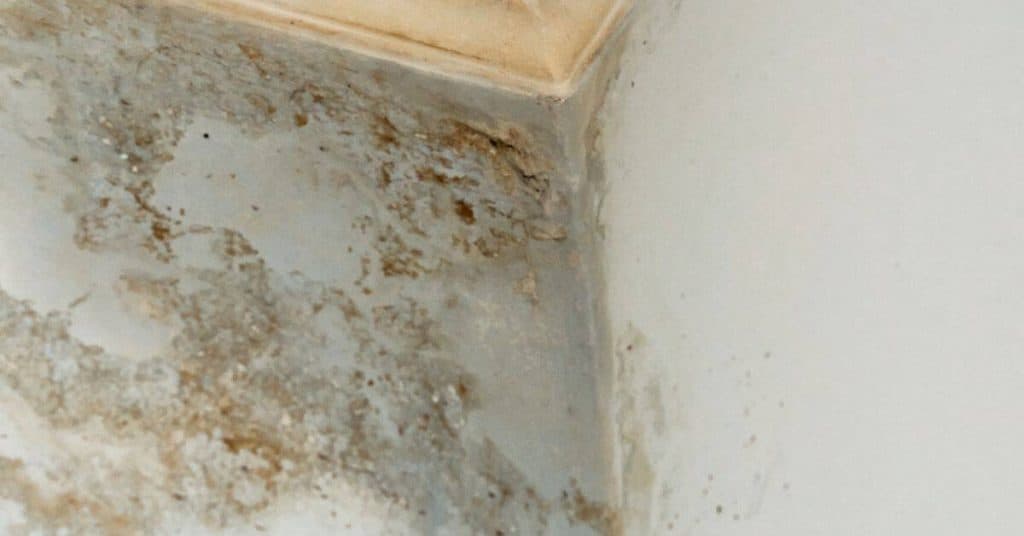
Signs that mold or rot may be developing
Mold and wood rot often leave clear signs of their presence if you know what to look for. Musty odors are a common indicator, especially in damp areas like bathrooms or basements.
Visual clues include dark spots on walls or ceilings, which can indicate mold growth. Peeling paint or wallpaper might also signal underlying moisture issues that need attention.
Structural damage from rot is another serious concern. Soft wood, crumbling drywall, and warped floorboards are all red flags. These signs not only affect the aesthetics of your home but also compromise its structural integrity over time.
Early detection is crucial because mold and rot can spread quickly once they take hold. By addressing these issues promptly, you can prevent further damage and save money on repairs down the line.

Identifying and Assessing Mold Problems Safely
Identify mold safely by distinguishing visible stains and odors from suspected hidden mold, and map common moisture culprits like roof leaks, plumbing issues, and poor ventilation to guide targeted checks. Use a non-invasive, step-by-step workflow that starts outside for water intrusion, surveys interior surfaces, and reviews attic and crawlspace with moisture meters or infrared imaging only when it won’t cause unnecessary disturbance. Wear proper PPE—N95 or higher, gloves, goggles, long sleeves, disposable coveralls—and keep containment tight: seal the area, and turn off HVAC if advised before you start.
This approach matters because it minimizes spore disturbance while giving you clear notes on findings to decide between DIY remediation or pro help. It also provides practical signposts for interior versus exterior moisture sources, a photo-documented log, and a simple checklist you can follow without demolition. Escalation criteria include a large affected area, hidden mold behind walls or under flooring, ongoing moisture issues, or hazardous materials in older homes, all of which should prompt a licensed professional while you maintain containment and safe handling as you document progress.
Visual checkpoints and smell tests
Use the following checklist when you notice musty odors, water stains, or discoloration.
- Under sinks: Look for standing water or wet insulation. Confirm by checking under cabinets for dampness.
- In attics: Inspect roof sheathing and rafters for dark spots or mold growth. Confirm by using a moisture meter if needed.
- Behind walls: Check baseboards, corners, and around pipes for signs of water damage. Confirm by tapping on drywall to check for softness.
- Around HVAC units: Look for condensation or mold growth in ducts and filters. Confirm by turning off the unit and checking for dampness.
- Beneath carpets: Lift corners and inspect padding for moisture damage. Confirm by feeling for wet spots under carpeting.
- In EIFS walls: Check exterior insulation finish systems for cracks or water intrusion. Confirm by looking inside wall cavities if possible.
Quick rule: Always document findings with photos and notes to track progress.
When to test or hire a professional
If you find extensive mold coverage, especially in HVAC systems, it’s best to call a pro. Professionals can safely sample and identify mold types using lab analysis.
For homes with immunocompromised occupants, professional remediation is crucial to prevent health risks. They use containment measures and specialized equipment to minimize spore spread.
If you’re unsure about the type of mold or its extent, a pro can provide guidance on necessary cleanup steps and ensure compliance with local regulations.
Simple DIY Fixes to Stop Moisture at the Source
Start with high-impact, low-skill fixes that hit multiple moisture sources at once. Look for obvious exterior gaps to seal with weatherproof caulk, upgrade door/window weatherstripping, improve ventilation, and use moisture absorbers in damp spots.
These quick actions reduce condensation, prevent mold, and buy you time before bigger repairs. Always check labels and instructions, and know when to call a pro for cracks, foundation issues, or persistent leaks; wear PPE and stop if things get worse.
Controlling indoor humidity and condensation
To keep mold at bay, aim for an indoor relative humidity below 60%, dropping to around 45% in very humid climates. Use a dehumidifier during damp seasons or when dealing with persistent moisture issues. Ensure your bathroom and kitchen have functioning exhaust fans to vent steam outside.
Quick fixes like sealing gaps around windows and doors can also help reduce condensation on cold surfaces. Apply weatherproof caulk to any cracks you find, especially near pipes and electrical outlets in basements or crawlspaces. This stops moisture from seeping into walls where it could foster mold growth.
Maintain a clean environment by drying out wet areas immediately after spills or leaks. Regularly check for dampness in carpets, curtains, and other textiles that can harbor mold spores. If you spot any signs of water damage or musty smells, address them promptly to prevent further issues.
Stopping leaks and improving drainage
Start by checking your roof for small leaks around flashing or chimneys. Use a tarp or temporary patch if you find any damage, but plan to have it properly fixed as soon as possible. For plumbing issues, look out for dripping faucets or running toilets that can add moisture to the air.
Outside, ensure gutters and downspouts are clear of debris and direct water away from your home’s foundation. Proper grading around the house is crucial; soil should slope downward at least six inches over ten feet from the walls. This prevents standing water near the base that could seep into cracks or gaps.
Inspect basement windows for proper sealing, especially where frames meet concrete. Apply a bead of caulk along any visible seams to stop moisture intrusion. Also, check around pipes and utility lines entering the house; these are common entry points for dampness.
Materials, Products, and Tools That Help Prevent Moisture Damage
This section highlights reliable moisture-protection materials and tools you can actually use on a DIY project. Look for damp-proofing and vapor barriers, exterior sealants and caulks, drainage or air-gap components for EIFS, high-performance concrete sealers, and moisture-resistant paints or coatings. For specs, check the product label or datasheet and balance durability with cost.
The goal is practical, not perfect, guidance you can apply without a pro. Understand how to choose within safe ranges: substrate compatibility, UV stability, and warranty considerations matter—check the label for what to expect. Use the listed inspection and repair tools—from moisture meters to caulking guns and trowels—along with basic testing steps to identify moisture entry points and compatible primers or finishes, and plan maintenance over time.
Recommended materials and what to check
When selecting moisture protection products, always verify key specs to ensure durability and effectiveness.
- Vapor barriers: Check for high permeability ratings; avoid low-quality films that tear easily. Skipping this can lead to condensation buildup inside walls.
- Damp-proofing membranes: Ensure they are UV-stable and compatible with your substrate; look for warranties covering at least 10 years. Poor quality leads to rapid degradation.
- EIFS drainage components: Verify proper air gap spacing and drainage channels; ensure materials resist water absorption. Incorrect installation can cause moisture entrapment.
- Breathable membranes: Confirm vapor permeability within 10-25 perms range; check for compatibility with EIFS systems. Inadequate breathability traps moisture inside walls.
- Sealants and caulks: Look for water-repellent performance, UV stability, and flexibility ratings. Poor quality sealants crack easily under weather exposure.
- High-performance concrete sealers: Ensure they bond well with existing surfaces; check for resistance to alkali and salt damage. Skipping this step leads to rapid deterioration of concrete.
- Moisture-resistant paints or coatings: Verify water vapor transmission rates below 1 perm; ensure UV stability and adhesion strength. Poor quality coatings peel off quickly, exposing substrate.
Quick rule: Always verify product specs for durability and compatibility to prevent future moisture issues.
Tools and materials checklist for common repairs
Having the right tools on hand ensures you can tackle small repair jobs effectively without delays.
- Moisture meter: Non-contact type; check for accuracy. Skipping this tool means guessing moisture levels, risking further damage.
- Caulking gun: Ensure it fits your sealant cartridges properly; test by applying a small bead. Incorrect fit wastes material and time.
- Infrared thermometer: Check for range covering wall temperatures; verify accuracy with known hot/cold spots. Inaccurate readings lead to misdiagnosis.
- Putty knife: Various sizes; test flexibility by bending slightly. Rigid knives can damage surfaces during repairs.
- Trowel: Smooth surface for applying sealants and coatings; check for durability under pressure. Poor quality trowels leave rough finishes.
- Safety gear: Gloves, goggles, respirator mask; ensure proper fit before use. Neglecting safety leads to injuries.
- Basic plumbing tools: Adjustable wrench, pliers, screwdrivers; verify all parts are in working order. Damaged tools waste time and effort.
Quick rule: Always have the right tools ready for immediate repairs to prevent further damage.

Mold Cleanup Guidelines and Safety Measures
Mold cleanup for small to medium patches means a clear, stepwise plan: isolate the area, set up containment, and follow gradual remediation steps so the spores don’t spread to the rest of the house. Wear proper PPE, including an N95, gloves, eye protection, and protective clothing, and use correct donning and doffing techniques to keep yourself and surfaces clean. Use surface containment, limit dust, and run air filtration as needed to control contamination and prevent cross‑room spread, disposing of contaminated materials promptly and addressing the moisture source to reduce recurrence. If the patch or conditions go beyond a simple spot, or if you see signs of structure involvement or health risk factors, pause and reassess whether professional remediation is warranted, based on product labels and manufacturer guidance.
This matters because mold can rebound if you don’t seal the area and eliminate the moisture that feeds it, so following a practical sequence helps you avoid spreading spores while you work. It also helps you recognize when DIY cleanup ends and licensed remediation begins, saving time and preventing costly mistakes, while reminding you to check cleaners, scrubbing methods, and disposal rules on the label or datasheet. By tackling the root cause and controlling the environment, you improve the odds of a lasting, safer result and reduce the chance of reoccurrence in other rooms.
Safe cleanup steps for different surface types
When tackling mold on various surfaces, it’s crucial to know the right approach. Non-porous materials like glass or metal can be scrubbed with a mild detergent and water. For semi-porous surfaces such as wood or concrete, use a stronger cleaner that penetrates deeper but doesn’t damage the surface.
Porous materials like drywall or carpet require more care. Scrubbing alone isn’t enough; you might need to remove and replace sections where mold has deeply penetrated. Always test small areas first to avoid damaging finishes.
For all surfaces, ensure proper ventilation during cleanup to prevent spore spread. Use fans and dehumidifiers if necessary. After cleaning, dry the area thoroughly to discourage regrowth.
Personal protective equipment and containment
Protect yourself with proper gear before starting cleanup. Gloves, a respirator, eye protection, and coveralls are must-haves.
- Gloves: Wear heavy-duty gloves to protect your hands from mold spores and cleaning chemicals. Look for nitrile or rubber gloves that fit snugly without being too tight.
- N95 respirator: Use an N95 mask or better to filter out small particles. Make sure it fits tightly around the nose and mouth, with no gaps.
- Eye protection: Safety glasses or goggles prevent mold spores from entering your eyes. Choose a style that seals well against the face.
- Coveralls: Wear disposable coveralls to keep your clothes clean and free of mold spores. Look for suits with elastic cuffs and ankles for better coverage.
- Floor covering: Lay down plastic sheeting around the work area to contain debris and prevent cross-contamination. Use duct tape to seal edges against walls.
Preventive Maintenance and Inspection Plans
A solid preventive plan is built around seasonal tasks and a yearly EIFS-focused inspection routine, plus careful recordkeeping to stop moisture from coming back. It covers joints, flashings, sealants, finish, penetrations, grading, drainage, and openings, with clear triggers to act when trouble shows up. You’ll have a simple framework to follow instead of chasing leaks after they worsen.
This matters because DIY homeowners often miss hidden moisture, rush cosmetic fixes, or delay repairs, which just makes things worse. Use it to guide when to DIY and when to call an EIFS-certified pro, and keep logs, photos, and notes to track moisture signs and repairs. Always check product labels and manufacturer instructions for coatings or sealants, and avoid common pitfalls by documenting conditions and following a clear remediation plan.
Routine checks and when to act
Use this checklist every season to catch moisture issues early.
- Roof inspection: Look for missing shingles or damaged flashing. Missing repairs can lead to leaks.
- Gutter cleaning: Clear out debris and check for cracks. Clogged gutters cause water overflow.
- Ventilation checks: Ensure attic vents are open and clear of obstructions. Blocked vents trap moisture inside.
- Sealant inspection: Look for gaps or cracking around windows and doors. Loose sealants let in rainwater.
- Sump pump test: Run the sump pump to ensure it’s working properly. A faulty pump can flood your basement.
- Drainage assessment: Check that downspouts direct water away from the foundation. Poor drainage leads to pooling and leaks.
- Foundation cracks: Inspect for new or widening cracks in concrete walls. Cracks allow moisture intrusion.
- EIFS joints: Look for gaps or separation at EIFS corners and edges. Separated joints let water seep through.
Quick rule: Address any issues immediately to prevent bigger problems later on.
Long-term care for specialized systems (EIFS and stucco)
This checklist is crucial if you have EIFS or stucco exterior walls.
- Sealant condition: Check sealants around windows, doors, and other openings. Deteriorated sealants let in moisture.
- Weep screed inspection: Look for blockages that prevent water from draining properly. Blocked weeps cause hidden leaks.
- Insulation board alignment: Ensure boards are flush with the wall surface and not loose or damaged. Misaligned boards trap moisture behind them.
- Qualified contractor assessment: Hire a certified EIFS specialist for annual inspections. DIY checks can miss critical issues.
Quick rule: Regular professional assessments are key to maintaining EIFS integrity and preventing hidden moisture damage.
Cost-Effective Planning and When to Hire Experts
Use a practical decision framework to decide when DIY makes sense and when to hire pros. DIY is typically cost-effective for simple fixes, drying and prevention in mold-prone areas, and basic maintenance. For structural concerns, extensive mold, hidden moisture, electrical work, or hazardous materials, bring in qualified specialists and lock in a clear scope and a written estimate.
Vet contractors by checking credentials, licensing where required, insurance (liability and workers’ comp), references, scope of work, warranties, and a solid change-order process. Build an itemized budget that covers remediation steps and preventive upgrades, plus a contingency, and keep thorough documentation—moisture readings, photos, reports, permits, and warranty papers—for insurance and resale.
Preparing a Remediation or Prevention Project Plan
Before diving into any moisture-related work, it’s crucial to scope out the job properly. Start by assessing the extent of damage and prioritizing areas that need immediate attention. For instance, if you have minor mold in one corner but extensive water damage elsewhere, focus on stopping further leaks first.
Next, get multiple bids from contractors for a clear picture of costs. This helps avoid surprises down the line. When deciding between repair or replacement, consider the condition and age of materials. If your EIFS system is showing signs of wear and tear, it might be more cost-effective to replace rather than patch up.
Set realistic timelines based on the complexity of work involved. For smaller DIY projects like fixing a leaky roof vent, you can tackle this in an afternoon. But for larger jobs like replacing siding or addressing hidden moisture issues, plan for several days to weeks depending on the scope and materials needed.
Choosing and Evaluating Contractors
When it comes to hiring professionals, make sure they have the right credentials. Check if they are licensed and insured for liability and workers’ compensation. Ask about their experience with EIFS or stucco systems specifically if that’s part of your project.
Request references from previous clients who had similar work done. This gives you a real-world view of how well they perform under pressure. Also, ask to see samples of their past work to ensure quality meets expectations.
Beware of contractors offering guarantees that seem too good to be true or those who push for quick decisions without proper planning. A reputable contractor will take the time to understand your needs and provide a detailed estimate with clear terms on changes and additional costs.

Conclusion
Moisture care is the steady backbone of a durable shell. Fixes that stop water at the source protect your health, your walls, and your budget.
Now move with a simple plan: inspect the area for any leaks or damp spots, test a small area first before wide repairs, remove obvious mold safely, seal or redirect moisture at its entry points, and schedule routine checks to catch trouble before it grows. Start with the path of least resistance, and work in a logical order from roof and flashing down to walls, then test and re-check after rain or heavy use.
Common mistakes to avoid are skipping the test area, using the wrong sealants or paints for the substrate, and ignoring ventilation or drainage fixes. Always follow basic safety rules: wear a mask and gloves when mold is present, ventilate well, shut off power if water exposure risks wiring, and document your findings before you cut or remove anything. If the job involves structural changes, hidden wiring, or large areas of mold, call a professional rather than pushing on alone. With a clear plan, tight controls, and discipline, you can stop moisture, protect the space, and finish with confidence.
FAQ
What causes moisture problems in a home?
Poor ventilation, leaks, and high humidity are the main culprits. Water finds any small opening and runs downhill, so fix the source first. Don’t skip missing or cracked seals on roofs, windows, and pipes.
How can I tell if I have a mold risk?
Look for musty smells, discolored spots, and damp or soft spots on walls or ceilings. If you see condensation that doesn’t go away, that’s a warning sign. Act fast to dry the area and improve airflow.
What are quick fixes I can do now?
Open windows or run a fan to dry the area. Use a dehumidifier in damp spaces and fix obvious leaks. Keep gutters clean and downspouts directing water away from the foundation.
When should I call a professional?
If water leaks persist after simple fixes, or you find widespread mold, get a pro. Structural damage or hidden moisture needs proper assessment and safety steps. Don’t gamble with your health or the house.