

Introduction
Paint nearly anything with practical techniques and smart, adaptable alternatives.
In this guide you’ll learn how to assess surfaces, choose the right paints and tools, prep properly, and apply finishes with confidence, plus practical tweaks you can use on imperfect or unusual projects.
Key takeaways
- Define project scope and surface types before choosing primer and paint.
- Use high-adhesion primers on glossy or metal surfaces for better grip.
- Sand between coats lightly to remove dust and ensure adhesion.
- Test color samples on actual surface under expected lighting.
- Label containers and maintain a wet edge to reduce lap marks.
- Clean tools promptly to prevent dried paint and tool waste.
Table of Contents
- Introduction
- Key takeaways
- Planning Your Painting Project
- Tools and Materials Checklist
- Surface Preparation Techniques
- Painting Methods for Every Surface
- Color Selection and Design Choices
- Smart Alternatives to Traditional Painting
- Troubleshooting and Maintenance
- Safety, Environmental, and Health Considerations
- Conclusion
- FAQ
Planning Your Painting Project
Start by outlining the scope of the job, set clear goals, and decide whether to DIY or bring in pros. Consider the rooms, surfaces, and whether you have the tools and know‑how. Alignment on time and budget helps prevent surprises.
This matters because it shapes timing, costs, and the work you take on. Your skill level and the product you pick drive what steps you need and how long it will take. Check the label or datasheet for practical guidance, and follow local rules for disposal.
Surface assessment and prepping priorities
Before you start painting, take a good look at the surfaces. Check for any cracks, peeling paint, or stains that need fixing. If there’s damage, address it first—patch up holes with spackle, fix loose nails, and sand rough spots smooth.
Next, clean everything thoroughly. Dust, dirt, and grease can mess up your finish. Use a degreaser for oily areas and a mild detergent for general cleaning. Rinse well and let dry completely before painting.
Identify the type of surface you’re dealing with—wood, metal, or drywall—and choose the right primer if needed. For example, bare wood needs a good coat of primer to seal it in, while metal might need an anti-rust primer first. This step is crucial for getting that professional look.
Budgeting and timeline planning
Start by figuring out how much paint you’ll need. Measure the area to be painted, calculate the square footage, and check with your local home improvement store for estimates on paint quantity.
Set a realistic timeline based on the size of the project. Don’t rush it—painting takes time to do right. Factor in prep work like cleaning and repairs, plus drying times between coats. If you’re painting large areas or multiple rooms, consider breaking the job into phases to avoid overwhelming yourself.
When budgeting, remember to include supplies beyond just paint: brushes, rollers, drop cloths, sandpaper, and any necessary tools for surface prep. Also, think about hiring pros if parts of the project are too big or complex for you to handle safely on your own.

Tools and Materials Checklist
This section lists the must-have tools, safety gear, and paint types you’ll likely need. It also offers low-cost or one-off project alternatives so you don’t overbuy. Get a simple setup to keep the job moving.
Having the right gear and paint options saves time and avoids do-overs. It helps you plan, stay safe, and choose a finish that fits your project. For product details, check the label or datasheet, and follow local rules for disposal and cleanup.
Brushes, rollers, sprayers, and how to choose
This checklist helps you pick the right tools for your painting project based on size and finish needs.
- Small projects: Use brushes or small rollers. Check if the area is less than 10 square feet. Skip this step and you might end up with too much paint waste.
- Moderate projects: Opt for medium-sized rollers or sprayers. Confirm if the space is between 10 to 50 square feet. Not choosing a roller can lead to uneven coverage.
- Larger projects: Go with large rollers or high-volume sprayers. Ensure your area exceeds 50 square feet. Skipping this step means you won’t cover walls efficiently.
- Smooth surfaces: Use brushes for precision work. Confirm if the surface is smooth and needs fine detail. Not using a brush can result in rough edges.
- Rough textures: Choose stiff bristle brushes or thick nap rollers. Verify if the texture requires deep penetration. Missing this step leads to poor paint adhesion.
- Spray finishes: Use sprayers for even coats. Confirm if you need a smooth, professional look. Skipping spray tools means uneven coverage and wasted time.
Quick rule: Pick the right tool based on project size and surface texture to save time and get great results.
Paint types and finishes explained
This checklist helps you choose the best paint type for your project’s needs, from interior walls to exterior siding.
- Latex paints: Ideal for interiors. Check if the surface is drywall or wood. Skipping this step can lead to peeling and cracking.
- Oil-based paints: Great for exteriors. Confirm if you need durability against weather elements. Not choosing oil means less protection.
- Enamel finishes: For high traffic areas. Verify if the surface needs resistance to wear and tear. Missing this step leads to quick deterioration.
- Chalk paints: Perfect for furniture. Confirm if you want a vintage look on wood pieces. Not using chalk paint means no soft, matte finish.
- Specialty paints: For unique needs. Check if your project requires specific properties like mold resistance or fire retardancy. Skipping this step can compromise safety and quality.
Quick rule: Select the right paint type based on surface material and desired finish to ensure durability and aesthetics.
Surface Preparation Techniques
Surface preparation is where you win or lose. Clean, sand, patch, prime, and mask the right way to get good adhesion and long life. Do each step in order and use the right tools for the material.
Skipping prep leads to peeling, cracking, or staining later. Taking the time to prep shows up as fewer touch-ups and a stronger finish. If you’re unsure about a product’s requirements, check the label or datasheet for guidance.
Cleaning and Removing Old Finishes
To start, you need to clean the surface thoroughly. Use a degreaser for oily spots and a wire brush or scraper for loose paint. For stubborn finishes, consider chemical strippers but follow safety guidelines strictly—wear gloves, goggles, and masks.
If mechanical removal is needed, use sandblasting or a heat gun carefully. Always test small areas first to avoid damaging the substrate. If you encounter tough spots like lead-based paints, it’s best to call in professionals who have the right equipment and permits.
Patching, Sanding, and Priming for Long-Lasting Results
Select a patch compound that matches your substrate. For wood, use wood filler; for drywall, choose joint compound. Apply the patch in thin layers to avoid cracking.
After patching, sand with the appropriate grit—coarse for rough areas and fine for smooth finishes. Feather edges well so patches blend seamlessly into the existing surface. This step is crucial for a professional look.
Painting Methods for Every Surface
Painting methods vary by surface. This section gives surface-specific instructions for walls, trim, cabinets, furniture, metal, and outdoor projects. Follow clear prep, application, and safety tips.
Knowing the right approach saves time, avoids drips, and gives a durable finish. You’ll see better results and fewer do-overs if you tailor your technique to the material.
Walls and ceilings: cutting in and rolling techniques
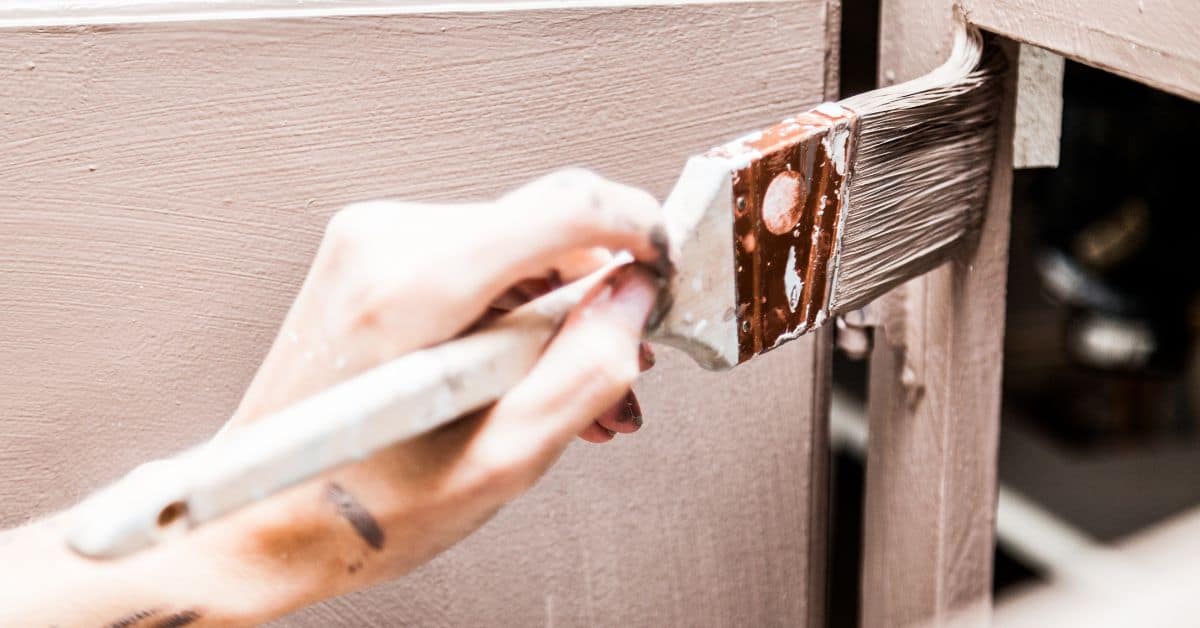
To paint walls and ceilings, start with the edges using a brush for cutting in. This means painting around windows, doors, and corners to create clean lines. Use a steady hand and work slowly to avoid drips.
Once you’ve cut in, move on to rolling large areas. Choose a roller cover that matches the paint texture—smooth for smooth walls, stipple for textured ones. Keep your roller wet but not dripping; this helps maintain a wet edge, allowing you to blend new paint with old without visible lines.
Roll in sections about 3 feet wide at a time. Overlap each pass by half the width of the roller to avoid lap marks. Work quickly and efficiently, but don’t rush—take breaks if needed to keep your work neat and professional-looking.
Trim, cabinets, and furniture: brushwork and sanding between coats
Painting trim, cabinets, and furniture requires precision. Use a quality brush that fits the job—small brushes for intricate details like corners and large ones for wider areas.
Before applying each coat, lightly sand the surface with fine-grit sandpaper to smooth out any imperfections or bumps left from previous coats. Wipe down the area with a tack cloth to remove dust before painting again.
If you’re repainting over glossy surfaces like cabinets, first apply a de-glossing agent to dull the finish and ensure better paint adhesion. This step is crucial for achieving a smooth, professional look without peeling or chipping later on.
Metal and outdoor surfaces: rust treatment and weatherproofing
When painting metal surfaces outdoors, start by cleaning the area thoroughly to remove dirt and grime. Use a wire brush or sandpaper to roughen up any smooth spots for better paint adhesion.
Treat any existing rust with a rust converter before applying primer. This product chemically converts rust into iron oxide, preventing further corrosion. Once treated, prime the surface with an epoxy-based primer designed for metal and outdoor use.
Finally, apply one or two coats of weather-resistant paint to protect against UV rays and moisture. Choose a topcoat that’s durable enough to withstand temperature changes and environmental exposure without cracking or peeling off over time.

Color Selection and Design Choices
Color selection and finishes shape mood, light, and how a room works. Pick a base color, note undertones, and use samples to compare in your actual space. Always test swatches in the room’s lighting before committing.
This matters because color changes with sun, lamp light, and nearby surfaces. Seeing samples in your space helps you avoid mismatches and regret. Use real-room testing to prevent costly re-dos and stuck finishes that don’t fit the room’s function.
How light affects color and finish
Natural light can make or break your paint choice. In the morning, colors look bright and vibrant; by afternoon, they might appear duller. Artificial lighting changes things even more, with fluorescent lights making whites look blueish and warm bulbs adding a yellow cast.
Directional lighting is key too. If you have strong sunlight coming through a window, it can highlight surface imperfections like cracks or bumps. Choose a matte finish to hide these flaws. For areas with less light, go for a semi-gloss sheen. It’ll catch the little light available and make surfaces look cleaner.
The right paint finish can also enhance your room’s mood. A glossy finish in a kitchen or bathroom will show off tile work beautifully but might not be ideal for bedrooms where you want a softer, more relaxed feel.
Testing swatches and avoiding common color mistakes
Mistakes in choosing paint colors can cost time and money. Here’s how to avoid them:
- Sample test first: Paint small areas of your walls before committing to a full room. This lets you see the true color under different lighting conditions.
- View at various times: Colors look different in morning light than they do at night. Check your swatches throughout the day and evening.
- Compare with existing elements: Bring your paint samples next to furniture, rugs, or other decor items you plan to keep. Make sure everything coordinates well.
- Avoid extremes: Bright neon colors might look great in photos but can be overwhelming in real life. Stick to shades that complement the room’s function and mood.
By following these tips, you’ll make a confident choice and end up with a space you love looking at every day.
Smart Alternatives to Traditional Painting
Smart alternatives to painting can save you time and money, using peel-and-stick finishes, furniture wrap, stain, wallpaper, or reglazing. These options cover walls without a full paint job and each has its own upsides and downsides. Weigh the pros and cons before you start.
Peel-and-stick and wallpaper go up fast, but they can fail on rough or curved walls. Stain and reglazing suit certain surfaces but require good prep and careful cleanup. Always check the product label and your local household hazardous waste rules for disposal.
When to use stains, sealers, or clear coats instead
If you want to maintain the natural look of wood or concrete while still protecting it from wear and tear, consider using a stain or sealer. These finishes allow the grain or texture of the material to show through, giving your space a unique character that paint can’t match.
Stains are great for enhancing the color and depth of wood without completely covering its natural beauty. They’re also easier to apply than paint since they don’t require as much prep work. Sealing with clear coats adds an extra layer of protection against moisture, UV rays, and scratches—perfect for high-traffic areas.
Clear coats are especially useful if you want a glossy or matte finish that doesn’t hide the underlying material’s texture. They’re also easier to maintain than paint because they don’t show dirt as much and can be easily touched up without repainting entire sections.
Remember, while stains and sealers offer less coverage than paint, they often last longer and require fewer touch-ups over time, making them a cost-effective choice in the long run.
Peel-and-stick, decals, and temporary options
If you’re renting or just want to make quick updates without committing to a permanent look, peel-and-stick finishes are a great choice. These come in various patterns and colors, allowing for easy application and removal.
Before applying any removable finish, make sure the surface is clean and smooth. Any bumps or rough spots can affect how well the material adheres and peels off later. Use a primer if necessary to ensure good adhesion.
While peel-and-stick options are convenient, they aren’t as durable as traditional paint. They may not hold up well in high-moisture areas like bathrooms or kitchens. Also, repeated application can damage the surface over time, so use them sparingly and replace when needed.
Decals offer another temporary solution for adding color or designs to walls without painting. They’re great for kids’ rooms where you might want to change themes frequently. Just be sure to follow manufacturer instructions carefully for best results.
Troubleshooting and Maintenance
This section shows how to diagnose common paint problems on concrete—blistering, peeling, brush marks, and mildew—and how to fix them. You’ll get practical steps to pinpoint the cause and guide a proper repaint.
Understanding what causes these issues helps you do it right and save time. Surface prep, proper coating, and following product directions prevent repeat problems and keep the finish looking good. If you’re unsure, check the label or datasheet for guidance and follow local hazardous waste disposal rules.
Fixing common finish problems
If you notice bubbles, runs, cracking, or poor adhesion on your painted surfaces, it’s usually a sign of improper application or environmental issues. Start by identifying the cause: was there too much paint applied at once? Was the surface not properly primed?
For bubbles and blisters, sand down to bare wood, clean thoroughly, prime if needed, then repaint. For runs and sags, you’ll need to strip back to a smooth finish before repainting evenly with fewer coats. Cracking can often be fixed by scraping off the cracked paint, cleaning well, priming, and applying new paint.
Poor adhesion might mean your surface wasn’t properly prepared or that there’s an incompatibility between old and new paints. In such cases, you may need to strip back completely and start over with a primer designed for the specific substrate.
Cleaning and touch-up best practices
To keep your painted surfaces looking fresh, use mild cleaning solutions like soapy water or vinegar diluted in water. Avoid harsh chemicals that can strip the paint layer.
For touch-ups, match the existing color as closely as possible. Sand lightly around the area to be touched up and apply a thin coat of primer before painting over it with your touch-up color. Blend edges carefully for a seamless look.
Maintain painted surfaces seasonally by cleaning them thoroughly in spring and fall, checking for any signs of wear or damage that need repair. This regular upkeep will help prevent bigger problems down the road.
Safety, Environmental, and Health Considerations
Safety, ventilation, PPE, and material choice matter when painting and handling coatings. Use proper ventilation, wear the right PPE, and follow the product label for disposal or cleanup. Look for low-VOC or green paint options and handle leftovers according to local rules.
This matters because good practices protect your health and help projects go smoother. Knowing how to ventilate, dispose of leftovers, and recycle or reuse materials keeps you out of trouble and reduces waste. If you’re unsure about a product’s safety, check the label or datasheet.
Safe handling and ventilation
When painting, always wear the right personal protective equipment (PPE). This includes gloves to protect your hands from solvents, a respirator mask for breathing in fumes, and safety glasses to shield your eyes. Don’t forget a dust mask if you’re sanding or scraping.
For indoor jobs, make sure there’s good ventilation. Open windows and doors, and use fans to push air out of the room. If painting with oil-based paints or using spray equipment, this is even more critical because these products release strong fumes that can be harmful if inhaled over long periods.
When working with solvents like paint thinner, keep them away from open flames and heat sources. Store them safely when not in use to prevent fires. Always follow the manufacturer’s instructions for handling chemicals properly.
Eco-friendly paints and waste reduction
Choose low-VOC (volatile organic compounds) or zero-VOC paints when possible. These options are better for the environment because they release fewer harmful chemicals into the air during application.
To reduce waste, buy only what you need by estimating your paint requirements accurately. Leftover paint can be donated to local community centers, schools, or charities that accept donations of unused materials. Some areas even have paint recycling programs where old paint is collected and repurposed.
When mixing paints for touch-ups later on, make sure to store them properly in sealed containers. This helps prevent the paint from drying out too quickly and ensures you can reuse it when needed without waste.
Conclusion
Stand tall on a solid plan. Safety, durability, and good appearance come from careful prep, testing in a small area, and protecting every surface and yourself as you work.
First, assess the project area, then clean and repair as needed, mask edges and floors, choose a suitable paint and sheen, test a patch, and map out the order and drying times. Work with proper ventilation, keep tools clean and organized, and store leftover materials safely for future touch-ups.
Common mistakes to avoid are skipping surface preparation, overloading brushes or rollers, and painting in the wrong conditions. Safety first means wearing a mask when sanding or applying coatings, using a stable ladder, and stopping if you smell fumes or see blistering. Always test in a small patch before committing to the whole project and follow label instructions on all products.
If you encounter lead paint, mold, major structural issues, or high, hard-to-reach areas, know when to call a professional. When in doubt, push forward only after a clear plan and with proper safeguards. You can do this—plan, protect, and paint smart, and you’ll finish with a durable, great-looking space.
FAQ
What should I prep before painting a room?
Clean the walls and fix any holes or cracks. Sand rough spots and wipe away dust. A clean surface saves you from peeling paint later.
Do I need primer on every project?
Primer helps paint stick and covers stains. Use it on bare wood, new plaster, or when changing from a dark to a light color.
What’s the best way to choose a paint finish?
Flat hides flaws, but washes poorly. Satin or eggshell is a good middle ground for most walls. Gloss shows fingerprints and is best for trim and doors.
How many coats does this usually require?
Most jobs need two coats for true coverage. If the color is very different from the old one, add a third coat to avoid streaks.