
Introduction
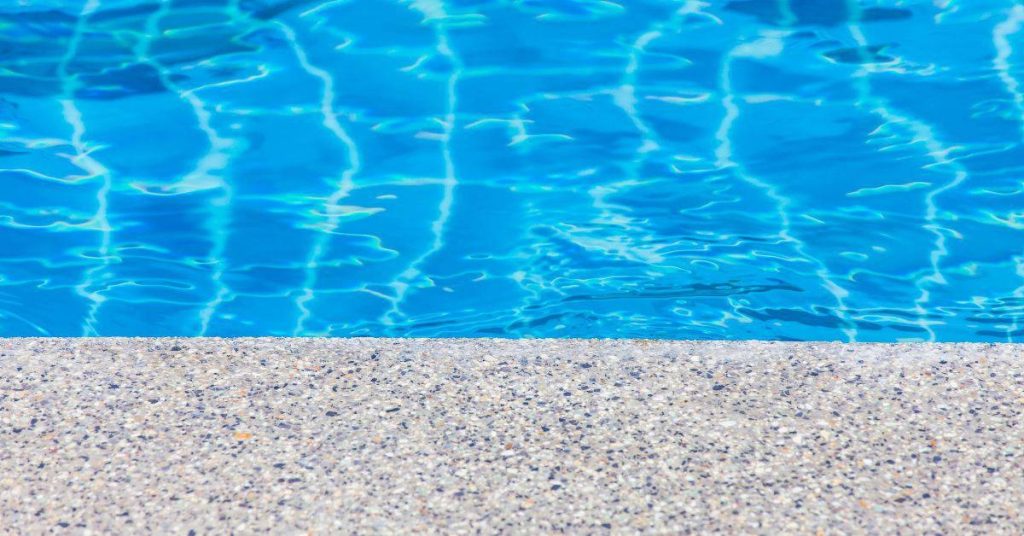
Concrete furniture outdoors is solid, weather-ready seating and tabletops cast from concrete that you use outside. Tweaks to the mix and detailing at the edges help prevent edge spalls and reduce staining over time. This article keeps things practical, focusing on what to check in your mix, forms, and finishes before you pour.
Maintenance basics include gentle cleaning around the furniture and considering how outdoor rugs interact with the surface. I’ll outline safe cleaning approaches for stubborn stains and odors, plus how to think about pressure washing if you go that route. If you’re unsure about a product or method, check the label, manufacturer instructions, and local rules for guidance.
Key takeaways
- Regularly inspect edges for micro-cracks and sealants to prevent spalls and staining.
- Use a broom-clean weekly routine for outdoor rugs: shake out, brush, air out.
- For stubborn stains, test mild cleaners first; avoid harsh solvents on concrete surfaces.
- When pressure washing, use low pressure and keep nozzle far to avoid edge damage.
- Plan formwork with rounded edges and proper chamfer to reduce spalls and chipping.
- Seal and cure outdoors following manufacturer guidance; avoid long exposure before full cure.
Table of Contents
- Introduction
- Key takeaways
- Why Edge Spalls and Staining Occur on Outdoor Concrete Furniture
- Mix-Design Tweaks to Reduce Spalling and Staining
- Detailing, Formwork and Edge Geometry to Prevent Spalls
- Curing, Finishing and Surface Treatments to Limit Staining
- On-Site Protection, Handling and Installation Tips
- Maintenance, Cleaning and Stain-Removal Without Causing Damage
- Repair Methods for Edge Spalls, Chips and Persistent Stains
- Tools, Materials Checklist, Safety and Budget-Friendly Alternatives
- Conclusion
- FAQ
Why Edge Spalls and Staining Occur on Outdoor Concrete Furniture
Edge spalls arise when loads and impacts concentrate at the thin, exposed margins of outdoor furniture. Mechanical issues include edge chipping, spalling from impact, and flexural stress at tight edge sections, especially where transitions or chamfers promote crack propagation. Abrupt edges and inconsistent cross-sections invite damage under use and weather.
Staining from chemicals, plants, and sealers compounds the problem. Efflorescence from drying salts, iron oxide from fasteners or rebar, and tannin or oil residues from nearby vegetation can migrate to the surface. Sunscreen and cleaner interactions with concrete also influence staining, particularly near edges that are less protected by finishes.
Common failure modes (spalls, delamination, efflorescence, staining)
Outdoor concrete furniture is exposed to harsh conditions that can lead to several common failure modes. Impact from chairs being moved around or objects dropped on the surface can cause edge chipping and spalling.
Freeze-thaw cycling is another culprit. Water seeps into pores, freezes, expands, and causes pieces of concrete to pop off (spalls). Trapped moisture in corners or under seats can lead to delamination, where the surface layer peels off.
Efflorescence, those white powdery deposits on your furniture, is caused by salts within the concrete migrating to the surface as water evaporates. This happens more often when there’s too much water in the mix or not enough time for proper curing.
Material and mix-related causes (porosity, aggregate, bleed water)
The materials you use in your concrete mix can significantly impact the durability of your outdoor furniture. High water-to-cement ratio (w/c) increases porosity, making it easier for stains to penetrate.
- Inappropriate aggregates: Using coarse or angular aggregates can lead to increased porosity and weak bond with the paste. Spec: use fine, rounded aggregates like pebbles or river gravel.
- Bleed water: Excess water rises to the surface during placement, weakening the top layer and increasing susceptibility to staining. Tip: Use proper consolidation methods to minimize bleed water.
- Insufficient paste quality: Too little cement can result in weak, porous concrete that stains easily. Spec: use a minimum of 300 lbs (136 kg) of cement per cubic yard (0.76 m³).
Environmental and use factors (planters, seating, tables, metal fixes)
Different types of outdoor concrete furniture face unique challenges. Planters, for instance, deal with soil acids and plant fertilizers that can stain or damage the concrete.
Seating and tables are subject to heavy use, which can lead to spalling at edges and on surfaces. Metal anchors and fasteners can cause rust stains if not properly protected. Tip: Use stainless steel or galvanized hardware for outdoor applications.
Cleaning products and sunscreen residue can also stain concrete. Regularly clean your furniture with a mild cleaner suitable for concrete to prevent staining. Remember, proper sealing can help protect against many of these environmental and use factors.
Mix-Design Tweaks to Reduce Spalling and Staining
Set clear goals for the mix: reduce porosity to resist staining, boost surface density, and improve toughness to deter edge spalling. Ensure curing methods support a durable finish without trapping moisture near the edges. Check product labels or datasheets to confirm compatibility with outdoor finishes.
Practical tweaks include lowering the water-cement ratio, choosing less absorbent aggregates, and incorporating pozzolanic materials when appropriate. Admixtures such as air-entraining agents and water reducers can help density; always verify dosages with manufacturer instructions in datasheets. Surface treatments and sealers should be considered in tandem with the chosen mix to avoid cracking.
Binder choices and supplementary cementitious materials (SCMs)
The right binders and SCMs can make your concrete furniture durable and stain-resistant. They reduce permeability, enhancing resistance to water and stains.
- Fly Ash: Reduces permeability, improves durability. Look for Class F or C with 20-30% replacement of cement. Avoid low-quality fly ash that can cause weak bond.
- Slag: Enhances sulfate resistance, reduces heat of hydration. Spec ASTM C989 Type I or II. Avoid high slag content for strength balance.
- Pozzolans: Improves long-term strength, reduces permeability. Look for silica fume or natural pozzolans with 10-20% replacement. Avoid excessive use to prevent delayed ettringite formation.
- Silica Fume: Highly reactive, improves strength and durability. Spec ASTM C1240 Type I or II. Use sparingly due to high cost.
- Limestone Fines: Improves workability, reduces shrinkage. Spec ASTM C593 with 10-20% replacement. Avoid excessive use to prevent strength reduction.
Water control and admixtures (water reducers, air entrainment, hydrophobic agents)
Controlling water content and using the right admixtures boost your concrete’s durability and stain resistance.
Lowering effective water content reduces porosity, making it harder for stains to penetrate. Use water-reducing admixtures to achieve this without sacrificing workability.
Air entrainment improves freeze-thaw resistance, crucial for outdoor furniture. Use air-entraining admixtures, but be careful not to exceed 6% air content as it can weaken the concrete.
Hydrophobic agents repel water and stains. Apply them after finishing and before curing. Follow manufacturer guidelines for timing and application.
Fiber and micro-reinforcement to prevent edge chipping
Adding fibers and discrete reinforcement can significantly improve your concrete furniture’s resistance to edge impact and crack propagation, especially in thin sections.
Polypropylene Fibers: Enhance flexural strength and toughness. Use 0.5-1% by volume. Avoid excessive use to prevent reduced workability.
Glass or Stainless Steel Microfibers: Improve tensile strength and crack resistance. Use 0.2-0.5% by volume. Be careful not to exceed recommended dosages to avoid weakened concrete.
Discrete Reinforcement (e.g., rebar, mesh): Strengthens thin sections against edge impact. Place reinforcement near the surface for maximum effect. Avoid placing too close to the surface to prevent delamination.
Detailing, Formwork and Edge Geometry to Prevent Spalls
Edge geometry matters. Specify radii or chamfers and maintain a consistent cross-section to reduce stress concentrations. The way edges are finished influences spall risk under load or impact, and formwork offset can introduce weak zones that crack later.
Reinforcement at the edges should be planned with proper cover and spacing to resist bending. Consider how edge seating or run-out affects the perimeter and ensure blending with interior reinforcement for cohesive performance. Formwork quality and tight joints prevent bulges that undermine edge integrity and future repairs.
Edge profiles: chamfers, radii and reinforcement placement
Sharp edges on outdoor concrete furniture are prone to chipping and spalling. Rounded edges with radii or chamfers help distribute stress evenly, reducing the risk of edge damage.
Rounded edges: Use a radius of at least 1/4″ for seats and tabletops. Larger radii reduce stress concentrations but may affect design aesthetics.
Chamfers: A 45-degree chamfer with a width equal to the edge thickness can also help distribute stress. It’s easier to form than a radius but offers less protection against impact damage.
Reinforcement placement is critical at edges. Use continuous rebar, epoxy-coated bars, or wire mesh with proper cover and spacing to resist bending and spalling. Blend edge reinforcement with interior reinforcement for strength continuity.
Formwork materials, vibration and consolidation best practices
Quality formwork is key to strong, durable edges. The right material, proper compaction, and minimal overworking ensure a solid, uniform finish.
- Plywood: Use exterior-grade plywood with a smooth surface for better concrete bond. Avoid over-troweling to prevent weak surface layers.
- Form release agent: Apply a suitable release agent to ease form removal and prevent adhesion. Choose one that doesn’t leave residues that can stain or weaken the concrete.
- Vibration: Use vibration to consolidate the concrete and remove air pockets. Over-vibrating can cause laitance (a weak, fine cement paste) to rise to the surface, weakening the edge.
- Compaction: Ensure proper compaction of the concrete in the forms. Slump control is crucial; use a slump of 3-5 inches for good consolidation without excessive bleeding or segregation.
- Avoid overworking: Over-troweling, over-vibrating, or over-finishing can create weak surface layers that are prone to chipping and spalling. Keep finish work minimal and timely.
Joints, anchors and planter-specific detailing
Proper detailing of joints, anchors, and planter-specific features prevents concentrated stresses, water ingress, and soil-related staining on outdoor concrete furniture.
Control joints: Incorporate control joints every 6-8 feet to control cracking. Use a joint sealer to prevent water ingress and staining.
Anchors: For planters, use anchor bolts or other suitable anchors to secure the piece to its base. This prevents movement that can cause stress and cracking at the edges.
Planter-specific detailing: For planters, ensure proper drainage with weep holes and a layer of gravel beneath the soil. Use a waterproofing membrane to prevent moisture wicking into the concrete, which can lead to staining and efflorescence.
Curing, Finishing and Surface Treatments to Limit Staining
Choose curing strategies that protect early strength without creating surface defects. Humidity control and avoiding premature use help minimize edge weaknesses. Look for signs of proper cure versus premature opening or use by inspecting the surface condition and cure regime.
Finishing options should enhance stain resistance while preserving edge strength. Topical and penetrating sealers affect texture, slip resistance, and edge durability. Always verify compatibility between the finish, the concrete mix, and edge detailing per product instructions before application.
Curing methods and timing for durable surface strength
Proper curing is crucial to develop concrete’s long-term strength and durability. Here are some methods and their timings:
Moist Curing: Keep the surface damp for 7 days, then mist occasionally until 28 days. This helps maintain a consistent temperature and prevents rapid water loss.
Curing Membranes/Coverings: Use plastic sheets or coverings to retain moisture. Remove them after 3-7 days, allowing the surface to breathe. Too early removal can cause premature drying and microcracking.
Timing: Concrete needs at least 28 days to gain full strength. Premature use can lead to surface weakness and spalling over time.
Finishes (trowel, exposed aggregate, textured) and their stain performance
Different finishes offer varying levels of stain resistance. Consider these factors:
Trowel Finished: Smooth surfaces show stains more easily due to less porous nature. Regular cleaning helps prevent staining.
Exposed Aggregate: More porous, but stains often hide better within the aggregate. Cleaning is trickier, and some stains may be harder to remove.
Textured Surfaces (honed or brushed): These can hide stains well, but are harder to clean due to their texture. Regular maintenance is key.
Sealers and impregnators: types, timing and what to check
Before applying any sealer, ensure the concrete is clean, dry, and fully cured (at least 28 days). Use this checklist:
- Check Sealer Type: Film-forming sealers create a barrier; penetrating impregnators soak into the surface.
- Verify Compatibility with Concrete Mix: Some sealers don’t play well with certain aggregates or admixtures. Check manufacturer data sheets.
- Timing: Apply After Full Cure: Applying too early can trap moisture and cause issues later.
- Check Recoat Intervals: Follow manufacturer guidelines to avoid over-applying or under-applying.
- Test Patch First: Ensure the sealer works as expected on your specific concrete before full application.
- Weather Conditions: Apply in temperatures between 50-90°F (10-32°C) and low humidity for best results.
- Surface Preparation: Clean, grind, or etch the surface as needed to ensure good sealer adhesion.
- Check Application Method: Follow manufacturer instructions for rolling, spraying, or brushing.
- Safety Precautions: Use proper PPE and ventilation when handling sealers.
Quick rule: Always follow the manufacturer’s guidelines to ensure optimal performance and longevity of your sealer.
On-Site Protection, Handling and Installation Tips
Plan transport and staging to prevent edge damage. Use sliders, blankets, and clear pathways to minimize scuffs or drops during movement and placement. Set up a route that avoids dragging or banging any exposed edges.
Protect edges during loading and unloading with appropriate tools and guards. Temporary coverings should shield from rain, dirt, and staining while awaiting placement. Ensure the site is ready, with level sub-base and supports, to avoid awkward handling that could mar edges.
Safe lifting, transport and placement techniques
When moving heavy concrete pieces, always lift from the middle. Never lift from the edges as it can cause chipping.
Use sliders or blankets to protect surfaces from scuffs and scratches. Dragging can abrade sealed surfaces, so avoid at all costs.
Support pieces evenly during transport. Use pallet jacks or dollies with wide, flat wheels for stability.
Never let pieces overhang edges of carts or dollies. This can cause them to topple and chip edges.
Temporary protection: edge guards, breathable covers and drainage
Use edge guards or foam strips on sharp corners to prevent damage during handling. They’re cheap and easy to install.
Cover pieces with breathable materials like canvas or plastic sheeting to protect from rain and dirt. But remember, never seal in moisture as it can cause staining.
Ensure planters and deck-mounted pieces have proper drainage. Trapped moisture is a recipe for stains and cracks.
If using tarps, secure them loosely to allow airflow but prevent direct rain contact.
Substrate compatibility and setting location (concrete, wood, turf)
Concrete on concrete is best. It allows for easy moisture transfer and reduces staining risk.
Wood can be tricky. Use isolating layers like plastic sheeting to prevent moisture wicking from the wood into your concrete piece.
Turf is a no-no. Grass holds too much moisture, leading to stains and cracks. If you must use turf, install a moisture barrier first.
Consider location too. Shady areas can retain more moisture, increasing staining risk. Place pieces where they’ll get plenty of sun and air circulation.
Maintenance, Cleaning and Stain-Removal Without Causing Damage
Create a practical maintenance rhythm that protects edge detailing and sealer life. Separate tasks into seasonal and routine checks to stay organized and effective. Document any changes or observations to guide future care.
Use safe, non-abrasive cleaners and methods that won’t degrade sealers or concrete edges. Rinse thoroughly and test cleaners on a small area first. For stubborn stains, pre-treat and follow up with appropriately chosen sealers or blockers as needed.
Routine maintenance schedule and gentle cleaning options
Keep your concrete furniture looking its best with a simple weekly/monthly check. Inspect for any signs of damage or stains.
Cleaning: Use mild detergents or pH-neutral cleaners like dish soap mixed with warm water. Soft-bristled brushes work well to gently scrub surfaces without damaging sealers or edges.
Rinse thoroughly and let it air dry. No need for harsh chemicals or abrasive pads that can strip sealers or scratch the surface.
Safe stain-removal steps and what to avoid
Avoid these common mistakes that can damage your concrete furniture’s finish or sealers.
- Avoid harsh acids: They can eat away at the surface, causing pitting and discoloration.
- No strong alkalis: Bleach and other strong alkaline cleaners can break down sealers and cause edge damage.
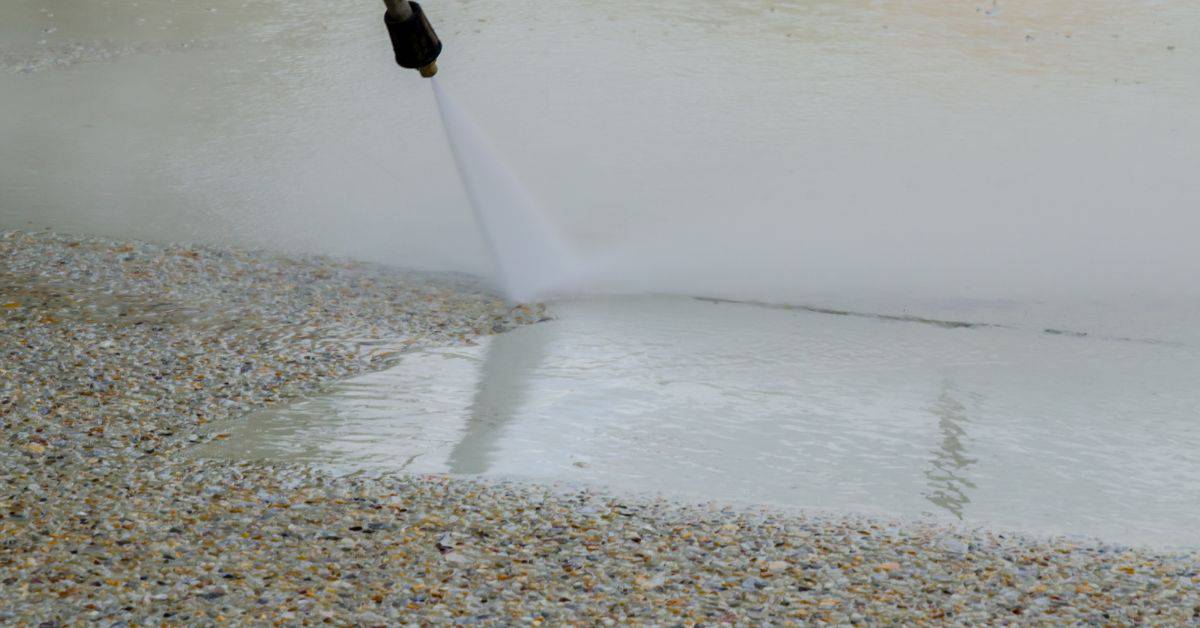
- Low pressure only: High-pressure jets can strip sealers and cause micro-cracking at edges.
- Mechanical brushing: Use soft-bristled brushes or brooms for scrubbing. Hard-bristled or wire brushes can scratch the surface.
- Poultices for tough stains: For stubborn stains, use poultices designed for concrete to draw out the stain without damaging the surface.
Always test cleaners on a small, hidden area first. If unsure, consult a professional.
Seasonal care for high-use or rainy periods
During wet seasons or heavy use, your concrete furniture needs extra TLC. Inspect more frequently for any signs of wear or damage.
Re-sealing: Apply a fresh coat of sealer every 1-2 years, or as needed, to protect against moisture and stains.
Temporary coverings: During heavy rain or when not in use, consider covering your furniture with breathable covers to prevent water pooling and potential damage. Ensure proper drainage to avoid water buildup.
After heavy use or rainy periods, clean thoroughly using the gentle cleaning methods mentioned earlier to remove any dirt or debris that may have accumulated.
Repair Methods for Edge Spalls, Chips and Persistent Stains
Assess damage scope to decide between DIY repairs and professional help. Consider weather and curing constraints when planning repairs for outdoor furniture. Distinguish edge spalls, chips, and staining to select the right approach.
Repair options vary by severity: small spalls may use cementitious patches or epoxy mortars with feathering to blend, while larger repairs require careful edge blending to preserve integrity. For stains, identify sources and select compatible cleaners and sealers, aiming to restore appearance without compromising durability.
Quick patch techniques for small chips and spalls
For minor edge spalls and chips, quick patching can restore your concrete furniture’s appearance. Start by cleaning the area with a wire brush to remove loose material. Use a bonding primer to prepare the surface for the repair mortar.
Choose an epoxy or polymer-modified mortar for thin-edge repairs. These mortars provide excellent adhesion and durability. Apply the mortar using a trowel, feathering the edges to blend it with the surrounding surface.
Pro tip: Work quickly but carefully. Once applied, you have limited working time before the mortar sets.
Reprofiling, color matching and durable overlays
For larger repairs, consider reprofiling mortars to restore shape. These mortars can be colored to match your furniture’s existing finish. First, clean the area thoroughly using a concrete cleaner or etcher.
Apply a bonding agent before applying the repair mortar. This ensures strong adhesion and helps prevent future spalling. Use a trowel to apply the mortar, feathering the edges for a smooth transition.
For an extra layer of protection, consider applying a thin overlay. This can help hide minor imperfections and provide additional durability. Always ensure your overlay is compatible with your existing finish.
When to replace versus repair and prevention after repair
Before attempting a repair, assess the damage. Small spalls can often be repaired, but extensive cracking or crumbling may indicate a need for replacement.
After repairing your concrete furniture, take steps to prevent future damage. Apply a waterproof sealer to protect against moisture intrusion. Consider using edge guards to protect vulnerable areas from impact.
Remember: Regular maintenance is key to prolonging the life of your repairs. Inspect your furniture regularly for signs of wear or new damage, and address any issues promptly.
Tools, Materials Checklist, Safety and Budget-Friendly Alternatives
Prepare a compact kit with mixing tools, trowels, floats, forms, chisels, and measurement devices. Include concrete additives relevant to edge spalls and staining prevention, then confirm their suitability with product data sheets. Keep a short list of essential PPE for mixing, application, and curing tasks.
Budget-friendly substitutes include basic bonding agents, rollers, and brushes that still meet durability needs. Plan the workflow and safety steps, tailoring the checklist to local conditions like temperature and humidity to prevent edge issues during outdoor use.
Tools and consumables for mixing, finishing, sealing and cleaning
Before you start your concrete furniture project, ensure you have all the necessary tools and consumables to achieve a durable finish without edge spalls or staining.
- Mixing Tools: Shovel, wheelbarrow, mixing paddle (rent vs. buy for occasional projects)
- Trowels and Floats: Hand trowel, bull float, edger
- Forms: Formwork materials – plywood, screws, stakes
- Chisels: Masonry chisel set for detailing and repairs
- Measuring Tools: Tape measure, level, square
- Concrete Additives: Retarder, plasticizer, release agent (for preventing edge spalls and staining)
- Sealers: Concrete sealer or stain-resistant top coat
- Curing Compounds: Curing membrane or curing compound
- Moisture/Air-Entraining Agents: Moisture meter, air-entraining admixture
- Cleaning Tools: Stiff-bristle brush, pressure washer (optional)
Quick rule: Always have a checklist on-site to ensure nothing gets overlooked.
Safety: PPE, chemical handling and equipment guidance
Prioritize safety during your concrete furniture project by following this checklist for personal protective equipment (PPE) and proper chemical handling.
- Eye Protection: Safety goggles or glasses to protect from debris and splashes
- Hand Protection: Work gloves to prevent cuts and abrasions
- Respiratory Protection: Respirator or dust mask for mixing and handling dry concrete
- Hearing Protection: Earplugs or earmuffs when using power tools
- Skin Protection: Long sleeves, long pants to protect from concrete burns and splashes
- Ventilation: Ensure proper ventilation when applying sealers or curing compounds
- Safety Data Sheets (SDS): Review SDS for each product before use
- Product Instructions: Always follow manufacturer’s instructions for handling and application
Quick rule: Never skip PPE or proper chemical handling – safety first!
Cost-saving DIY tips and when to hire a pro
Save money on your concrete furniture project with these budget-friendly strategies, but know when it’s time to call in the professionals.
- Batch Work: Plan projects to use materials efficiently (e.g., mix enough for multiple pieces at once)
- Pre-blended Repairs: Use pre-mixed repair mortars for small touch-ups
- Preventive Detailing: Apply release agents and sealers promptly to prevent staining and spalling
- Rent vs. Buy: Consider renting tools instead of purchasing for occasional projects
- Bulk or Off-brand Materials: Source materials in bulk or opt for off-brand options when quality is consistent
- Hire a Pro When: Complex designs, large-scale projects, or when DIY repairs fail
- Professional Advice: Consult with a pro before starting to ensure your project’s success
Quick rule: Know your limits – DIY is great for simple projects, but hire a pro for complex work.
Conclusion
Safety first on every pour and every handling step. If you stay disciplined about mix, form, curing, and protection, your outdoor concrete furniture will last longer, stay truer to its look, and avoid costly edge repairs.
Check your plan in one clean flow: verify your mix tweaks for the right water balance and workability, inspect form edges and any chamfers before pouring, test a small patch for cure and stain resistance, apply site protection and controlled curing, and then proceed with a careful finish and routine maintenance. Do each step in sequence and keep notes so you can repeat what works and skip what doesn’t, and always test a small area first before committing a full piece.
Common mistakes to avoid are rushing the cure, skipping edge geometry and detailing, and skipping testing for staining or efflorescence before moving to finishing. Simple safety rules help: wear eye and hand protection, keep kids and pets away from wet concrete, work in moderate weather, and never force release or form removal if a release agent, edge, or cure film is unsure.
If the edge spalls or persistent stains linger after the basic steps, Call a professional instead of pushing on, especially for larger repairs or structural concerns. Stay practical, stay patient, and use what you’ve learned to plan your next pour or repair with confidence. You can do solid, durable outdoor concrete furniture—one careful step at a time.
FAQ
What’s the best basic weekly maintenance routine for outdoor rugs on concrete furniture?
Shake or beat the rug to remove loose debris, then brush with a stiff broom to lift dirt from the fibers. Let it dry completely before laying it back; damp rugs can trap moisture against the concrete.
How do I deep clean outdoor rugs without damaging the rug or the concrete?
Vacuum first to remove surface dirt, then use a mild soap and water solution with a soft brush to scrub. Rinse thoroughly and let the rug dry in the sun or a well-ventilated area before laying it back down.
What cleaning solutions work for stubborn stains or odors under outdoor rugs?
Use a gentle, non-bleach cleaner designed for fabrics when treating stains. If odors linger, sprinkle baking soda on the rug and let it sit before brushing and rinsing it away. Check the rug label for any restriction on cleaners.
Are pressure washing or washing machine methods ever appropriate for outdoor rug care?
Pressure washing is risky near edges and backing; use the lowest setting and keep the nozzle at a safe distance to avoid fiber damage or dislodging the rug. Avoid high heat and harsh solvents; verify with the manufacturer’s care instructions before proceeding.
How can I prevent mold or mildew under the rug and prepare for winter storage?
Ensure the rug is clean and completely dry before placing it on the concrete. If you’re storing, roll the rug and keep it in a dry, ventilated space; avoid stacking heavy items on top. Check for moisture buildup periodically and air the area if you can. If mold is suspected, treat per label directions and avoid bleach unless approved for the rug.