
Introduction
This article teaches how to achieve professional-quality interior door finishes with practical DIY tips and smart alternatives.
You’ll learn how to prepare surfaces, choose the right paints and sheens, apply even coats, and evaluate when to use traditional methods versus modern substitutes, giving you a clear, actionable path to better door styling.
Key takeaways
- Plan surface prep, doors, hardware, and drying times before painting.
- Use a quality primer, stain-blocking and smooth-sanding for best finish.
- Apply two to three thin coats with light sanding between; avoid heavy film.
- Mask edges and raised panels with masking liquid for fastest setup.
- Drying times vary; plan at least 24 hours between coats and final cure.
- Cleanup with mineral spirits or soap and water after solvent-based use.
Table of Contents
- Introduction
- Key takeaways
- Quick planning checklist before you start
- Tools and materials checklist (with estimated costs and safe ranges)
- Step-by-step method for a professional finish (general workflow)
- Best method for painting French or paneled doors (masking liquid vs. tape)
- Time- and cost-saving pro tips
- Common mistakes and how to avoid them
- Post-paint cleanup, maintenance, and curing
- Conclusion
- FAQ
Quick planning checklist before you start
Before you start, nail down the project scope and door specifics. Decide whether you’ll remove doors or paint in place, and note if doors are hollow-core or solid, with glass panes, and whether frames differ.
This matters because door type and hardware choice drive masking, handling, and possible warping. Plan for features like glass panes, intricate profiles, pre-finished doors, and weatherstripping that affect adhesion. Have a backup plan for tricky doors, plus ventilation, drop cloths, eye protection, and cleanup.
Assess door material and condition
Before you start painting, take a moment to check the type of doors you’re working with.
- Identify material: Look for wood grain, hollow core, or smooth surface. Confirm by tapping or checking edges.
- Check condition: Inspect for dents, scratches, and peeling paint. Address any issues before painting to avoid poor results.
- Sand rough spots: Smooth out imperfections with sandpaper. Skipping this can lead to an uneven finish.
- Add filler: Fill small holes or gaps with spackle or wood filler. Missing this step leaves visible flaws after paint dries.
- Prime bare surfaces: Apply primer on raw wood or metal for better adhesion and coverage. Not priming can result in poor paint adherence.
Quick rule: Know your materials to ensure a smooth painting process.
Decide removal vs. in-place painting
Determine whether removing doors from hinges or leaving them hung is best for your project.
- Evaluate space: Check if you have room to lay out doors flat. Confirm by measuring available floor area.
- Assess hardware: Consider ease of removal and reinstallation of hinges, locks, and handles. Missing this step can lead to damaged parts.
- Weigh warping risk: Evaluate likelihood of door warping if removed. Confirm by checking moisture levels in storage area.
- Plan for masking: Decide on materials needed for covering hardware and glass panes. Skipping this leaves paint residue everywhere.
Quick rule: Choose the method that minimizes risk of damage or poor results.
Safety and ventilation prep
Ensure a safe working environment by preparing for proper ventilation and protection.
- Open windows: Ventilate the room to reduce fumes. Confirm by checking air flow.
- Wear respirator: Use appropriate mask or respirator for solvent-based paints. Skipping this can lead to health issues.
- Cover floors: Lay down drop cloths or plastic sheets. Missing this step results in paint spills on the floor.
- Protect nearby finishes: Mask adjacent walls and trim with painter’s tape. Not masking leads to unwanted paint marks.
Quick rule: Prepare for safety first before starting any painting work.

Tools and materials checklist (with estimated costs and safe ranges)
This section breaks down tools and materials by purpose (prep, application, masking, finishing) and surface type, and it gives estimated cost ranges per item and per gallon or pack. It also flags what to splurge on for best finish and what to economize on to keep costs realistic. Use the ranges on the label or store shelf and check manufacturer guidance.
You’ll get practical tips on where to shop, affordable substitutes, and even rental options, plus a quick pre-purchase sanity check by door count, room size, and coats. Budget planning helps avoid sticker shock and overbuying while still getting a solid DIY result.
Specialty supplies for doors with glass (masking liquid, film, tools)
When dealing with interior doors that have glass panels, you need specialized masking materials to protect the glass during painting. Here’s what you’ll need:
- Masking liquid: Use it to cover small areas of glass or intricate designs; apply a thin layer and let dry.
- Painter’s film: Apply painter’s tape first, then lay down the film over it for extra protection. Confirm by checking that no paint seeps through.
- Razor blades: Use to carefully trim edges of masking materials around glass; ensure clean cuts without damaging the door frame.
- Low-tack tape: An alternative to painter’s film, use it for less precise areas. Confirm by checking that no residue is left behind after removal.
Quick rule: Always test masking materials on a small area first to ensure they work as expected without damaging the door or glass.
Recommended paint types and primers
Picking the right paint type is crucial for durability and finish quality. Here’s what you need to know:
- Satin/semi-gloss finishes: These are ideal for doors as they hide imperfections well; confirm by checking if the finish looks smooth and clean.
- Oil-based alkyd primer: Use on bare wood or when painting over dark colors; ensure it adheres properly before applying paint.
- Waterborne alkyd primer: A more eco-friendly option, suitable for most surfaces; confirm by checking if the surface is smooth and free of imperfections after priming.
- Bonding primer: Essential when painting over glossy or non-porous surfaces like metal; ensure it adheres well to create a good base for paint.
Quick rule: Always test your chosen primer and paint on a small, inconspicuous area first to check compatibility and finish quality.
Step-by-step method for a professional finish (general workflow)
This 7-step workflow takes you from removal or off-hang of doors through prep, priming, sanding between coats, applying even coats, re-hanging, and observing cure times with practical time estimates. It covers masking hardware, quick-dry surfaces, and whether to paint door-by-door or two sides at once. Use the plan to keep the project moving and avoid guesswork at each stage.
Variables like humidity and temperature affect timing; check the label or manufacturer guidance for interior doors. Following edge-to-edge coating, light sanding between coats, and careful masking helps avoid laps, drips, and brush marks. This matters because a professional finish on a DIY project reduces rework and makes cure progression safer and more predictable.
Step-by-Step Process
This sequence ensures a professional finish by systematically preparing, painting, and finishing your interior doors.
- Remove or mask hardware: Take off hinges and knobs or cover them with tape to protect from paint. Quick check: No metal parts left exposed.
- Clean the door surface: Wipe down with degreaser to remove oils and dust. Reason: Clean surfaces ensure better adhesion of primer and paint.
- Fill minor flaws: Use spackle or wood filler for dents, gaps, and holes. Quick check: Smooth out any bumps before sanding.
- Sand the surface lightly: Use 220-grit sandpaper to smooth out rough spots and fillers. Reason: A smooth base is key for a flawless finish.
- Prime the door: Apply primer with a brush or roller, focusing on edges and corners first. Quick check: Even coverage without drips.
- Sand between coats: Lightly sand after each coat to remove imperfections before applying next layer. Reason: Smooth surface ensures uniform paint finish.
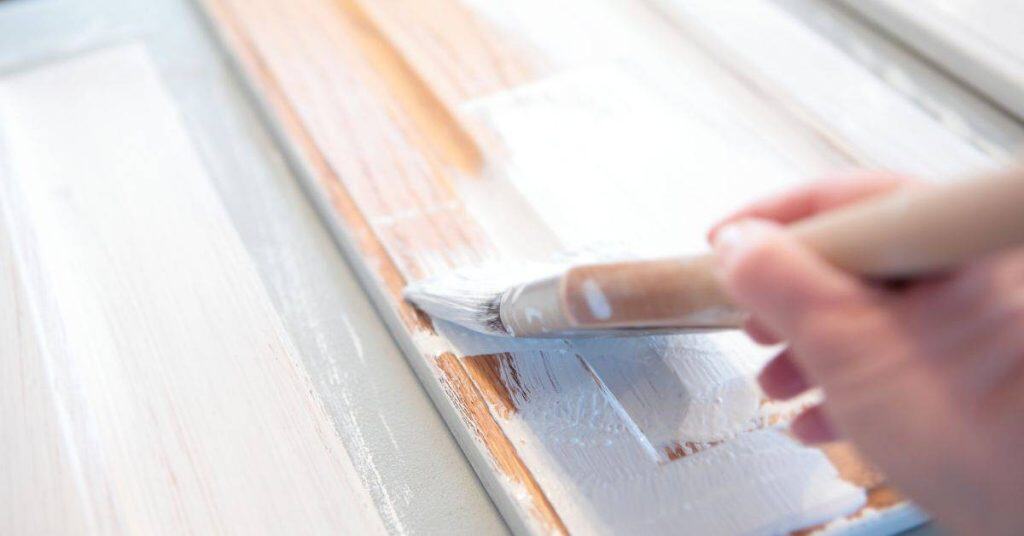
- Paint the door: Use semi-gloss or satin finish for durability and ease of cleaning. Quick check: No brush marks, lap marks, or drips.
Surface Prep and Repair
Start by sanding the door with 220-grit paper to smooth out any rough spots. Reason: A smooth surface is crucial for a professional finish.
For minor dents or gaps, use spackle or wood filler. Apply it and let it dry before lightly sanding back to a smooth finish. Quick check: No bumps or uneven areas left behind.
Clean the door thoroughly with a degreaser like rubbing alcohol or TSP (trisodium phosphate). This removes oils and dirt that can interfere with paint adhesion. Reason: Clean surfaces ensure better paint coverage and durability.
Priming and Painting Technique
Start by priming the door using a brush for edges, corners, and hardware areas, then switch to a roller for larger surfaces. Reason: This ensures full coverage without overworking the paint.
For panel doors, begin with the stiles (vertical sections) and rails (horizontal sections), then move on to the panels in between. Reason: This sequence helps avoid drips and lap marks that can occur when painting large flat areas first.
When applying paint, use a semi-gloss or satin finish for durability and ease of cleaning. Thin your paint slightly if using a sprayer for an even application without lumps or streaks. Quick check: Smooth coverage with no brush strokes visible.
Best method for painting French or paneled doors (masking liquid vs. tape)
For French or paneled doors, masking liquid is the fastest way to get clean, edge-to-edge coverage on glass panes and ornate profiles. It lets you seal along the edge without lifting varnish and keeps a sharp line that’s easy to remove. Use masking liquid when you want speed and a crisp edge.
When you choose tape or film, be aware of residue, lift, or clarity issues on light panes. For masking liquid, follow a simple sequence: prep the surface, apply with a steady hand, allow it to set as directed, and remove while the paint is still workable to minimize drips, then touch up as needed.
How to apply and remove masking liquid
To start, prep your door by cleaning it thoroughly with a damp cloth. Once dry, use a soft-bristled brush to apply the masking liquid in thin layers, focusing on edges around glass panes and intricate designs. Let each layer dry completely before applying another; this prevents drips and ensures full coverage.
After application, score the dried masking liquid along sharp edges with a utility knife for easy removal later. This step is crucial to avoid paint pulling when you peel off the mask. Wait until the masking liquid feels tacky but not sticky—this is the ideal time for painting. Once your door is painted and dry, gently remove the masking liquid by peeling it back from one corner at a time.
For cleanup, wash brushes with soap and water immediately after use to prevent residue buildup. If you notice any drips on glass panes during application, quickly blot them up with a lint-free cloth before they set. This keeps your door looking sharp and professional once the paint dries.
Tape and film alternatives — when to choose them
For doors with intricate designs or weathered glass, consider using low-tack painter’s tape. This type of tape adheres well without leaving residue but can be tricky on varnished surfaces where it might lift the finish.
Plastic films are another option for large areas and complex window panes. They’re easy to apply and remove, though they may not offer as sharp an edge as masking liquid or high-quality tape. Ensure you choose a clear film that doesn’t cloud over light-colored glass.
A hybrid approach works well too—use masking liquid on edges and intricate details, then cover larger areas with plastic film. This method combines the best of both worlds for clean lines and quick application. Always test your chosen material in an inconspicuous area first to ensure it meets your needs without damaging the door.

Time- and cost-saving pro tips
Short on time and money? Use 8–10 practical shortcuts like batching sanding, priming, and painting several interior doors in one go, and keep a centralized workspace with labeled materials to cut back-and-forth. Plan your sequence so you decouple priming from finishing coats, use fast-drying primers or quick-setting enamels where appropriate, and consider polymer extenders to save coats—while watching for texture or color shifts. Avoid over-priming by using the right tool technique, and decant or discard excess material to reduce waste. Check the label or datasheet for any limits, and be ready to adjust if you see lap marks or uneven areas.
These tactics matter because they cut downtime, lower material waste, and keep progress moving even on a tight schedule. They also force a simple, repeatable workflow: batch tasks, label everything, and maintain a clean, dedicated setup to minimize backtracking. Expect some tradeoffs—faster formulas may tint or slightly alter finish quality, and extenders can affect cure time or texture if pushed too hard. Use a quick-reference checklist and a simple workflow diagram on site to guide decisions, and always prioritize ventilation, stable temperatures, and humidity for best results.
When Replacement Is Smarter Than Repainting
If your doors are severely damaged, warped, or have non-functional hardware, replacing them might be more cost-effective in the long run. For example, a single door with extensive rot could cost $150 to replace versus $75 for painting and materials.
Consider the condition of the door’s surface and hardware. If you notice significant warping or splitting, it’s likely cheaper to install new doors rather than trying to paint over them. Similarly, if your door locks are worn out or don’t function properly, replacing the entire unit might be a better investment.
When deciding between painting and replacement, weigh the cost of materials against labor costs for both options. If you’re handy with tools, DIY replacement can save money compared to professional installation fees.
Smart Tool Investments That Pay Off
Investing in quality tools upfront will save time and effort on your painting project. Here are some essential items:
- Angled brush: Ideal for cutting in around edges and corners, this tool ensures a neat finish without the need for masking tape.
- Mini-roller: Perfect for small areas like door frames or panels, it reduces paint waste and provides consistent coverage.
- HVLP sprayer: While expensive to buy outright, renting an HVLP (High Volume Low Pressure) sprayer can significantly speed up the painting process with minimal overspray. Alternatively, a touch-up sprayer is more affordable for smaller projects.
Common mistakes and how to avoid them
Common mistakes to watch for are painting in cold or humid conditions, skipping primer, using the wrong primer or paint for the substrate, poor masking, thick coats, rough sanding, over-brushing, and rushing dry times between coats. For each, use the right environment, choose the correct primer and paint pairing, mask edges and protect surfaces, apply thin coats, sand smoothly, use the proper tool, and respect the suggested dry time per product label. Don’t guess—check the product instructions and adjust to the room you’re working in.
That matters because these errors affect adhesion and the final look, often causing finish pulls, bleed-through, or nibs that require touch-up or rework. Following solid prep, masking, and application steps gives you a durable, even surface with fewer surprises, and it reduces the need to start over. If you spot problems, fix them with targeted spot priming or light coats rather than a full redo, and always review the label for guidance on use and drying cues.
Paint adhesion and finish problems
If your paint is peeling or showing brush marks, it’s likely due to poor surface prep or incorrect application techniques. Peeling paint often happens when the door wasn’t properly sanded or primed before painting. To fix this, strip off the old paint and start over with a thorough sanding and primer coat.
Orange peel texture is another common issue that can ruin your finish. This occurs when you apply too much paint at once, causing it to dry unevenly. Always use thin, even coats for the best results. If you notice orange peel after painting, lightly sand the surface and reapply a primer before repainting.
To avoid brush marks or streaks, make sure your brush is loaded correctly with paint and apply in smooth, consistent strokes without overloading the bristles. A good rule of thumb is to dip only about one-third of the brush into the paint can and then wipe off excess on the rim before applying it to the door.
Avoiding drips, runs, and uneven coverage
Drips and uneven coverage are common mistakes that can ruin your paint job. Here’s how to avoid them:
- Thin coats: Apply thin layers of paint instead of thick ones to prevent dripping and ensure even coverage.
- Maintain wet edge: Keep the brush or roller moving so that you don’t let the paint dry before covering the entire surface. This helps avoid visible lines where one coat ends and another begins.
- Load brush correctly: Don’t overload your brush with too much paint, which can lead to drips and uneven application. Dip only a third of the bristles into the paint and wipe off excess on the rim before applying.
- Use painter’s tape: Properly mask edges and corners to prevent bleed-through or uneven coverage around trim work.
By following these tips, you’ll achieve a smooth, professional finish without any drips or runs.
Post-paint cleanup, maintenance, and curing
After you finish painting, clean brushes and sprayers in a simple, methodical order: rinse or wash with the appropriate solvent, and follow the manufacturer guidance for whether water-based or solvent-based products should be used, then let the tools dry in a shelf or rack away from traffic. Dispose of masking liquid residue by removing it from surfaces first, checking for any paint transfer, and keeping leftover products out of drains while you consult local household hazardous waste rules for disposal. Remember that cures take time before heavy use or re-hanging doors, and plan ongoing care for the painted doors by noting wear patterns and setting up a routine to check and address issues as they appear.
Temperature, humidity, and paint type affect cure readiness, so test a small area or look for a clear sign of surface firming before demanding heavy use or rehangs. A practical maintenance cadence helps prevent surprises like peeling or chipping, with regular inspections for wear, peeled edges, and touch-ups, plus a simple plan for resealing or repainting as the finish ages. Keep cleaning routines gentle on the new finish, avoid harsh abrasives, and consider an optional protective topcoat or wax if the door shows wear, while always checking product labels and manufacturer instructions for care specifics.
Long-term maintenance and touch-ups
To keep your freshly painted doors looking great, regular checks for scuffs and chips are a must. If you spot minor damage, don’t panic—quick fixes can save the day. For small scratches or marks, use a dual-action orbital sander to smooth out rough spots before applying touch-up paint.
When it comes to cleaning, choose mild soap and water for everyday maintenance. Harsh chemicals like ammonia or bleach can strip away your new finish. If you notice any peeling or chipping paint, it’s time to reassess whether a full repaint is needed versus just recoating the damaged areas.
To decide between touch-ups and repainting, consider the extent of damage. Small spots? Go for touch-ups. Large sections with multiple issues? Plan a full repaint. Regular maintenance keeps your doors looking fresh without major overhauls every year.
Storage and reinstallation tips
When it’s time to reinstall your painted doors, handle them with care. Protect the new finish by wrapping edges in plastic or cloth before moving. This prevents accidental scratches during storage.
Before hanging, ensure all hardware is securely tightened but not over-torqued. Over-tightening can warp door frames and cause uneven gaps around the door. Use a torque wrench to set screws at the manufacturer’s recommended tightness level for best results.
Lastly, give your doors time to fully cure before reinstalling them, especially if they’re high-traffic areas like entryways or bathrooms. Rushing can lead to smudges and marks that mar the finish. Wait until the paint is completely dry and cured—usually 24 hours for water-based paints and up to a week for oil-based ones—to avoid issues.
Conclusion
A solid, durable finish starts with careful prep, proper materials, and steady technique. Protect yourself and the door’s edges by ventilating the space, using the right tools, and applying thin, even coats.
Check the door for wear and repair needs, remove or protect hardware, sand lightly, and wipe clean before you prime or paint, then mask or tape the edges with your chosen method, set up good ventilation and lighting, mix and test a small sample, then apply several thin coats, letting each coat dry fully before the next, and finally inspect and clean up while keeping the workspace tidy and safe.
Common mistakes are skipping prep and masking, using the wrong paint or finish for interior doors, and rushing through coats or curing times; always follow a dry-time schedule, ventilate well, wear a mask if sanding or spraying, and avoid overloading the brush or roller with paint to prevent drips.
If the door is heavily paneled, warped, or you’re unsure about the masking liquid versus tape method, consider a pro for precision or difficult surface work, but otherwise you can finish confidently by sticking to the plan, staying patient, and following the safe steps until the job is complete and looks professional. Stay focused, keep safety at the front, and you’ll have a door that lasts.
FAQ
What is the first step before starting to paint an interior door?
Remove the door and take off hardware. Clean the door with a damp cloth to remove dust and grease. A clean surface helps the paint stick and last longer.
Should I sand the door before painting?
Yes. Lightly sand to roughen the surface. Wipe away dust before applying primer.
Do I need a primer for interior doors?
Yes. Use a stain-blocking or bonding primer. It seals finished wood and helps the topcoat go on smooth.
What is the best way to apply paint for a smooth finish?
Use a high-quality brush or a small roller. Apply thin, even coats and let them dry fully between coats. Lightly sand between coats for a crisp look.