
Introduction
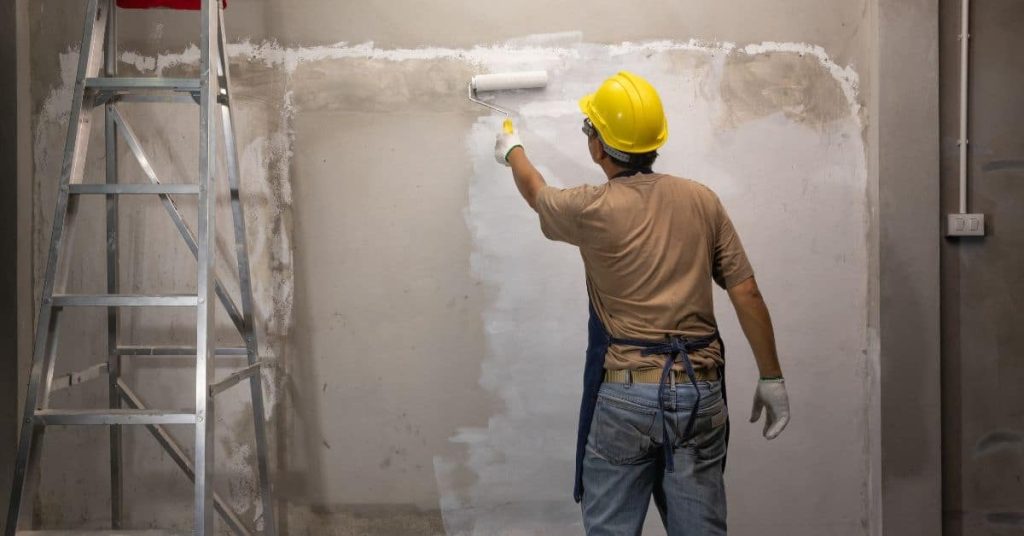
Wall-painting shortcuts are quick fixes that promise fast results but often backfire later. Skip proper prep, primer, and even consistent drying, and you’ll see peeling, staining, or a finish that’s dull long before you’re done.
If you’re choosing between DIY-painted cabinetry, ready-made curtains, peel-and-stick floor tiles, or flat-pack furniture, aim to do the basics right rather than shortcutting. Sand smooth, clean the surface, prime where needed, and apply coats with steady even strokes, then let each layer dry fully per the label. When in doubt, double-check the manufacturer instructions and local rules, and test a small section first to see how the finish holds across materials.
Key takeaways
- Skips in prep backfire; lasting paint failures, peeling edges, and uneven coverage.
- DIY-painted cabinetry carries risks: finish failure, chipping, and poor sealing.
- Ready-made curtains may not fit or block light as claimed.
- Peel-and-stick floor tiles often ripple, lift, or trap moisture long term.
- Flat-pack furniture can look cheap and wear unevenly with use.
- Choose proper ventilation and edge protection; safety first during painting.
Table of Contents
- Introduction
- Key takeaways
- When Skipping Prep Backfires
- DIY Cabinetry Painting — When to Do It and When to Hire a Pro
- The Painted Accent Wall Trap
- Peel-and-Stick Tiles and Other “Quick” Floor/Wall Coverings
- Ready-Made Curtains, Shades, and Quick Window Treatments
- Battery-Powered and Plug-in Lighting Shortcuts — Safety First
- Fast Furniture, One-and-Done Decorating, and the Cost of Rushing
- Safety, Maintenance, and Long-Term Planning for Paint Projects
- Conclusion
- FAQ
When Skipping Prep Backfires
Skipping surface prep is a fast path to paint failure—peeling, blistering, and obvious repairs. DIYers cut corners by skipping cleaning, sanding, patching, priming on bare wood or gloss, and even choosing the wrong tape, then wonder why the finish looks and wears poorly.
Adhesion starts with a clean, roughened surface that’s free of oil, dirt, and moisture. The surface, not the paint, does the sticking, so you need the right profile and primer for longevity; skipping steps leaves barriers that cause failures and more effort later. Quick checks like substrate type, moisture clues, gloss level, patch integrity, and a simple adhesion test help decide whether to redo prep or proceed with proper prep.
Surface prep mistakes to avoid
Certain steps in surface preparation are crucial for a lasting paint job. Here are some common mistakes to steer clear of:
- Skipping cleaning: Dirt, grease, and grime prevent paint from adhering properly, leading to peeling.
- Neglecting sanding: Rough surfaces help paint bond better. Skipping this step results in poor adhesion and blistering.
- Ignoring moisture: Painting over damp or humid surfaces causes mildew growth and peeling.
- Overlooking glossy surfaces: Glossy areas need to be sanded lightly before painting to ensure good adhesion.
Taking these simple precautions will save you from redoing your work later on.
Wrong primers and paint choices
Using the wrong primer or paint can lead to adhesion problems and an uneven finish. Here’s what to avoid:
Gloss paint on unprimed surfaces: Gloss paints require a primed surface for good adhesion. Applying them directly results in peeling.
Water-based paint over oil-based primer: Water-based paints don’t adhere well to oil-based primers, causing blistering and peeling.
Using low-quality products: Cheap primers and paints often lack the necessary binders for good adhesion, leading to poor results.
Patching and texture pitfalls
Rushed repairs and mismatched textures can make your paint job look amateurish. Here’s how to avoid these common mistakes:
- Using the wrong patching compound: Match the existing wall texture for a seamless finish.
- Not sanding properly: Uneven or rough patches stand out under paint, so smooth them thoroughly.
- Painting too soon after patching: Allow compounds to dry completely before painting to prevent adhesion issues.
- Ignoring color matching: Ensure your patch matches the surrounding wall color for a consistent look.
Taking these steps will help you achieve convincing, long-lasting repairs.
DIY Cabinetry Painting — When to Do It and When to Hire a Pro
DIY cabinetry painting is about knowing what you can reasonably pull off and where a professional finish, hardware install, or veneer work will save you time, drama, and a lot of touch-ups in the end. Define scope and skill fit by considering framed versus frameless cabinets, doors versus full boxes, and when the finish quality justifies a pro’s spray, veneer, or precision hardware work. Expectation matters: DIY tends to show more brush or roller marks, color irregularities, and wear in high-traffic kitchens, while pros often deliver a more uniform sheen and tougher, long-lasting surfaces, though at a higher upfront cost and longer lead time.
Think through the cost and time reckoning: hidden DIY costs from tools, primer, multiple coats, sanding, and potential re-dos can add up, while pro estimates and warranties may offer different protections and assurances. Prep, materials, and technique matter: ideal substrate prep, bonding or stain-blocking primers, paint type choices, drying and curing times, and proper surface sanding all drive durability, repairability, and the final appearance. If you’re leaning DIY, plan masking, ventilation, hardware management, and realistic timelines, and be prepared to step back and hire a pro for high-traffic areas, veneers, softening or warping, or color-tuning across multiple cabinets. Check labels and manufacturer instructions, local rules, and your own skill limits to decide what you can safely achieve and when it’s wiser to bring in a pro.
Why pros recommend professional cabinet finishing
Painting cabinets might seem like a straightforward DIY job, but it’s not as simple as slapping on some paint. Pros know what they’re doing for a reason.
First off, adhesion is a big deal. If your paint doesn’t stick to the surface, you’ll end up with peeling or chipping. Pros use specific primers and techniques to ensure good adhesion. You might not get that right on your first try.
Then there’s the hardware. Those hinges, knobs, and drawer pulls aren’t going to reinstall themselves perfectly. Pros have the tools and experience to make sure everything lines up just right. You could end up with crooked doors or drawers that don’t close properly if you DIY.
Lastly, finish durability is something pros prioritize. They know which paints and sealers to use to ensure your cabinets look good for years, not months. You might save some money upfront with a DIY job, but you could end up spending more in the long run if you have to repaint or refinish your cabinets sooner than expected.
DIY Acceptable Projects and Skill-Based Alternatives
For confident DIYers, these projects are perfect for a cabinet facelift:
- Touch-ups: Scratches, nicks, or minor damage. Use touch-up markers or paint.
- Refacing: Replace only the doors and drawer fronts. Keep the boxes (carcasses) if they’re in good shape.
But remember, when in doubt, hire a pro. Here’s when:
- Complex Designs: Intricate paint techniques or custom colors may need an expert’s touch.
- Structural Issues: Warped doors, broken hinges, or damaged boxes. These need a pro to fix right.
Tools and materials checklist for cabinetry projects
Before you start painting your cabinets, use this checklist to ensure you have everything you need. This will help you avoid common mistakes and save time in the long run.
- Paint: Check that it’s a water-based, latex paint designed for cabinets. It should be labeled as “cabinet-grade” or “kitchen and bath” paint.
- Primer: Ensure you have a high-quality bonding primer to seal the surface and improve paint adhesion.
- Sandpaper (120-grit): Verify that you have sandpaper with a grit size between 120 and 150 for smoothing surfaces without damaging them.
- Tack cloth: Check that you have a tack cloth to remove dust after sanding, ensuring a smooth finish.
- Paintbrushes (2-2.5″): Make sure you have angled sash brushes with synthetic bristles for better paint flow and control.
- Painter’s tape: Verify that you have blue painter’s tape to protect areas from overspray and ensure clean lines.
- Drop cloths: Check that you have enough drop cloths or plastic sheets to cover the floor and protect it from paint spills.
- Safety equipment: Ensure you have safety glasses, gloves, and a respirator or dust mask to protect yourself during sanding and painting.
Quick rule: Always check product labels for specific instructions on usage, drying times, and clean-up procedures. This will help you stay safe and achieve the best results.
The Painted Accent Wall Trap
An accent wall only improves room balance when you pick the right wall, the right color, and the right lighting. If you choose the wrong wall or a shade that’s too close to the others, it can feel dated or shrink the space. Then it becomes a trap you regret.
Look at ceiling height, room size, natural light, and furniture layout to decide if an accent wall fits here. Test color swatches in different lighting, check vertical and horizontal proportions, and note how reflections change the effect. If the wall doesn’t move the eye the way you want, consider alternative accents like trim, built-ins, wallpaper on a single panel, or strategically placed art and lighting.
Color, proportion, and placement mistakes
Steer clear of these common accent wall pitfalls to create a balanced focal point.
- Wrong color: Picking a shade too dark or similar to adjacent walls can make the room feel unbalanced. Choose a color that complements, not matches, surrounding hues.
- Poor wall choice: Selecting the wrong wall as your accent can throw off the room’s balance. The accent should be on the natural focal point, often opposite the entrance or above a fireplace.
- Ignoring lighting: Different light conditions can change how the color appears. Test swatches in various lights to avoid surprises.
- Reflection issues: Glossy surfaces nearby can distort the accent wall’s appearance. Consider this when choosing paint sheen and nearby decor.
By avoiding these mistakes, you’ll create an accent wall that enhances your room’s balance rather than detracting from it.
Better alternatives to a single painted wall
Instead of a full accent wall, consider these longer-lasting, higher-impact options for adding visual interest to your space.
Muted trim: Paint baseboards, door frames, or window casings in a subtle color that complements the walls. This draws attention to architectural features without overpowering the room.
Partial panels: Instead of painting an entire wall, consider painting just one panel or section. This creates a focal point without overwhelming the space.
Wallpaper strips: Apply narrow stripes of wallpaper horizontally or vertically to add texture and interest without committing to a full accent wall.
Coordinated decor: Use area rugs, throw pillows, and art that incorporate your desired accent color. This creates a cohesive look without the permanence of paint.
Peel-and-Stick Tiles and Other “Quick” Floor/Wall Coverings
Peel-and-stick coverings promise fast, low-effort results, but they fail if the surface isn’t ready or in moisture and high-traffic areas. Expect lifting from poor prep, staining from moisture or oils, and substrate damage from peeling paint or sealants, plus adhesive breakdown over time in busy kitchens and baths.
Carefully map out the substrate and moisture risks, and follow the product label for prep steps and limitations before starting any install. If in doubt, skip peel-and-stick in high-traffic or wet areas and choose safer alternatives, then use a clear install sequence: clean, test moisture, prep with primer if allowed, seal seams, and leave expansion gaps.
Where peel-and-stick typically fails
Peel-and-stick products might seem like a quick fix, but they often fail prematurely in certain environments. Here’s where you’ll likely face issues:
Moisture-prone areas: Bathrooms, kitchens, and laundry rooms are hotspots for moisture. Peel-and-stick tiles and wallpaper can lift or stain due to trapped moisture.
High-traffic zones: Mudrooms, entryways, and hallways see heavy foot traffic. Peel-and-stick products may peel or wear out faster in these areas.
Heat sources: Placing peel-and-stick coverings near heat sources like radiators or stoves can cause them to dry out and crack over time.
Durable, budget-friendly alternatives
While peel-and-stick products might seem convenient, investing in more reliable options can save you money and hassle in the long run. Here are some alternatives tailored to different budgets:
Proper tiles: Ceramic or porcelain tiles with proper grout and sealant last longer than peel-and-stick. They’re affordable and suitable for DIY installation.
Luxury vinyl planks (LVP): LVP is waterproof, durable, and easy to install. It’s a bit pricier but worth the investment in high-traffic or wet areas.
Professional installation: For high-end materials like natural stone or hardwood, consider hiring a pro. They’ll ensure proper installation and minimize long-term issues.

Ready-Made Curtains, Shades, and Quick Window Treatments
Off-the-rack curtains save time, but they rarely fit right and leave you chasing coverage. Width, length, and stack height often miss the window, creating gaps and a disproportionate look that makes a room feel off from day one. Light-control and fabric quality are the weak links, with sheer panels that glare, darker colors that soak up daylight unevenly, and stiff or fraying fabric that fades or looks tired after a few chores.
For a DIY homeowner, that matters because fit, light, and wear determine function as much as style in a concrete-and-paint room. Quick installs can sag or misalign on heavy curtains or tall ceilings, and hardware choices—whether you mount on wall or ceiling—affect durability and the risk of wall damage. Consider semi-custom or modular options and test fit and light before committing, using label directions and manufacturer instructions to confirm size limits, care, and expected wear rather than guessing.
Common fit-and-function failures
Off-the-rack window treatments often fall short in coverage and functionality. Here’s what to watch out for:
Length: Ready-made curtains may not reach the floor, leaving gaps that let light in and ruin your room’s aesthetic.
Width: Too narrow, they’ll look skimpy; too wide, they won’t close properly. Either way, it’s a poor fit for your window and room size.
Stack height: When drawn open, ready-made treatments might not stack neatly at the top of the window, blocking views or looking messy.
Affordable custom and DIY alternatives
When off-the-rack treatments don’t cut it, consider these budget-friendly options:
Hemming: Buy longer curtains and hem them to your desired length. It’s simple, cheap, and ensures a perfect fit.
Rail adjustments: Some ready-made rods have adjustable lengths. If not, buy an extendable rod separately for a custom fit.
Semi-custom online options: Websites like The Home Depot or Lowe’s offer made-to-order treatments at reasonable prices. Measure carefully, and you’ll get a better fit without breaking the bank.
Battery-Powered and Plug-in Lighting Shortcuts — Safety First
Battery-powered and plug-in lighting should stay in decorative or wireless accents, not in places that require hardwiring. Use them only if the fixture is listed for that use and the installation won’t make permanent wiring out of reach or unsafe.
Understand the risks of shortcuts like daisy-chaining batteries or running cords behind walls. Check that fixtures are listed for their intended use and that cords are rated for the mounting and environment. When in doubt about circuit capacity, moisture, or whether a permit or electrician’s inspection is needed, plan for professional help to prevent hazards and costly mistakes.
Electrical and safety risks of shortcuts
Battery-powered and plug-in lighting might seem convenient, but they can pose serious electrical and safety hazards when used improperly. Here’s what you need to know:
Fire Hazards: Overloading outlets or daisy-chaining batteries can cause overheating, leading to fires. Keep cords and batteries clear of flammable materials.
Insecure Mounting: Hanging heavy fixtures with just a plug or battery pack can lead to accidents. Always use appropriate mounting hardware for the fixture’s weight and type.
Improper Load Concerns: Plugging too many devices into one outlet or using extension cords as permanent wiring can overload circuits, causing sparks, tripping breakers, or even starting fires. Respect your home’s electrical capacity.
Low-cost safe alternatives and when to call a pro
If you’re looking for low-cost, safe lighting solutions, consider these options:
Cord Covers: Protect cords from damage and prevent tripping hazards by installing cord covers along baseboards or under rugs.
Professionally Installed Switches: Have an electrician install switches for your plug-in fixtures to avoid running cords across the floor. This is a low-cost upgrade that adds safety and convenience.
When to Call a Pro: If you’re planning any of the following, it’s time to hire a licensed electrician:
– Installing hardwired fixtures in kitchens, bathrooms, or other moisture-prone areas.
– Upgrading your electrical panel or adding new circuits.
– Moving or adding outlets, switches, or fixtures that affect your home’s wiring.
Fast Furniture, One-and-Done Decorating, and the Cost of Rushing
Fast furniture and one-and-done decorating mean grabbing cheap, impulse pieces and big, single-step updates. They often backfire in a painted, concrete-focused space by fading, not fitting, and needing replacement sooner than you think. The fix is a staged-decorating approach that matches the durability and vibe of a concrete room without wasting money or space.
This matters because rushing invites more waste, misaligned styles, and durability trouble in high-traffic or moisture-prone areas. A simple framework—planning with mood boards, a paced room-by-room rollout, and a budget cadence—helps you check fit, color, and material compatibility before full commitments. Pause fast purchases using clear criteria, prototype with samples or small patches, and compare what you buy to a concrete finishes mindset. Focus on better basics, borrow or rent tools when possible, and donate what you don’t keep. A clear end state lets you measure progress and avoid repaint cycles while keeping the room cohesive with durable surfaces and careful choices.
Durability and proportion problems with flat-pack and impulse buys
Fast furniture and one-and-done decorating often mean low-cost, quick-assembly pieces. But don’t be fooled by the initial savings. These items often lack durability and can look out of place in a concrete-focused space.
Construction quality: Flat-pack furniture is usually made from cheaper materials that wear out faster. They’re not built to last, especially in high-traffic areas or near moisture-prone walls.
Scale and proportion: Impulse buys can throw off the balance of your room. A small table might look fine in a store but dwarf your concrete walls at home. Conversely, an oversized piece could overwhelm your space.
How to plan decor over time
A staged-decorating approach helps you spread costs and reduces buyer’s remorse. Here’s how:
Phase 1: Structural upgrades. Start with big-ticket items like paint, flooring, and built-ins. These updates transform your space and provide a solid foundation for later additions.
Phase 2: Furniture. Once the structure is in place, layer in furniture. Start with key pieces that serve multiple functions, then add accent furniture as your budget allows.
Phase 3: Decor. Finally, add decorative elements like art, textiles, and lighting. This phased approach lets you refine your taste over time and ensures each addition enhances the space you’ve already created.
Safety, Maintenance, and Long-Term Planning for Paint Projects
This section covers staying safe, planning for maintenance, and budgeting for the long haul on paint jobs. You’ll learn how to ventilate properly, spot hazards like lead paint, use ladders safely, and set a go/no-go rule for weather and work conditions. It also outlines how to plan inspections, use the right PPE, and keep tools and cleanup tidy.
Planning ahead saves money and headaches. A simple maintenance calendar helps you time re-coats before wear shows, track surface prep standards, and manage disposal and low-VOC choices. Keeping records, permits, and disposal notes makes future projects easier and safer for everyone.
Health and safety checkpoints
Before starting any paint project, use this checklist to ensure a safe work environment.
- Test for lead: If your home was built before 1978, test for lead-based paint. Skip this step at your peril – exposure can cause severe health issues.
- Ventilation: Ensure proper ventilation. Open windows or use fans to keep the area well-ventilated and prevent fumes from building up.
- PPE: Wear a respirator, goggles, and gloves. These protect you from harmful chemicals and debris.
- Ladder safety: Inspect your ladder before use. Ensure it’s secure and in good condition to prevent falls.
- Fall prevention: Secure drop cloths at the top of ladders to prevent them from slipping.
- Electrical safety: Turn off power to outlets you’ll be working near. Test wires with a voltage tester before handling.
- Hazardous materials: Identify and handle hazardous materials (solvents, thinners) according to their labels’ instructions.
- Go/no-go threshold: Assess work conditions. If it’s too hot, cold, wet, or windy, postpone the job until conditions improve.
Quick rule: Never compromise safety for speed. A few extra minutes spent on precautions can save you from serious injuries or health issues.
Maintenance and life-cycle cost considerations
When planning a paint project, consider the long-term costs to make cost-effective choices.
Upfront savings might seem appealing, but cheap paints often require more frequent touch-ups and repainting. High-quality paints may have a higher upfront cost but last longer, reducing rework and replacement costs over time.
Fastidious surface prep: Proper surface preparation extends the lifespan of paint and improves appearance. Don’t skimp on this step – it’s worth the extra effort.
Account for disposal: Factor in the cost of disposing old paint, especially if it contains lead. Local regulations may require special handling and disposal methods.
Visual checkpoints and quality inspection steps
At each stage of your paint project, use this checklist to inspect your work and catch any issues early.
- Surface preparation: Inspect the surface before painting. It should be clean, dry, and free of defects. Any imperfections will show up under paint.
- Paint quality: Check the paint’s consistency. If it’s too thick or thin, adjust accordingly to ensure even coverage.
- Coverage: Ensure you have enough paint for the job. Measure twice, buy once – running out mid-project is frustrating and time-consuming.
- Application technique: Check your painting technique. Even strokes and proper overlap help achieve a smooth finish.
- Drying time: Allow adequate drying time between coats. Rushing this step can lead to poor adhesion and uneven coverage.
- Final inspection: Once the project is complete, do a thorough walkthrough. Check for any missed spots, drips, or other imperfections.
Quick rule: Regular inspections help catch problems early, saving you time and money in the long run.
Conclusion
Shortcuts in painting and quick fixes can save time, but they risk safety, durability, and looks. The smart move is to plan, test, and protect your space before you change anything permanent.
Check your plan like this: assess the area and any risks, prep thoroughly and test a small patch first, choose materials that fit the job, and schedule clear steps with maintenance in mind. Keep the project simple, work in clean, well-ventilated spaces, and stop if something doesn’t feel right.
Common mistakes to avoid are skipping prep, using the wrong products on surfaces, and rushing through steps. For safety, read labels, use eye and skin protection, unplug or switch off power when needed, and never mix methods that clash with the surface or room timing. Keep these rules: test first, follow the product directions, and plan for the long haul rather than a quick hit.
For tougher calls—like cabinet painting, floor or wall coverings that act like shortcuts, or wiring and lighting—know when to bring in a pro. If the project involves structural changes, electrical work, or significant color changes in a high-visibility space, professional help saves money and prevents damage. Stay disciplined, finish with solid prep, and you’ll finish strong and proud of the result.
FAQ
What are the risks of DIY-painted cabinetry and how can I avoid common mistakes?
Cabinets are heavy and close quarters mean easy drips and brush marks. Sand between coats, use a proper primer, and test finish on a small area first. If gaps or misalignment show up, call out a pro before you ruin doors or hinges.
Why might ready-made curtains or window treatments cause more problems than they solve?
Off-the-shelf options rarely fit your windows perfectly and can look off if you have unusual sizes. They can also use poor hardware that falls or drags on the floor. Measure twice, fit once, and check weight ratings and mounting hardware on the label.
Are peel-and-stick floor tiles a long-term solution or a quick trap?
Peel-and-stick tiles save time, but edges lift and patterns wear in high-traffic areas. They’re easy to install, but expect wear in kitchens or entryways. Check the manufacturer’s adhesion guidelines and surface prep before starting.
What should I know about flat-pack furniture and “one-and-done” decorating?
Flat-pack can be nice for fast setups, but joints and finishes may be thinner than solid wood. It often won’t handle heavy use or moisture well. If you expect wear, factor in stronger pieces or reinforce critical joints and hardware.