
Introduction
Mortar isn’t always the right choice for replacing thinset in tile projects.
This article explains when mortar can work, when it can’t, and how to choose the best substrate and technique for a durable tile installation.
You’ll learn practical guidance on evaluating your substrate, selecting appropriate materials, and applying them correctly to avoid failures.
Key takeaways
- Mortar lacks flexible adhesion; use polymer-modified thinset for movement and crack resistance.
- For floors with deflection, avoid rigid mortar; opt for premium thinset or epoxy alternatives.
- Substrate prep and flatness are critical; skim coats, back-buttering, and priming improve bonding.
- Some tile projects (large-format, outdoor, wet areas) need durable thinset, not mortar.
- Building codes require specific mortar-thinset use; verify substrate specs and ASTM standards.
- If choosing mortar, ensure crack-isolation and movement joints are integrated.
Table of Contents
- Introduction
- Key takeaways
- Quick overview: mortar vs thinset
- Performance factors: adhesion, flexibility, and durability
- Common tile projects where mortar may fail
- Substrate compatibility and prep requirements
- Building-code and standards considerations
- Practical risks and visible failure modes
- When mortar can be an acceptable choice
- Better alternatives and hybrid approaches
- Tools, materials checklist and material specs explained
- Troubleshooting, maintenance and repair strategies
- Conclusion
- FAQ
Quick overview: mortar vs thinset
Mortar is a cement-and-sand mix used to bond bricks or stones, while thinset is a finer cement-based paste designed to bond tiles. Mortar cures by drying and is strong in compression but relatively stiff, whereas thinset stays more flexible as it cures. In practice, use thinset for tiled floors and walls, and mortar for masonry or backer-board installation.
For a DIYer, choosing the right material matters for long-term adhesion, waterproofing, and staying level over temperature changes. Using the wrong product can lead to cracks, lippage, or failed bonds that require rework.
What thinset is and why pros use it
Thinset is a cement-based tile adhesive blended with fine sand and polymers. The polymer modifiers improve flexibility and adhesion compared with plain portland cement mixes, so the bond stays strong when the substrate moves a little.
Pros pick thinset for its high shear strength and good water resistance once cured. It grips porcelain, ceramic and stone well and is designed to form a thin, consistent layer under tiles rather than a thick bedding mortar.
Because it cures by hydration and the polymers add toughness, thinset handles regular floor traffic and wet areas better than traditional masonry mortars used as adhesives.
What mortar (masonry mortar) is and how it differs
Masonry mortar is a blend of cement, lime and sand formulated for laying bricks, blocks and stone. It comes in grades—Type N, S and M—where strength and stiffness increase from N to M. The sand aggregate gives it body and helps with leveling big joints.
Unlike thinset, mortar is made for structural jointing and workability, not thin, high-bond tile adhesive layers. It’s thicker, more forgiving to shape, and can take heavier vertical loads, but it lacks the tailored polymers that boost tile bond and flexibility.
On jobs where mortar is used in lieu of thinset, expect different cure behavior and less reliable tile adhesion unless the right mortar type and additives are chosen. Adjust expectations: mortar is for masonry work first, adhesive performance second.

Performance factors: adhesion, flexibility, and durability
Adhesion, flexibility, and durability determine how well a material holds up over time. Bond strength, flexibility, and compressive strength describe how it resists forces, deforms, and withstands moisture.
For DIY projects, choosing the right product means considering where it will be used and what loads it must bear. A well-balanced mix of adhesion and flexibility helps prevent cracks and failure in both load-bearing and moisture-prone applications.
How adhesion is measured and why it matters
Adhesion is the bond between the tile and the bed beneath it. On the job we think in two forces: shear (sliding) and tensile (pulling away). Shear strength tells you how well the system resists lateral loads; tensile strength shows resistance to tiles popping off from impacts or bend in the substrate.
Manufacturers measure adhesion with standardized tests — pull-off tests and shear tests — but you can spot poor adhesion yourself: hollow sounds when you tap a tile, edges that lift, grout that cracks out from the joint, or tiles that slowly sink or shift under load. Those symptoms mean the bond failed long before the tile or mortar did.
Movement, thermal expansion, and flexibility needs
Floors and walls move. Wood substrates expand with humidity. Concrete slabs flex under loads. Ambient temperature changes make tiles and substrate expand and contract at different rates. If the adhesive is rigid, those relative movements create stress that leads to cracked tiles, popped corners, or debonding.
That’s why pros use polymer-modified thinset or flexible adhesives. They absorb small movements and keep the bond intact. For DIYers, matching adhesive flexibility to the tile type and substrate — and installing movement joints where needed — prevents failures that look like material defect but are actually stress-related.
Common tile projects where mortar may fail
Mortar can fail in tile installations that experience movement, moisture, or heavy loading. This is common with large-format tiles, porcelain, rectified edges, floors with heavy traffic, and wet areas. In these situations, thinset mortar provides a stronger, more reliable bond than traditional mortar.
Understanding where mortar tends to fail helps you choose the right setting materials and technique for a DIY or jobsite. Using the proper thinset and proper prep reduces cracking, hollow spots, and water intrusion, saving time and rework. This context helps you plan substrate prep, mixing, and tool selection for durable tile installs.
Wet areas and moisture-prone installations
Mortar designed for masonry absorbs and holds moisture. In showers, steam rooms, exterior facades, and pool surrounds that moisture weakens the bond over time and can cause tiles to loosen or pop out.
Polymer-modified thinsets resist water intrusion and keep adhesion intact under repeated wet/dry cycles. They also tolerate the slight movement caused by expansion and freeze-thaw better than plain mortar.
If you’re tiling anywhere regularly exposed to water, use an adhesive rated for wet conditions and follow the manufacturer’s recommendations for waterproofing and curing times. That combination prevents premature failures you’d see with standard mortar.
Large-format and low-porosity tiles
Big tiles and dense porcelain don’t suck up water or adhesive like smaller, porous tiles do. That makes it hard for standard masonry mortar to get full contact and bond across the entire back of the tile.
Professionals often use polymer-modified thinsets and techniques like back-buttering and butter-and-floating to achieve full coverage and avoid lippage. Those thinsets provide higher bond strength and longer open time than plain mortar.
On large-format or low-porosity tile jobs, inadequate coverage is the main risk — and that’s where mortar typically fails while the right thinset succeeds.
Substrate compatibility and prep requirements
Substrate type governs mortar compatibility. Concrete and cement board generally accept standard mortar when properly prepared, but plywood and gypsum require specific primers, sealers, or alternative setting methods.
Proper prep matters because the wrong combination can lead to cracks, delamination, or moisture problems. By cleaning, flattening, and using the right primer or additive for your substrate, you improve adhesion and long-term durability on a DIY project.
When mortar can be used on concrete or brick
Mortar can work acceptably on solid, well-cured concrete or masonry walls and floors. These substrates are rigid and dimensionally stable, so the lack of flexibility in masonry mortar is less of an issue than on wood or gypsum.
Prep is critical: remove all loose laitance, dirt, oil, and efflorescence. Mechanically clean the surface by scraping, brushing, or using a stiff wire brush, then rinse and let the slab dry to the proper damp-but-not-sopping condition for bonding.
Leveling and planarity matter. Patch deep voids and use a suitable leveling compound designed for tile over concrete before applying mortar. If the surface is uneven or has poor bond strength, thinset or a bonded mortar bed system is the safer choice.
When to avoid mortar on plywood, OSB, or gypsum
Using masonry mortar over moisture-sensitive or flexible substrates is a common mistake. These materials move or swell with moisture and need adhesives that accept movement and bond to non-porous or soft surfaces.
- Plywood or OSB movement — Wood panels flex with load and humidity; mortar will crack. Use a manufacturer-approved thinset with movement accommodation or uncoupling membranes to prevent failures.
- Gypsum board sensitivity — Gypsum softens with moisture and won’t hold masonry mortar. Use cement backer board or a bonding thinset designed for gypsum, and keep wet-area gypsum out of the tile plane.
- Unsupported joints — Gaps at seams concentrate movement and break mortar. Fasten and tape seams per tile substrate instructions or float a proper cement board layer before bonding tile.
- Low nail/fastener rigidity — Insufficient fastener schedule lets panels bounce under foot traffic. Add screws to manufacturer specs or switch to a rigid substrate that accepts mortar.
- Moisture risk — Areas exposed to spills or humidity will deteriorate gypsum and wood under mortar. Choose thinset rated for wet areas or use cementitious backer and waterproofing systems.
When in doubt, treat plywood, OSB, and gypsum as hostile to masonry mortar: either convert to a rigid cementitious substrate or use thinset and substrate prep methods designed for movement and moisture.
Building-code and standards considerations
Building codes and manufacturer warranties for certain tile installations favor thinset over mortar. Ignoring these specs can void warranties and increase liability.
Following the exact setting requirements helps ensure durability, safety, and compliance on the jobsite. This awareness can prevent costly failures and keep a project on track.
Manufacturer installation standards and warranties
Manufacturers write installation instructions for a reason. If their tech data calls for a polymer-modified thinset, swapping in plain masonry mortar can break the chain of responsibility. Warranties often require specific products, coverage limits, and approved substrates.
Using an unapproved adhesive can void the tile maker’s or system manufacturer’s warranty and leave you paying for repairs. Inspectors and warranty reps expect paperwork and adherence to the spec; deviations are easy to spot during a claim.
Bottom line: follow the product data sheet and keep receipts. If you choose a different material, get written approval from the manufacturer first.
Tile Council and ASTM guidance
Trade standards from bodies like the Tile Council and ASTM set the baseline for acceptable adhesives and surface prep. They don’t endorse one brand, but they do define performance criteria and testing methods that installations must meet.
These standards guide inspectors and professionals when evaluating installations. If a mortar-based approach fails to meet the criteria—bond strength, movement accommodation, moisture performance—the job can be rejected even if the tiles look fine at first glance.
Reality check: use methods that meet published standards for your installation type, or be prepared to justify and document any alternative approach to the authority having jurisdiction.

Practical risks and visible failure modes
Using the wrong adhesive leads to visible failures like lippage and hollow spots, followed by cracking or tile pop-offs. These issues show up early and worsen over time.
Recognizing these signs helps you diagnose the problem fast, so you can fix the installation before costly damage occurs. Proper adhesive choice and technique also improves durability and reduces call-backs on future projects.
How to inspect for hollow spots and poor coverage
Walk the finished floor and tap each tile with the handle of a screwdriver or a coin. A solid, dull sound means good contact. A hollow, echoing sound points to voids under the tile.
During installation lift a few tiles at the end of a run to check the mortar bed or thinset. Look for full coverage to the tile back and consistent ridge collapse on the trowel lines. Partial coverage or thin ribbons are signs the adhesive won’t carry the tile long-term.
Also check edges and corners; installers often miss these. If you see dry spots, cavities, or air pockets, reapply proper adhesive with the right trowel notch before grouting.
Long-term signs of adhesive failure
Cracks in grout that follow tile joints or spider out from grout lines are an early sign the tile or substrate moved because the adhesive failed. Small hairline cracks can quickly widen if left unchecked.
Tiles that become loose, rock underfoot, or pop off entirely usually mean the bond lost adhesion. This often shows up months or years after installation when loads and thermal cycles take their toll. Soggy or discolored grout and persistent damp spots can indicate water is getting beneath tiles through failed seals or adhesive gaps.
Watch for localized depressions (lippage) and repeat failures in the same area. Those patterns point to coverage or movement issues rather than cosmetic grout wear.
When mortar can be an acceptable choice
Mortar can be an acceptable choice only in limited, non-structural applications such as exterior stucco, certain brick veneers, and non-traffic decorative tile. Use it when these conditions apply and when proper mixes and installation steps are followed.
In these cases, understanding substrate, sealing, and curing precautions helps prevent cracking and moisture problems on a DIY jobsite. Following manufacturer guidance and keeping joints clean protects long-term durability.
Low-stress, non-wet decorative applications
Mortar can work for small, decorative tiles that won’t see foot traffic or water exposure. Think accent bands on an exterior stucco wall, small brick veneers on a sheltered facade, or a framed tile plaque indoors where movement and moisture are minimal.
Keep tile size small and use pieces with porous backs that accept mortar. Rigid substrates like solid masonry or well-bonded stucco are best because they limit flex and shear. If the piece is purely ornamental and easy to replace, mortar is an acceptable, low-cost option.
Do not use this approach where moisture, heavy loads, or frequent thermal cycling are expected; those conditions quickly expose mortar’s weaknesses.
Reinforcing best practices if choosing mortar
If you decide to use mortar, treat the job like a critical repair. Mechanically anchor where possible—wire ties, masonry anchors, or screws through a flange—so the tiles aren’t relying on the mortar bond alone. That prevents easy delamination if the mortar weakens.
Build a full bed of mortar rather than spot-setting. Maintain proper thickness for the tile and press to achieve full contact. Allow adequate curing time before loading or grouting; rushing this step invites premature failure.
Match materials to the substrate and follow mixing and curing recommendations. Clean, keyed substrates and controlled drying conditions reduce risk and give the mortar its best chance to last.
Better alternatives and hybrid approaches
There are several material options that can outperform plain mortar, including polymer-modified thinset, epoxy mortars, mastic for dry walls, and hybrid methods like back-buttering. Choosing the right mix can improve bond strength and durability. These alternatives often install faster and resist cracking better.
Polymer-modified thinsets offer better adhesion for porcelain and large tiles, while epoxy mortars excel in high moisture areas. Mastic is a convenient option for dry-wall tile installs where quick set is useful, and back-buttering helps even out thin tiles. In practice, selecting a hybrid approach can save time and reduce callbacks.
Polymer-modified thinset and epoxy adhesives
Polymer-modified thinset adds latex or other polymers to the cement mix. That changes flex, bond strength, and water resistance compared with plain mortar. For most floor and wall tiles over standard substrates, a good polymer thinset gives better long-term adhesion and fewer failures than plain mortar.
Epoxy adhesives are a different animal. They bond to difficult surfaces, tolerate moisture, and resist staining and chemicals. They cost more and need careful mixing and fast work, but they’re justified for areas with heavy moisture, chemical exposure, or where an immediate waterproof bond is critical — for example wet rooms, commercial kitchens, or certain natural stone installations.
Choose polymer-modified thinset for general durability and flexibility. Reserve epoxy when the substrate or service conditions demand maximum bond and chemical/water resistance, or when manufacturer specs require it to keep the warranty intact.
Combining mortar with mechanical fastening or thinset spot-bonding
When a surface or layout makes full thinset coverage tough, hybrid methods let you use the best of both worlds. You can bed tile into a thin layer of mortar for leveling, then apply polymer thinset as a contact layer or back-butter high-stress tiles. That gives structural support from the mortar and a better adhesive bond where it counts.
For large-format tile or installations over substrates that move, add mechanical fixes — screws with washers, clips, or anchors — to hold tiles while the bedding cures. Use spot-bonding of thinset at corners and center points to reduce hollow spots and improve coverage without relaying the whole bed.
Think of hybrids as risk management: mortar for bulk shaping, thinset or anchors for bond and movement control. Test a small area and follow tile and substrate manufacturer limits to avoid warranty problems.
Tools, materials checklist and material specs explained
This section lists a practical tools and materials checklist and explains essential tile setting specs you’ll need for smooth results. It covers trowel sizes, thinset types, curing times, and how those choices vary with common tile sizes and substrates. Keep this quick reference handy on the jobsite.
Using the right tools and specs saves time, reduces mistakes, and helps ensure a durable install on walls or floors. Following clear guidelines for substrate prep, mortar selection, and curing helps DIYers get professional-looking results and fewer callbacks.
Essential tools and safety equipment
Keep the right tools and PPE on hand before you mix anything. Good tools save time and prevent mistakes.
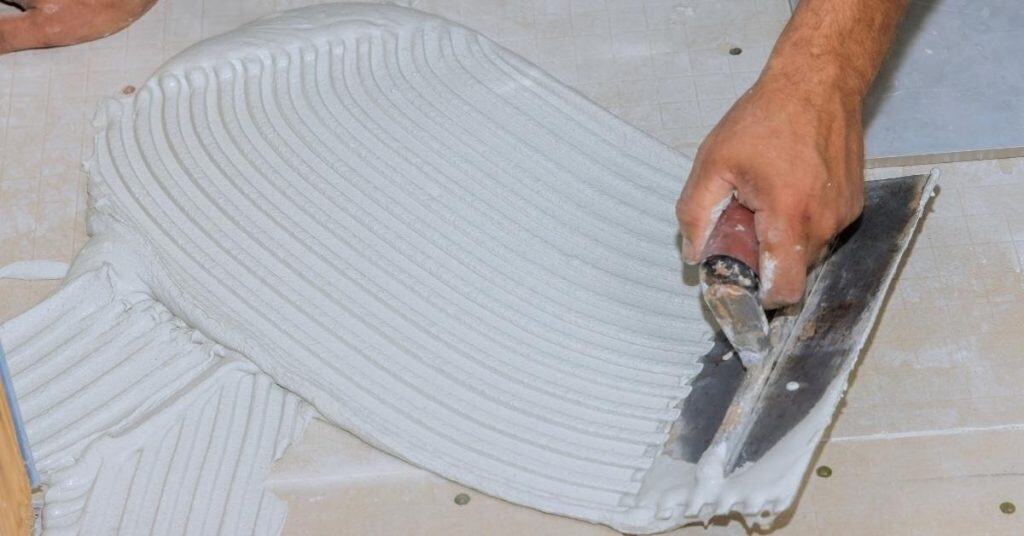
- Notched trowels Use 1/4″ x 3/16″ for small mosaics and 1/2″ x 1/2″ for standard 12″–18″ tiles. Match the notch to tile size and back-butter large tiles. Buy a set for $10–$25 or rent specialty trowels for textured tile.
- Mortar mixer A paddle on a 1/2″ drill gives consistent thinset mix. Mix at low speed to avoid air; follow manufacturer water ratio. Rent a heavy-duty drill for $15–$40/day if you don’t own one.
- Straightedge and level Use a 4′ level and a 6′ straightedge to check flatness and screed thinset. Look for hollows and high spots. A 4′ level runs $20–$60.
- Tile spacers and leveling clips Maintain grout joints and prevent lippage. Choose spacer width for grout size; use a leveling system on large-format tile. Systems cost $15–$40 per box; reusable clips cut long-term cost.
- Notched bucket trowel For spreading in corners and mixing small batches. Helps get clean edges and proper coverage. Keep a spare; they dull with use.
- Grout float and rubbers Smooth grout and clean joints without damaging tile. Choose firm rubber for grout and softer for polished tile. Inspect for cuts before use to avoid scratches.
- Personal protective equipment Wear gloves, N95 or better respirator when mixing dry powder, and eye protection. Knee pads and dust mask reduce fatigue and inhalation risk. Replace disposable respirators after heavy use.
- Wet saw or snap cutter Cut ceramic and porcelain cleanly. Use a diamond blade for porcelain and a carbide wheel for ceramic. Rent a wet saw for $30–$80/day for a few cuts instead of buying.
Choosing the right thinset or mortar product
Read the bag before you buy. Look for product claims like “polymer-modified,” ANSI classifications (A118.1, A118.4, A118.11, etc.), and recommended tile size limits. Those codes tell you adhesion strength and suitability for wet areas.
For wall-mounted or small tiles a standard thinset (ANSI A118.1) can work, but most floor and large-format projects need a polymer-modified thinset (A118.4/A118.11) for better bond and flexibility. Epoxy adhesives or mortar blends are for specialty tiles and high-moisture environments; choose them only when the label and substrate match your job needs.
Check pot life, open time, and cure times on the technical data sheet. Long open time helps with large panels or hot, dry conditions. If you see limitations for substrate or tile type, pick a different product rather than improvising—manufacturer instructions affect warranty and long-term performance.
Troubleshooting, maintenance and repair strategies
This section covers practical steps for small repairs, when to rip out and re-install, and tips to extend adhesive life. Follow a clear, step-by-step approach so repairs are quick, safe, and durable.
Understanding when to re-install vs repair saves time and material, and regular maintenance helps prevent failures on future jobs. Consistent checks and simple upkeep reduce downtime and keep projects progressing smoothly.
Fixing loose tiles and localized failures
Start by confirming the scope: tap the tile, check grout lines, and lift one or two tiles to inspect the bed. If the hollow or failed area is small and the substrate is sound, you can often re-bond rather than rip out the whole floor.
For quick field repairs, remove grout around the affected tile, lift the tile, clean all old adhesive from both tile and substrate, and inject a proper adhesive or reapply a thinset bed. Use a polymer-modified thinset or epoxy for stubborn spots and follow proper open time and coverage—don’t shortcut the trowel-notching and bonding steps.
If multiple adjacent tiles show poor coverage, movement, or moisture beneath, plan for full removal and re-install. Partial repairs with spot-bonding are fine for cosmetic or low-stress areas, but when structural adhesion is compromised, replace the assembly to avoid repeat failures.
Preventative maintenance to avoid adhesive issues
Most adhesive failures start with avoidable moisture, movement, or neglect. The items below are common mistakes and simple steps to stop small problems from becoming large ones.
- Seal grout lines — Grout is a primary path for water. Reseal grout every 1–3 years to limit moisture reaching the adhesive.
- Control moisture — Fix leaks, improve drainage, and use proper waterproofing in wet areas so the adhesive never stays wet long-term.
- Allow movement joints — Tiles and substrate expand. Install and maintain control joints to prevent stress on the adhesive.
- Monitor high-traffic spots — Inspect edges and corners periodically where traffic or loads concentrate; catch failure early and re-bond before it spreads.
- Keep substrate stable — Avoid heavy impacts and address subfloor deflection; a stiff, secure substrate protects the adhesive bond.
Routine checks and small fixes save a full rip-out. A little preventive work keeps the adhesive doing its job longer.

Conclusion
Choosing the right setting bed isn’t optional. It determines safety, durability, and how your tile will look for years. When in doubt, prioritize the rules that protect the structure and your investment—proper substrate prep, correct product choice, and following manufacturer instructions.
First, verify substrate compatibility and cure conditions, then confirm whether mortar or thinset is appropriate for the area and tile type; test a small area, clean and prime as required, mix per the spec, maintain proper open time and pot life, use the correct trowel notch, keep the substrate dry and free of debris, and watch for movement or moisture that could undermine adhesion and durability.
Common mistakes to avoid are using mortar in places that need flexibility or moisture resistance, skipping substrate prep or curing, and ignoring code or warranty requirements; always wear proper PPE, test a tiny area before full-scale work, and respect open time, cure time, and temperature limits to prevent failures.
If the substrate is questionable, you’re working over a large area, or code compliance is uncertain, call a professional; sticking with the right method now saves time, money, and headaches later, and you’ll end up with a reliable, long-lasting tile installation. Stay practical, stay cautious, and get it right the first time.
FAQ
When should I avoid replacing thinset with mortar?
If the substrate isn’t solid or is flexing, mortar will crack and tiles will loosen. If your tile layout uses large format tiles or you expect heavy traffic, stick to proper thinset with a good bond. In short, don’t swap to mortar when you need a stable, flat surface for tiles to last.
What’s the difference between mortar and thinset?
Mortar is thick and sticky for masonry work. Thinset is a cement-based adhesive designed for tile and bonds better with a level surface. For most tile jobs, thinset is the right tool, not regular mortar.
Can I replace thinset with mortar on a concrete slab?
On a solid, clean concrete slab you can use the right thinset, not mortar. If you’re forcing mortar because you can’t get a flat surface, you’re asking for gaps and cracks. Always aim for a proper, flat thinset bed instead of mortar on slabs.
What are the risks of using mortar for tile beds?
Tiles can crack or pop loose when mortar isn’t designed for tile bonding. Mortar can shrink, warp, or not bond evenly, leading to failures over time. Save yourself the call-backs and use the correct thinset for tile work.