
Introduction
Mastic is a flexible, premixed adhesive that some DIYers use for lightweight backsplashes.
Thinset is a cement-based mortar that needs mixing and longer cure times. For most reliable backsplashes, you should check manufacturer guidance and local rules before choosing.
Key takeaways
- Mastic is easier for small, dry layouts but unsuitable for wet areas.
- Thinset provides superior bonding in wet backsplash zones and moisture-prone walls.
- Use mastic only where splash exposure is minimal and surface is dry.
- If grout lines or tile edges are exposed to water, choose thinset.
- Follow manufacturer instructions and local codes for curing, sealing, and compatibility.
- Wear eye protection and gloves during installation to prevent injuries.
Table of Contents
- Introduction
- Key takeaways
- Quick Overview: What Are Mastic and Thinset?
- Performance Comparison for Backsplash Applications
- Where Mastic Is Safe to Use (Ideal Scenarios)
- Where Mastic Fails and Thinset Is Required
- Installation Considerations and Best Practices
- Tools and Materials Checklist
- Visual Checkpoints and Troubleshooting Common Problems
- Cost, Time, and Environmental Considerations
- Conclusion
- FAQ
Quick Overview: What Are Mastic and Thinset?
Mastic is an organic adhesive used to bond thin materials to walls. It is typically premixed and aims to simplify quick setups for small projects.
Thinset mortar is a cementitious product mixed with water or additives to form a strong, durable bond. It is designed for a wider range of conditions and tile types, with different performance characteristics than mastic.
Mastic — composition and common forms
Mastic adhesive is an organic, polymer-based product. It’s made from a mix of resins, latex, and other additives. You’ll find it in two main forms:
Pre-mixed: Ready to use right out of the pail. No mixing needed.
Powder: Needs water added before use. It’s usually cheaper but requires more effort.
Both types have a working life of around 30 minutes once opened or mixed. Store them properly to extend shelf life.
Thinset — composition and common forms
Thinset is a cement-based mortar, made from cement, sand, and water. It’s often modified with polymers for better performance:
Cement-based: The basic form, good for most tile installations.
Polymer-modified: Has added polymers for improved flexibility and adhesion. Great for heated floors or areas prone to movement.
Additives can change thinset’s properties. For instance, adding latex can improve bond strength but reduce open time.
Performance Comparison for Backsplash Applications
Bond strength and flexibility affect how well a backsplash stays secure on a vertical surface. Different products respond to movement and load in distinct ways.
Water resistance, drying or curing behavior, and heat tolerance influence longevity behind a kitchen splash. Consider how these factors align with your wall conditions and tile choice.
Bond strength and adhesion over tile types
Both mastic and thinset are great for bonding tiles to walls, but their performance varies with different tile types.
Mastic is a versatile adhesive that works well with ceramic and porcelain tiles. It’s also suitable for some natural stone tiles. However, it may not be the best choice for heavy or large format tiles due to its lower bond strength compared to thinset.
Thinset, on the other hand, is a cement-based adhesive designed for heavy-duty applications. It’s ideal for ceramic, porcelain, and natural stone tiles, especially larger formats. Thinset provides superior bond strength, making it a better choice for heavier tiles or areas with high traffic.
For glass tiles, both mastic and thinset can be used, but you’ll need to ensure the tile’s back is well-suited for adhesion. Always check the manufacturer’s recommendations for your specific tile type.
Moisture and humidity resistance
The kitchen and bathroom are high-moisture areas, so it’s crucial to choose an adhesive that can handle damp environments.
Mastic is water-resistant but not waterproof. It can soften or delaminate over time when exposed to prolonged moisture or humidity. This makes it less suitable for areas around sinks or showers where water exposure is frequent.
Thinset, being a cement-based product, is more resistant to moisture and humidity. It won’t soften or delaminate as easily as mastic when exposed to water. However, it’s not completely waterproof either, so proper installation and care are still necessary in high-moisture areas.
In both cases, ensure the substrate is clean, dry, and primed before application to enhance adhesion and moisture resistance.
Thermal tolerance and stove backsplash considerations
Heat from ranges can affect the performance of your adhesive over time, especially in areas like stove backsplashes.
Mastic is not designed to withstand high heat. Prolonged exposure to heat can cause it to dry out and crack, leading to tile delamination. It’s generally recommended to use a heat-resistant mastic for stove backsplashes, but thinset is a better choice for long-term durability.
Thinset is more heat resistant than mastic. It can withstand higher temperatures without drying out or cracking. This makes it an ideal choice for areas behind stoves and ranges where heat exposure is frequent. However, ensure the thinset you choose is rated for high heat applications.
Regardless of your chosen adhesive, always allow tiles to cool before applying grout to prevent heat-related issues.
Where Mastic Is Safe to Use (Ideal Scenarios)
Mastic can be suitable for low-moisture, indoor areas with minimal heat exposure. It works best with small-format tiles and light decorative accents.
Choose mastic when you prioritize ease of use and a quicker setup on uncomplicated backsplashes. Always check the product label or manufacturer instructions to confirm suitability for your wall type.
Indoor, non-wet areas and short tiles
Mastic is a great choice for decorative backsplashes in dry indoor areas. It’s perfect for those small tiles you’re using to add a pop of color or pattern behind your kitchen sink or bathroom vanity.
Here’s why it works:
Less moisture: Mastic isn’t as water-resistant as Thinset, so avoid areas with constant water exposure. But for occasional splashes, like above the countertop, it’s fine.
Easier to work with small tiles: Mastic has a longer open time than Thinset, making it easier to spread and position those tiny mosaic or subway tiles without them falling off.
Temporary installations and light-duty applications
If you’re looking for a quick, easy solution that won’t break the bank, mastic might be your friend. It’s ideal for short-term or non-structural installations.
Here are some situations where mastic shines:
Rentals or temporary spaces: If you’re not planning on staying in a place long-term, using mastic lets you update the look without investing in a more permanent solution like Thinset.
Light-duty applications: For areas with minimal tile weight and no heavy use, like a small backsplash behind a desk or a decorative accent wall, mastic can handle the job.
Where Mastic Fails and Thinset Is Required
Areas exposed to moisture, significant heat, or frequent splashes are settings where mastic is prone to performance issues. Large or heavy tiles also call for a more robust adhesive.
Stone, exterior surfaces, or installations over problematic substrates typically require thinset for reliable bonding. Verify with product data sheets or local building guidance before proceeding.
Wet areas, near sinks, and behind stoves
Mastic can soften and lose its bond in consistently wet or humid conditions. This makes it unsuitable for areas like behind sinks, showers, or around bathtubs.
Indicator: If the area is exposed to water regularly, use thinset instead.
Heat from stoves and cooktops can also degrade mastic over time. So, it’s not recommended for backsplashes behind these appliances.
Large-format tiles and heavy materials
Big tiles or heavy stone can be too much for mastic. It may not provide enough support, leading to sagging or cracking.
- Large format tiles: Look for thinset with high bond strength ratings. Use a notched trowel for better coverage and support.
- Heavy stone or porcelain: Opt for thinset with enhanced polymer modified (EPM) or latex additives for extra strength. Apply using the straight edge of the trowel first, then use the notched side to create grooves.
- Avoid: Using mastic with large format tiles or heavy materials can lead to weak bonds and installation failures.
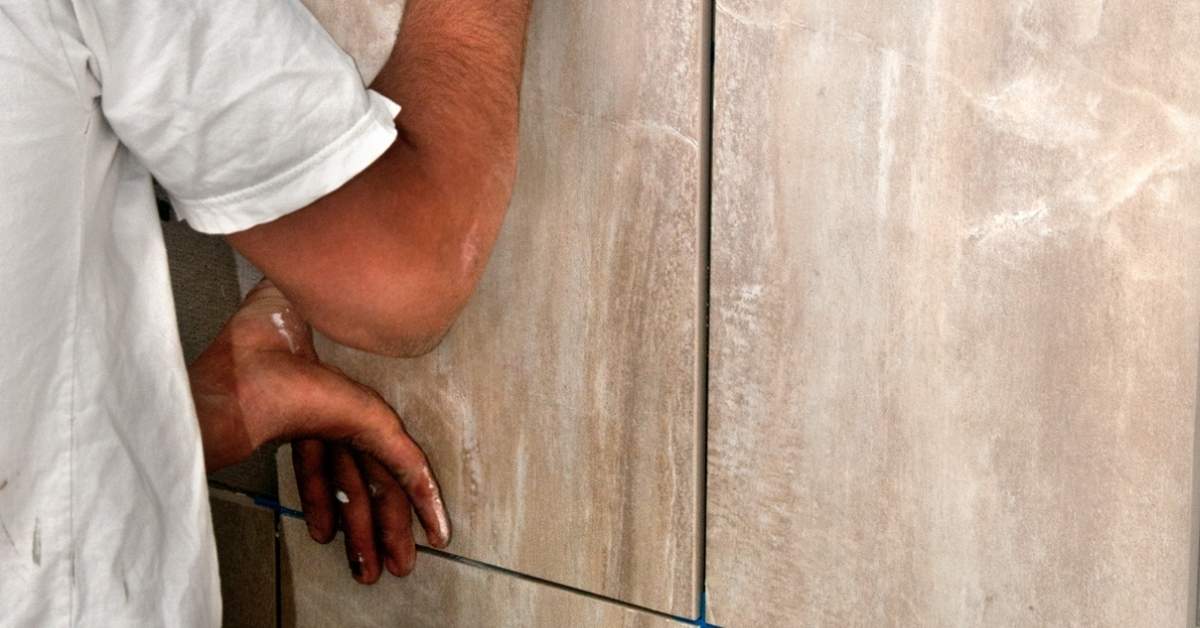
Installation Considerations and Best Practices
Prepare the substrate properly and ensure a clean, flat surface before applying adhesive. Follow a consistent tiling pattern to avoid voids behind tiles.
Use the recommended trowel size and allow appropriate curing or drying according to the manufacturer instructions. Plan for expansion joints where required by local rules or project scope.
Substrate Preparation and Priming
Before you start tiling, prep your substrate right. It’s the key to a strong bond.
Drywall: Use a primer-sealer combo to block moisture and create a better bond. Apply it evenly with a paintbrush or roller.
Cement board: No need for priming here. Just make sure the surface is clean, dry, and free of any debris.
Existing tile: Remove any loose tiles, fill cracks with thinset, let it cure, then prime to improve adhesion.
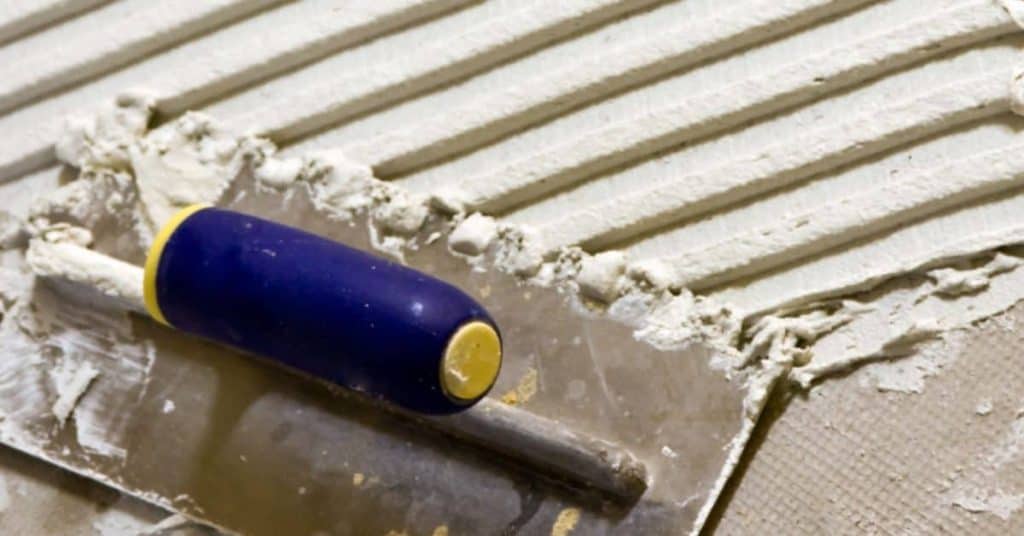
Trowel Size, Adhesive Coverage, and Float Techniques
Choose the right trowel for your tile. The notch size should match your tile’s back profile.
For small tiles (under 6″): use a 1/4″ or 3/16″ V-notch trowel.
For large tiles: go for a 3/8″ or 1/2″ square-notch trowel. This ensures full coverage and better adhesion.
Apply the adhesive, then use your float to spread it evenly. Work in small sections at a time.
Grout, Sealing, and Movement Joints
After tiling, grout fills the gaps between tiles. Choose a sanded or unsanded grout depending on your tile joint size.
For porous tiles: seal them before grouting to prevent staining. Apply the sealer with a paintbrush or spray bottle.
Lastly, install movement joints every 1/4″ to 3/8″. This lets your tile installation expand and contract without cracking.
Tools and Materials Checklist
Gather basic tools for measuring, mixing (if needed), and applying adhesive, plus safety gear. Have a level, spacers, and a notched trowel on hand for accurate coverage.
Keep the product data sheets, labeling, or manufacturer instructions handy to confirm substrate compatibility and curing guidance. Include both mastic and thinset options if you anticipate multiple scenarios.
For mastic installations
Use this checklist for installing backsplashes using mastic. Mastic is ideal for light-duty, indoor, non-wet areas.
- Mastic: Choose a quality, latex-based mastic designed for ceramic tile.
- Trowel (notched): A 3/16″ or 1/4″ notched trowel is usually sufficient.
- Safety glasses: Protect your eyes from debris.
- Gloves: Use to protect hands and improve grip.
- Knee pads: For comfort during installation.
- Ventilation: Ensure the area is well-ventilated. Mastic fumes can be strong.
- Tile spacers: Use to maintain even grout lines.
- Level: Check tiles for level before pressing into place.
Quick rule: Always follow manufacturer’s instructions for specific product use and safety guidelines.
For thinset installations
Use this checklist for installing backsplashes using thinset. Thinset is ideal for wet areas, heavy tiles, and long-lasting durability.
- Thinset mortar: Choose a polymer-modified thinset for added flexibility and strength.
- Mixer (drill-powered): A mixing paddle attachment for your drill makes quick work of mixing thinset.
- Trowels (square & notched): Use a 1/4″ or 3/8″ square trowel and a matching notched trowel.
- Safety glasses: Protect your eyes from debris.
- Gloves: Use to protect hands and improve grip. Thinset can be harsh on skin.
- Knee pads: For comfort during installation, especially with large-format tiles.
- Level: Check tiles for level before pressing into place.
- Setting bed (if needed): For heavy tiles or uneven surfaces, use a setting bed to improve adhesion and support.
Quick rule: Always follow manufacturer’s instructions for specific product mixing, application, and safety guidelines.
Visual Checkpoints and Troubleshooting Common Problems
Look for gaps, loose tiles, or adhesive bleed-through during installation. Address misalignment before grout or sealing stages begin.
Signs of failure may include cracking, hollow sounds, or peeling edges after setting. Use the manufacturer guidance to determine remediation steps or when to replace affected tiles.
Early signs of bond failure
The sooner you catch bond issues, the easier they are to fix. Here’s a quick checklist.
- Hollow sounds: Tap tiles gently with a wooden block. A hollow sound means poor bonding.
- Tile movement: Gently wiggle tiles. Any movement indicates weak adhesion.
- Discoloration: Look for dark spots or lines behind tiles, which could signal moisture and bond failure.
- Cracking grout: Cracks in grout can indicate underlying bond issues.
- Warping: Warped tiles might mean the adhesive underneath has failed.
- Peeling edges: Tiles peeling away from walls or floors need immediate attention.
- Mold or mildew: These can grow where moisture is trapped due to bond failure.
- Uneven surfaces: Tiles that feel bumpy or uneven might have lifted slightly.
Quick rule: If you find any of these signs, don’t wait. Re-tile and re-adhere immediately to prevent further damage.
Repairs and retrofit strategies
When bond failure happens, here’s how to fix it.
- Delaminated tiles: Remove any loose tiles carefully. If the adhesive is still sticky, switch to thinset for re-adhering.
- Wet areas: Always use thinset in wet areas like behind sinks or showers. Mastic won’t hold up.
- Heavy tiles: For large-format or heavy tiles, use thinset. Mastic might not be strong enough.
- Substrate damage: If the substrate is damaged, remove all old adhesive and re-prep before re-tiling with thinset.
- Switch to thinset: If you’ve been using mastic and it’s failing, switch to thinset for any repairs or new installations.
- Remove old adhesive: For severe bond failure, remove all old adhesive down to the substrate before re-tiling.
- Prime the surface: Before re-applying adhesive, prime the surface to improve adhesion.
- Use appropriate trowel: Use a square-notched trowel for thinset. For mastic, use a V-notched trowel (if you’re still using it).
Quick rule: Always address bond failure promptly and thoroughly to prevent further damage and costly re-dos.
Cost, Time, and Environmental Considerations
Evaluate the relative material costs and labor implications for each adhesive type. Time factors vary with cure or dry times and your project schedule.
Consider VOC content, disposal requirements, and environmental impact as part of a responsible installation plan. When in doubt, consult local guidelines and product labels for compliance details.
Cost and time trade-offs
Upfront, mastic is cheaper than thinset. But remember, you get what you pay for.
Mastic: Around $20 per 10 sq ft bucket. Easy to apply, quick drying. But it’s not as durable or flexible.
Thinset: Around $35 per 46 lb bag. More labor-intensive, slower drying. But it’s tougher, more water-resistant, and has better grab.
Mastic might save you money upfront and get you done faster. But thinset could save you repairs down the line.
Health and environmental factors
Both mastic and thinset have their own health and environmental considerations.
Mastic: High VOC content. You’ll need good ventilation when applying. Dispose of according to local regulations, usually with regular trash.
Thinset: Lower VOCs than mastic. Still, keep the area well-ventilated. Thinset can be recycled or disposed of in construction waste, depending on your area’s rules.
Neither is perfect, but thinset has the edge on health and environmental impact.
Conclusion
Choose the right adhesive for the job first, because durability and a clean look depend on understanding where mastic is safe and where thinset is required. Prioritize safety and test a small area before committing to the full backsplash to avoid costly mistakes.
Make the decision by checking the substrate and exposure: confirm the wall is dry and sealed, verify the backsplash height and style, and then proceed in practical steps—prep the surface, mix or mixless as the product dictates, apply with steady pressure, set or cure as recommended, and finish with a simple grout or sealant plan that suits the chosen method.
Avoid these common missteps: using mastic in wet or high-heat areas, skipping careful surface prep, and rushing the cure time. Follow rules of thumb like “test first, use the correct setting for the environment, and respect cure times” to keep the project safe and durable. Always wear basic safety gear and work in a well-ventilated space, and verify the repair area is clean and dry before sealing or grouting.
If the project faces unusual substrates, long spans, or extensive moisture exposure, consider bringing in a pro. When in doubt, pick the safer option and plan for a small, controlled trial first—your backsplash will look and last longer for it.
FAQ
Can I use mastic for a kitchen backsplash over a standard drywall surface?
This depends on the product label. Check the manufacturer instructions to see if it’s rated for vertical, high-moisture areas. If in doubt, default to a adhesive like thinset that’s specified for backsplashes.
What should I check before choosing mastic or thinset for a backsplash?
Look at the product label for suitability in wet areas and for porcelain or ceramic tiles. Confirm the tile type and surface you’re tiling onto. Local rules or manufacturer guidelines will tell you what’s allowed.
Why does mastic fail in some backsplash setups?
Mastic can soften with water, heat, or steam. It may not bond well to certain backer materials or on uneven surfaces. If your area is wet or prone to splashes, thinset is a safer choice.
What are practical alternatives if I’m unsure about mastic?
Use a thinset mortar that’s labeled for backsplashes and tile type. Follow the label for mixing and curing; skip mastic and save trouble if you’re unsure about moisture or heat exposure. Always verify with the tile manufacturer and local guidelines.