
Introduction
Rebar is primarily steel, with common variants including epoxy-coated and stainless options for specialty uses.
This article explains the materials, the general production steps, and the mistakes to avoid so you can choose the right type and install it correctly.
You’ll learn how to assess material options, follow practical steps for handling and placement, and spot everyday pitfalls in typical projects.
Key takeaways
- Select rebar grades and coatings based on exposure, environment, and load demands.
- Follow step-by-step manufacturing notes to verify manufacturer marks and bend allowances.
- Check material specs against code standards before purchase and installation.
- Choose rebar size and layout per structural plan, spacing and cover requirements.
- Apply appropriate coatings and corrosion strategies for soil, moisture, and chlorides.
- Inspect supports, couplers, and ties during installation to prevent movement.
Table of Contents
- Introduction
- Key takeaways
- Rebar materials and types explained
- How rebar is manufactured — step-by-step
- Material specs, standards, and code compliance
- Choosing the right rebar size and layout for your project
- Corrosion, coatings, and longevity strategies
- Installation process — best practices and step-by-step guide
- Common mistakes to avoid when working with rebar
- Costs, sustainability, and environmental impact
- Conclusion
- FAQ
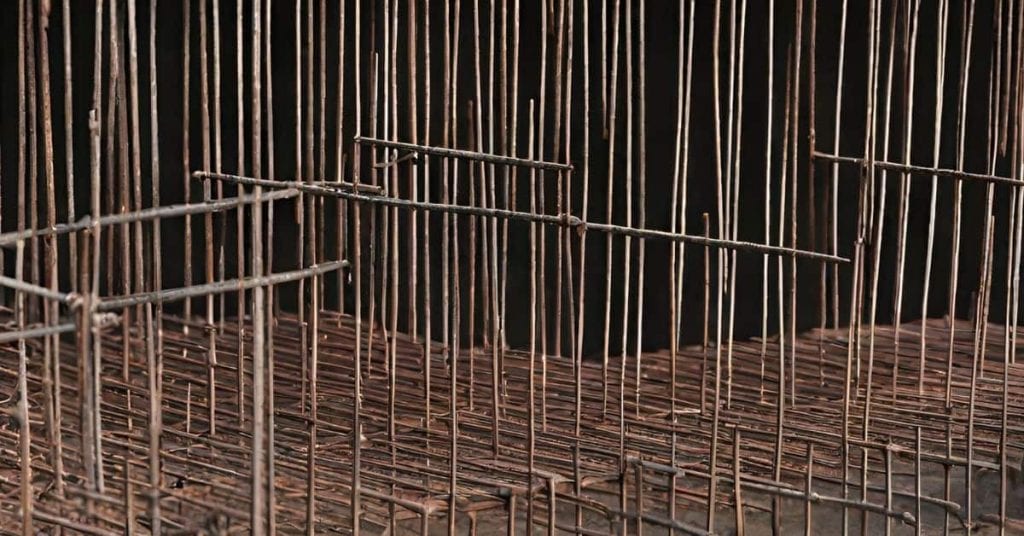
Rebar materials and types explained
This section covers the common rebar materials—carbon steel, stainless steel, epoxy-coated, galvanized, and fiberglass/GFRP—and what they offer in terms of corrosion resistance and strength. Understand where each type shines or struggles indoors, outdoors, or in harsh environments, and roughly how long it tends to last in concrete.
In practice, choose based on exposure, structure load, and concrete cover, and beware coating damage during fabrication and placement. Use simple checks: match coatings to conditions, plan for compatible couplers or lugs, and know when to consult the specs or a pro. Always read the product label or datasheet for specifics.
Carbon steel and grade classifications
Carbon steel rebar is the most common type used on construction sites. It’s made from a mix of iron and carbon, with small amounts of other elements like manganese to improve strength and durability. The numbers you see next to ‘grade’—like 40 or 60—refer to its yield strength in kilopounds per square inch (ksi). A grade 60 rebar is stronger than a grade 40.
Grade 40 rebar is used for less demanding projects, like sidewalks and low-rise buildings. Grade 60 is more common for structures that need extra support, such as bridges or high-rises. The higher the number, the better it can handle heavy loads without bending or breaking.
When choosing carbon steel rebar, make sure you know the exposure class of your project. This will help you pick the right grade and thickness to match the structural load and environmental conditions. For example, if your building is in a salty coastal area, you might need higher-grade rebar with better corrosion resistance.
Coated and corrosion-resistant options
For areas prone to harsh conditions like saltwater or chemicals, coated and stainless steel rebars are a safer bet. Galvanized rebar is covered in zinc to protect against rust. Epoxy-coated rebar has an extra layer of epoxy for even better protection.
Stainless steel rebar is the most resistant but also the priciest option. It’s ideal for marine environments or places with high chemical exposure, like swimming pools or industrial plants. Glass Fiber Reinforced Polymer (GFRP) rebar is another choice that doesn’t rust at all and can handle extreme temperatures.
Each type has its pros and cons. Galvanized rebar is cost-effective but may not last as long in very corrosive settings. Epoxy-coated rebar offers good protection but requires careful handling to avoid damaging the coating during installation. Stainless steel is highly durable but expensive, while GFRP is lightweight and non-corrosive but can be tricky to work with.
Specialty rebars (high-strength, deformed patterns)
Deformed rebar has ridges or other surface textures that improve its grip on concrete. Smooth bars are used less often because they don’t bond as well with the surrounding material. High-strength alloys like Grade 100 offer even more resistance to bending and breaking under heavy loads.
The pattern of deformations can vary, but common types include ribbed or helical shapes. These patterns increase friction between rebar and concrete, making them ideal for critical structures where stability is key. High-strength rebars are used in projects that require extra reinforcement, such as skyscrapers or bridges.
When selecting specialty rebars, consider the specific needs of your project. For instance, if you’re working on a bridge over water, you might need both high-strength and corrosion-resistant rebar to ensure longevity and safety. Always follow manufacturer guidelines for installation to avoid issues like coating damage or improper anchoring.

How rebar is manufactured — step-by-step
Rebar starts as scrap steel or billets. It is melted in a furnace, refined, and then cast into shapes that feed the rolling mill. The hot rolling and thermomechanical work give ribbed rebar, and finishing steps add the final texture and dimensions.
For a DIY job, knowing the chain from melting to finishing helps you choose a reliable product and spot red flags like rough surface or uneven diameter. It matters because finishing, testing, and labeling tell you if the rebar will perform under load and bond with concrete. Also pay attention to safety and environmental considerations on the jobsite and ask about traceability from batch to batch.
Step-by-Step Process
This sequence outlines the practical steps to manufacture rebar, ensuring quality and safety from start to finish.
- Preparation: Set up the electric arc furnace or basic oxygen furnace for melting. Check all equipment is in good working order before starting.
Ensure proper ventilation and protective gear are ready. - Melting: Add scrap steel or billets to the furnace, heat until molten. Monitor temperature closely using thermocouples.
Keep an eye on impurities like sulfur and phosphorus levels. - Casting: Pour molten steel into molds for continuous casting, forming billets or blooms. Ensure even cooling to avoid cracking.
Inspect the castings for any defects before moving to rolling. - Rolling: Feed billets through hot-rolling mill at high temperatures to form rebar sections with ribs and desired diameter.
Check that the ribbed pattern is consistent across each bar. - Treatment: Apply thermomechanical treatment, quenching or tempering as needed. This step hardens the steel for better strength properties.
Inspect bars for surface quality and dimensional accuracy before moving to finishing. - Finishing: Clean rebar surfaces with sandblasting or grinding to remove any imperfections. Apply protective coating if required.
Label each bar with grade, size, and manufacturer information.
Melting and Casting: Raw Material to Billets
The choice of starting materials—scrap steel or iron billets—affects the final quality of rebar. Scrap steel is cost-effective but requires careful refining.
- Material selection: Use clean scrap steel with low impurities for better results.
Avoid rusty or contaminated material to prevent weak spots in the finished product. - Melting process: Heat scrap in an electric arc furnace until fully molten. Monitor temperature closely.
Keep sulfur and phosphorus levels under control to avoid cracking during casting. - Casting setup: Pour molten steel into molds for continuous casting, forming billets or blooms.
Ensure even cooling to prevent porosity or cold shuts in the castings.
Hot Rolling, Deformation, and Surface Patterning
The hot-rolling process shapes billets into rebar with specific diameters and deformations that enhance concrete bond strength.
First, feed the billet through a series of rolling mills at high temperatures to form the desired diameter. The temperature must be just right—too cold and it cracks; too hot and it’s soft.
Next, apply deformation patterns such as ribs or hooks using specialized rollers. These deformations increase friction with concrete, improving grip strength.
Finally, grind the surface to achieve a consistent texture that helps in bonding better with concrete. This step also removes any imperfections from rolling.
Heat Treatment, Quality Control, and Marking
After rolling, rebar undergoes heat treatments like quenching or tempering to enhance its mechanical properties. This step is crucial for achieving the required strength.
Inspect each bar using tensile tests to ensure it meets the specified yield and ultimate strengths. Also perform bend tests to check flexibility without breaking.
Label each rebar with grade, size, and manufacturer information before shipping. Proper labeling ensures traceability from batch to lot, maintaining quality control throughout.
Material specs, standards, and code compliance
Rebar specs come from major standards like ASTM, AASHTO, and relevant EN rules, and knowing which one applies is the first step for any DIY frame, footing, or slab project. You’ll learn to map those standards to your job, read the marks on coils or bars for grade, diameter, deformation, coating, country of origin, and lot numbers, and understand when plain, deformed, epoxy-coated, galvanized, or stainless bars are required by code or by the project documents. The goal is to translate the language on the label into practical material choices so you don’t mix mismatched bars on site or miss a requirement.
Knowing the supporting documents behind the material helps you verify you’re buying what the plan calls for and spot red flags early, from the wrong coating for exposure to missing traceability or insufficient documentation. This matters because minimum cover, correct spacing and spacing tolerance, bend radii, and who does the inspection are not optional; a small slip here becomes a big problem at pour time. Keep the supplier certificates handy, check melt or lot tests where provided, and compare what you’re getting with the project specs and standard tables before you install.
Key ASTM/AASHTO/EN standards to know
TheASTM A615 and A706 cover the most common rebar types, specifying requirements for carbon steel bars. For epoxy-coated rebars, look at ASTM A775. These standards ensure your rebar meets strength and durability criteria.
TheAASHTO M180/M294 standard is crucial for highway construction in the U.S., setting guidelines similar to ASTM but tailored specifically for road projects. In Europe, EN 10080 covers rebar requirements and ensures compatibility with international standards.
Understanding these standards helps you pick the right grade of rebar based on your project needs. For instance, if you’re building in a corrosive environment like near saltwater, go for epoxy-coated or stainless steel rebars as specified by A775.
How to verify rebar meets specs on site
To ensure your rebar is up to code, start with the mill markings. These marks tell you the grade and size of the bar. Look for clear labels like A615 Grade 42 or A706 Grade 60.
Next, check the supplier’s certificates. They should include melt/lot tests that prove your rebar meets ASTM standards. If you’re unsure, ask for a copy of these documents.
Do a visual inspection to spot any defects or inconsistencies in the bar’s surface and deformations. Simple field tests like bending can also help identify if the rebar is too brittle or soft.
Code considerations for exposure and cover requirements
The environment your building will be in plays a big role in choosing the right rebar. For example, if you’re constructing near saltwater or in an area with high humidity, use epoxy-coated rebars to prevent corrosion.
The concrete cover thickness is another critical factor. This is the layer of concrete surrounding the rebar and acts as a protective barrier against environmental elements. The ACI 318 code specifies minimum cover requirements based on exposure conditions.
Design loads also influence your choice. Heavier loads might require higher-strength rebars, like Grade 60 instead of Grade 42. Always refer to the project documents and consult with a structural engineer if you’re unsure about load-bearing capacities.
Choosing the right rebar size and layout for your project
Choose rebar sizes based on expected loads, span, and concrete element type (slab, beam, column, footing). Use the common sizes like #3, #4, or #5 as a quick guide, and match spacing and layout to the element you’re building. For any exact numbers, check the label/datasheet or local guidance and don’t guess.
Keep the rebar layout clean to maintain proper load transfer paths, with attention to minimum cover and appropriate lap splices or connectors where needed. Plan chair spacing, avoid bar buckling, and keep bars clean and accessible for placement and compaction. For exposed works or corrosion-prone projects, consider coatings or protective options and adjust for any unusual loads or dynamic forces.
Selecting diameter and grade for beams, slabs, and footings
Choosing the right rebar size starts with understanding your project’s load requirements. For a typical residential slab on grade, #4 or #5 bars are usually sufficient, but check local building codes and consult an engineer if you’re unsure. Beams and columns need more robust reinforcement; use #6 or higher for spans over 10 feet.
Grade selection is also critical. Grade 60 rebar is standard in most residential construction due to its strength-to-weight ratio, but grade 42 might be adequate for non-structural elements like footings if local codes permit it. Always verify your choice with a structural engineer or the building inspector.
Remember, rebar size and spacing are directly tied to concrete cover requirements. Ensure you maintain at least 1.5 inches of concrete above and below rebar for proper protection against corrosion and environmental factors.
Splicing, anchorage, and bend requirements
Lap splices are used to connect rebars within a concrete element. For beams and columns, lap lengths should be at least 40 times the rebar diameter for grade 60 steel. Mechanical couplers offer an alternative by providing a secure connection without the need for long laps.
Development length is crucial for transferring loads effectively from one bar to another. This can vary based on the type of load and whether you’re using lap splices or mechanical couplers. Always refer to your local building codes or consult with a structural engineer to determine the correct development lengths.
Bends in rebar are specified by their angle and radius, typically noted as 90 degrees with a 4-inch bend diameter for standard applications. Ensure that all bends are smooth and continuous without sharp kinks, which can weaken the bar’s integrity.
Visual checkpoints during layout and tying
Before pouring concrete, conduct a thorough visual inspection of your rebar layout to ensure everything is in place according to plans. Use this checklist:
- Rebar alignment: Check that all bars are straight and parallel. Misaligned bars can cause weak spots.
- Tie spacing: Ties should be placed every 12 inches along the length of each bar, with additional ties at corners and around openings.
- Chair placement: Chairs must support rebar evenly without allowing it to sag or shift. Inspect chair positions for proper elevation.
- Cover measurement: Use a cover gauge to verify that the concrete cover is consistent across all bars, ensuring at least 1.5 inches above and below.
- Bend accuracy: Confirm that all bends are smooth with no sharp edges or kinks.
Quick rule: If any of these checks fail, address them immediately to prevent structural issues down the line.

Corrosion, coatings, and longevity strategies
Corrosion in rebar starts when moisture and chlorides reach the steel inside concrete, and carbonation can erode the protective surface layer over time. As the rebar rusts, it expands and pushes against the surrounding concrete, which leads to cracking, spalling, and a weakening of the structure that allows more water in. Look for signs like hairline cracks, peeling concrete, rusty stains, or spalling near joints as practical indicators you shouldn’t ignore.
Several factors speed this up, including how exposed the project is to moisture and salt, how much concrete covers the steel, cracking, and how well curing was done; these are things you can assess with a careful look and simple checks before and after pours. For DIY projects, weigh coating and protection options such as epoxy coatings, epoxy-coated casings, or even choosing stainless or galvanized components when longevity matters more than upfront cost, and remember that some choices fit small repairs while others suit larger builds. Long-term success comes from keeping adequate cover, using a proper mix and curing approach, controlling cracks, applying sealants or penetrating sealers, managing moisture, and inspecting regularly—and don’t hesitate to bring in a professional for advanced protection methods if you notice ongoing trouble.
Causes and signs of rebar corrosion in concrete
Rebar corrodes when moisture, chlorides from salt or seawater, and carbon dioxide penetrate the concrete. These elements cause rust to form on the steel, leading to expansion that cracks and spalls the surrounding concrete.
Signs of corrosion include rust stains, cracking around rebar, and exposed metal. Over time, this can weaken structures by reducing the cross-section of the reinforcing bars, compromising structural integrity.
To prevent corrosion, ensure proper cover depth to protect the rebar from environmental factors. Check for cracks early on and address them promptly to avoid further damage.
Protective measures: material choice, coatings, and concrete design
Selecting the right materials is crucial for preventing rebar corrosion. Use galvanized or epoxy-coated bars in areas with high chloride exposure.
- Galvanized coating: Provides a zinc layer that resists rust; look for AASHTO M 189; avoid using in acidic environments.
- Epoxy coating: Offers excellent barrier protection; check for ASTM A767 rating; apply correctly to prevent chipping.
- Stainless steel rebar: Resists corrosion better than carbon steel; suitable in marine environments; ensure proper anchorage and detailing.
- GFRP (Glass Fiber Reinforced Polymer): Non-corrosive alternative for critical areas; check ASTM D7934; avoid overloading due to lower tensile strength.
Inspection and repair techniques for corroded rebar
Regular inspections are key to catching corrosion early. Use this checklist when assessing your structure:
- Visual inspection: Look for rust stains, cracks; confirm by probing with a screwdriver.
- Concrete cover depth: Measure from surface to rebar; ensure it meets code requirements.
- Patch damaged areas: Use hydrophobic sealants or epoxy injections; avoid leaving exposed concrete.
- Cathodic protection: Consider for severe cases; consult a professional for installation.
- Replace corroded rebar: Cut out and replace if necessary; ensure proper anchorage.
Quick rule: Address corrosion early to prevent further damage and maintain structural integrity.
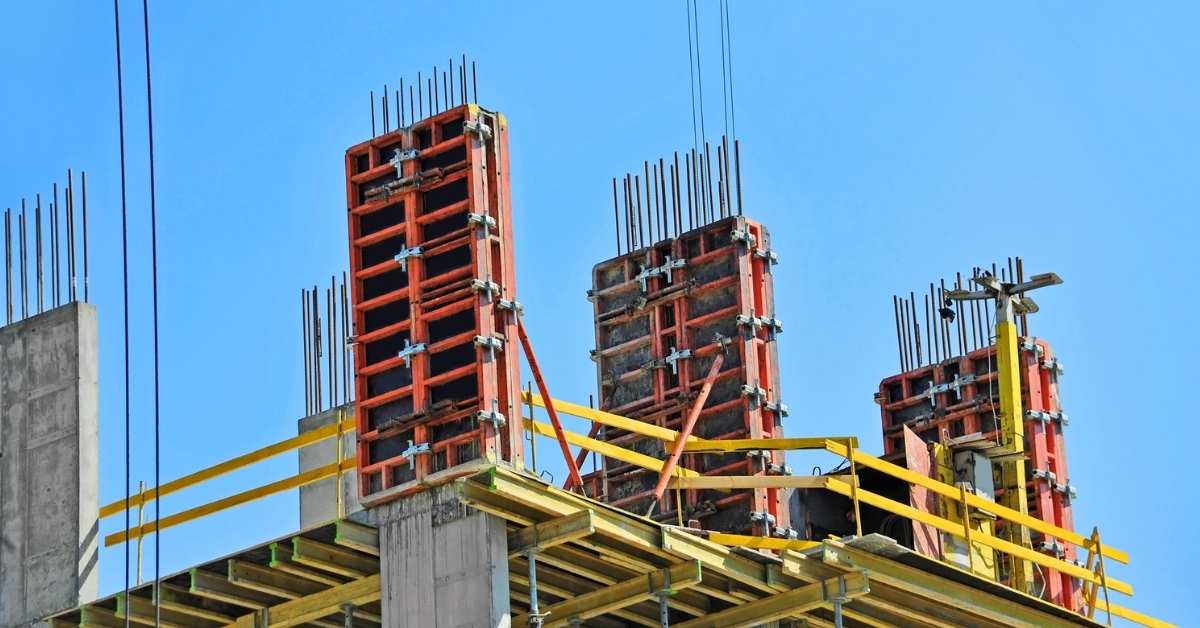
Installation process — best practices and step-by-step guide
This section walks you through storing, moving, cutting, tying, bending, and inspecting rebar before a concrete pour. You’ll see a practical sequence from site storage to final checks that you can actually follow. Keep it simple, safe, and plan overlaps and support so the reinforcement stays in place during the pour.
Step-by-Step Installation Process
This sequence ensures your rebar is properly installed and ready for the concrete pour.
- Inspect all rebar upon delivery to ensure it meets specifications. Use gloves when handling galvanized or epoxy-coated bars to avoid skin irritation.
- Lay out rebar according to plans, using spacers or chairs to maintain proper cover and alignment. Double-check spacing with a tape measure.
- Cut rebar accurately using a hacksaw or rebar cutter. Bend as needed but keep bends smooth and within code limits to avoid weakening the bar.
- Tie rebar securely with wire, ensuring knots are tight without over-tightening which can deform bars. Use double-twist knots for stability.
- Finalize layout by checking all overlaps, anchor points, and continuity before concrete is poured. Adjust any loose or misaligned pieces immediately.
Handling, storage, and cutting/bending best practices
Proper handling prevents damage and contamination of rebar. Store it off the ground on wooden supports to avoid rusting or bending.
Use gloves when moving galvanized or epoxy-coated bars to prevent skin irritation and wear protective eyewear during cutting operations. Ensure you have a hacksaw, bolt cutters, or a rebar cutter for accurate cuts.
When bending rebar, use a manual bender or hydraulic press to maintain consistent bend radii without weakening the material. Always check your work with a measuring tape and visual inspection before proceeding.
Tying, supports, and ensuring correct concrete cover
Use wire ties to secure rebar intersections tightly but avoid over-tightening which can deform the bars. Ensure ties are evenly spaced for stability.
Place spacers or chairs at regular intervals to maintain proper concrete cover as specified in your project plans. This prevents corrosion and ensures structural integrity.
Before pouring concrete, double-check all rebar spacing and alignment using a tape measure and visual inspection. Adjust any loose pieces immediately to avoid issues during the pour.
Coordination with concrete placement and vibration
Maintain constant communication between rebar installers and concrete workers to prevent displacement of reinforcement. Ensure all ties are secure before starting the pour.
Use a vibrator to consolidate concrete around rebar without causing movement or damage. Avoid over-vibrating which can lead to segregation and weaken structural integrity.
After pouring, conduct a final inspection to ensure proper cover and alignment. Address any issues immediately to prevent long-term problems such as corrosion or reduced strength.
Common mistakes to avoid when working with rebar
Common mistakes with rebar come down to five trouble areas: getting the right gauge and cover, keeping bars lined up and elevated during the pour, and protecting coatings from damage, plus making correct laps and tying so the bars stay continuous as concrete goes in. If any of these slip, you’ll get weak zones, surface cracks, or exposed steel that can rust and shorten the life of your slab. Do not guess—verify that your spacing, cover, and alignment match what your plan calls for and what the manufacturer label recommends for coatings and bending.
Understanding why these details matter helps you avoid costly re-dos. Poor placement or movement during pouring leads to honeycombing and uneven strength, while damaging galvanized or epoxy coatings invites corrosion and premature failure; improper laps or ties can separate bars under load, and grinding or bending can ruin protective finishes. Take simple, practical steps: set up proper chairs and spacers, protect coatings during cutting and handling, follow sane splice patterns and secure ties, and pour in lifts with careful vibration to collapse voids without shifting bars. If you’re unsure about a specific requirement, check the product label or datasheet and follow local guidance.
Wrong material or grade selection
The right rebar grade and coating can mean the difference between a strong, long-lasting structure and one that fails prematurely. Here are some common mistakes to avoid:
- Select by code. Use rebar grades specified in your local building codes for beams, slabs, or footings; this ensures structural integrity.
- Avoid substitutions. Never substitute a lower grade of rebar without consulting an engineer; it can lead to weak points and cracks.
- Check coatings. Use galvanized or epoxy-coated rebar in corrosive environments, as plain steel will rust faster and weaken the structure.
- Verify ratings. Look for the grade markings on each bar; failing to do so can result in using an incorrect material that doesn’t meet structural requirements.
- Avoid over-specification. Using higher-grade rebar than needed wastes money and adds unnecessary weight without improving performance significantly.
Improper placement, insufficient cover, or inadequate splices
Misplaced rebar can lead to weak spots in your concrete structure. Ensure proper spacing and alignment for maximum strength.
Inadequate cover is another common mistake that exposes the rebar to corrosion from moisture and chemicals, reducing durability over time.
Improper splices weaken structural integrity by failing to maintain continuity between sections of rebar. Always follow code requirements for lap lengths and tie patterns to ensure a strong bond throughout your structure.
Damaging coatings, rough handling, and poor inspection
Before installing rebar, inspect it carefully for any damage or defects that could compromise its performance. Here’s a quick checklist:
- Check packaging. Ensure the rebar is not stored on bare ground; this can scratch coatings and expose steel to corrosion.
- Look for dents. Inspect each bar for any signs of physical damage during transport or handling that could weaken its integrity.
- Verify mill certificates. Confirm the rebar meets all required specifications before installation; this ensures compliance with building codes and standards.
- Avoid sharp tools. Use soft-cutting blades when cutting epoxy-coated bars to prevent damaging protective coatings.
- Handle gently. Avoid dropping or rough handling that can scratch the surface, exposing rebar to corrosion.
Quick rule: Always handle rebar with care and inspect it thoroughly before installation to avoid costly repairs later on.
Costs, sustainability, and environmental impact
Costs vary by rebar type: plain carbon steel is usually cheapest upfront, while epoxy-coated, galvanized, stainless, and fiber-reinforced polymer add material cost but can reduce maintenance and longer life in tough environments. Lifecycle costs depend on corrosion risk and maintenance needs; some options pay off in harsh soils, others are fine in mild conditions. Environmental factors matter: embodied energy, recyclability, coatings, and end-of-life handling differ.
For DIY folks, consider handling and installation: some materials bend easily, others require special tools and waste management. Check the label or datasheet for recommended exposure, and use a qualitative rule-of-thumb if you can’t find exact numbers. Choose based on project type, exposure conditions, and total cost of ownership, and plan for disposal per local rules.
Price comparison and lifecycle cost considerations
The initial cost of rebar can vary widely depending on the material type. For instance, plain carbon steel is usually the cheapest option upfront, but it comes with higher maintenance costs due to its susceptibility to corrosion. Epoxy-coated rebar offers better protection against rust, which means lower long-term repair and replacement expenses.
When you factor in labor and installation costs, the choice becomes clearer. Stainless steel rebar is more expensive initially but requires less frequent inspections and has a longer lifespan, reducing overall maintenance needs over time. Fiber-reinforced polymer (FRP) can be cost-effective for certain applications where corrosion isn’t an issue, like dry environments or non-structural elements.
Understanding these lifecycle costs helps you make informed decisions. For example, if your project is in a highly corrosive environment like near the ocean, investing in epoxy-coated rebar might save money over time by preventing costly repairs and replacements down the line.
Rebar recycling, embodied carbon, and greener options
Recycling plays a crucial role in reducing the environmental impact of rebar. Steel rebar can be recycled multiple times without losing its quality, making it an eco-friendly choice compared to materials like fiber-reinforced polymer (FRP) that have higher embodied energy due to complex manufacturing processes.
The production and transportation of steel contribute significantly to carbon emissions. However, using recycled content in steel rebar reduces the need for new raw materials, lowering its overall environmental footprint. Additionally, sourcing locally can help minimize transport-related emissions.
For projects aiming to be more sustainable, consider alternatives like FRP or stainless steel with high recycled content. While these options might have a higher upfront cost, they offer long-term benefits in terms of reduced maintenance and lower carbon footprints over the lifecycle of the structure.
When to choose premium corrosion-resistant options
Premium rebar like stainless steel or epoxy-coated varieties is worth considering for projects in harsh environments where corrosion is a major concern. For example, marine structures near the coast face constant exposure to saltwater and moisture, making them prime candidates for high-end materials.
Similarly, bridges and parking structures are exposed to de-icing salts during winter months, which can accelerate rebar corrosion. Choosing epoxy-coated or stainless steel in these scenarios not only extends the lifespan of the structure but also reduces maintenance costs over time.
In regions with highly acidic soils or high moisture levels, investing in premium options upfront can prevent costly repairs and replacements later on. While these materials come at a higher initial cost, their durability and longevity make them economically viable choices for long-term projects.
Conclusion
The right rebar choice and proper layout protect your project’s safety, durability, and appearance. Get this part right now so you don’t pay the price later with cracks, corrosion, or a failed pour.
First verify you’re using the right rebar type and coating for your environment, then confirm the size and spacing meet the code, plan your layout on the forms, tie or secure as required, place and support the bars, keep corners and intersections clean, and double-check clear cover and pour continuity. Do these steps in sequence and document any deviations from the plan before you pour concrete.
Common mistakes to avoid include undersizing or over-spacing rebar, skipping corrosion protection, neglecting proper cover and supports, and rushing the tie or splice work. Stay safe by wearing gloves, steel-toed boots, and eye protection, lifting heavy bars with a buddy or a hook, and never bending beyond the manufacture’s limits or improvising repairs after the fact. If you’re uncertain about code requirements or complex layouts, don’t push ahead alone—call a professional and get a quick review before you pour. Stay deliberate, follow the plan, and you’ll finish strong with a solid, lasting result.
FAQ
What is rebar made of?
Rebar is metal reinforcing bar used in concrete. It is usually steel, sometimes with coatings or alloys for extra protection. The core idea is to give concrete strength where it cracks.
What materials are used to make rebar?
Most rebar is plain carbon steel. Some types are epoxy-coated, stainless steel, or galvanized for corrosion resistance. For certain jobs, fiber-reinforced polymers are used, but that’s less common on DIY projects.
What are the main steps to install rebar?
Plan the layout and tie the bars together where needed. Elevate the bars off the ground with chairs so the concrete covers them properly. Pour and finish the concrete, then cure it without rapid drying.
What mistakes should I avoid when using rebar?
Avoid placing rebar too close to the edge or letting it rest on the ground. Don’t over-tighten ties or misjudge spacing. Poor placement or skipping covers can lead to weak, cracked concrete and a wasted job.