
Introduction
The timeline and duration of concrete strength development are crucial factors in ensuring the success of your DIY projects. Understanding how long it takes for concrete to gain strength helps you plan your project more effectively, avoid common mistakes, and achieve better results.
In this guide, we’ll walk you through the key stages of concrete strength development, from mixing to curing, and provide practical tips on how to monitor and verify its progress over time.
The Concrete Strength Timeline: Key Stages & Duration
Concrete strength develops in several distinct phases, each with its own duration and significance. Here’s a breakdown of the key stages and their approximate timelines:
- Setting (Initial Set): 30 minutes to 1 hour – During this stage, concrete begins to harden and lose its plasticity.
- Early Strength Gain (First 7 days): Concrete gains about 20-30% of its final strength within the first 24 hours. By the end of the seventh day, it has reached around 50-60%.
- Intermediate Strength Gain (Day 7 to Day 28): Concrete continues to gain strength at a slower pace during this period, reaching about 70-80% of its final strength by the end of the 28th day.
- Final Strength Gain (Day 28 onwards): Concrete continues to gain strength slowly over time. It reaches its full design strength after around 28 days under ideal curing conditions, but this can take longer in real-world scenarios.
Understanding these timelines is essential for planning your project’s schedule and ensuring that concrete has adequate time to cure properly before being subjected to loads or stress.
Key takeaways
The duration of each stage in the concrete strength timeline is influenced by factors such as mix design, water-cement ratio, aggregate type, and curing conditions. Proper planning and preparation before any test can help optimize these factors and ensure that your concrete gains strength at an appropriate pace.
- Understand that higher strength concrete improves load capacity and reduces cracking risk.
- Plan cure conditions early; uneven curing can halve apparent strength outcomes.
- Use proper non-destructive checks like rebound hammer and ultrasonic tests.
- Core extraction provides direct compressive strength readings but involves safety controls.
- Track moisture and humidity with calibrated meters before any strength testing.
- Maturity method and embedded sensors support better pour planning and early strength estimates.
Table of Contents
- Introduction
- Key takeaways
- Why concrete strength matters for DIY projects
- Planning and preparation before any test
- Quick non-destructive on-site checks (fast, DIY-friendly)
- Core extraction and compression testing (most reliable DIY-adjacent method)
- Moisture and humidity: meters, probes, and why they affect strength tests
- The maturity method and embedded sensors for new pours
- Non-destructive testing combos and advanced options
- Safety, common mistakes, and troubleshooting poor results
- Conclusion
- FAQ
Why concrete strength matters for DIY projects
Concrete strength isn’t cosmetic. Verifying strength gives safety margins for family use and traffic, helps durability against cracking and moisture, and keeps you aligned with local specs or manufacturer guidance. For DIY patios, footings, and patches, strength determines load-bearing capacity, when to finish or seal, and whether repairs will hold.
Look for practical cues like cure time and surface hardness, but don’t rely on appearance alone. Weather, slump, and mix variability can mask underlying deficiencies, so use simple checks and postpone heavy loads if strength is uncertain; protect from moisture and wear. We’ll discuss non-destructive tests and pull-off or core checks later to guide your next steps.
Common strength benchmarks and what they mean
Concrete compressive strength is a critical measure for any DIY project. For most homeowner tasks, you’ll find that 2,500 psi to 4,000 psi is the standard range. Lower strengths are okay for non-load-bearing applications like decorative walkways or garden borders.
Around 3,000 psi, concrete becomes suitable for patios and small footings where minor loads will be applied. For more robust structures such as driveways or retaining walls, aim for a higher strength of at least 4,000 psi. This ensures durability against heavy traffic and environmental stress.
Remember, the exact requirements can vary based on local building codes and specific project needs. Always check with your local authorities to ensure compliance.
When testing is necessary versus when visual inspection suffices
Knowing when to test concrete strength can save you from costly mistakes. Here’s a quick checklist:
- Structural repairs: Test if patching load-bearing elements; skipping tests may lead to structural failures.
- Bonding existing slabs: Verify strength before attaching new sections for proper adhesion and stability.
- Mix uncertainty: If unsure about the mix design, test to confirm it meets required standards.
- Heavy load-bearing footings: Essential testing ensures they can support significant weight without failing.
- Water exposure areas: Test for durability against moisture and freeze-thaw cycles in critical locations.
Quick rule: If unsure about the concrete’s ability to handle its intended load, test it before proceeding with further work.

Planning and preparation before any test
Environmental and seasonal considerations
Temperature and humidity play a big role when testing concrete. If it’s too cold, the test results can be off because the concrete hasn’t cured properly yet. On the flip side, if it’s super hot or humid, moisture in the air can affect your readings.
A good rule of thumb is to wait at least 28 days after a pour before testing for strength. This gives the concrete enough time to cure and settle into its final form. If you’re dealing with an older structure, check the weather history to see if there were any extreme conditions that might have impacted curing.
Keep in mind that recent rain or snow can also mess up your test results by adding extra moisture to the surface. Make sure the concrete is dry and free of debris before starting your tests. This way, you get accurate readings every time.
Note: Always check local weather forecasts and plan your testing during a stable period to avoid any unexpected changes that could skew your results.
Permits, codes, and when to consult an engineer
Before you start testing concrete strength on a DIY project, make sure you know the local building codes. Some areas require permits for any structural changes or tests that might affect load-bearing walls or foundations.
If your test area is part of a larger structure like a bridge or high-rise, it’s best to consult an engineer first. They can help determine if DIY testing is appropriate and advise on the necessary steps to ensure safety and compliance with regulations.
Signs that you need professional help include:
– Testing areas that are hard to reach without specialized equipment.
– Structures where the consequences of a weak spot could be catastrophic (like bridges or dams).
– Projects involving heavy loads or high-stress environments.
TIP: Always err on the side of caution and seek professional advice if you’re unsure about any aspect of your project. It’s better to be safe than sorry when it comes to structural integrity.
Quick non-destructive on-site checks (fast, DIY-friendly)
Quick non-destructive on-site checks give you a fast, low-hassle read on concrete strength without damaging the slab. You’ll learn what a rebound hammer, Windsor probe, and simple penetration test can tell you about the surface and near-surface hardening, and you’ll get a sense of whether the material is in the normal range for the area or if readings look off. For each method, expect a lightweight setup, straightforward surface prep, a sequence of readings, and a simple interpretation that you can document and compare over time, while keeping in mind that results are indicative, not a final structural grade.
These tests matter because they help you flag potential issues early and decide if you need formal verification or core sampling later. You’ll gain practical reasons to use them: quick checks after weather events, during repairs, or before you plan a retrofit, with notes on surface conditions, moisture, temperature, decorative coatings, and aging that can skew results. The key is to log where you tested, how you prepared the surface, and the readings, then look for consistency across locations; large variability or readings outside expected bands should trigger a professional assessment or core sampling, while a few outlier readings may just prompt a re-test under better conditions.
Using a rebound hammer safely and reading results
To start, make sure the surface is clean and dry. Place the hammer on the concrete and pull the trigger to release the spring-loaded striker. The rebound distance gives you an estimate of strength based on a scale from 10 to 100.
Watch out for factors that can mess up your readings: moisture, rough or uneven surfaces, and any kind of coating. If it’s wet, wait until it dries. For readings, aim for areas with the same surface condition across similar concrete sections.
The rebound hammer gives you a good idea if the concrete is weak or strong but isn’t exact. A reading around 30 to 40 suggests normal strength; lower means weaker. Higher numbers can mean stronger concrete or just a rougher surface. Always take multiple readings and average them for better accuracy.
Windsor probe and penetration resistance basics
The Windsor probe is simple: you push the instrument into the concrete to measure how hard it is. The deeper it goes, the weaker the concrete. For a handheld penetration test, use a sharp tool like a screwdriver or chisel.
Consistency is key. Make sure your probe or tool penetrates at least 1/4 inch deep for reliable results. Take multiple readings in different spots to get an average strength estimate. This method works best on fresh concrete but can also give you clues about older surfaces if they’re exposed and clean.
Remember, these tests are quick checks—not definitive proof of strength. If the probe goes too far or feels soft, it might mean there’s a problem that needs further investigation by an expert.
Visual and tactile quick checks
Start with your eyes: look for cracks, especially if they’re wide or spreading. Delamination—where layers of concrete peel off—is another sign of weakness. Spalling, where chunks chip away from the surface, also points to issues.
To feel it out, tap the concrete gently with a hammer or screwdriver. A dull thud usually means solid concrete; a hollow sound can indicate air pockets or voids underneath. Also, check how hard the surface feels—softer spots might need more attention.
These checks are quick and don’t require any special tools. They’re great for initial assessments but won’t tell you everything. If something looks off, it’s worth doing a deeper test with a rebound hammer or Windsor probe to be sure.
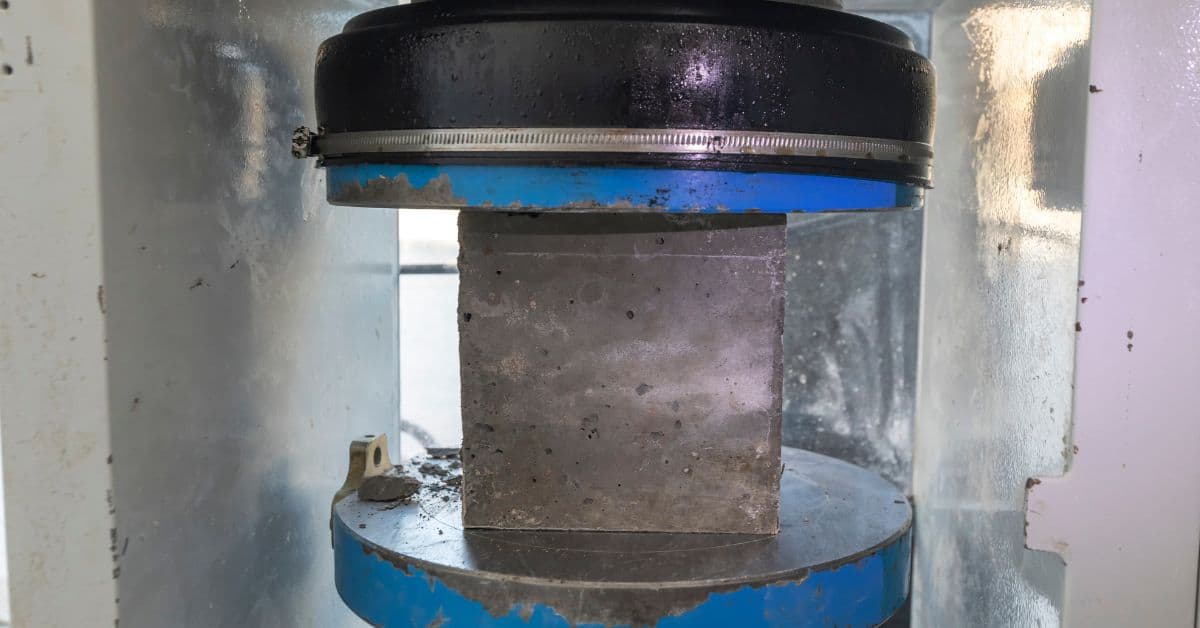
Core extraction and compression testing (most reliable DIY-adjacent method)
Coring concrete to test compression is the most reliable DIY-adjacent method for finding out actual strength. You’ll drill cores (typically 4×8 inches), clean up the edges, cap them for a true bearing surface, and then send them to a lab for UCS testing under established procedures. This workflow gives a direct, measurable result you can trust for existing vs. new work, and it’s the standard many pros rely on.
Expect a careful planning path: get the right permissions, assess site safety, and choose core locations so the sample represents the whole element. You’ll document core orientation, finish irregularities, and curing or moisture conditioning before submission, and you’ll follow lab handling and data requirements with strict labeling. This method costs time and money, but it minimizes guesswork and helps you compare results to project needs while acknowledging variability between cores.
DIY coring considerations and common pitfalls
Avoid these mistakes to ensure your core samples accurately represent the concrete’s true strength.
- Improper safety gear: Wear protective eyewear, gloves, and dust masks. Safety first!
- Inadequate coring equipment: Use a high-quality wet or dry corer with diamond bits for clean cuts.
- Incorrect core size: Stick to standard 4×8-inch cores for reliable testing results.
- Misplaced cores: Place cores in representative areas, avoiding repairs and surface treatments.
Following these guidelines ensures your samples are valid and useful for assessing concrete strength.
Interpreting lab results and age corrections
Understanding the UCS (Unconfined Compressive Strength) report is key to evaluating your concrete’s performance. If the test date doesn’t align with the 28-day standard, adjust accordingly.
If results are lower than expected, consider factors like curing conditions or mix design issues. Consult an engineer if unsure about next steps.
Always document and compare multiple cores for a comprehensive assessment of your concrete’s strength.

Moisture and humidity: meters, probes, and why they affect strength tests
Moisture in concrete slabs is a big deal. It affects how strong the slab will gain its strength, how it cures, how finish work will lay out, and whether tiles or coatings will bond properly. Distinguish between moisture meters and in-situ RH probes: calcium chloride or non-destructive surface meters give you a quick moisture check, while in-situ probes measure the actual humidity inside the slab; check the label or datasheet for exact method and accuracy, and choose based on what you’re testing and what you plan to install.
Use moisture testing at key steps like after a new pour, during or after finishing, before topping or bonding finishes, and after rain or long dry spells. Place probes or perform tests with a representative sampling approach to avoid edge effects, and document how many probes you used and where they were located. When results show elevated moisture or humidity, adjust curing, delay finishing or bonding, consider moisture barriers, and follow the manufacturer guidance for any corrective measures; keep meters calibrated and maintain a simple log to track conditions over time.
Choosing between surface moisture meters and in-situ RH probes
Surface moisture meters, like calcium chloride tests, give you quick readings of the top layer’s moisture content. They’re handy for a fast check but don’t tell you what’s going on deeper down. In contrast, in-situ RH probes, such as those following ASTM F2170 standards, measure relative humidity deep within the slab to predict how much moisture will eventually come out of the concrete.
In-situ RH probes are more accurate for assessing long-term performance and potential issues like delamination or adhesive failure. They’re a bit more invasive since they require drilling holes, but they give you a clearer picture of what’s happening inside your slab. Surface meters are great for quick checks on new pours or before applying finishes, while in-situ RH probes are essential when dealing with moisture-related problems.
Choose surface meters if you need immediate results and don’t mind some uncertainty about deeper layers. Go with in-situ RH probes if you’re looking to ensure long-term stability and want precise data for critical applications like flooring or coatings.
Best practices for moisture measurement and interpretation
To get reliable results, start by selecting representative test locations. Avoid edges and corners where conditions can be different due to exposure. For in-situ RH probes, drill holes at least 4 inches deep and place the probes near the middle of your slab.
Calibrate your equipment regularly according to manufacturer guidelines. This ensures accuracy and consistency over time. Keep detailed records of each test, including date, location, and readings. These logs are crucial for tracking trends and making informed decisions about when it’s safe to proceed with finishing or bonding work.
Interpret the results carefully. For example, an RH level below 70% is generally acceptable before applying overlays or adhesives. If levels are higher, you may need to extend curing time or use a moisture barrier. Always consult product-specific guidelines for exact thresholds and recommendations.
The maturity method and embedded sensors for new pours
The maturity method uses the concrete’s temperature history to estimate in-place strength, rather than waiting for a lab test result. You’ll embed simple temperature sensors into the fresh pour, and track how the concrete heats and cools as it cures. Place the sensors in several spots, near critical sections, and log data with a basic recorder so you can see how strength is developing over time.
For DIY builders, this can speed up decisions about form removal, protection, or loading, and help tighten your schedule. It’s a useful guide, but it isn’t a substitute for lab tests in critical structures, and results can vary with mix, moisture, and sensor placement. Watch for thermal gradients, keep data continuous, and compare readings against a referenced strength curve; if in doubt, consult a professional.
Installing maturity sensors and reading the curves
When you’re pouring new concrete, stick a few temperature sensors into the mix before it sets. Place them at least 1 inch from the edge of the form to avoid thermal gradients. Use suspenders or clips to keep them in place as the pour settles.
Once set up, connect your data logger and start recording temperatures every hour or so. The maturity method uses a curve that correlates temperature history with strength gain over time. This curve is specific to your mix design and curing conditions, but you can find generic ones online for quick estimates.
To read the curves, plot your recorded temperatures against the standard 28-day strength curve. Look at where your data points fall on this curve to estimate current concrete strength. Remember, accuracy depends heavily on proper sensor placement and consistent logging intervals.
When maturity replaces or supplements cylinder testing
Maturity sensors can save time by giving you a quick estimate of concrete strength. Use them to decide when it’s safe to remove forms or start loading, but always double-check with lab tests for critical structures.
For non-critical pours, like sidewalks or simple foundations, maturity data might be enough. However, don’t skip cylinder testing entirely—use sensors as a supplement. Take occasional cylinders and test them in the lab to validate your sensor readings.
Keep detailed records of both sensor data and cylinder tests for comparison. This helps you fine-tune your interpretation over time and ensures compliance with building codes and safety standards.
Non-destructive testing combos and advanced options
Combining non-destructive tests gives you a clearer picture of concrete strength without destroying the structure. Pair rebound hammer with ultrasonic pulse velocity (UPV) to check surface hardness and internal consistency, or use pull-out tests alongside the rebound hammer to gauge how pull resistance lines up with hardness. If results feel off or show anomalies, escalate to professional-grade UPV or pull-out testing as needed.
Use this as a quick screen: start with the simple, portable tests, then decide if you need a deeper look. The benefit is you get cross-checks—surface results vs internal signals and measured tension—so you can make smarter decisions on curing, containment, or repairs. Keep notes on prep, moisture, and calibration; that helps you track changes across dates and justify what to do next.
Using combined NDT to reduce uncertainty
Combining non-destructive tests like the rebound hammer with ultrasonic pulse velocity (UPV) or pull-out testing helps you get a clearer picture of your concrete’s strength. The rebound hammer gives you surface hardness, while UPV tells you about internal consistency and integrity.
Start by hitting the concrete with your rebound hammer to gauge its surface hardness. If it looks good but you’re not sure about deeper layers or potential inconsistencies, follow up with an ultrasonic test. This will help identify any weak spots inside that might not show on the surface.
If you suspect issues related to moisture or tension strength, consider a pull-out test alongside your rebound hammer readings. Pull-out tests measure how well concrete holds onto embedded fixtures and can give you insights into its tensile strength.
Document all results clearly with notes on any anomalies like laitance (a weak layer of cement paste) or uneven moisture levels. This documentation helps track changes over time and supports your decision-making process when it comes to reinforcing or repairing concrete elements.
When to hire pros for advanced NDT
There are times when you need professional help with non-destructive testing. If your DIY tests show inconsistent results, or if there’s a chance of structural failure due to weak points in the concrete, it’s time to bring in experts.
If you’re dealing with critical structures like bridges or high-rise buildings, professional ultrasonic pulse velocity (UPV) testing is essential. These advanced methods can pinpoint issues that DIY tools might miss and provide detailed reports for legal documentation.
Another reason to escalate is if there’s a risk of litigation over structural integrity. Professional pull-out tests offer more precise measurements and better data for court cases or insurance claims.
Contact certified inspectors who specialize in concrete testing when you need reliable, professional-grade results. They have the equipment and expertise to ensure accuracy and can provide detailed reports that stand up in legal settings.
Safety, common mistakes, and troubleshooting poor results
Wear proper PPE and keep the jobsite safe when coring and testing concrete: eye/face protection, gloves, dust mask or respirator as needed, and hearing protection for drilling. Set up a clearly marked exclusion zone and secure the area so others don’t wander into the work. Avoid common DIY mistakes that invalidate readings and know the immediate steps if a test shows low strength.
Operate core drills and testers only with inspected equipment and a secured work area, using dust suppression and proper ladder practice. Before testing, verify curing time, note ambient conditions, label samples, and consider how moisture can affect results. If readings look off, stop, re-test with fresh cores or cubes, verify cure conditions and method, and document deviations before seeking professional guidance.
Personal protective equipment and safe tool use
Wearing the right gear is crucial to avoid injuries. Here’s what you need:
- Eyewear protection: Use safety glasses or a face shield to protect your eyes from flying debris.
Choose ANSI Z87.1 certified lenses for impact resistance. - Hearing protection: Wear earplugs or earmuffs when drilling, especially in enclosed spaces.
Earplugs cost around $5-$10 and can be reused multiple times. - Dust mask or respirator: A N95 dust mask is essential for reducing inhalation of concrete dust.
Respirators offer better protection but are more expensive, typically ranging from $20 to $40 each. - Gloves: Wear durable gloves made of leather or thick rubber to protect your hands from cuts and abrasions.
Look for puncture-resistant materials; a good pair costs around $15-$30. - Tool inspection: Before using any equipment, check it thoroughly for damage or wear.
Replace damaged bits immediately; new ones cost about $20-$40 each.
How to retest and verify suspect results
If your initial tests show low strength, don’t panic. Follow these steps:
First, take a fresh core sample or cube from the same area.
This ensures consistency in testing conditions.
Document every step of the retesting process.
Note down the date, time, and environmental conditions like temperature and humidity.
If results still seem off, check for moisture gradients or curing issues.
Misinterpretation can happen if you don’t account for these factors properly.
Conclusion
The core idea is simple: know your strength, know your limits, and stay safe—your project will look and hold up better when you verify concrete health before it cures, not after it fails.
Start with a clear checklist in your head: assess the site and conditions, verify moisture and humidity as you go, run quick non-destructive checks first, document everything, then plan any core or deeper tests only if needed. Keep notes on temperature, cure time, and surface condition, and don’t push ahead if readings look off. If you do core tests, do them in a controlled, low-risk area first and only scale up once you’ve got reliable data.
Common mistakes to avoid are concrete misreads from rushing, skipping moisture checks, and ignoring cure or environmental factors that skew results. Don’t test in direct sun on a hot day or right after rain. Don’t drill or sample near edges or embedded utilities. Always wear eye and breathing protection, clear the area, and secure the work zone before any test or drilling begins. Safety first, document your results, and back out if the numbers don’t add up—it saves time and money later.
If the project is critical, or you’re unsure about the results, call a professional instead of pushing on alone. A pro can interpret readings, confirm cure status, and recommend fixes without risking structural damage. Stay disciplined, stay conservative, and you’ll finish with confidence—and a pavement or slab that actually stands up to daily use.
FAQ
What affects concrete strength the most?
Mix proportion, water amount, and proper curing drive strength. Poor mixing, too much water, or skipping curing wrecks strength now and later. Do it right from the start.
How can I test concrete strength myself?
You can do a rough rebound hammer test for a quick check, but it’s not precise. For real numbers, use a cylinder test through a lab at 28 days.
How long before I can drive on or load the new concrete?
Curing time matters. Keep the slab damp for at least 7 days and wait for around 28 days for full strength before heavy loads.
Should I use additives or extra cement to get more strength?
No shortcuts. Follow the approved mix design and avoid ad hoc changes. If you doubt it, ask a pro before pouring.