

Introduction
Masking windows for exterior spray painting is the process of shielding glass, trim, and frames to protect them from overspray. Good masking starts with clean, dry surfaces and a plan so you don’t miss spots. Take your time to inspect the area and anticipate how weather or sun will affect adhesion.
Choosing masking materials and proper tape is the next step to keep paint off surfaces you want to stay clean. Carefully press and seal tape along the frame, corners, and any gaps, and work slowly to avoid pulling paint later. When removing or reapplying tape, do it slowly and at a shallow angle to minimize damage to paint or trim.
Key takeaways
- Prepare windows: remove loose debris, clean frames, dry surfaces before masking.
- Choose masking materials: low-tack tape, protective film, painter’s plastic with overlap.
- Secure tape to frames: run straight, press with blunt edge; seal corners thoroughly.
- Test adhesion on inconspicuous area before full application.
- Safety: avoid masking over moisture-prone areas; protect nearby plants and surfaces.
- Removal and reapplication: lift at a shallow angle after spray dries, re-tape if needed.
Table of Contents
- Introduction
- Key takeaways
- Why Window Masking Matters for Exterior Spray Painting
- Planning an Exterior Window-Masking Project
- Tools and Materials Checklist for Exterior Window Masking
- Surface Preparation for Windows and Surrounding Areas
- Masking Techniques Specific to Windows for Exterior Spraying
- Tests and Inspections to Run Before You Spray
- Common Masking Failures and Practical Fixes on-Site
- Cost, Time Estimates, and Choosing Between DIY Vs. Professional Masking
- Conclusion
- FAQ
Why Window Masking Matters for Exterior Spray Painting
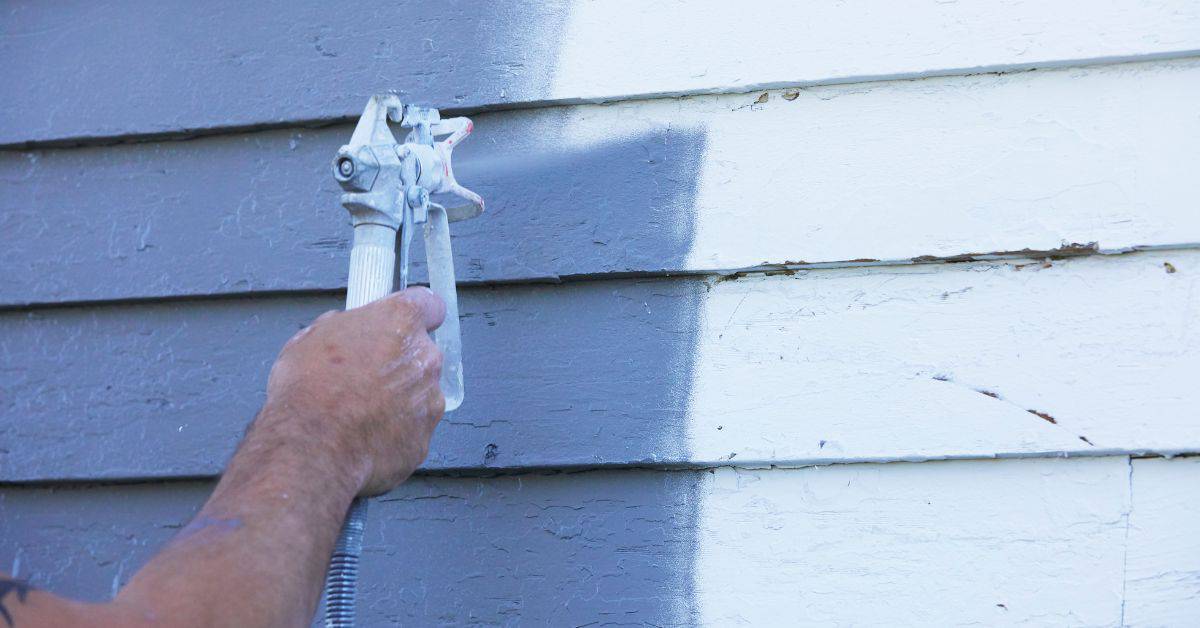
In exterior spray painting, bad masking invites overspray on glass and hardware, paint bleed at seams, and possible seal damage, which makes cleanup long and messy. Those problems usually come from wind, poor adhesion, or using the wrong materials. A good mask clearly protects glass panes, window frames, hardware, and the surrounding siding while leaving clean lines between masked and unmasked areas.
Plan with practical materials: low-residue or painter’s tape, masking film or paper, edge seals, and a quick surface clean and dry check before you start. Do a quick test spray to verify containment and note any gaps or windy spots so you can re-mask if conditions change. After the job, remove masking carefully, dispose of materials properly per local rules, and inspect for any bleed or missed spots.
Common causes of masking failure
Masking failures often stem from environmental factors and human error. Wind can lift tape, causing gaps that let paint through. High humidity or temperature shifts can make tape lose its stickiness or cause plastic film to billow.
Poor surface preparation is another common culprit. Dirt, grease, or moisture on the window surface can prevent tape from adhering properly, leading to lift-offs and paint migration.
Choosing the wrong materials also spells trouble. Using low-quality tape or film that’s not suited for exterior painting can lead to failures under stress from wind or heat.
Consequences of poor masking
Inadequate masking leads to costly consequences. Overspray on glass and hardware leaves you with a mess that’s tough to clean up, and paint bleed at seams can ruin the finish on trim and surrounding siding.
Paint getting into window seals can damage them, leading to leaks and potential mold growth. This could void warranties or violate HOA rules, costing you even more in repairs or fines.
Rework time is another hidden expense. Poor masking often means you’ll have to strip off the bad paint and start over, doubling your labor time.
Planning an Exterior Window-Masking Project
Planning an exterior window masking project starts with a clear scope, a realistic schedule, and knowing what permits or neighbor notices you might need. Identify which windows, openings, and nearby surfaces require protection, and set a masking tolerance so you choose the right materials and labor hours. Create a simple plan that notes exposed surfaces, prevailing winds, and potential containment zones, plus a quick map of ingress, egress, and staging areas to keep trips and rework to a minimum.
This plan helps you predict problems before they slow you down and keeps neighbors happy when spraying is involved. It matters because masking choices—tape-and-film versus full-drape, edge sealing, dropcloths, and containment—depend on project size and visibility, wind, and weather. By linking roles, tool lists, and a fall-back sequence for masking, removal, cleaning, and inspection, you speed up work and cut callbacks while staying safer and more organized on the jobsite; always check product labels and manufacturer instructions for any specifics.
Weather and Timing Considerations
Wind, temperature, humidity, and forecasted events all play a role in your exterior window masking project. Here’s what you need to consider:
Wind: Avoid spraying when winds exceed 10 mph. It can blow paint onto unmasked surfaces and reduce finish quality.
Temperature & Humidity: Check the paint manufacturer’s guidelines for ideal application temperatures (usually between 50-90°F). High humidity can cause poor adhesion or blistering.
Always check the forecast before starting. Postpone if severe weather is expected, and re-mask if conditions change during spraying.
Site Prep and Logistics
Proper site preparation ensures a smooth masking process. Here’s how to get your job site ready:
Access: Ensure you have safe access to all windows. Use sturdy ladders or lifts, and secure them properly.
Protect nearby landscaping and vehicles by covering them with drop cloths or plastic sheeting. This minimizes mask exposure time before spraying.
Stage your materials (tape, film, dropcloths) near the work area to avoid multiple trips and reduce mask exposure time.
Tools and Materials Checklist for Exterior Window Masking
This section gives you a categorized checklist for exterior window masking, organized into tapes/films/papers, sealants and barriers, fasteners and mounting aids, cutting tools and application aids, and PPE. It explains what each category is for and how it helps you decide what to buy or rent first. You’ll see guidance on pre-testing adhesion and clean removal, edge sharpness, and when to choose different tape types and masking films.
Why it matters: a well-planned kit saves time, reduces paint seepage, and minimizes damage to glass and frames. It helps you budget with basic, standard, and pro options and avoid overbuying or underbuying. If unsure, check the product label or manufacturer instructions for curing times, edge sealing tips, and safe use guidelines.
Masking materials and how to choose them
Before you start, know your options. Here’s a quick checklist.
- Blue Painter’s Tape: Great for indoor use, but not UV-resistant. Use for short-term exterior jobs.
- Exterior-Grade Masking Tape: UV-resistant, outdoor-rated. Ideal for long-term exterior masking.
- Masking Film: Flexible, protects large areas. Check for UV resistance and adhesion strength.
- Construction-Grade Plastic: Heavy-duty, rigid. Good for windy conditions. Ensure it’s UV-resistant.
- Kraft/Flooring Paper: Inexpensive, protects large areas. Not suitable for high winds or long-term use.
Quick rule: Always check labels for UV resistance and outdoor rating to prevent sun damage and peeling.
Safety and PPE for exterior spraying
Protect yourself and the environment. Here’s what you need.
- Respirator: Essential for spray painting. Use a half-face respirator with P100 filters.
- Eye Protection: Safety glasses or goggles to protect from paint and debris.
- Gloves: Disposable gloves to protect hands from paint and chemicals.
- Drop Cloths: Collect overspray. Check local regulations for disposal.
- Filters: Use high-efficiency filters (HEPA or activated carbon) for spray booths or containment systems.
Quick rule: Always follow local environmental and disposal regulations to keep your site safe and clean.
Surface Preparation for Windows and Surrounding Areas
Begin with a pre-cleaning assessment of the window area: inspect seals, weatherstripping, and surrounding trim for damage or moisture, and note spots where tape adhesion might be weak or mildew or dirt could bleed under masking. Then follow a cleaning protocol that removes loose dirt, dust, and cobwebs, tackles mildew with a mildew killer or a diluted household bleach solution (rinsing well afterward), and makes sure glass and frames are dry before you set the masking tape. For minor repairs, caulk gaps between trim and siding, touch up peeling paint on the window surround, tighten loose screws, and replace cracked weatherstripping to prevent masking flaws and paint bleed.
When preparing the surface for tape adhesion, lightly abrade glossy areas if needed, wipe with a tack cloth, and prime severely chalky or stained patches to improve tape grip and finish quality. Plan your masking strategy to follow along moldings and brick or trim lines to minimize edge bleed, and cover adjacent surfaces that shouldn’t receive paint while identifying delicate or porous materials that may need special tape or membranes. Check weather conditions and timing: ensure dry weather, low humidity, and appropriate curing conditions, and avoid prepping during rain, high winds, or extreme temperatures to maintain masking integrity and a clean final line.
Cleaning and Inspection Checklist
Before applying any masking tape, ensure your windows are clean and free of damage. This checklist helps you prepare the surface for proper tape adhesion.
- Glass: Remove dust, oil, and cobwebs using a damp cloth or glass cleaner. Dirty surfaces can cause tape to peel off prematurely.
- Frames: Inspect for peeling paint, cracks, or other damage. Neglecting these issues may lead to paint bleed under the masking tape.
- Seals: Check window seals for gaps or moisture. Damaged seals can cause poor tape adhesion and water intrusion.
- Weatherstripping: Inspect for cracks, tears, or loose fitting. Faulty weatherstripping can lead to drafts and paint bleed.
- Trim: Look for damaged or rotting trim. Repair any issues before masking to prevent paint from seeping into the gaps.
- Moldings: Check for cracks, chips, or peeling paint. These areas can cause uneven tape adhesion and paint bleed.
- Brick/Trim lines: Inspect for any damage or irregularities. These areas may require special attention when applying masking tape.
- Glass edges: Ensure they are clean and free of debris. Dirty glass edges can cause tape to lift off easily.
Quick rule: Always inspect and clean windows before masking to ensure proper paint adhesion and finish quality.
Small Repairs and Priming Before Masking
Address minor issues around your windows before applying masking tape. This ensures a smooth painting process and better paint adhesion.
Start by caulking gaps between trim and siding to prevent paint from seeping into unwanted areas. Use a high-quality exterior caulk and tool it smooth for best results.
Next, repair peeling paint on the window surround using an exterior primer and paint. This primes the surface for masking tape adhesion and prevents further peeling.
If your window sash is rough or has bare wood, lightly sand it and apply a coat of exterior primer before masking. Priming ensures better paint adhesion and helps prevent tannin bleed from the wood.
Tighten loose screws around the window to ensure a secure fit. Loose screws can cause gaps that allow paint to seep through.
Finally, replace cracked or damaged weatherstripping. Faulty weatherstripping can lead to drafts and poor paint adhesion along the edges of your masking tape.
Masking Techniques Specific to Windows for Exterior Spraying
Different window setups require different masking. For single-pane glass, multi-pane grids, recessed frames, and shutters, pick full-cover exterior masking film where drips are likely and tape-and-paper for tight profiles. Always start with pre-cleaning, then edge sealing, then mask from the most exposed side to the least.
This matters because it protects siding and trim and keeps paint chips down. It also guides you on masking operable parts and hardware without sealing drains or seals, and sets the plan for adhesion checks and safe removal.
Edge sealing and precision lines
Creating crisp paint lines at frame edges is crucial for a professional finish. Here are three methods:
Back-taping: Use painter’s tape to create a sharp edge on the glass or frame. Press down firmly to prevent paint from seeping underneath.
Edge sealants: For complex edges, use an edge sealant like FrogTape Multi-Surface Paintblock or 3M Edge Lock. Apply with a small brush, let it dry, then tape over it.
Adhesive liners: For delicate trim, use adhesive liners designed to protect edges. They stick to the edge and create a barrier for paint.
Masking complex assemblies (screens, hardware, trim)
Windows often have screens, hardware, and trim that need special attention:
Screens: Remove them if possible. If not, mask with tape and paper or use a screen-specific masking film.
Hardware: Protect latches, handles, and hinges with painter’s tape. Press down firmly to ensure no paint seeps underneath.
Trim: Use tape-and-paper for tight profiles. For delicate trim, use adhesive liners or edge sealants as mentioned earlier. Ensure you don’t trap moisture by allowing proper ventilation.
Tests and Inspections to Run Before You Spray
Before you spray, run quick tests: adhesion tape test to verify sticking, a small spray/spot test to watch for bleed‑through or edge lift, and a wind‑displacement check to confirm masking stays secure. If a test fails, re‑prep, consider primer or different masking, and retest. These tests reduce rework by identifying weak adhesion points early.
Choosing test areas, documenting outcomes, and adjusting technique helps you spray with confidence and stop problems before they spread. It also guides you on when to proceed or postpone spraying based on what the tests show.
Adhesion and wind-resistance checks
Before you start spraying, check your masking tape’s adhesion and resistance to wind. This ensures your tape won’t lift during the job.
- Press tape firmly: Use a squeegee or your fingers to press down on the tape, ensuring it adheres well to the surface.
- Perform wind test: Gently blow across the taped area or shake the window to check for any lifting edges. If it lifts, reapply with more pressure.
- Check corners: Pay extra attention to corners and edges where tape may lift due to wind displacement.
- Inspect masking paper: Ensure masking paper is securely attached and won’t blow off in gusts.
- Secure sheets: Use weights, clamps, or tape to secure large masking sheets and prevent blow-off.
- Avoid overlapping edges: Overlapping tape can create gaps that allow paint to seep through. Keep edges tight.
- Check for dust: If dust is present, it may reduce adhesion. Clean the surface if needed.
- Moisture check: Ensure the surface is dry before applying tape. Moisture can weaken adhesion.
Quick rule: A solid wind test and proper tape application will save you from touch-ups later.
Dry run and masked-area visual checkpoints
Before full spraying, perform a dry run or visual check to ensure your masking is secure and won’t cause overspray onto nearby areas.
- Choose test area: Select an inconspicuous spot for a small spray test to avoid visible marks.
- Low-pressure pass: Use low pressure when spraying the test area to minimize overspray.
- Check for bleed-through: Inspect the masked area for any paint seeping through. If present, reapply tape or use edge sealant.
- Edge lift check: Ensure edges of masking paper aren’t lifting during spraying by checking them visually or with a light touch.
- Overspray observation: Keep an eye out for overspray onto nearby areas, like trim or hardware. Adjust your technique if necessary.
- Masking integrity: Inspect all masking materials to ensure they’re secure and won’t blow off during spraying.
- Check for dust or contamination: If present on the masked area, clean it before spraying to prevent paint from adhering poorly.
- Confirm primer adhesion: If you’ve applied primer, ensure it’s fully dry and adhered before spraying.
Quick rule: A thorough visual check or dry run will help catch any masking issues before they cause rework.
Common Masking Failures and Practical Fixes on-Site
Common masking failures include tape lift, plastic billowing, paint seepage under tape, and sealant contamination. Diagnose quickly on-site and apply rapid fixes like re-taping with pressure-anchored tape, swapping to heavier painter’s plastic, resealing joints before re-spray, and spot-patching seepage with approved sealants.
A fast on-site test plan helps you catch problems before you rework large areas. By doing a small edge spray, feathering edges, and using quick containment if failures appear, you protect the job without big rework. Use the right tape and plastic setup and document fixes for next time.
Fixes for tape lift and billowing covers
Tape lifting and billowing plastic are common issues on exterior spray jobs. Here’s how to fix them quickly:
For lifted tape: Don’t remove the sprayed section. Just press down the lifted edge, apply a small amount of painter’s tape adhesive, and re-tape with an exterior-rated tape like 3M ScotchBlue.
For billowing covers: Switch to heavier masking film or use mechanical fasteners like clamps or weights at the edges. If it’s windy, add more support with stakes or sandbags.
Repairing paint bleed and edge imperfections
Paint seepage under tape can happen. Here’s how to fix it without redoing large areas:
Containment: Apply an edge seal before respraying, scrape off excess paint with a razor blade, and use solvent-safe cleaners to remove any residue.
If imperfections are visible, spot sand lightly using fine-grit sandpaper, wipe off dust with a damp cloth, then touch up with matching paint. Remember, spot sanding should be done after the initial spray and before respraying.
Cost, Time Estimates, and Choosing Between DIY Vs. Professional Masking
We break masking into three cost-factor buckets: low-cost disposable materials, mid-range reusable films, and high-cost professional masking systems. The choice depends on project size and window types, and you’ll see time trade-offs between DIY setup and pro crews. Always check local prices and get multiple quotes rather than trusting any single number.
DIY masking typically takes longer and involves more setup, edge sealing, and cleanup, while pros speed through with trained methods. Consider weather, surface complexity, and your tolerance for paint bleed to decide if beginners can manage or if a pro is worth it. Use edge sealing techniques, test on scrap or inconspicuous areas, and note that protective film can behave differently on rough textures.
Budgeting materials and labor considerations
The right materials can save you time and rework. Here’s what to consider:
- Low-cost disposable materials: Cheap, but expect more waste and touch-ups. Look for packs with enough length, not too narrow.
- Mid-range reusable films: Better durability, can be cleaned and reused. Check adhesive strength to avoid lifting.
- High-cost professional systems: Top-notch performance, but pricey. Consider if you have complex surfaces or tight lines.
- Tape: Go for painter’s tape with a strong adhesive and minimal bleed risk. Avoid masking tape that can leave residue.
- Edge sealers: Use liquid paper or edge sealer to prevent paint from bleeding under the tape. Don’t skip this step.
When to call a pro
Knowing when to hire help can save you time and money. Here are signs it’s time to call in the professionals:
Large multi-story jobs require safety equipment like scaffolding, which pros have access to.
Sensitive historic glazing or complex architectural details need certified finishers who understand preservation techniques and can handle intricate work.
Complex projects with tight deadlines might warrant a pro’s speed and efficiency. Don’t underestimate the time masking takes, especially for first-timers.
Conclusion
Masking windows properly is the difference between a clean, lasting finish and a rework that costs time and money. Do the masking right, and you protect trim, glass, and siding, keep overspray where it belongs, and reduce the risk of damage or costly fixes.
Before you spray, confirm the plan: inspect the window setup, gather masking materials and tools, test a small section for adhesion and paint behavior, mask in the correct order from outside edge to center, seal edges with careful hand pressure, perform a final test spray on a hidden area, and then proceed with the full job only after everything seals and seams stay clear of spray. Move methodically, and document any fixes you make for future projects.
Common mistakes to avoid include skipping surface prep or test sprays, rushing edge sealing or tape removal, and using improper tape or film that curls or leaks. Always lay out a clean work area, protect adjacent surfaces with drop cloths, wear eye and respiratory protection, and keep a calm pace so you don’t rush past a critical detail. If you see peeling tape, loose edges, or paint creeping under masking during test runs, stop and correct it before you proceed.
If the project grows beyond planned scope, or you’re dealing with high or intricate windows, consider bringing in a professional before you risk expensive repairs. When in doubt, err on the side of caution and schedule a quick accuracy check now rather than a costly fix later. Stay steady, follow the checks, and you’ll finish with a sharp, durable paint job that lasts.
FAQ
How should I prepare the window frames before masking for exterior spray painting?
Clean the frames to remove dirt, grease, and old paint flakes. Wipe with a solvent or cleaner recommended by the manufacturer and let it dry fully before applying tape or film.
What masking materials work best for exterior windows, and how do I choose them?
Use painter’s masking tape and compatible drop cloths or protective film. Check the tape for UV resistance and room temperature performance; match the tools to your surface (wood, vinyl, metal) and follow the manufacturer instructions.
How do I secure masking tape to window frames without pulling off finish?
Apply tape perpendicular to the edge, press down firmly with a flat tool or your thumb to seal the edge. If the frame is textured, use longer pieces and avoid stretching the tape; work slowly to prevent edge lifting.
How can I ensure full coverage during spraying and prevent overspray without ruining the tape?
Overlap masking and sills slightly and use protective film to cover adjacent surfaces. Keep the spray distance and pattern steady, and tape any gaps or joints that could leak spray toward the protected areas.
What’s the right way to remove and reapply masking tape after a spray pass or a weather delay?
Peel tape back on itself at a low angle when the paint is tack-free or dry to avoid pulling fresh paint. If you need to re-tape, clean the edge again and reapply fresh tape firmly to seal the joint.