

Introduction
Drywall, plaster, and blueboard are common interior wall systems you can choose for renovations. Drywall is the standard, fast-to-install option; plaster is older and durable when done right; blueboard is a base for a plaster finish. Each has its own prep and finish needs.
To pick the right one, consider the room, finish you want, and how much work you’re willing to do. Always check product labels, manufacturer instructions, and local rules for installation steps, compatibility, and moisture considerations. If in doubt, ask a pro or test a small section before committing.
Key takeaways
- Drywall repairs are faster but less durable for high moisture or impact.
- Blueboard with veneer plaster offers smoother finishes but longer installation than drywall.
- Plaster systems require skilled trades and preparation for crack resistance.
- Moisture-prone areas favor moisture-resistant boards and proper waterproofing details.
- Consider overall cost, timeline, and labor when choosing wall finish.
- Always follow manufacturer instructions and local code; wear masks and eye protection.
Table of Contents
- Introduction
- Key takeaways
- Quick Comparison Overview
- What Is Drywall (Gypsum Board)?
- What Is Plaster?
- What Is Blueboard and Veneer Plaster?
- Cost, Timeline, and Labor Comparison
- Performance Factors: Durability, Moisture, Fire, and Acoustics
- Surface Finishes and Paintability
- Tools, Materials Checklist, and Material Specs Explained
- Conclusion
- FAQ
Quick Comparison Overview
This quick overview compares the three concrete systems side-by-side on what matters: cost, installation speed, durability, finish quality, and typical use cases. You’ll see a simple at-a-glance sense of each system’s pros and cons, so you can decide fast. If you need exact numbers, check the label or datasheet for details.
Understanding the trade-offs helps you pick the right approach for your project and your timeline. It matters because DIY mistakes can cost time, money, and effort later on. Use this snapshot to guide questions for suppliers and to plan your work safely and efficiently.
Snapshot table of pros and cons
Here’s a quick side-by-side comparison to help you decide.
Pros
- Drywall: Fast installation, inexpensive, wide availability.
- Plaster: Provides better soundproofing, elegant finish, long-lasting durability.
- Blueboard: Allows for thinner profile, consistent finish, good for remodels with existing plaster.
Cons
- Drywall: Easily damaged, low moisture resistance, not ideal for humid areas.
- Plaster: Slow drying time, high labor cost, less suitable for DIY projects.
- Blueboard: Higher upfront cost, heavier than drywall, requires professional installation.
Choose based on your budget, desired finish, and project specifics.
Decision flowchart guide
Follow this simple workflow to pick the right wall system:
1. Budget: If you’re on a tight budget, drywall is your best bet. For more flexibility, consider plaster or blueboard.
2. Desired finish: For a smooth, elegant look, go with plaster. If you prefer a consistent, modern finish, choose blueboard. Drywall offers a basic, affordable option.
3. Timeline & existing substrate: If speed is crucial and your walls are in good condition, drywall is ideal. For remodels with existing plaster or requiring better soundproofing, consider blueboard or plaster respectively.
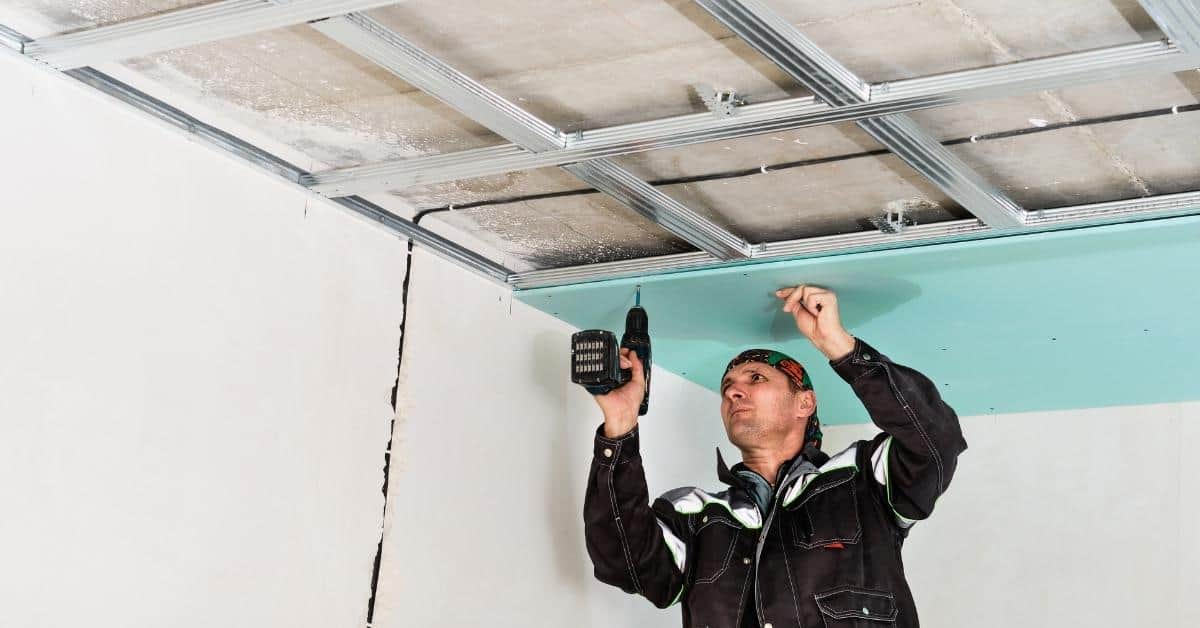
What Is Drywall (Gypsum Board)?
Drywall, or gypsum board, is the flat panels you see on interior walls and ceilings. It comes in a few common types: regular, moisture‑resistant, fire‑rated, and soundboard. It also comes in several thickness options; you should check the label or datasheet for the exact numbers that fit your project.
In renovations, drywall goes up to form walls, ceilings, and room partitions. It’s useful because it cleanly covers framing and handles paint and textures well. Knowing which type to use and the right thickness helps you avoid headaches later—read labels and ask for help if you’re unsure.
Installation basics and timeline
Drywall installation is a straightforward process, but it’s crucial to follow the steps carefully. Here’s a typical timeline for a standard room:
Day 1-2: Measure, cut, and hang drywall sheets on the walls and ceiling. Start from the ceiling corners and work your way out.
Day 3: Apply joint tape to all seams and screw holes using a joint compound. Let it dry for about 24 hours.
Day 4-5: Apply a second coat of joint compound, feathering the edges. Allow it to dry again (around 24 hours).
Performance characteristics and lifecycle
Drywall offers several performance benefits:
Durability: Drywall is tough, but not indestructible. It can handle normal wear and tear, but avoid impacts that may cause dents or cracks.
Moisture Tolerance: Regular drywall isn’t suitable for high-moisture areas like bathrooms or laundry rooms without additional protection. Moisture-resistant drywall is available for these spaces.
Lifecycle: With proper maintenance, drywall can last 30-50 years. Inspect your walls periodically for signs of damage and address them promptly to extend its lifespan.
What Is Plaster?
Plaster is a wall finish built up in coats. Traditional plaster uses lime or gypsum in multiple steps to create a solid, breathable surface. Modern veneer plaster is a thin, fast-setting finish that gives a smooth, durable look.
Knowing the difference helps you plan a project, choose the right tools, and avoid cracking or weak patches. Finish options and the room you work in affect how you apply and cure it. Check labels and manufacturer instructions for mix, cure, and compatible paints.
Plaster Application Methods and Skill Requirements
Plastering is a labor-intensive process that requires skilled tradespeople. It’s not a DIY job like drywall installation.
Traditional multi-coat plaster needs time to cure between coats, adding days to the timeline. Skilled plasterers apply each coat with precise thickness and smoothness.
Cost: Hiring skilled labor drives up costs compared to drywall. Expect to pay more for quality workmanship.
The same goes for modern veneer plasters, though they’re faster due to fewer coats. But they still need experienced applicators to achieve a smooth finish.
Advantages: Aesthetics and Durability
Plaster offers unmatched aesthetic appeal. It provides a seamless, smooth finish that’s hard to achieve with drywall. This makes it ideal for historic renovations or high-end finishes.
Plaster also absorbs sound, reducing echo and noise transfer. This is particularly useful in open-plan spaces or apartments.
Durability: Once cured, plaster is hard and resistant to cracking or denting. It outlasts drywall, which can be damaged by moisture or impact.
However, it’s less flexible than drywall, so it may crack during settling or earthquakes. Consider this when choosing your wall system.
What Is Blueboard and Veneer Plaster?
Blueboard is a specially surfaced drywall panel designed to take plaster. It differs from standard drywall by having a smoother, more uniform surface that plaster can key into instead of relying on paper and joints. Veneer plaster is a thin, sanded plaster finish applied over blueboard in a few coats to create a solid, seamless look.
The combo gives you plaster aesthetics with the faster install of board. It matters because you get a durable, repairable surface that can be patched without pulling down entire walls. For DIY, follow manufacturer instructions for the plaster mix and bonding requirements, and always check labels or datasheets for exact ratios, cure times, or surface prep steps.
When to choose blueboard over other systems
Blueboard is your best bet when you want a thin, plaster-like finish. It’s perfect for renovations where you can’t add much thickness to walls.
Existing substrates play a role too. Blueboard sticks well to old plaster or lath, giving you a solid base for new work.
Historic matches – Blueboard lets you maintain the look and feel of older homes. It’s often used in historic restorations where preserving original aesthetics is crucial.
Installation considerations and finishing outcomes
Blueboard installation starts like drywall, but that’s where the similarities end. You’ll need to tape and sand seams as usual, then apply a base coat of veneer plaster.
The real magic happens with the finish coats. A single skim coat gives you a smooth, plaster-like surface. For a more polished look, apply multiple thin coats, sanding between each.
With practice, you can achieve a range of finishes – from traditional Venetian plaster to modern polished plaster looks. Just remember, patience and thin coats are key with blueboard and veneer plaster.
Cost, Timeline, and Labor Comparison
Costs, labor, and timelines change a lot with scope. For small rooms vs whole houses, you’ll see big differences in installed costs, labor hours, and schedule. Regional variability matters—check local rates and what’s included in an estimate.
Timelines and labor are your biggest gotchas. An itemized estimate that breaks out materials, labor, and a contingency helps you compare apples to apples. Regional rates can swing what’s affordable, so check a few local sources.
DIY vs Professional Trade Considerations
When it comes to choosing between drywall, plaster, and blueboard, some tasks are more DIY-friendly than others. Here’s what you can handle yourself and when to call in the pros.
Drywall: Hanging drywall sheets is a task most homeowners can tackle with the right tools and know-how. It’s heavy but manageable, especially for small rooms. Just be prepared for some dust and minor damage to your floors.
Plaster (Three-Coat): Applying three-coat plaster is a job best left to professionals. It requires specialized skills, equipment, and knowledge of the process. The first two coats need to be applied at specific times, and the final coat must be perfectly smooth for a flawless finish.
Fine Veneer Finishes: If you’re aiming for high-end, fine veneer plaster finishes like Venetian or Stucco lustro, don’t even think about doing it yourself. These require years of training to master and should always be done by experienced tradespeople.
Hidden Costs and Contingency Planning
Before you start your renovation, it’s crucial to understand that there are often hidden costs associated with wall systems. Here are some common ones and how to plan for them.
Surface Prep: Before installing any wall system, surfaces need to be clean, dry, and free of defects. This can involve repairs, sanding, or priming, all of which add time and cost.
Repairs: Old homes often have hidden damage behind walls. Expect to find and fix issues like rot, cracks, or missing pieces before installing your new wall system. Set aside a contingency fund for these unexpected repairs.
Waste and Drying Delays: There’s always waste when cutting drywall or plasterboard. Plus, drying times can delay your project schedule, especially with plaster systems. Plan for about 10-15% waste and allocate extra time for drying in your timeline.
Performance Factors: Durability, Moisture, Fire, and Acoustics
We’re looking at how durable each system is against everyday banging, moisture, flames, and noise. You’ll get side-by-side notes on impact resistance, mold and moisture tolerance, fire rating options, and sound transmission. It’s about picking the right tool for the job, not guessing.
This matters because DIY projects live in real walls with real moisture and banging from foot traffic. Check labels and datasheets for exact performance details. If you’re unsure, follow manufacturer instructions or local rules to avoid loud surprises or weak spots in the build.
Moisture-prone areas and mitigation strategies
When it comes to moisture, not all wall systems are created equal. In rooms like bathrooms and kitchens, you need a system that can handle the extra humidity.
Drywall has a greenboard option designed for these areas. It’s resistant to mold growth, but it’s not waterproof. For full waterproofing, you’ll need to apply a separate membrane or use blueboard, which is specifically designed for wet areas.
Plaster, on the other hand, isn’t typically used in moisture-prone areas due to its porous nature. It can absorb moisture and may eventually crack or crumble if exposed to prolonged dampness.
Soundproofing and thermal considerations
Each wall system has its own interaction with insulation and resilient mounting, which can improve acoustics and energy performance.
Drywall, when combined with proper insulation and resilient clips, can provide good soundproofing. It also offers decent thermal mass, helping to regulate indoor temperatures.
Plaster systems, especially those applied over metal lath, can provide excellent soundproofing due to their mass and the air space behind them. They also offer good thermal mass but may require additional insulation for optimal energy performance.
Blueboard, being a gypsum board, offers similar soundproofing and thermal benefits as drywall when combined with proper insulation and resilient mounting. Its main advantage is its ability to accept both thin and thick plaster veneers, allowing for more design flexibility while maintaining good acoustics and energy performance.
Surface Finishes and Paintability
This section covers how different wall systems take paint, wallpaper, texture, and specialty finishes like polished plaster, Venetian, or skim coats. It also covers the prep needed to pull off high-end finishes. Expect each system to have its own primer and prep steps—no one-size-fits-all.
For DIY folks, the payoff is a durable, good-looking finish that lasts. Start by following the product label and manufacturer instructions; check the label/datasheet for bonding primers and sealing coats. Disposal rules vary, so check local household hazardous waste rules and never dump anything down drains.
Repairability and future refinishing
When it comes to repairs, each wall system has its own quirks. Here’s what you need to know:
Plaster: Small dings can be touched up easily with a bit of joint compound. Larger repairs may require a pro’s touch. Patches might show if not done right.
Drywall: Repairs are straightforward, but patches can be visible if not sanded smooth or primed properly. Joint tape seams can crack over time.
Blueboard: Similar to drywall, repairs are manageable. Patches might show if not done carefully. Blueboard’s texture makes it easier to hide imperfections compared to drywall.
Visual checkpoints for quality finishes
Before you paint or wallpaper, use this checklist to ensure a smooth finish. Inspect after taping and sanding, and again before painting.
- Smoothness: Run your hand over the surface. It should feel even with no bumps or hollows.
- Joint feathering: Check taped joints. They should blend smoothly into the surrounding wall, not stand out as ridges.
- Sheen consistency: Look for any shiny or dull spots that might affect paint adhesion and sheen.
- Nail holes/screw holes: All should be filled and sanded smooth.
- Tape seams: No gaps, bubbles, or wrinkles. Tape edges should be well-sealed.
- Corner beads: Straight and securely attached with no gaps.
- Texture consistency: If textured, ensure it’s even across the wall.
- Primer coverage: Check for any missed spots or thin areas that might affect paint absorption.
Quick rule: If in doubt, hire a pro. A bad finish can’t be undone with just a fresh coat of paint.
Tools, Materials Checklist, and Material Specs Explained
This section gives you a practical, renovation-ready list of tools and materials for every system. It also explains the material specs you’ll need to understand, like board types, plaster mixes, and adhesives. You’ll know what to grab and what to ask for.
Knowing the right tools and specs saves time and keeps the project moving. It helps you spot bad gear and avoid mismatches by checking the label or datasheet. When in doubt, verify with the manufacturer instructions or local rules before buying.
Safety, Ventilation, and Disposal
Before you start any work, ensure safety measures are in place. This checklist helps protect you and your team.
- Personal Protective Equipment (PPE): Wear a respirator, goggles, gloves, and protective clothing to minimize dust inhalation and contact with chemicals.
- Dust Control: Use wet sanding or misting systems to control drywall dust during cutting and sanding.
- Ventilation: Ensure proper ventilation in the work area. Open windows, use fans, or consider renting a HEPA vacuum system for plaster work.
- Waste Management: Have recycling bins ready to separate waste materials like drywall, cardboard, and metal.
- Plaster Waste Disposal: Follow local regulations for disposing of plaster waste. It’s often considered hazardous due to its gypsum content.
- Fire Safety: Keep a fire extinguisher nearby when working with adhesives and other flammable materials.
- Electrical Safety: Turn off power at the main panel before installing or removing any electrical components near walls.
- Noise Control: Inform neighbors about your work schedule, especially if it involves heavy machinery like drywall lifts.
Quick rule: Always prioritize safety. A few minutes spent on preparation can save you from serious injuries or costly mistakes.
Sourcing Tips and Contractor Questions
Before making purchases or hiring contractors, use this checklist to ensure you’re getting the best value for your money.
- Material Suppliers: Look for local suppliers with a good reputation. Check online reviews or ask for recommendations from friends and neighbors.
- Big Box Stores vs Specialty Shops: Big box stores offer convenience but may not have the specialized knowledge of a local shop. Consider both for different materials.
- Material Quality: Inspect materials for any damage or defects before purchasing. Check for proper labeling and certifications.
- Contractor Vetting: Ask for references, proof of insurance, and licenses. Verify their credentials with your local licensing board.
- Scope of Work: Ensure the bid includes a detailed scope of work outlining tasks, materials, and timelines.
- Warranty Information: Ask about warranties on both labor and materials. This protects you if issues arise after the project is completed.
- Payment Schedule: Discuss a fair payment schedule tied to project milestones rather than upfront lump sums.
- Change Order Policy: Understand how changes to the scope of work will be handled and billed.
Quick rule: Never rush into purchases or hiring decisions. Take time to research, compare, and ask questions to protect your investment.
Conclusion
Choose the wall system that fits the space and your risk profile: moisture exposure, durability needs, and the finish you want. The right choice reduces callbacks, keeps the project safe, and looks right for years to come.
First, verify the basics: check moisture levels and framing before you buy, pick drywall, plaster, or blueboard based on the room and finish you plan, gather the correct tools, and outline a realistic timeline. Then follow a simple course: prep the area, install or repair the substrate, apply the chosen finish with the proper compounds, cure or dry correctly, and test the surface before painting.
Common mistakes to avoid are skipping a moisture check, rushing joints or edges, and ignoring cure times or safety steps. Don’t mix materials beyond their intended use, don’t sand aggressively on soft surfaces, and don’t work with damaged wiring or plumbing behind the wall. Always wear appropriate eye and respiratory protection and keep ventilation steady while you work.
If you encounter structural issues, persistently high moisture, or a veneer plaster path with complex finishes, it’s time to call a pro. Otherwise, stay focused on the plan, test small areas first, and progress 하나 step at a time. You’ve got this—finish strong and you’ll end up with walls that look good and hold up.
FAQ
1. When should I choose drywall, plaster, or Blueboard veneer for a renovation?
Think about the finish you want, moisture exposure, and how much work you’re willing to do. Drywall is quick and cheap; plaster lasts longer and can hide flaws, but is messier. Blueboard with veneer plaster can give a smooth finish but follow the manufacturer’s instructions.
2. Can I retrofit plaster over existing drywall or swap to Blueboard later?
You can sometimes retrofit, but it depends on the existing wall conditions. It may require extra prep, longer installation time, and checking manufacturers’ specs. If in doubt, check the label, instructions, or local rules before starting.
3. How does moisture or humidity affect drywall vs plaster or veneer systems?
Drywall tolerates dry interior spaces better when finished and sealed. Plaster and veneer plaster resist some moisture when properly coated, but you still need proper moisture management. Always verify product ratings on the label and follow installation guidelines for damp areas.
4. Is veneer plaster on Blueboard a DIY-friendly option, and what should I verify before starting?
It can be DIY-friendly if you’re comfortable with multiple coats and careful feathering. Verify that your Blueboard and veneer plaster system is compatible, and follow the manufacturer instructions. Check finish coats, drying times, and any priming requirements on the product datasheet.