
Introduction
Hanging drywall on ceilings without a lift means using safe setup, helpers, and careful lifting to install sheets overhead.
Plan your work with temporary supports and clear paths, and verify that the ceiling structure can support the drywall. Work with a partner and wear eye protection and a dust mask, and follow local rules for overhead work.
Start by dry fitting sheets, then lift them into place with a partner while you guide edges to the studs. Prep joints and fasteners per manufacturer instructions and avoid skipping steps, and stop if anything feels unsafe. Always check labels and local building rules for weight limits and equipment use.
Key takeaways
- Confirm ceiling framing is solid, free of hazards, and cords before hanging drywall.
- Plan manual lifting helpers and use temporary supports to hold sheets in place.
- Secure drywall with screws along edges and field at regular spacing.
- Use a reliable lift alternative like a drywall jack or ridge strap to reduce strain.
- Mark crown points and cutouts before hanging to avoid rework.
- Inspect after install for gaps, nails, or screws that need reseating.
Table of Contents
- Introduction
- Key takeaways
- Overview and Safety Considerations
- Tools and Materials Checklist
- Preparing the Ceiling and Framing
- Methods to Lift and Hold Drywall Without a Lift
- Step-by-Step Installation Process
- Finishing, Inspection, and Common Fixes
- Ergonomics and Injury Prevention Tips
- Cost, Time Estimates, and When to Hire a Pro
- Conclusion
- FAQ
Overview and Safety Considerations
This section sets the scope of hanging ceiling drywall without a lift and highlights the unique risks involved. Falls, back strain, and panel drops are real concerns that can cause injury or damage. Knowing when to call a pro can prevent a hazardous situation before it starts.
Expect a mix of planning, careful handling, and practical workarounds. We’ll outline safe, DIY-friendly options and clearly mark tasks that may require professional help or specialized equipment. Use this as a safety check before you begin any ceiling drywall project.
Assessing the job and your skill level
Before you start, take a good look at the ceiling. Measure its size and height to ensure you can safely reach all areas.
Joist layout: Check where the ceiling joists are located. You’ll need to know this for attaching drywall screws. Use a stud finder if necessary.
Your experience: Be honest about your DIY skills. If you’ve never hung drywall before, consider practicing on a smaller project first or hiring a pro.
Personal protective equipment and workspace prep
Safety comes first. Here’s what you need:
- Eye protection: Wear safety glasses or goggles to protect your eyes from debris.
- Respiratory protection: Use a dust mask or respirator to prevent inhaling drywall dust.
- Hearing protection: Wear earplugs if you’re using power tools.
- Gloves: Protect your hands with work gloves to avoid cuts and scrapes.
- Secure the area: Clear the room of furniture, cover floors with drop cloths, and ensure there’s adequate lighting and ventilation.
- Optional tools: Consider renting a drywall lift for heavier panels (~$50/day) or a drywall screw gun (~$20/day).
Tools and Materials Checklist
Start with the basics: measuring tools, utility knife, straight edges, and a square for layout accuracy. A drill, screw gun, or impact driver helps speed fastening, and you’ll need drywall screws and tape for seams. Have a couple of personal protective items ready, such as eye protection and a hearing-safe environment for loud tasks.
Consider renter-friendly or one-time-project options like temporary supports, drywall lifting aids, or rental equipment. If you’re unsure about requirements, check product labels, manufacturer instructions, and local rules before purchasing or renting. Have a clear plan for storing and reusing any tools that aren’t single-use.
Essential hand and power tools
Before you start hanging drywall, make sure you have all the necessary tools. Use this checklist to verify your tools and avoid common mistakes.
- Drywall T-square: Check that it’s straight and long enough for your wall size. It should be at least 4 feet long for standard drywall sheets.
- Utility knife: Ensure the blade is sharp and replaceable. A dull blade can tear the paper face of the drywall.
- Screw gun or drill with clutch: Confirm it’s in good working order. Check that the clutch setting is compatible with your chosen screw size (usually 1/4″ to 3/8″).
- Drywall saw: Make sure it has a sharp blade and is suitable for cutting drywall. A dull blade can cause tears.
- Ladder/scaffold types: Inspect for stability and safety. Ensure they’re tall enough to reach your ceiling without overreaching.
- Recommended bit/screw sizes: Check your local building codes, but typically #6 or #8 drywall screws are used with a Phillips head bit (size 1 or 2).
- Tape measure: Verify it’s accurate and long enough. For drywall, you’ll need at least 25 feet.
- Pencil: Make sure it writes clearly to mark your cutting lines accurately.
Quick rule: Always double-check your tools before starting work. A few minutes of preparation can save hours of rework and prevent costly mistakes.
Materials and fasteners
Use this checklist before starting your drywall installation to ensure you have everything needed for a smooth job.
- Drywall panels (Ceiling): Check panel size, typically 4′ x 8′, and thickness. Common ceiling thicknesses are 1/2″ or 5/8″.
- Screws: Ensure you have drywall screws, not nails. They should be long enough to penetrate the stud by at least 3/4″, usually 1-1/4″ or 1-5/8″ for ceilings.
- Joint tape: Verify you have paper joint tape for seams and corners.
- Drywall compound (Mud): Check mud consistency. It should be creamy, not too thick or thin. Ensure it’s suitable for ceilings if that’s where you’re working.
- Setting-type compound: For final coats, check if you have setting-type compound to provide a smooth finish.
- Adhesive (Optional): If using adhesive to reduce screw count, ensure it’s suitable for drywall and follow manufacturer instructions.
- Backing supports (Optional): For large panels or where extra support is needed, check if you have backing supports like furring strips or hat channels.
Quick rule: Always double-check your materials before starting. Skipping this can lead to costly mistakes and rework, such as using the wrong panel thickness or not having enough screws.
Preparing the Ceiling and Framing
Begin by inspecting the ceiling joists or existing furring strips for soundness and level reference. Mark layout lines clearly so panel edges align with studs or blocking. Plan for seams over underlying framing and identify where blocking may be needed to back up joints.
Install blocking or extra support where seams fall between joists if required by your framing layout. Verify that the ceiling is structurally capable of supporting the drywall weight and that any existing wiring or plumbing is accounted for. Recheck measurements before lifting or fastening any sheet.
Measuring and planning panel layout
Before you start hanging drywall, measure your ceiling’s length and width. Mark these dimensions on the back of your first panel. This helps you visualize where seams will fall.
Plan your panel layout to minimize butt joints – avoid placing them directly above each other. Stagger seams like you would with flooring for strength and finish quality.
Consider panel orientation too. Run panels horizontally if possible, especially in rooms with low ceilings. This makes the room feel taller.
Installing temporary supports and blocking
Before hanging drywall, ensure your ceiling joists or furring strips are secure and evenly spaced. If not, install temporary supports to reinforce them.
Add blocking where needed for secure screwing points. Cut 2x4s or 2x6s to fit between joists, then screw them in place. This prevents screw pull-through and gives you a solid surface to attach drywall screws.
For extra support, consider installing cross-bracing or backer strips. These can be made from thin strips of plywood or OSB, screwed onto the ceiling frame at an angle.
Methods to Lift and Hold Drywall Without a Lift
Explore techniques that use the wall to brace panels and reduce holding time, such as temporary supports, sawhorse workstations, or a helper assisting with alignment. Consider using a drywall cart or simple sling methods to keep panels level while you fasten. Each method has different ease and safety tradeoffs that suit various spaces.
Evaluate factors like required manpower, equipment availability, and your comfort with overhead work. Always follow manufacturer guidance for any lifting aid and adapt approaches to your ceiling height and room layout. If in doubt, opt for safer, lower-risk methods or seek guidance from a professional.
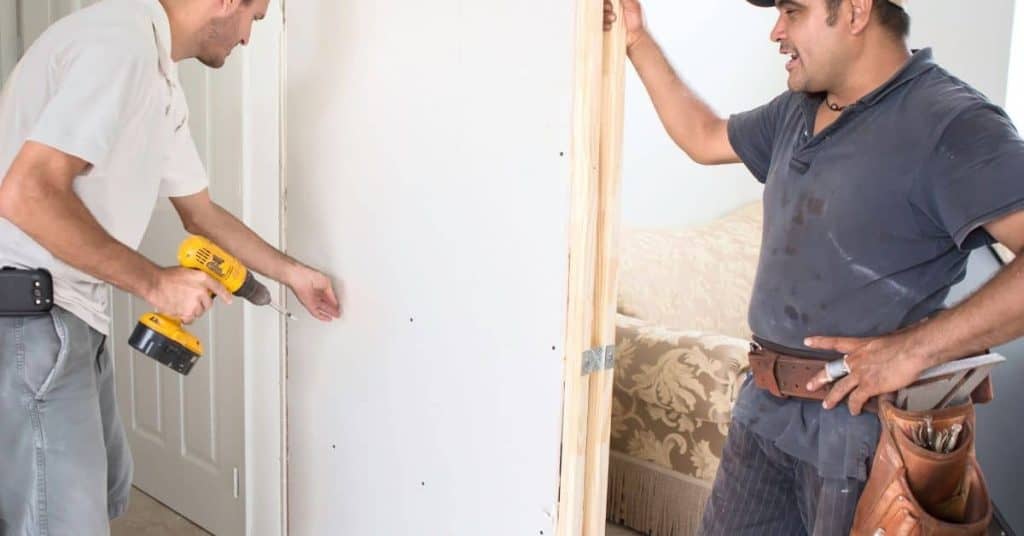
Two-person lift and position technique
The safest way to handle drywall on ceilings is with two people. Here’s how:
1. Plan your moves. One person (A) stands below the panel, ready to lift it up. The other (B) is above, ready to guide and position it.
2. A lifts the panel vertically while B guides it into place from above, using a gentle rocking motion if needed.
3. Once aligned, B secures the panel temporarily with one hand while A steps back to start screwing. Use footholds for safety, never stand on unsupported drywall.
T-brace/temporary support methods
If you’re working alone or need extra support, build a simple T-brace or use adjustable cleats to hold your panels in place.
1. Build the T-brace: Cut two 2x4s – one long enough to span between joists (plus 6 inches), and another cut into 16-inch pieces for the ‘T’.
2. Place the longer piece across the joists, then slide the shorter pieces through it to create a ‘T’ shape. Rest your panel on this.
3. Fasten the T-brace to the joists with screws or nails, then position and secure your drywall panel before screwing.
Bean pole, cribbing, and panel jacks
Extendable poles, improvised cribbing, or trade panel jacks can help you lift drywall panels to the ceiling. Here’s how:
1. Bean pole: Use a long, sturdy pole (like a floor jack extended) to push the panel up into position. Have someone guide it from above.
2. Cribbing: Stack 2x4s or other scrap lumber under your panel to lift it. Be careful – this method can be unstable and may not reach high enough.
3. Panel jacks: These are adjustable, purpose-built tools for lifting drywall. Follow the manufacturer’s instructions, but remember: never exceed their load limits. Always test them first with a small weight before using on your panels.
Step-by-Step Installation Process
Align the first sheet along a straight edge and position it near the wall. Lift the panel to the ceiling line and secure it with fasteners along the marked pattern. Work methodically across the room, keeping seams staggered and edges supported during fastening.
Check that each sheet is flush with the framing and that screws do not pull the edge. Maintain consistent spacing and avoid overdriving screws to prevent buckling. Plan for finishing seams after all panels are in place to ensure a smooth ceiling surface.
Step-by-Step Installation Process
Follow this clear, numbered sequence to hang drywall on your ceiling safely and efficiently. It starts with preparation, moves through the main work, and ends with cleanup.
- Check all safety measures are in place, including temporary supports and blocking.
- Start from one corner, aligning the first sheet with the framing.
- Secure the first sheet using the two-person lift method or T-brace/temporary support methods mentioned earlier.
- Drive screws every 6-8 inches along the edges and every 12 inches in the field. Keep them slightly below the seam line for finishing later.
- Measure, cut, and install subsequent sheets, staggering seams as you go.
- Use a four-foot level to ensure each sheet is flat before securing it.
- Once all sheets are up, check for any gaps or low spots. Fill with joint compound if necessary.
- Sand, tape, and apply joint compound to the seams. Let dry and sand again.
- Inspect your work one last time before painting or texturing.
Aligning and fastening the first sheet
Positioning the first drywall sheet correctly is crucial. Here’s how to do it safely and securely.
Start by placing the sheet against the ceiling framing at one corner. Have a helper hold it in place if needed.
Drive your first screws into the studs along the edges of the sheet, about 6-8 inches apart. This will prevent sagging. Make sure to keep these screws slightly below the seam line for finishing later.
Safety note: Always wear safety glasses when driving screws to protect from debris.
Working across the ceiling and handling seams
Staggering seams and maintaining flatness are key to a professional-looking ceiling. Here’s how to achieve that.
When measuring for your next sheet, stagger the seam so it doesn’t line up with the one below. This distributes stress evenly across the ceiling.
Run butt joints to blocking or other structural supports to ensure flatness. Use a four-foot level to check each sheet before securing it.
Drive screws every 6-8 inches along the edges and every 12 inches in the field, following the same pattern as the first sheet. This continuous fastening helps maintain flatness across multiple sheets.
Cutting for fixtures, vents, and obstacles
Measuring and cutting around light fixtures, HVAC vents, and ceiling boxes can be tricky. Here’s how to do it safely and accurately.
Measure from the centerline of each fixture or vent to mark your cut lines on the drywall sheet. This ensures your cuts are centered and symmetrical.
Use a utility knife to score along your marks, then snap the sheet along the scored line. Finish the cut with a keyhole saw or jigsaw for clean edges.
Safety note: Always use power tools with caution, keeping fingers away from the blade and wearing safety glasses.
Finishing, Inspection, and Common Fixes
Apply joint tape and skim coat or lightweight mud over seams, keeping coats thin to minimize sag. Allow for proper drying and then sand lightly to achieve a level ceiling. Inspect for screw pops, gaps, or uneven areas and address them promptly.
Note typical fixes for common issues like nail or screw heads pulling away or slight surface texture differences. Use appropriate patch methods and recheck for flatness before applying final finishes. Always verify that repairs align with the overall ceiling plan and safety guidelines.
Taping and first coat strategies for ceilings
Use this checklist before applying the first coat of joint compound on your ceiling seams to ensure a smooth, bubble-free finish.
- Check tape width: Use 2″ wide tape for wider seams. For narrower ones, use 1-1/4″.
- Inspect seam edges: Ensure they’re straight and clean. Any imperfections can cause bubbles.
- Moisten tape: Lightly dampen the back of the tape to help it adhere better.
- Apply tape: Press firmly along the seam, using a taping knife or your fingers. Avoid stretching the tape.
- Score seam: Use a utility knife to lightly score the paper face of the tape every 3/4″. This helps joint compound penetrate.
- Apply first coat: Using a wide taping knife (10″ or wider), apply a thin, even layer of joint compound over the tape. Avoid over-applying.
- Check for bubbles: Look for any signs of lifting or blistering. If found, re-wet the area and press down firmly with your knife.
- Let it set: Allow the first coat to dry according to manufacturer’s instructions before sanding and applying the next coat.
Quick rule: Always apply joint compound in thin, even coats. Thick applications can sag and blister on ceilings.
Detecting and correcting fastening issues
Use this checklist when you notice screws popping, sagging areas, or want to prevent these issues. It’s best to check after taping and first coat application.
- Check for under-driven screws: Look for screw heads that sit flush with the surface or are slightly below it. Use a flathead screwdriver to gently press on them; if they move, they’re too loose.
- Check for over-driven screws: Screw heads that are pushed in too far can cause damage. Look for dimples or indentations in the surface. Use a small pry bar to gently lift and check.
- Repair popped screws: Remove the popped screw, fill the hole with joint compound, let it dry, sand, and replace with a new screw driven to the correct depth.
- Check for sagging areas: Use a straight edge (like a level) to check for any dips or waves in your surface. If found, see below for repair.
- Repair sagging areas: Add joint compound to the low spot, let it dry, sand, and apply another layer if needed. Check with your straight edge after each application.
- Check support behind panels: Gently pull on panels to check for movement. If they move more than 1/8″, you may need additional support.
- Add additional support (if needed): Install blocking or furring strips between studs where panels are loose. Secure with screws driven to the correct depth.
- Check panel alignment: Ensure all panels are level and plumb using a level or straight edge. Misaligned panels can cause issues later on.
- Replace damaged panels: If a panel is damaged (cracked, broken, etc.), remove it, measure for a new one, install, and secure properly.
Quick rule: Always check your work after taping and first coat. It’s easier to fix issues now than later when they’re hidden behind more layers.
Ergonomics and Injury Prevention Tips
Protect your back and shoulders by using proper lifting posture, bending at the knees, and keeping panels close to your center of gravity. Rotate tasks to avoid prolonged overhead work and take regular short breaks to reduce fatigue. Involve helpers for heavier lifts or awkward angles to minimize strain.
Set up a logical workflow that minimizes reaching and twisting, and use available supports to reduce hold times. Verify that any assisting equipment is stable and used according to its instructions. Keep a clear path and secure your workspace to prevent slips and trips during the job.
Safe lifting techniques and team coordination
Lifting drywall panels safely is crucial to prevent injuries. Always lift with your legs, not your back.
Keep the panel close to your body, using a two-handed grip. For awkward edges, communicate clearly with your partner to avoid snags or drops.
When positioning panels on the ceiling, work together. One person holds the panel while the other guides it into place and secures it.
Alternatives to reduce physical demand
If you’re working alone or want to minimize strain, consider these alternatives:
Renting short-term equipment like panel lifts or jacks can make the job easier. More helpers can also lighten the load.
Pre-scoring panels at the stud locations before lifting reduces the need to stretch and reach while on a ladder.
Choosing lighter materials within safe ranges, like half-inch or 5/8″ drywall, can make handling panels less demanding.
Cost, Time Estimates, and When to Hire a Pro
Think through how long each stage might take and what DIY effort is realistic for your space. Consider consumables, fasteners, and basic tools as part of your planning. If timelines or effort feel overwhelming, weighing the option to hire a pro can prevent costly mistakes.
Red flags to consider include repeated misalignment, sagging ceilings, or unsafe lifting conditions. Check local rates, rental prices, and contractor availability to make an informed decision about DIY versus professional help. When in doubt, validate with a professional, especially for complex ceilings or high-risk setups.
Project timeline and labor planning
Hanging drywall on ceilings is a multi-stage process. Here’s a realistic breakdown:
Prep (1-2 days): Measure, cut, and cribbing if needed. Get your tools and materials ready.
Hanging (3-5 days per room): Start with the first sheet, work across the ceiling, handle seams, and cut for fixtures. Allow time for breaks and adjustments.
Finishing (1-2 days): Taping, first coat, and inspection. Fix any issues that pop up during this stage.
Hiring considerations and questions to ask contractors
Before hiring, make sure your contractor is insured and licensed. Ask for references and check them.
Pros are safer and more economical in complex jobs like:
– High ceilings (over 9 feet)
– Intricate cuts around obstacles
– Large areas with many seams
Ask about their experience with ceiling installations specifically. Make sure they understand your project’s unique demands.
Conclusion
The key to hanging drywall on a ceiling without a lift is control: plan, test, and hold fast until the screws pull everything true. When you stay focused on safety, you protect yourself, the material, and the finished look from costly mistakes.
First, confirm the ceiling framing is solid and the work area is clear, then set up the chosen temporary supports, dry-fit the sheets, and mark your fastener pattern. Lift and hold each panel with a trusted partner, secure it start to finish, and check that each sheet is plumb and continuous before moving on to finish work or finishing compounds. Stay patient, work in small steps, and test as you go in a small area before committing to the whole ceiling. Test in a small area first and always use proper PPE and stable footing.
Common mistakes to avoid include rushing the lift, trying to muscle the sheet into place without a support plan, and using damaged or warped panels. Don’t work over shoulder height for long stretches, take breaks to reset your stance, and double-check that every fastener line is secure before moving on. Follow a simple safety rule: never bypass a step that would compromise alignment or hold, and always verify the sheet is supported before you load screws or joint compound.
If the project veers into uneven ceilings, sagging framing, or you simply can’t achieve a solid hold safely, it makes sense to hire a pro rather than pushing ahead. For most homeowners, a well-planned approach and a clear safety margin deliver durable results without drama. Stay disciplined, stay safe, and you’ll finish with a ceiling that looks good and lasts.
FAQ
What are safer alternative methods to lift drywall without a lift?
Use a helper or two, and move the sheet in stages to the ceiling edge. Set up a stable staging area with supports you can slide the sheet onto, then slide it into place rather than lifting high and far at once. Always check the sheet’s weight and manufacturer guidance before attempting any lift.
How should I secure drywall to the ceiling before fastening it?
Hold the sheet tight against the ceiling and fasten along the edge first. Use temporary supports or a helper to keep the sheet from sagging as you set screws or nails in the recommended pattern. If the sheet won’t hold, check the framing, supports, and manufacturer instructions before proceeding.
What are red flags that mean I should stop and hire a pro?
If the ceiling or joists look damaged, sagging, or out of plumb, stop. If you cannot safely support a full sheet or balance it with a helper, pause and reassess. When in doubt, check manufacturer guidance and local rules, and consider a pro for high-risk scenarios.
How can I protect my back while hanging drywall on a ceiling?
->Plan moves in small steps and keep the sheet at waist height as you position it. Use proper lifting techniques and take breaks to reset your stance. If you feel strain or pain, stop and rework with a helper or alternative support.