
Introduction
Hanging drywall solo means installing full sheets on walls by yourself, using temporary cleats and supports.
This intro explains practical, hands-on steps you can use to hold panels in place while you fasten them. Plan your approach, set up simple temporary cleats and supports so the sheet can be slid into place without grabbing the edges, and work methodically from a corner to keep things manageable. If something feels off, pause and verify, then proceed with the appropriate fasteners and safe handling as guided by the product instructions and local rules.
Key takeaways
- Plan ahead, mark drywall sheet sizes, studs, and electrical obstructions before starting.
- Secure temporary cleats level and clear of debris to prevent slips during lift.
- Practice solo lifting with small sections and ask for help if motion feels unstable.
- Map screw pattern from top course down to maintain alignment and edges.
- Maintain clean work area; remove trip hazards and store tools before drilling.
- Know when to pause, recheck alignment, or call in professional help.
Table of Contents
- Introduction
- Key takeaways
- Planning the Job and Assessing Site Conditions
- Tools and Materials Checklist
- Building and Using Temporary Cleats
- Solo Lifting and Positioning Techniques
- Fastening Sequence and Screw Pattern for Solo Work
- Troubleshooting Common Problems While Working Alone
- Finishing Touches and Removing Temporary Supports
- Material Specs, Standards, and When to Get Help
- Conclusion
- FAQ
Planning the Job and Assessing Site Conditions
Start by walking the room and noting any obstacles that will affect hanging drywall. Look for windows, doors, outlets, and uneven studs that can throw off alignment. Decide whether to start on the ceiling or the wall based on access and support needs, and outline a steady sequence for solo installation.
Check labels and manufacturer instructions for any special considerations on the boards you have. If you’re unsure about local rules or code requirements, verify with the label, product data sheet, or your local building department before you begin. When in doubt, plan for extra hands or postponing tricky sections until help is available.
Measuring and Layout Strategy
Start by measuring the length and height of each wall. Mark these dimensions on a sketch for reference.
Use a stud finder to mark stud lines every 16 or 24 inches, depending on your home’s construction. These marks will guide you when hanging drywall.
Plan seams carefully. Try to end each sheet in the middle of a stud for maximum support. Avoid ending sheets at corners or over windows and doors.
Safety and Work Space Preparation
Wear appropriate PPE: gloves, safety glasses, and a dust mask. For ceiling work, consider a hard hat.
Clear the workspace of any obstructions. Remove or cover furniture and protect floors with drop cloths.
Ensure adequate lighting by setting up work lights if needed. Ventilation is crucial; open windows or use fans to keep dust to a minimum.
Tools and Materials Checklist
Keep a short, prioritized kit handy: temporary cleats, braces, screws, joint tape, and finishing supplies like compound and a knife. Include a utility knife, drywall screws, a drill/driver, a screwgun, and a measuring tool. Consider rental options for specialty tools if you don’t already own them.
Review each item’s label and manufacturer instructions to confirm suitability for your board type and thickness. If you’re missing something, note safe alternatives and callouts like “use wall studs for backing” or “check load limits” on the packaging. Always plan for proper storage and disposal of temporary supports after the job.
Essential Tools for Lifting and Securing Sheets
Before you start hanging drywall, make sure you have these tools to help you lift, secure, and cut the sheets safely and efficiently.
- Drywall lift: A must-have tool for lifting heavy sheets up to the ceiling. If you don’t have one, consider renting or using a T-bar as an alternative.
- Screw gun: Use this to drive screws quickly and securely into the cleats and studs. Using a manual screwdriver can be time-consuming and tiring.
- Utility knife: Essential for cutting drywall sheets to size. A sharp blade ensures clean cuts and prevents damage to the sheet.
- Tape measure: Measure twice, cut once. Accurate measurements prevent waste and ensure a proper fit.
- Straight edge: Use this to guide your utility knife for straight, accurate cuts.
- Pencil: Mark where you need to cut and where studs are located to ensure proper screw placement.
- Safety glasses: Protect your eyes from debris while cutting and sanding drywall.
- Work gloves: Prevent blisters and protect your hands from sharp edges.
Quick rule: Always double-check your measurements before making cuts to avoid wasting material and time.
Temporary Cleats, Bracing Options, and Fasteners
To secure drywall sheets in place while you work, use these temporary supports and fasteners.
- Cleats: Use 1×4 or 1×6 lumber for cleats. They should be long enough to span the width of your drywall sheets and provide support at both ends.
- Adjustable braces: These are useful for supporting drywall on uneven surfaces or when working alone. They can be adjusted to fit different angles and heights.
- T-braces: For added stability, use T-braces at the top of your cleats to prevent them from tipping over while you work.
- 1-5/8″ drywall screws: Use these for securing drywall to studs and cleats. They are long enough to penetrate studs but not so long that they protrude through the drywall surface.
- 1-1/4″ drywall screws: For attaching cleats to studs, use shorter screws to prevent them from poking through the drywall surface.
- Stud finder: Locate and mark studs so you know where to drive screws for added support.
- Level: Ensure your cleats are level before attaching drywall sheets. This helps create a smooth, even surface.
Quick rule: Always secure drywall sheets to both studs and cleats for maximum stability during installation.
Building and Using Temporary Cleats
Cut scrap lumber to create sturdy cleats that catch the edges of the drywall as you Hang. Space cleats to align with stud lines and board edges so the sheet rests firmly while you fasten. Attach them securely to solid framing with screws or nails that won’t pull out under load.
Place cleats where you’ll need edge support and remove them only after the sheet is firmly fastened and the area is safe to work around. For load-bearing placement, prioritize edges and corner areas, and avoid overloading any single cleat during handling. If you’re unsure about attachment methods, consult the product instructions or a pro for safe options.
Ceiling Cleat Techniques
To hang drywall on the ceiling solo, you’ll need temporary cleats to support the sheets while you fasten them. Here’s how:
First, cut 1×4 or 2×4 lumber into strips about 8-10 inches long for your cleats.
Position these cleats along the ceiling joists, spacing them every 16-24 inches. Screw them in using drywall screws, leaving the head of the screw slightly proud to create a lip that supports the drywall edge.
Tip: Place your cleats about an inch away from the wall to allow for easy lifting and hanging of the ceiling sheets.
Wall Cleat and Ledger Methods
For long wall sheets, you’ll need additional support. Here’s how to use ledger strips and horizontal cleats:
Cut 1×4 or 2×4 lumber into long strips for your ledgers. These should be as long as your drywall sheets.
Position the ledger strip along the top of your wall, level with the ceiling. Screw it in using drywall screws every 8-10 inches. This will provide a solid edge to rest your drywall sheet on while you fasten it.
For additional support, cut shorter cleats (similar to your ceiling cleats) and screw them horizontally into the studs at the desired height. These should be spaced every 16-24 inches along the wall.
Solo Lifting and Positioning Techniques
Grip the sheet with a stable stance and use your legs to lift, keeping the board close to your body. Use a slide-and-tilt motion to bring the sheet into place without jerking. Work from the center or a supported edge to guide the sheet toward its final position.
Wedges or shims can help fine-tune alignment before driving screws, reducing twisting and edge gaps. Move slowly and communicate with anyone nearby if you have help available; if not, stop and re-evaluate your approach to avoid dropping the sheet. Focus on maintaining control throughout the placement.
Using a T-Brace and 2×4 Supports
When hanging drywall solo, you’ll need temporary supports to hold sheets in place while driving screws. A simple yet effective method is using a T-brace or push brace made from a 2×4.
To create a T-brace, cut a 2×4 into two pieces: one about 3 feet long and another about 1 foot long. Attach the shorter piece perpendicular to the longer one using screws or nails, creating a ‘T’ shape.
Position the T-brace against the wall where you want your drywall sheet to go. Place the vertical part of the T against the wall, with the horizontal part resting on the floor. Lean the drywall sheet against the brace, then drive screws through the drywall and into the studs behind it.
Safety tip: Always wear safety glasses when cutting or driving screws to protect your eyes from debris.
Leveraging Doors, Windows, and Other Anchors
Existing openings like doors and windows can serve as excellent temporary supports when hanging drywall solo. They provide a stable point to lean your sheets against while you secure them.
To use an opening as a support, position the drywall sheet so that one edge rests on the door or window frame. Be sure to protect the frame with a scrap piece of wood or cardboard to prevent damage from the drywall’s sharp edges.
Once your sheet is positioned, drive screws through it and into the studs behind it, just as you would with a T-brace. If needed, use wedges or shims to fine-tune the sheet’s position before screwing.
Pro tip: For extra stability, you can temporarily remove the door or window from its hinges while hanging drywall. Just be sure to put it back once you’re done.
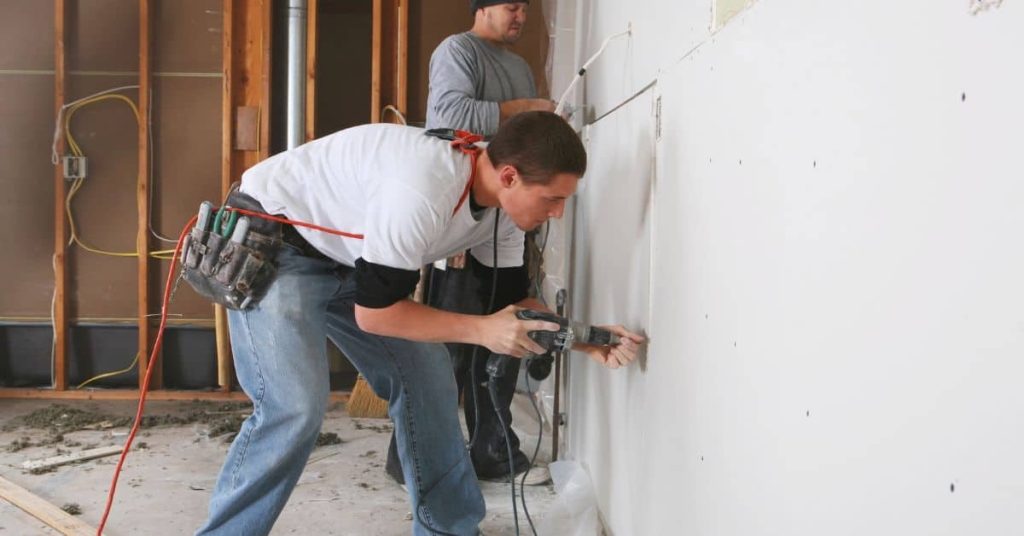
Fastening Sequence and Screw Pattern for Solo Work
Start by securing the sheet along one edge to establish a straight line, then fasten the opposite edge. Proceed to intermediate points between edges to prevent sagging and keep seams tight. Maintain a consistent spacing pattern that suits the board type and your existing framing, avoiding over-tightening that could warp the sheet.
Back-screwing from the opposite side can help pull the sheet flat and align edges, but only if your setup permits safe access. Follow manufacturer guidance for screw types and lengths, and check that each fastener seats cleanly without tearing the paper face. If in doubt, verify the pattern and required spacing on the board label or instructions.
Ceiling First vs. Wall First: Pros and Cons
The order you hang your drywall – ceiling first or walls first – can make a difference in how smoothly the job goes.
Pros of Hanging Ceiling First
- Easier to handle sheets on the ground before lifting them up.
- Less chance of damaging walls with drywall screws.
- Can use ceiling as a reference for straight walls.
- Easier access to electrical boxes from above.
Cons of Hanging Ceiling First
- Need to secure ceiling sheets temporarily before starting walls.
- May need to work overhead, which can be tiring and awkward.
- Dust from ceiling may fall onto finished walls.
For typical rooms with standard ceilings, hanging the ceiling first is usually the better choice. It’s easier to handle sheets on the ground and use the ceiling as a reference for straight walls.
Handling Seams, Cutouts, and Corners
Fitting drywall sheets around openings, electrical boxes, and corners is crucial for a tight, flat finish.
For cutouts: Measure and mark the opening on the drywall. Use a utility knife to score along the line, then snap the sheet and use a saw to complete the cut. Fit the sheet into place and secure it with screws.
For electrical boxes: Use a drywall saw or jab saw to cut around the box. Fit the sheet in place, then use a screwdriver to gently push the drywall around the box’s edges. Secure the sheet with screws, making sure not to cover the box.
For corners and seams: Use joint tape to cover the seam or corner. Apply joint compound over the tape, feathering it out on either side. Let it dry, then sand it smooth before applying a second coat of compound.
Troubleshooting Common Problems While Working Alone
Bowling or waviness can show up as you go; address it by adjusting supports and re-tightening screws in a progressive pattern. Misaligned studs are tough to fix late; take time to re-check before continuing and use shims if needed. Large gaps between sheets require incremental tightening and added fasteners in the seam area.
Heavier sheets can bind or slip; keep cleats in place and use wedges to hold while you secure the next fasteners. If gaps persist, pause and reevaluate alignment, then apply tape and mud as needed after the sheet is stabilized. When issues arise, refer to the board label for recommended remedies and safe steps.
Fixing Bowed or Uneven Sheets
When sheets start to bow, don’t panic. Here’s how to pull them flat:
Shims are your friend. Slip them between the sheet and the studs where it’s bowed out. Tap gently with a hammer to set.
Add extra screws in a staggered pattern along the bow. This helps distribute pressure evenly.
If bowing is severe, remove the screws, tap the sheet flat using a block of wood and a hammer, then reset the screws.
Dealing with Misplaced Studs or Weak Backing
Misplaced studs or weak backing can cause issues. Here’s how to tackle them:
For misplaced studs, use a furring strip. Attach it to the misplaced stud, then screw your drywall into this new straight surface.
If you’ve got weak backing, consider using adhesive. Apply it to the back of the sheet before screwing. This adds extra hold.
For localized support, use a toggle anchor. Drill a hole in the drywall, insert the toggle, then screw through the drywall into the stud.
Finishing Touches and Removing Temporary Supports
Carefully remove cleats and braces without prying or bending the drywall edge. Inspect screwheads for flush seating and re-drive any that sit high or low. Prepare seams for taping and mudding by ensuring edges are clean and well-supported.
Clean up debris and recycle or reuse temporary pieces where appropriate, taking care not to damage installed drywall during removal. If you used specialty temporary pieces, store them for possible reuse and note any wear or damage for future projects. Always verify that the finished surface is ready for taping before proceeding.
Visual Checkpoints Before Taping
Before you start taping and mudding, it’s crucial to inspect your drywall for any issues. This ensures a smooth finish and helps prevent costly mistakes.
- Flush Seams: Ensure all seams are flush with the wall or ceiling. Any gaps can cause problems later on.
- Screw Depth: Check that screws are slightly recessed (around 1/32 inch) but not too deep, which could cause cracking.
- Gaps at Edges: Ensure there are no gaps between the drywall and the wall or ceiling edges. Fill any with joint compound if necessary.
- Screw Heads: Make sure all screw heads are fully set, not sticking out.
- Seam Alignment: Check that seams align properly both horizontally and vertically.
- Corners: Ensure corners are square and flush. Use a corner bead if needed.
- Cutouts: Inspect any cutouts (like for switches or outlets) to ensure they’re clean and ready for mudding.
- Bowed Sheets: Check for bowed sheets, which can cause visible waves in your finished walls. If found, address them before taping.
Quick rule: Always inspect your work before moving on to the next step. It saves time and money in the long run.
Salvaging and Storing Cleats and Braces
Temporary supports like cleats, braces, and T-braces are valuable tools that can be reused many times. Here’s how to store them for future use.
Cleaning: After each job, clean your supports thoroughly to remove any dried joint compound or other debris. This ensures they’ll last longer and work better the next time you need them.
For adjustability, consider adding holes at regular intervals along the length of your cleats and braces. This allows you to adjust their size for different drywall sheets and jobsites.
Storage: Store your supports in a cool, dry place where they won’t warp or rust. A garage or shed works well. Keep them organized so you can find what you need quickly when starting a new job.
Material Specs, Standards, and When to Get Help
Understand common drywall thicknesses and the purpose of moisture-, fire-, or sound-rated boards, then compare to your project’s needs. Review any code-relevant considerations and plan for safe ranges and installation limits. If you’re unsure about compatibility, check the board label or manufacturer instructions for guidance.
When a second pair of hands or a pro is advisable, rely on local rules or a call to the local building department for confirmation. If you’re uncertain about codes, prioritize safety and seek professional help or at least a second opinion before proceeding with tricky sections or high-risk installations.
Choosing the Right Drywall Type and Thickness
When it comes to drywall, thickness matters. It affects how you handle sheets and what supports you need.
1/4″ is great for small repairs or where you don’t want much bulk. It’s easy to handle solo but offers less soundproofing.
3/8″ is a good balance between weight and strength. It’s manageable alone, provides decent soundproofing, and is often used in single-family homes.
1/2″ is heavy but offers excellent soundproofing. It’s best for rooms where noise reduction is crucial, like home theaters or bedrooms. You might need help with these sheets.
5/8″ is thick and heavy, used in places like hospitals or apartments to meet fire codes. These are tough to handle alone; consider renting a lift or getting help.
Recognizing Jobs That Need a Second Pair of Hands
Some drywall jobs are just too big for one person. Here’s when to call in reinforcements or rent equipment.
Large sheets, like 1/2″ or 5/8″, can be unwieldy alone. If you’re working with these, consider getting help or using a lift.
High ceilings mean heavy lifting. If your ceiling is more than about 9 feet, think twice before going solo. You’ll need someone to hold the sheet while you fasten it in place.
Structural openings, like doors and windows, require careful maneuvering. If you’re working around these, having another person can make the job safer and easier.
Complex curves or shapes are tough to handle alone. If your walls aren’t straight, consider getting help or renting specialized equipment.
Conclusion
aragraph>With drywall hung, the job is durable only if you treated it like a controlled lift and a precise fasten. Keep safety front and center, verify each step against your plan, and check that everything stays true as you work solo.
aragraph>
Proceed with a simple, repeatable check sequence: install and secure temporary cleats and supports, verify the wall is plumb and the sheet is centered, assemble the sheet on the cleats, lift and position with deliberate movement, then apply the fasteners in the recommended pattern, recheck alignment, and finally remove the temporary aids after the panels are firmly set. Do small tests first, test a cut in a hidden spot, and work from one edge toward the center so you don’t push a misfit into place.
Common mistakes to avoid are trying to lift panels heavier than you can control, skipping the temporary supports or misplacing them, and rushing the screw pattern or spacing. A few safety rules to follow: never lift alone past your limit, always secure the sheet before moving it, and verify the edge along any long seam before driving fasteners. If something feels off, stop, recheck the setup, and correct it before continuing.
If you’re unsure about a job step—especially complex lifts, long spans, or awkward layouts—calling a pro is wise. When in doubt, don’t push ahead; get help sooner rather than risking wall damage or personal injury. Stay deliberate, stay safe, and you’ll finish clean and solid. You’ve got this.
FAQ
How do I know when temporary cleats are ready for a solo lift?
Check that the cleats are solidly fastened and properly aligned with the sheet edge. They should feel stable if you push or pull gently, and there should be no wobble. If in doubt, recheck attachment points and manufacturer guidance for the cleats you used.
What should I do if a drywall sheet shifts while I’m lifting solo?
Pause, set the sheet back where it belongs, and re-secure the cleats or supports. Do not fight the sheet—take the time to recheck balance and grip before continuing. If movement repeats, re-evaluate your setup or get a second pair of hands.
How can I prevent screws from stripping when driving them alone?
Use the correct screw length and sharp bit, and take steady, consistent turns without forcing. Stop and start positions after a few screws to avoid overdriving. If the screw stalls, back it out a bit and recheck the surface alignment before proceeding.
How should I safely remove temporary supports after hanging a sheet?
Remove fasteners and cleats in a controlled order, keeping the sheet supported until the last attachment is secure. Work from the edges toward the center so the sheet doesn’t sag or drop unexpectedly. If in doubt, wait for a second pair of hands to help with the final lift.