
Introduction
Plaster over blueboard means applying a veneer plaster finish bonded to the paper-faced gypsum board rather than feathering multiple coats of joint compound; it’s a different material and technique used when a harder, smoother surface is wanted. Veneer plaster generally requires cleaner, keyed surfaces and different tools than joint compound, so check product instructions and local rules before starting. I’ll describe why you might pick veneer plaster versus joint compound and what to expect from each on blueboard.
For a DIY job, think of veneer plaster as a thin cement-like skim that sets differently and often needs a different mixing and application approach than ready-mixed compound. Prepare the blueboard by cleaning, repairing seams per manufacturer guidance, and gathering trowels, hawk, mixing gear, and finishing floats; if unsure about a step or a spec, check the product label or the plaster manufacturer’s instructions. This overview helps you weigh durability, finish quality, and prep work so you can choose the method that fits your skills and the room’s needs.
Key takeaways
- Veneer plaster yields a smooth, tougher finish on blueboard compared to joint compound.
- Prepare blueboard by cleaning, priming, and feathered edges for veneer plaster.
- Use dedicated plastering trowels, hawks, and a plaster mixer for consistent work.
- Follow manufacturer guidelines and local codes for application thickness and cure.
- Sanding and priming require dust control, ventilation, and PPE like masks.
- Damage or cracks indicate substrate movement: address issues before veneer plastering.
Table of Contents
- Introduction
- Key takeaways
- Executive Comparison: Veneer Plaster Vs. Joint Compound
- Preparing Blueboard and Substrate for Plastering
- Tools and Materials Checklist
- Application Techniques for Veneer Plaster on Blueboard
- Finishing Steps: Sanding, Priming, and Painting
- Common Problems and Troubleshooting
- Cost, Durability, and Maintenance Comparison
- Project Planning, Timeline, and Safety
- Conclusion
- FAQ
Executive Comparison: Veneer Plaster Vs. Joint Compound
Veneer plaster and joint compound behave differently on blueboard: veneer plaster bonds chemically and cures to a harder, thinner finish while joint compound relies on mechanical adhesion and generally stays softer and thicker. Consider adhesion, crack resistance, and final surface texture when deciding which system matches your performance needs.
Use veneer plaster where a high-end, durable smooth finish is the goal and surface impact or humidity resistance matters; choose joint compound for quick repairs, small skim coats, or fast-track DIY patches. Compare material and labor drivers—material type, number of coats, equipment and sanding effort, plus rework risk—and check product labels or data sheets for specific cure and application limits before committing.
Advantages of veneer plaster
Veneer plaster, also known as finish plaster, offers several benefits when used over blueboard. It’s durable, hard, and can hide substrate irregularities better than joint compound.
Its superior smoothness makes it ideal for high-end finishes. Once applied, veneer plaster provides a consistent, uniform surface that’s ready for painting or wallpapering.
It also has good resistance to cracking and shrinking, ensuring long-term performance with minimal maintenance.
When joint compound is the better choice
While veneer plaster is often superior, there are situations where joint compound may be adequate or preferable. If you’re on a tight budget, joint compound can be cheaper.
For small repairs or touch-ups, it’s faster and easier to apply. It also requires less skill to use, making it a good option for DIYers with limited experience.
If speed is a priority, joint compound dries quicker, allowing you to move on to the next step of your project more rapidly.
Preparing Blueboard and Substrate for Plastering
Start by inspecting fasteners, seams, and the overall plane: tighten or countersink loose screws, replace damaged board, and run a straightedge to locate highs and lows that need filling. Clean the face of dust, oils, and loose paint, then lightly abrade the surface to promote bonding without creating gouges that could show through the final coat.
Treat seams with the manufacturer-recommended joint system—mesh or tape and compatible joint material—and feather joints smooth to the panel face so they won’t telegraph through the veneer. Verify substrate moisture and compatibility with the chosen plaster or primer by checking the product instructions and addressing any leaks or damp conditions first.
Assessing and repairing blueboard
Before you start plastering, give your blueboard a thorough once-over. You’re looking for any issues that could cause problems later on.
Loose fasteners: Tighten any screws or nails that wobble. Use a screwdriver or hammer to secure them. If one’s too damaged, replace it.
Crushed edges: Check for any crushed or bent edges on the blueboard panels. Straighten them out as best you can. If they’re badly damaged, you might need to replace the panel.
Damaged panels: Look for any cracks, holes, or other damage in the blueboard. Repair these using a joint compound and mesh tape before plastering.
Visual checkpoints before veneering
Before you start applying your veneer plaster, it’s crucial to do a visual inspection. This ensures your blueboard is ready for the job.
- Seam level: Check that all seams are level and flush with the surrounding surface. Any ridges here will show up in your finished wall.
- No gaps: Ensure there are no gaps between panels. Fill any with joint compound and mesh tape.
- Dry substrate: Make sure the blueboard is completely dry. Moisture can prevent adhesion and cause bubbling.
- No oil or contaminants: Wipe down the surface to remove any dust, oil, or other contaminants that could interfere with adhesion.
- Lightly abraded: The face of the blueboard should have a slightly rough texture. This helps the plaster adhere better.
- Avoid deep gouges: While some texture is good, deep gouges can telegraph through to your finished wall. Sand out any that are too deep.
- No loose paint: Remove any loose or flaking paint from the surface. This could cause problems later on.
- Check for lipping: Run a straightedge across the walls to check for high spots, dips, or ‘lipping’. You’ll need to address these before plastering.
Quick rule: If in doubt, do a small test patch. This can help you spot any issues before they become big problems.
Moisture, bonding, and compatibility checks
Before you start plastering, it’s important to ensure your blueboard is in good condition and compatible with the veneer plaster you’re using.
Check for moisture: Make sure there are no water leaks or moisture incursions behind the blueboard. Moisture can cause serious problems with your finished wall.
Substrate contamination: Ensure the surface is clean and free of contaminants. These could interfere with adhesion and cause problems later on.
Compatibility check: Make sure the blueboard and veneer plaster system you’re using are rated for your environment and compatible with each other. Check the manufacturer’s data to be sure.
Tools and Materials Checklist
Separate your lists: for veneer plaster bring bonding primer, blueboard-compatible veneer mixes, finishing trowels, hawk, mixing bucket, straightedges, and optional sprayer or pump for large areas; for joint compound include setting-type or ready-mix compound, taping knives, mud pan, mixing drill with paddle, and sanding screens. Confirm pot life, working time, and recommended mixing method on the product packaging before purchase or rental.
Also collect substrate-prep items—cleaners, abrading blocks, primer—and PPE: dust masks or respirators, goggles, and gloves, plus dust containment gear for sanding. Make a quick-on-site checklist to validate batch sizes, mixing tools, drill speed settings, and that a test patch is possible to confirm bonding and cure behavior in your room conditions.
Plaster-specific materials to verify
Before you start, check these plaster-specific materials and their details to ensure a smooth application.
- Veneer gypsum vs. cement-based plasters: Check which type suits your project better. Gypsum is lighter but less durable; cement-based is heavier but more durable.
- Bonding agents: Ensure you have the right bonding agent for your chosen plaster and substrate. Skim coat or primer may be needed for blueboard.
- Plaster mix type: Verify if you need pre-mixed or powdered plaster. Pre-mixed is easier to use but has a shorter pot life.
- Working time: Check the working time of your chosen plaster. This affects how long you have to apply and smooth it before it sets.
- Cure characteristics: Understand how long it takes for the plaster to cure fully and reach its full strength.
- Plaster weight: Check the weight of the plaster mix. Lighter mixes are easier to apply but may not provide as thick a coat.
- Coat thickness: Verify the recommended coat thickness with the product data. This affects how many coats you’ll need and how long the job will take.
- Clean-up needs: Check if your plaster requires water or chemical cleaners for tool cleaning after use.
Quick rule: Always verify product specs with the manufacturer to avoid surprises on-site.
Joint compound and accessory materials
Here’s a checklist of joint compound options, taping supplies, and accessories for a smooth finish.
- Joint compound types: Choose between ready-mix (easier to use but shorter pot life) or setting-type (longer working time but needs mixing).
- Premixed vs. powder: Decide if you need premixed joint compound for immediate use or powdered for flexibility.
- Additives: Consider using additives like fiberglass tape for added strength and durability.
- Fiberglass tape compatibility: Ensure your chosen joint compound is compatible with fiberglass tape.
- Batch sizing: Calculate how much joint compound you’ll need per batch to avoid waste or running out mid-job.
- Pot life: Check the pot life of your chosen joint compound. This affects how long it stays usable once mixed.
- Working time: Understand how long you have to apply and smooth the joint compound before it sets.
- Clean-up needs: Check if your joint compound requires water or chemical cleaners for tool cleaning after use.
Quick rule: Always verify product specs with the manufacturer to ensure compatibility and avoid job delays.
Application Techniques for Veneer Plaster on Blueboard
Follow the manufacturer’s recommended coat sequence: apply bonding primer or bond coat as required, then scratch or leveling coats only if specified, finishing with the thin veneer coat to the thickness the product calls for. Mix to the proper consistency, work in manageable sections, and control trowel angle and pressure to avoid highs and lows or hairline ridges.
Watch ambient conditions—temperature and humidity affect set and cure—so check product guidance for acceptable ranges and waiting periods between coats. Keep essential tools at hand (trowels, hawk, straightedge, mixing tools) and troubleshoot pinholes or popping by allowing full cure and applying targeted rework as the instructions recommend.
Mixing, Pot Life, and Test Patches
Start by mixing your veneer plaster according to the manufacturer’s instructions. Consistency is key – it should resemble thick peanut butter.
Check the pot life – how long the plaster remains usable after mixing. Work within this time frame to avoid waste and ensure proper adhesion.
Always do a test patch before full application. This helps you check for any compatibility issues, ensures your mix is right, and gives you a feel for the material’s behavior on your specific substrate.
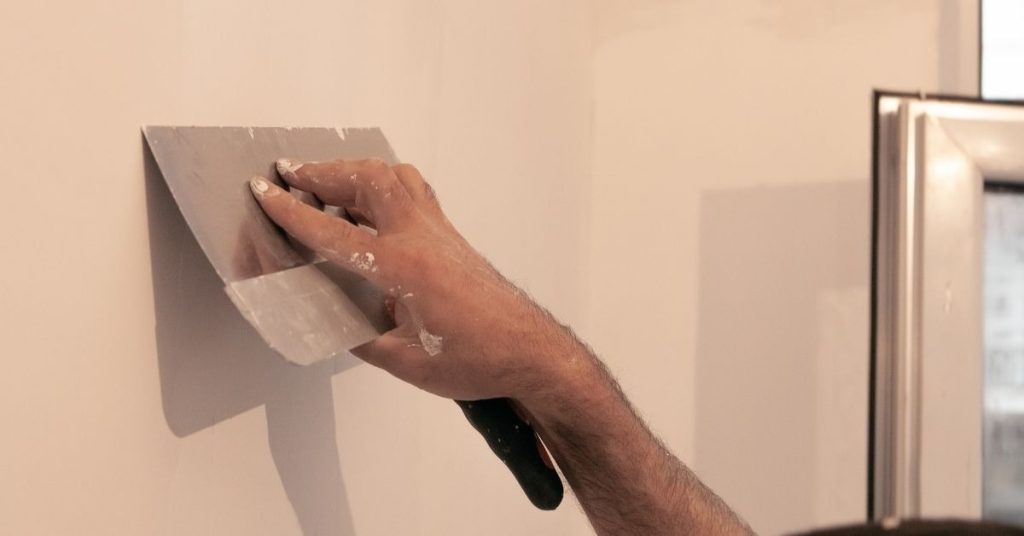
Troweling, Feathering, and Timing Tips
Use a 12-inch trowel for your first pass. Hold it at a 45-degree angle to the wall for better control and to avoid air pockets.
For subsequent passes, use a 6-inch trowel. Feather the edges of each pass into the previous one to avoid lap marks. Maintain consistent pressure – too much can cause low spots, too little can leave highs.
Time your passes carefully. Work within the plaster’s open time – the window between when it’s applied and when it starts to set. This varies by product, so check the manufacturer’s guidelines.
Finishing Steps: Sanding, Priming, and Painting
Determine whether sanding is appropriate for your plaster product and wait until the veneer has cured to the stage the manufacturer specifies; use damp-sanding methods or fine abrasives where advised to avoid tearing the surface. Remove dust thoroughly before priming—vacuum and tack cloths work best—so the primer bonds evenly to the plaster surface.
Choose a primer compatible with the plaster type and the paint you plan to use; consult product directions for recommended primer classes and any special sealing steps. Test a small panel for sheen and adhesion to confirm the paint system performs as expected under your environmental conditions before finishing the entire project.
Techniques to minimize sanding and dust
Sanding can create a lot of dust, so here are some strategies to reduce it:
Wet Scraping: Use a damp flexible scraper to remove any excess plaster. This minimizes dust and helps achieve a smooth finish.
Float Finishes: After the initial application, use a float trowel to smooth out any imperfections. This can help reduce the need for sanding later on.
Start with coarser grits (e.g., 120) and progress to finer ones (e.g., 220). Use a sanding block or pole sander to maintain even pressure. Always wear a dust mask and consider using a vacuum attachment for your sander.
Primer and paint selection for veneered walls
A good primer is crucial for even sheen and adhesion on plastered surfaces. Here’s what to consider:
Bonding Primers: For new blueboard, use a bonding primer to ensure the plaster adheres well. These primers create a strong bond between the substrate and the plaster.
PVA or Acrylic Latex Primers: Once your plaster is cured, these primers can help seal the surface and improve paint adhesion. They’re also great for sealing minor imperfections.
Always check the paint manufacturer’s guidance for plaster substrates. Some paints may require a specific primer or have special application instructions. Consider the sheen you want (e.g., flat, eggshell, semi-gloss) and whether you need durability, washability, or stain resistance.
Common Problems and Troubleshooting
Recognize typical failures early: bond loss shows as flaking or delamination, hairline cracking often follows substrate movement or rapid drying, and seam telegraphing appears as linear ridges or depressions. Use visual cues—pattern, location, and timing—to narrow causes and perform simple field checks like moisture evaluation and adhesion spot tests before large repairs.
Repair paths vary: re-bonding or spot-skim can fix small delaminations, cracks may need routed-and-filled repairs or mesh reinforcement, and telegraphed seams often require re-feathering and a thin skim over the area. Always follow compatible-material guidance for primers, bonding agents, and repair mortars, and use dust control and PPE while working.
Diagnosing joint compound failures
Joint compound issues can arise during the application process. Here’s how to spot and fix common problems:
Shrinking: This happens when compound dries too quickly or wasn’t mixed properly. Solution: Re-wet, re-mix, and apply additional coats.
Cracking: Cracks form due to improper drying, substrate movement, or inadequate embedding of tape. Solution: Retape, apply more compound, and ensure proper drying time.
Soft spots: These occur when compound wasn’t allowed to dry completely before sanding or painting. Solution: Allow the area to dry fully, then lightly sand and reapply a thin skim coat.
Repairing veneer plaster issues
Veneer plaster can develop imperfections over time. Here’s how to decide between spot repairs and full section replacement:
For minor hairline cracks or small chips, spot repair is usually sufficient. Use a bonding agent, apply joint compound, and feather the edges.
If you see wide cracks, large areas of discoloration, or severe substrate movement, it’s best to remove and reapply sections. First, score and snap off damaged areas, then prep the surface for new plaster application.
Always remember: prevention is key. Maintain consistent substrate moisture levels, use compatible materials, and follow proper curing procedures to minimize future issues.
Cost, Durability, and Maintenance Comparison
Cost drivers include material choice, labor skill and time, project scale, and expected rework frequency; veneer plaster typically shifts cost toward skilled labor and specific mix products, while joint compound leans on longer sanding and recoat time. For lifecycle planning, check manufacturers’ longevity guidance and solicit local labor quotes to compare realistic cost-per-square-foot scenarios and contingency allowances.
Durability factors hinge on environment and use: veneer systems tend to resist impact and humidity better when properly installed, whereas joint compound may need more frequent touch-ups in high-traffic or damp areas. Build a maintenance plan that schedules inspections, moisture control, and timely crack repairs, and document conditions and product choices for future warranty or renovation decisions.
Cost drivers and how to estimate
The cost of plastering over blueboard varies based on several factors. Let’s break down the primary cost drivers:
Labor rates differ from one region to another, and even between contractors in the same area. Get quotes from at least three local pros to compare.
Complexity of the job—like intricate corners or high ceilings—also affects labor costs. More complex jobs take longer, so time is a significant cost driver.
Waste and surface prep materials like tape and primer add to the total cost. Ask contractors for an itemized quote to see where you can cut back on waste or upgrade materials without breaking the bank.
Longevity, repairs, and resale considerations
Veneer plaster typically outperforms joint compound in terms of longevity. It’s designed to bridge hairline cracks and absorb minor movement, reducing the likelihood of major failures.
Maintenance is minimal but not zero. Expect to touch up small cracks every few years. Regular inspections help catch issues early. For major repairs, you’ll likely need a pro, especially if the substrate is damaged.
Proper maintenance keeps your walls looking great and can boost resale value. Buyers prefer smooth, well-maintained surfaces. Plus, a history of regular upkeep shows you’ve taken good care of the home.
Project Planning, Timeline, and Safety
Lay out a clear sequence: blueboard installation and inspection, substrate prep and priming, bond/scratch/veneer coats as required, then finishing and paint—consult product data for exact intervals between coats. Map key milestones on a timeline and allow flexibility for dry and cure windows that depend on temperature and humidity; verify those windows with the manufacturer’s technical information.
Set up safety and ventilation: plan dust containment, appropriate PPE, safe scaffold or ladder practices, and a staging area for mixing and waste. Consider environmental contingencies—high humidity or cold snaps—and include inspection checkpoints for planarity, adhesion, and pinholes before moving to the next stage.
Typical project phases and sequencing
Plastering over blueboard involves several stages. Plan your workdays around these:
Prep Day: Inspect blueboard, fill gaps if needed, and prepare the surface.
Bonding/First Coat (Day 2): Apply the first layer of veneer plaster to bond with the blueboard. Allow it to set and dry according to product data.
Finish Coats (Day 3-4): Apply skim coat, then finish coat, allowing each to set and dry as recommended by the manufacturer before applying the next.
Cure Period: After final coat, allow the plaster to fully cure for the duration specified in product data before moving on to finishing steps.
Safety, PPE, and dust control
Safety First: Wear long sleeves, gloves, and safety glasses. For heavy-duty work, use a respirator to protect from dust.
Dust Control: Keep your workspace clean by wetting down the area before starting. Use damp rags for wiping hands and tools. Seal off other rooms with plastic sheeting.
Ventilation: Ensure proper ventilation in the work area. Open windows, use fans, or consider a HEPA vacuum to control dust.
Handling Materials: Be careful when handling bagged plasters and compounds. Follow manufacturer’s guidelines for safe disposal of leftovers and waste materials.
Conclusion
Work that looks smooth and lasts depends on safe, deliberate steps from start to finish. If you follow proper prep, use veneer plaster correctly on blueboard, and seal and finish it right, you’ll get walls that hold up and look clean for years.
First, check the substrate and layout, then set up your tools and materials, then apply veneer plaster in thin coats with proper drying times, then sand and finish with primer and paint, and finally inspect the result for any touch-ups before you call it done. Do this in a logical sequence, test a small area first, and never skip dust-control, ventilation, or edge protection as you work.
Common mistakes to avoid are mixing materials too thick or too thin, rushing the skim coats, and skipping curing and diagnostic sanding before priming. Safety first means wearing a dust mask, eye protection, and hearing protection when you sand, keeping ladders secure, and cleaning spills promptly to prevent slips or damage. Don’t overmix plaster, don’t force joints, and don’t plaster over moisture-damaged or crumbling blueboard surfaces.
If the surface shows persistent cracking, underlying moisture, or you’re unsure about substrate condition, it makes sense to call a professional rather than push on. With careful planning, steady hands, and these checks in place, you’ll finish with strong walls and a straightforward project timeline that yields a durable, polished result. Stay steady, follow the plan, and you’ll be smiling at the first clean, even wall you measure.
FAQ
What makes veneer plaster different from joint compound on blueboard?
Veneer plaster is a cement-based finish that bonds to a prepared blueboard while joint compound is a gypsum-based filler. Veneer plaster tends to dry harder and can create a very smooth surface, but it needs proper plastering technique. Check the product label for recommended substrate and curing guidance.
Can veneer plaster be used effectively on blueboard, and what should I prepare?
Yes, veneer plaster can work on blueboard when the substrate is clean, dry, and properly set. Prep means removing dust, sealing any corner beads, and ensuring the blueboard joints are addressed per the manufacturer’s directions. Always follow the substrate and plaster product instructions for best results.
What tools and materials do I need for veneer plaster versus joint compound on blueboard?
For veneer plaster, you’ll need appropriate plaster mix, hawk, float, trowel, and a clean water source. For joint compound, have a taping knife, drywall knife, sanding block, and primer. Use only what the plaster or compound manufacturer approves for blueboard.
How do drying and finishing differ between veneer plaster and joint compound?
Veneer plaster dries through a cementitious cure and needs gradual drying in a controlled environment. Joint compound dries by evaporation and often requires longer sanding and sealing steps. Always follow the label for cure times and ventilation tips.