
Introduction
The duration of fixing stucco wicking over walkways can vary depending on the extent of damage and your chosen repair method. Understanding the timeline helps you plan effectively.
This guide focuses on estimating how long it takes to fix wicking without full removal, breaking down the process into manageable steps with approximate timeframes.
Estimated Timeline for Fixing Wicking Without Full Removal
The total duration can be broken down into several key stages:
- Inspection and Diagnosis (1-3 hours): Inspect the walkway and stucco, identify wicking issues, and determine the extent of damage.
- Preparation (2-4 hours): Gather tools and materials, set up safety measures, and prepare the work area. This step can take longer if you need to order specific materials or wait for suitable weather conditions.
- Partial Removal and Repair (6-12 hours): Remove contaminated stucco, install flashing or sealant, and apply new patch material. The time taken depends on the size of the affected area and your familiarity with the repair process.
- Drying and Final Touches (1-3 days): Allow the repaired area to dry completely before applying final coats or touching up the stucco finish. This step can take longer in humid conditions or if you’re using slow-drying materials.
The total estimated time for fixing wicking without full removal ranges from 9 to 20 hours, plus drying time. Keep in mind that these are rough estimates, and actual duration may vary based on your specific situation.
Key takeaways
Proper preparation can significantly impact the overall timeline. For instance, ensuring you have all necessary tools and materials ready before starting can save you valuable time and prevent delays.
- Inspect stucco clearance over walkways and note any continuous contact with water.
- Create a capillary break by flashing or sealant to redirect moisture away.
- Check local codes and manufacturer guidelines before any removal or alteration.
- Use graduated drainage or grading to slope water away from the wall.
- Document partial removal steps with clean joints and coordinated repairs for consistency.
- When in doubt, hire a pro; unsafe conditions can cause water damage.
Table of Contents
- Introduction
- Key takeaways
- What Stucco Wicking Is and Why Clearance Matters
- Diagnosing Wicking over Walkways: a Practical Inspection Checklist
- Codes, Standards, and Safe Clearance Ranges to Verify
- Non-Removal Fixes: Create a Capillary Break and Redirect Water
- Partial Removal and Repair Workflow (Step-by-Step)
- Preventing Recurrence: Grading, Drainage, and Material Choices
- Tools, Materials Checklist and Material Specs to Verify
- When to Hire a Pro, Red Flags, and Contractor Guidance
- Conclusion
- FAQ
What Stucco Wicking Is and Why Clearance Matters
Wicking is capillary movement of moisture into porous stucco, drawing water upward or laterally from ground or splash zones. This intro defines that mechanism in plain terms so you can recognize it on an exterior wall.
Vertical clearance above walkways keeps the stucco out of continuous contact with moisture sources and reduces the chance of water migrating into the cladding and substrate. Maintaining that gap helps prevent downstream damage like efflorescence, delamination, and interior moisture problems.
How capillary action moves moisture into stucco
Stucco’s porous nature allows it to absorb water, but how does that water get in there? It’s all about capillary action.
Imagine a straw in your drink. When you pick it up, liquid rises inside due to surface tension and adhesion. Same thing happens with stucco and moisture from the ground or concrete below.
Capillary suction pulls water upward through tiny pores in the stucco. This continuous path of absorption can lead to serious issues if not addressed.
Damage modes caused by inadequate clearance
When stucco doesn’t have enough vertical space above walkways, it’s like a sponge sitting in a puddle. Trouble’s bound to follow.
First, you’ll see staining. Water brings dirt and minerals along for the ride, leaving ugly marks on your once-pristine stucco.
Then comes efflorescence, a white, powdery deposit that forms as water evaporates. It’s like a bad case of dandruff on your home’s exterior.
Worst-case scenario? Inadequate clearance can lead to freeze-thaw spalling, where water seeps into the stucco, freezes, and expands, causing pieces to break off. Delamination – peeling layers of stucco – and accelerated substrate decay might follow suit.
Diagnosing Wicking over Walkways: a Practical Inspection Checklist
Start with non-destructive checks: look for staining, soft or powdery stucco near the walk, and white salts along the base, plus signs of ongoing splashing. Use a moisture meter and run a water test rather than guessing the cause from appearance alone.
Follow a step-by-step workflow that rules out other causes—damaged flashing, failed sealants, plumbing leaks, or poor grading—before concluding wicking is the issue. If you need exact test methods or meter settings, consult the device instructions or a materials datasheet.
Visual checkpoints and telltale signs
Before you start poking or probing, use your eyes. Here’s a quick visual checklist to help pinpoint wicking.
- Check lower wall staining: Look for consistent staining patterns around the walkway’s perimeter. Wicking often leaves a telltale line about 18-36 inches above the ground.
- Inspect salt deposits: Check for white, flaky deposits (efflorescence) on the stucco surface. This indicates moisture migration and potential salt damage.
- Examine stucco edges: Softened or crumbling edges near the walkway could signal wicking-related deterioration.
- Look for consistent moisture line: A clear, horizontal moisture line around the entire walkway is a strong sign of wicking.
- Check walkway joints: Cracked or crumbling joints could indicate trapped moisture and wicking issues.
- Inspect adjacent areas: Compare the walkway area to nearby, unaffected surfaces. Significant differences might point to a wicking problem.
- Check for ponding water: Standing water near or against the wall can exacerbate wicking issues and should be addressed.
- Observe after rain: Watch how water drains from the walkway. Slow drainage or pooling can contribute to wicking.
Quick rule: If you spot two or more of these signs consistently around the walkway, it’s time for further testing.
Moisture measurement and non-destructive testing
Now that you’ve done a visual check, let’s confirm with some moisture measurements. Here’s how:
- Use a moisture meter: Take readings at several heights (every 6-12 inches) along the wall. Focus on areas where visual signs were present.
- Interpret results: Look for consistent, elevated readings (above 15%) within the same height range around the walkway.
- Employ infrared or thermal imaging: These tools can help locate trapped moisture behind the stucco. Scan the wall and look for temperature differentials that match your moisture meter findings.
- Compare readings: Make sure elevated moisture readings are consistent around the walkway, not just in one spot.
Quick rule: If you find consistently high moisture readings and temperature differentials around the entire walkway, it’s likely wicking is to blame.
When to expose a small test area
Sometimes you need to cut and remove a small section of stucco to see what’s really going on. Here are the signs it might be necessary:
- Consistent, high moisture readings: If your moisture meter shows elevated readings at the same height around the walkway, consider exposing an area.
- Visible damage: Softened stucco edges or crumbling joints might require a closer look.
- Inconsistent findings: If your visual checks and moisture readings don’t align, exposing a small area can help clarify the issue.
Quick rule: Only expose a small test area when you have consistent signs of wicking. Cutting into the stucco should be a last resort to confirm your findings, not a first step.
Codes, Standards, and Safe Clearance Ranges to Verify
Local codes and standards set minimum clearances to keep exterior finishes above potential splash or ponding areas; those rules vary by jurisdiction and assembly type. Check your local building code and product manufacturer guidance to confirm required clearances for your wall system.
There are commonly-cited safe ranges used as guidelines, but you should verify the exact dimension in your code or the product data sheet for the stucco and weather barrier. When in doubt, ask the product manufacturer or your building department for the required clearance for your specific conditions.
What codes usually address (weeps, flashing, termination)
Building codes are designed to protect your home’s exterior and ensure its longevity. They often dictate specific requirements for stucco installations over walkways.
Termination height: Codes typically require a minimum termination height above the walking surface. This is usually around 8 inches, but it can vary depending on your location.
Weep screed placement: Weep screed should be placed at the bottom of the stucco wall to allow moisture to escape. Codes often specify its placement and size.
Flashing and membrane continuity: Proper flashing and continuous membranes are crucial to prevent water intrusion. Codes usually outline how these should be installed and connected at intersections.
Safe clearance ranges to aim for (verify with authorities)
When it comes to stucco clearance over walkways, there’s a sweet spot that balances aesthetics and functionality. A commonly recommended range is between 6 to 12 inches.
However, this can vary based on your location and specific conditions. Always verify with local authorities before making any modifications to your finishes.
Here’s a simple way to check: Measure from the walking surface to the bottom of your existing stucco. If it’s less than 6 inches, you might want to consider increasing the clearance.
Remember, these are just guidelines. Your local codes may have different requirements, so always double-check before making any changes.
Non-Removal Fixes: Create a Capillary Break and Redirect Water
You can often stop wicking without full stucco removal by adding a capillary break—install metal or PVC flashing, drip edges, and continuous trim at the termination to prevent water contact. These measures interrupt the moisture pathway and keep splash and runoff away from the stucco face.
Also consider redirecting water with improved overhangs, guttering, or surface drainage so water doesn’t reach the wall base. Follow flashing manufacturer instructions and verify compatibility with existing materials before fastening or sealing.
Retrofitting metal flashing and hemmed drip edges
To fix wicking without full removal, you need to create a capillary break at the base of your stucco. This stops moisture from traveling upwards.
Use corrosion-resistant metal flashing, like galvanized steel or aluminum. Cut it to fit along the bottom edge of your stucco, where it meets the walkway.
Attach the flashing with sturdy construction adhesive and screws. Make sure it’s tight against the stucco but doesn’t overlap onto the walkway surface. This creates a barrier that stops moisture from wicking into the stucco.
For added protection, install hemmed drip edges. These are L-shaped metal pieces that fit over the flashing and direct water away from the stucco.
Installing trim pieces or setback strips to create visual and physical separation
When full removal isn’t desired, you can use trim pieces or setback strips to lift the stucco face off the walkway surface. This creates a small gap that interrupts the capillary action.
Metal or composite trim pieces work best. They won’t rot like wood and they’re durable enough to withstand foot traffic.
Install them using construction adhesive and screws. Make sure they’re level and plumb, and that there’s a consistent gap between the walkway surface and the stucco face.
The trim pieces also serve as a visual cue, clearly marking where the walkway ends and the stucco begins. This helps prevent people from walking too close to the stucco, reducing the risk of wicking.
Using breathable water-repellent treatments correctly
Breathable water-repellent treatments like silane/siloxane can help as a complementary measure, but they do not replace proper clearance. They work by allowing moisture to escape from the stucco while preventing liquid water from entering.
Apply these treatments according to the manufacturer’s instructions. Typically, you’ll need to clean the surface first, then apply the treatment with a sprayer or paintbrush.
Remember, these treatments are not a cure-all. They won’t stop moisture that’s already wicked into the stucco. They’re best used as a preventative measure, applied after you’ve created a capillary break using flashing and trim pieces.
Partial Removal and Repair Workflow (Step-by-Step)
When wicking has damaged only the lower stucco, use a conservative staged approach: remove just the affected outer layers, expose the weather-resistive barrier, and inspect flashing and substrate. Keep the work area tidy and protect adjacent finishes as you go to avoid unnecessary demolition.
Reinstall or repair the WRB and flashing, reinstall lath as needed, and patch the stucco to match existing thickness and profile. Follow product instructions for curing and finishing, and verify any fastener or material compatibility requirements with the manufacturer.
Step-by-Step Cleaning Process
This step-by-step guide walks you through the partial removal and repair workflow, ensuring a safe and efficient process.
- Preparation: Clear the area, wear safety gear (gloves, goggles), and cover nearby surfaces. Why: Safety first, minimize mess.
- Inspect and mark: Identify damaged areas, mark horizontal lines for removal. Check: Ensure marks are level and accurate.
- Main work: Score and remove stucco (next step), expose WRB. Sign it’s right: You see the weather-resistive barrier.
- Clean up: Remove debris, prepare for reinstallation. Check: Area is clean, ready for new materials.
- Final checks: Inspect work, ensure everything is in order before proceeding. Call a pro if: You find unexpected damage or issues.
Safe scoring and removal of the lower stucco band
Carefully cut a horizontal band to remove only the damaged lower stucco without compromising adjacent areas.
Tip: Use a utility knife or score cutter for clean cuts.
Score along the marked lines, then use a flat bar or chisel to gently tap and break off the stucco. Be careful: Work from top to bottom, avoid undermining adjacent stucco.
Remove finish and scratch coat until you expose the weather-resistive barrier. Check: Ensure WRB is intact, undamaged.
Rebuilding the substrate: WRB, flashing, and weep screed installation
Reinstall or repair the weather-resistive barrier (WRB) to protect your wall assembly from moisture.
Tip: Use a high-quality, self-adhesive WRB for easy application.
Install lath over the WRB, ensuring it’s securely attached. Check: Lath is level, properly spaced.
Apply hemmed flashing at the bottom, install weep screed to allow water drainage. Sign it’s right: Water can shed away from the wall assembly easily.
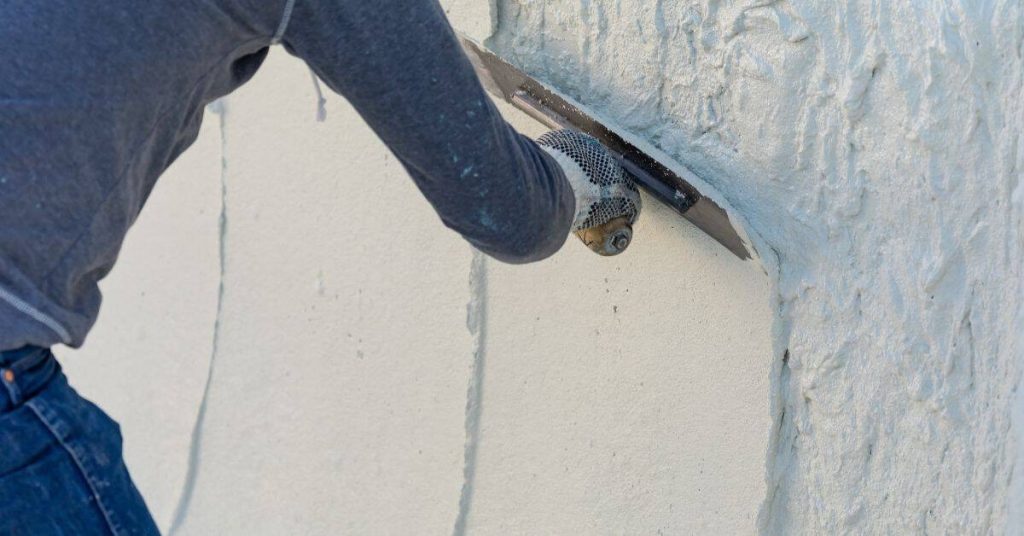
Feathering, texture matching and curing the patch
Apply base coat, feathering edges to blend with existing stucco. Tip: Use a hawk and trowel for even application.
Match finish coat texture by using a comb or float, working from multiple directions. Check: Texture matches, no visible patch lines.
Cure the patch properly to ensure long-term adhesion. Follow manufacturer’s instructions: Apply curing agent, keep area moist (not wet) for recommended time.
Preventing Recurrence: Grading, Drainage, and Material Choices
Long-term prevention focuses on keeping water away from the wall: adjust grading so surface flow moves away, add channel drains or re-slope hardscapes, and maintain gutters and downspouts. These landscape and drainage fixes reduce the amount of moisture that can reach the stucco base.
Choose resistant materials for near-ground details—durable flashing, corrosion-resistant fasteners, and breathable sealants or coatings where appropriate. Check product labels and technical sheets to confirm breathability and compatibility with your existing assembly.
Regrading and surface drainage solutions
First, ensure your walkway has a positive slope away from the wall. This helps water drain naturally. Aim for at least a 1/4 inch drop per foot.
Consider installing drainage channels along the base of the wall to collect and direct water away. Make sure they’re sloped properly and connected to downspouts or daylighting.
Minimize splash-back from the walkway surface by using non-slip, textured surfaces. This reduces water bouncing back onto the stucco.
Capillary break layers and base materials explained
Choosing the right materials for your walkway base can prevent moisture wicking. Here’s what to consider:
- Drainage mats: These allow water to pass through while blocking capillary action. Look for ones with high flow rates and good compression resistance.
- Air gaps: Incorporating a small air gap between the base material and stucco allows moisture to evaporate, preventing it from reaching the stucco.
- Non-porous edging materials: Using these at the walkway’s edge can prevent water from seeping in. Concrete or metal edging works well.
- Avoid porous materials: Stay away from materials like concrete with high water absorption rates, as they can draw moisture into the stucco.
Maintenance practices to catch problems early
Regular inspections help prevent small issues from turning into big ones. Here’s what to check:
Inspect seals and caulking around the walkway edges annually. Replace any cracked or peeling material.
Check the finish condition of your stucco. Cracking, staining, or bubbling could indicate moisture problems.
Use a moisture meter to test for excess moisture in the walkway and wall. If readings are consistently high, it’s time to investigate further.
Tools, Materials Checklist and Material Specs to Verify
Gather essential tools and materials: moisture meter, cutting tools, hand tools, flashing, fasteners, breathable sealant, and appropriate backer or lath for the repair. Lay out what you need before cutting into the wall so you can match materials and avoid delays.
Confirm key specs—compatibility with stucco systems, corrosion resistance of flashings and fasteners, and breathability of sealants—by reading product labels or data sheets. If you can’t find the information, contact the manufacturer or supplier for the technical details you need.
Essential tools for a safe partial repair
Before you start, make sure you have the right tools. Here’s a quick checklist.
- Tape measure: To ensure accurate cuts and measurements.
- Utility knife: For scoring and cutting stucco.
- Circular saw: With a masonry blade, for larger cuts.
- Flashings (metal or plastic): To install at the base of the repair area.
- Drip edge hemmed flashing: For water runoff protection.
- Trowel and float: For applying and smoothing mortar or stucco.
- Safety glasses: To protect your eyes from debris.
- Work gloves: For handling materials and tools.
- Respirator: Essential when cutting or removing old stucco to prevent inhaling dust.
Quick rule: Never skip safety gear. It’s your first line of defense on the jobsite.
Materials and specs to verify before purchase
Before you buy, check these material specifications to ensure compatibility and effectiveness.
- Water-Resistant Barrier (WRB): Check it’s compatible with your existing system.
- Flashing gauge: Thicker isn’t always better. Choose what fits your needs.
- Flashing finish: Smooth or textured? Match your existing for a seamless look.
- Mortar/stucco bonding additives: Ensure they’re compatible with your existing materials.
- Breathability rating: Check it’s within the recommended range (5-15 perm) to prevent moisture buildup.
Quick rule: Always check product specs. It saves time and money in the long run.
Personal protective equipment and safety tips
Safety first! Here’s what you need to protect yourself and others on the jobsite.
- Respirator: Wear when cutting or removing old stucco. Change filters regularly.
- Eye protection: Safety glasses or goggles to prevent debris from entering your eyes.
- Hearing protection: Use when using power tools to protect your hearing.
- Work gloves: Protect your hands from cuts and abrasions.
- High-visibility clothing: Wear it to be seen by others, especially in areas with foot traffic.
- Barricades: Set them up to keep pedestrians away from work areas.
Quick rule: Always prioritize safety. It’s not worth risking your health or others’ for a few minutes of work.
When to Hire a Pro, Red Flags, and Contractor Guidance
Call a licensed stucco or building-envelope contractor if you find widespread delamination, structural wood rot, recurrent interior moisture, or if the repair requires permits or changes to flashing that affect the envelope. Those are red flags that go beyond a simple DIY patch.
When vetting bids, ask for scope details, warranty terms, evidence of relevant licensing and insurance, and references for similar work. Verify permit requirements with your local building department and confirm any product or installation requirements with the manufacturer.
Red flags that indicate full removal or structural work is needed
Before you start any repair, inspect your stucco carefully. Some issues might mean full removal and structural work are necessary.
Rotting framing behind the stucco could signal a big problem. If you see pervasive delamination, where chunks of stucco fall off easily, that’s another red flag. Widespread moisture intrusion might indicate a leaky roof or plumbing issue.
Check behind the stucco too. If the flashing is failed behind multiple courses, you’ll need to replace it, which could mean full removal.
What to ask contractors and how to compare proposals
When getting quotes, ask the right questions to ensure you’re comparing apples to apples. Here’s what to ask:
Methods: Ask about their approach – partial repair or full removal? Why?
Materials: What materials will they use? Are they compatible with your existing stucco?
Warranties, Permitting, and Moisture Testing: Get details on warranties, permits needed, and what moisture testing they’ll do before and after work.
Permits, inspection, and warranty considerations
Quick rule: Always check if permits are needed. It’s the law, and it protects your investment.
- Check local building codes: Permits might be required for stucco repair work.
- Moisture test before work: Ensure contractors do this to find hidden issues.
- Moisture test after work: Verify the problem is fixed. If skipped, you won’t know if water’s still getting in.
- Ask about warranties: What does their warranty cover? How long does it last?
- Inspections during work: Ensure they’re done to ensure quality and code compliance.
- Final inspection: Make sure one is scheduled before the project wraps up.
- Ask about asbestos: If your home was built before 1978, ask if they test for asbestos. It’s dangerous if disturbed.
- Check their license and insurance: Ensure they’re licensed and insured to protect yourself and your property.
Conclusion
Wicking over walkways is solvable without ripping out sections, but you must act with proper clearance, a solid capillary break, and good drainage to protect the structure and appearance. Prioritize safe work and test your approach on a small area before scaling up.
To move forward, think like this: verify the clearance ranges you should meet, inspect the area for damp spots, install a capillary break and redirect water away from the wall, then recheck after a rain or a test soak. If needed, plan a controlled partial removal and repair with clear steps, always confirming drainage and material compatibility first, and keep moisture away from the wall until you’re sure the fix holds.
Common mistakes to avoid include skipping the clearance checks, sealing or painting over moisture, and rushing any partial removal without testing or proper weather windows. Safety rules are simple: wear eye and hand protection, shut off any nearby water or power sources as you work, test a small patch first, and never force a repair that leaves water pooling or signs of rot. If you spot extensive wood rot, mold growth, or shifting stucco, stop and bring in a professional rather than pushing ahead alone.
If the signs point to required expertise or permits, call in a pro sooner rather than later. Red flags include sustained dampness, worsening wicking after repairs, or unsure drainage performance. With careful steps, practical checks, and respect for safety, you can get a durable, clean outcome and stay confident you’re doing it right the first time.
FAQ
What should I look for to know if wicking is returning after a capillary break?
Check for damp spots on the stucco surface near the walkway, new staining, or a musty smell. If the wall behind the capillary break feels cool or damp to the touch after rain, review the area for drainage or flashing issues.
When is it better to keep patching instead of doing a full removal?
If the damage is shallow and the structure behind the stucco is sound, patching with proper sealant and a new capillary break can be enough. If moisture is actively wicking through a large area or behind the stucco, plan for more extensive repair and consult the guides you already have.
How can I protect clearance as I make changes to landscaping or grading?
Keep mulch and soil away from the stucco face, and ensure grading directs water away from the wall. Add a small, clean expansion gap at the base if the soil footprint changes, and maintain a dry, unobstructed path for any future inspections.
What should I document or bring up when talking to a pro?
Take clear photos of the wicking areas, notes on drainage or grading, and any repairs you’ve done. Tell the pro exactly what you’ve observed, what materials you used, and what you’d like to achieve with a fix. Always ask for manufacturer guidance on any products you plan to use.