
Introduction
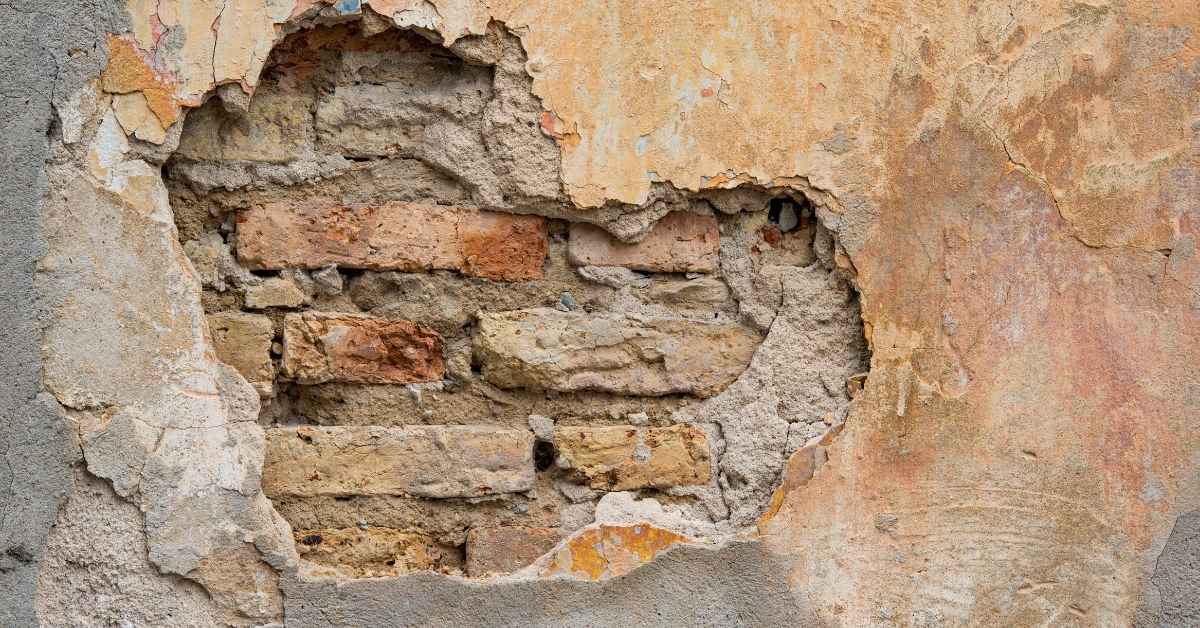
Crumbling stucco at the bottom edge happens when moisture wicks into the base and weakens the coating. This article covers a practical DIY approach to stop the leak, remove damaged material, and start a proper patch. Check your local rules and product labels for compatibility and any safety steps.
Start by cleaning the edge, removing loose stucco, and inspecting the base for dampness. Use a patch material that matches your system and set it with the right curing guidance, then add proper flashing or sealant where needed. Always refer to manufacturer instructions and local requirements when selecting materials and methods.
Key takeaways
- Identify crumbling edges due to capillary wicking and improper base moisture management.
- Test moisture source by probing for damp substrate beyond the stucco edge.
- Stabilize the site with proper safety gear and fall protection before work.
- Implement correct weep screed, flashing, and capillary breaks to divert water.
- Use compatible bonding coats and substrates when rebuilding the base to prevent cracking.
- Follow manufacturer and local codes; verify material specs before purchases.
Table of Contents
- Introduction
- Key takeaways
- Why Stucco Bottom Edges Crumble — Primary Causes
- Diagnosing Wicking Versus Other Moisture Problems
- Preparing the Site and Safety Precautions
- Step-by-Step Repair: Removing Damaged Stucco and Exposing Substrate
- Installing Proper Water-Management Details (Weep Screed, Flashing, Capillary Breaks)
- Rebuilding the Stucco Base: Mixes, Coats, and Bonding
- Material Specs and Standards Explained
- Preventing Future Wicking and Keeping the Base Dry
- Conclusion
- FAQ
Why Stucco Bottom Edges Crumble — Primary Causes
Moisture wicking from the soil or foundation often drives deterioration at the bottom edge of stucco. Salt deposits and repeated wetting speed up material breakdown, especially when cycles freeze and thaw. Look for the interaction between moisture, salts, and decay that accelerates damage.
Common details failures, like missing weep screed or improper flashing, let water stay against the base. Poor grading or drainage keeps water near the stucco, and persistent leaks compound the problem. Biological growth can also weaken the finish over time when moisture is allowed to linger.
Capillary action and wicking mechanics
Moisture loves to climb. That’s capillary action for you. Stucco, being porous, lets moisture rise through its tiny gaps and pores. This is why you see water stains or efflorescence (salt deposits) near the bottom edge.
Wicking happens when this rising moisture meets a cold surface, like a concrete wall at night. The moisture wicks – it’s pulled upwards by capillary action again. This constant cycle of rise and wick is tough on your stucco base.
To break this cycle, you need a capillary break at the bottom. This is where weep screed comes in. It stops that moisture climb dead in its tracks.
Construction detail failures (weep screed, flashing, drainage plane)
Weep screed’s job is to keep moisture out of the wall base. If it’s missing or blocked, water can’t escape and starts pooling. That’s a recipe for crumbling stucco.
Flashing and drainage plane are like bodyguards for your walls. They direct water away from the base. If they’re not installed right or get damaged, water accumulates, leading to decay and salt damage.
Check these details: Weep screed should be continuous and unobstructed. Flashing and drainage plane should be intact and properly sloped.
External water sources (grade, gutters, irrigation, plumbing)
The ground around your house can slope water towards the walls. This is called grading. If it’s wrong, you’re inviting moisture into your stucco base.
Overflowing gutters or leaks from irrigation systems can also keep that base wet. Plumbing leaks are another sneaky culprit. All these external sources contribute to wicking and decay.
Inspect and fix: Check the grading around your house. Ensure gutters are functioning properly. Inspect irrigation systems for any spray towards the walls. Keep an eye out for plumbing leaks too.
Diagnosing Wicking Versus Other Moisture Problems
Start with visual clues: damp patches at the base, salt stains, or efflorescence can indicate wicking. Check for roof runoff and gutter issues that may direct water toward the foundation. Consider plumb-line tests or simple moisture checks to separate capillary action from bulk leaks.
Prioritize checks that won’t require invasive work first, such as inspecting flashing at visible joints and the condition of the base course. If you suspect vapor diffusion, look for interior condensation or warm-to-cold surface patterns. Collect notes to guide a targeted repair plan.
Visual checkpoints and signs of wicking
Before you start poking holes, look for these visible clues that point to capillary rise.
- Horizontal staining: Look for discoloration or streaks around the base. This could be efflorescence – a sign of moisture moving up.
- Powdery crumbling: Check if the stucco is flaking off in small, powdery pieces near the bottom. This indicates deterioration due to moisture.
- Efflorescence: White, chalky deposits on the surface could mean water’s been moving up and carrying salts with it.
- Repeated failure near the base: If repairs keep failing in the same area, it might be a sign of persistent moisture wicking.
- Wet spots or dampness: Check for any obvious wet areas around the bottom edge. Moisture should dry quickly; if not, it’s a red flag.
- Mold or mildew: Dark spots or a musty smell could indicate moisture and mold growth.
- Cracking patterns: Vertical cracks might suggest settlement, but horizontal ones near the base often point to wicking.
- Water stains on adjacent surfaces: Check nearby walls, floors, or ceilings for signs of water intrusion.
Quick rule: If you spot two or more of these signs, it’s time to dig deeper with moisture tests.
Simple moisture tests and probes for DIYers
Now that you’ve spotted some visual clues, let’s confirm it with these easy-to-do tests.
First, grab a roll of clear plastic sheeting. Tape it to the wall around the suspect area. Leave it there for 24 hours. If moisture is moving up, you’ll see water droplets forming on the inside.
Next, use a spot moisture meter. These are cheap and easy to find online. Stick the probes into the stucco at various points near the base. If the reading’s high (usually above 15%), it’s a sign of moisture.
For targeted probing, use a screwdriver or awl to poke small holes in the stucco. Look for dampness or signs of deterioration inside. Be careful not to make the problem worse by creating new pathways for water.
Differentiating salt damage and freeze-thaw deterioration
Now you’ve confirmed moisture, but what’s causing it? Let’s figure that out.
Salt crystallization: If you see efflorescence or white deposits, salts are likely being carried up by the water. This can cause damage as the salts crystallize and expand in tiny cracks. To fix this, you’ll need to address the moisture source and clean off the salts.
Freeze-thaw deterioration: In cold climates, water can freeze and thaw repeatedly, causing damage. Look for flaking or crumbling stucco, especially near corners or edges where water might pool. To fix this, you’ll need to repair any cracks or gaps that let water in, and ensure proper drainage.
Moisture saturation: If the stucco feels consistently damp or wet, it’s a sign of persistent moisture intrusion. This could be due to leaks, poor drainage, or other issues. To fix this, you’ll need to find and address the source of the water.
Preparing the Site and Safety Precautions
Clear furniture, plants, and loose debris from the work zone to protect surfaces and minimize dust. Wet or cover nearby plant beds to reduce tracking of debris while you work. Set up protective plastic sheeting to trap dust toward the exterior.
Review any local permit requirements and check for hidden hazards like electrical lines or gas connections. Use proper personal protective equipment and secure ladders or scaffolding. Plan for occupant safety if you’re working near living spaces.
Tools and materials checklist
Before you start, make sure you have the right tools and materials. This list covers essentials for a base repair job.
- Tape measure: To ensure accurate cuts and measurements.
- Utility knife: For scoring and cutting stucco. A sharp blade is crucial to prevent chipping.
- Hammer and chisel: To remove damaged stucco and prepare the surface for repair.
- Stucco mix or patching compound: Choose one that matches your existing stucco’s composition.
- Lath (if needed): For reinforcing the repaired area. Use galvanized steel or stainless steel to prevent corrosion.
- Trowel and float: To apply and smooth the repair material.
- Safety glasses: Protect your eyes from debris and dust.
- Dust mask: To protect your lungs while cutting and sanding.
- Drop cloths or tarps: To protect landscaping and catch falling debris.
- Ladder or scaffold: For accessing high areas. Ensure it’s stable and secure before working.
Quick rule: Always double-check your tools and materials before starting any repair job to avoid delays and mistakes.
Personal protective equipment and safe work practices
Safety should always be your top priority when working on your home’s exterior. Here are essential PPE and safety measures to follow.
- Hard hat: Protects against falling debris, especially when working above ground level.
- Ear protection: Reduces noise exposure from power tools. Disposable foam earplugs or earmuffs are both viable options.
- Work gloves: Provides grip and protects your hands from cuts and abrasions. Choose a pair that fits well and allows for good dexterity.
- Steel-toed boots: Protects your feet from falling objects and provides traction on uneven surfaces.
- Safety harness (optional): For added safety when working at heights. Rent one if you don’t have, and ensure it’s properly fitted and secured.
- Ladder or scaffold: Always use a stable, secure ladder or scaffold. Ensure it’s level and well-braced before climbing.
- Cut-resistant clothing (optional): Provides extra protection when cutting stucco. A long-sleeved shirt and pants are recommended.
Permits, codes, and inspections to check first
Before starting any repair work, it’s crucial to ensure you’re in compliance with local building codes and regulations.
- Check local building codes: Visit your city or county’s website for a list of requirements. Some may require permits for stucco repairs.
- Determine if a permit is needed: Repairs under a certain square footage may not require one, but it varies by location. Always check first to avoid fines.
- Contact your homeowners association (HOA): If you have an HOA, they may have specific guidelines or requirements for exterior repairs.
- Schedule an inspection: Once you’ve completed the repair, schedule a final inspection with your local building department to ensure everything is up to code.
- Keep records: Maintain copies of all permits, inspections, and receipts related to the repair. This can be helpful if you decide to sell your home in the future.
Quick rule: Always err on the side of caution when it comes to permits and inspections. It’s better to check first and avoid potential issues later.
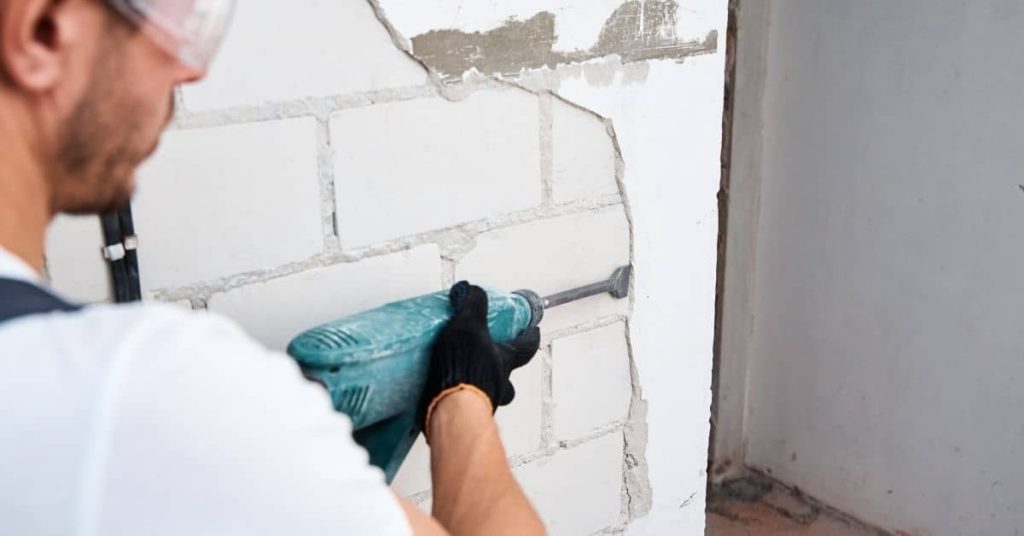
Step-by-Step Repair: Removing Damaged Stucco and Exposing Substrate
Begin by marking a clean perimeter to limit collateral damage. Remove damaged stucco in controlled lifts, stopping at sound material or the substrate. Protect intact areas and avoid pulling back more than necessary.
Document the exposed substrate conditions as you go, noting any rot, corrosion, or loose lath. Work gradually to maintain control and minimize debris. Keep the removal area contained for inspection and planning of the next steps.
Step-by-Step Cleaning Process
This step-by-step guide helps you safely and efficiently remove damaged stucco, exposing the substrate for repair.
- Prepare the area: Clear debris, secure drop cloths, and set up ladders. Wear safety gear – gloves, goggles, and a dust mask.
- Inspect the damage: Identify crumbled areas and mark them for removal. Check for any underlying issues like rot or corrosion.
- Cut and remove stucco (see next section): Use a utility knife or oscillating tool to carefully cut through damaged stucco in a controlled pattern, then chip away debris.
- Examine the substrate: Once you’ve removed all damaged stucco, visually inspect the lath, framing, and sheathing for signs of damage.
- Clean up: Remove remaining debris, wash the area with water to remove dust, and let it dry before proceeding with repairs.
How to cut and remove crumbled stucco safely
Safely removing deteriorated stucco involves careful cutting patterns and techniques to minimize damage to the backing or lath.
Start from the top and work your way down, cutting horizontal lines about 12″ apart. This helps control the removal process and prevents large chunks from falling off unexpectedly.
Use a utility knife with a sharp blade for precise cuts. For larger areas or stubborn spots, an oscillating tool can help. Always cut away from yourself and others to prevent injuries.
Once you’ve made your cuts, use a flathead screwdriver or pry bar to gently chip away the damaged stucco. Work carefully to avoid damaging the lath or sheathing behind it.
Inspecting lath, framing, and sheathing for rot or corrosion
After removing the damaged stucco, carefully inspect the underlying materials to assess their condition.
Look for visible signs of damage, such as warping, cracking, or discoloration. Gently probe suspect areas with a flathead screwdriver to check for softness or crumbling, which may indicate rot.
Check fasteners like nails and screws for rust or corrosion. Tighten or replace any loose or damaged ones. If you find extensive damage, you may need to replace sections of lath, framing, or sheathing before proceeding with repairs.
If you’re unsure about the extent of the damage, don’t hesitate to consult a professional. It’s better to address problems early than risk further deterioration and costly repairs down the line.
Installing Proper Water-Management Details (Weep Screed, Flashing, Capillary Breaks)
Inspect and restore weep screed to allow drainage at the base. Install or repair flashing to direct water away from joints and into proper drainage paths. Create a capillary break or drainage plane at the base to keep moisture away from the stucco system.
Coordinate with existing cladding and foundation surfaces to avoid abrupt transitions. Ensure fasteners and flashing materials are compatible with the substrate and climate. Verify that all details promote shedding water rather than wicking back into the wall.
Weep Screed and Drainage Plane Integration
The weep screed is your first line of defense against water intrusion. Install it at the bottom edge of your stucco, just above finished grade.
Seal both ends of the weep screed with a flexible caulk to prevent water from bypassing it. Use a caulk that’s compatible with your stucco system and can handle movement.
Behind your stucco, install a drainage plane. This could be a house wrap or a building paper. Make sure it extends all the way down to the weep screed and is sealed at the bottom. This ensures water that gets behind the stucco has a path out.
Flashing and Termination at Foundation Interface
At the base, install flashing that runs vertically up from the weep screed. This should be a wide, rigid flashing that can handle some movement.
Terminate this flashing into your foundation wall. Use a flexible caulk to seal the joint between the flashing and the foundation. Make sure water can’t get behind the flashing but can still drain out through the weep screed.
If you have a basement, ensure the flashing extends down to the window wells or other openings. Seal these intersections with caulk as well.
Tying In Other Penetrations
Windows and doors are common trouble spots. Install flashing at these openings that ties into your base flashing and extends up under the stucco.
At control joints, use a flexible caulk to seal the joint where it meets the weep screed. This prevents water from wicking up through the joint.
Trim should be installed after the stucco is complete. Use a flexible caulk to seal the joint between the trim and the stucco. Make sure any drip edges on the trim are functioning properly to direct water away from the stucco.
Rebuilding the Stucco Base: Mixes, Coats, and Bonding
Follow a proper layering sequence: bonding, scratch, brown, then finish coats. Prepare the surface with adequate cleaning and roughening to promote adhesion. Use control joints as required by the design and climate.
Choose appropriate material types for the base repair and cure according to the product instructions. Check the curing conditions and adhesion requirements in the data sheets. Do not rely on brand claims without validating the spec sheets for your project.
Bonding agents and proper adhesion methods
Before applying new stucco, ensure the substrate is clean and dry. Remove any loose material, dirt, or mildew. Use a bonding agent for best results on bare surfaces or over existing paint. For better adhesion, consider using mechanical keys like fiberglass mesh or metal lath.
When to use bonding agents: Apply a bonding agent when working with new surfaces, previously painted areas, or if the old stucco has been completely removed. This helps create a strong bond between the new and existing materials.
Mechanical keys: Use metal lath or fiberglass mesh for added strength and durability. Attach them securely to the substrate before applying the first coat of stucco.
Layer application techniques and curing guidance
Apply each layer of stucco in thin, even coats. Aim for around 1/8″ to 1/4″ per coat. Use a straight edge or trowel to achieve consistent thickness. Compact the material firmly with a darby or float to remove air pockets and ensure proper adhesion.
Curing: Keep the newly applied stucco damp for at least three days, but not wet. Cover it with plastic sheeting if necessary. This allows the stucco to cure slowly and evenly, preventing cracking and delamination.
After each coat, allow it to dry completely before applying the next one. This usually takes around 24 hours, depending on weather conditions.
Matching texture and finishing for a seamless repair
To achieve a visual match, start by creating small test panels using different mix ratios and application techniques. This helps you replicate the existing stucco’s texture and color.
Tools: Use the same tools as those used to apply the original stucco. This includes trowels, darbies, and floats. If possible, borrow or rent the exact tools used by your previous contractor.
Focus on durability at the base. Ensure proper compaction and adhesion of each layer. The visual match should be a bonus, not the primary goal. Always prioritize strength and longevity in your repair work.
Material Specs and Standards Explained
Understand the role of cementitious mixes versus acrylic finishes and how they behave at the base edge. Use corrosion-resistant fasteners for any new metal parts and ensure flashing materials meet local code expectations. Match materials to climate and substrate conditions.
Always check manufacturer instructions and local codes before purchasing or mixing. Review product data sheets for suitable applications, cure times, and compatibility with existing cladding. If in doubt, verify details with the supplier or local building authority.
Choosing durable lath, fasteners, and flashing materials
The right materials for your stucco base ensure durability and longevity. They prevent cracking, staining, and weak bonds.
- Corrosion-resistant fasteners: Use stainless steel or hot-dipped galvanized fasteners to avoid rust. Look for ASTM A325 or A490 ratings. Avoid aluminum as it can corrode.
- Flashing materials: Opt for flexible, corrosion-resistant flashing like EPDM or PVC. Check manufacturer’s compatibility with your stucco system. Avoid rigid materials that can crack.
- Lath materials: Choose from metal lath (galvanized steel) or fiberglass mesh. Both are durable and compatible with stucco. Avoid wood lath due to rot risk.
- Flashing termination: Use flashing that extends at least 6 inches up the wall and laps properly over the base. This prevents water intrusion.
- Avoid incompatible materials: Don’t mix metals (e.g., aluminum with steel) to prevent galvanic corrosion. Stay away from materials not approved by your stucco system’s manufacturer.
Finish coat materials and water-resistive coating options
The right finish coats and water-resistive membranes protect your stucco base from moisture damage.
- Cement-based finishes: Use for their durability and breathability. Look for Type N or S mortar with a cement-to-sand ratio of 1:3 to 1:4. Avoid acrylic finishes on the base layer as they can crack under stress.
- Acrylic finish coats: Apply over the base coat for color and texture. Use 100% acrylic binders with a minimum solids content of 45%. Avoid low-quality acrylics that can stain or peel.
- Water-resistive membranes: Apply before the base coat to prevent water intrusion. Use fluid-applied membranes (FABM) or self-adhesive membranes. Check compatibility with your stucco system and local codes.
- Capillary breaks: Incorporate them in your design to stop moisture migration. Use materials like expanded metal lath or foam insulation boards rated for exterior use.
- Avoid incompatible materials: Don’t apply water-resistive membranes over damp surfaces. Ensure all materials are compatible with your stucco system and local building codes.
Preventing Future Wicking and Keeping the Base Dry
Address site grading and drainage to keep water away from the base. Improve exterior systems like gutters and downspouts to direct flow away from walls. Plan for ongoing maintenance that includes inspection after wet seasons and routine cleaning of drainage paths.
Prioritize fixes by impact and cost, starting with the easiest upgrades that prevent repeated wetting. Combine structural corrections with protective coatings or barriers as appropriate. Keep notes of what was done to guide future upkeep and avoid recurrence.
Grading, Landscaping, and Trim Adjustments
The first line of defense against wicking is proper exterior grading. Water should always flow away from your home’s foundation.
Check the grade: Ensure it slopes down at least 6 inches over 10 feet away from the walls. If it doesn’t, you’ll need to regrade.
Avoid splashback: Trim any plants or bushes that could direct water onto the base when it rains. Keep them a few feet away from the wall.
Gutters, Downspouts, and Irrigation Best Practices
Properly functioning gutters and downspouts are crucial to keep water away from the stucco base.
Maintain gutters: Keep them clean and free of debris. Clogged gutters can cause water to overflow, soaking the wall below.
Route downspouts properly: Extend them at least 5-10 feet away from the foundation to discharge water far enough that it doesn’t seep back towards the base.
Routine Inspection Checklist and Maintenance Tasks
Regular checks help catch potential issues early. Use this list every few months, or after heavy rain.
- Check for standing water: Around the base, near downspouts, or on flat areas near the walls. Standing water can wick up into the stucco.
- Inspect plants and trim: Ensure they’re well-maintained and don’t direct water onto the wall.
- Examine gutters: Check for clogs, leaks, or proper drainage.
- Ensure downspouts are clear: Water should flow freely through them. If not, clean any blockages.
- Check grading: Ensure it still slopes away from the walls.
- Inspect flashing and weep screed: Ensure they’re intact and functioning properly (see earlier sections).
- Look for cracks or damage: In stucco, lath, or trim. These can allow water intrusion.
- Check caulking: Around windows, doors, and trim. Cracked or missing caulking can let water in.
Quick rule: If you notice any issues, address them promptly to prevent minor problems from becoming major ones.
Conclusion
Fixing the crumbling bottom edge comes down to controlling moisture and following a solid repair sequence with the right details, safety, and patience. When you fix the wicking correctly and keep the base dry, the stucco will not only look better, it will last longer and resist future damage.
To finish strong, proceed in this order: first verify the moisture source and dry the area, then remove damaged stucco and expose the substrate, install proper water-management details such as weep screed, flashing, and capillary breaks, rebuild the base with correct mixes and coats, and finally test for moisture and reseal with appropriate finishes. Do all work in good weather, dry the site first, and document each step so you know what you did and why.
Common mistakes to avoid are rushing repairs without addressing drainage and flashing, skipping the capillary break, or using the wrong mix or bonding technique that won’t hold up in the next wet season. Never seal a wall that still shows moisture; always check with a moisture test and keep safety at the top of your list—protect yourself, the structure, and the surrounding area during every step.
If you’re unsure about flashing details, code specifics, or substantial damage, call a professional instead of pushing on. A small setback up front can save much more later, and you’ll stay safe while you get it right. You’ve got this—steady hands, measured steps, and a finished base that stays dry.
FAQ
How can I confirm that moisture is wicking at the base and not something else?
Look for wet patches at the bottom edge after rain or cleaning. Use a moisture meter or pry a small area to see if the substrate is damp beneath loose plaster. If you’re unsure, check the substrate condition and any staining with the product label or manufacturer instructions.
What should I do right away to stop more damage while I repair?
Contain the area and protect it from rain and splash. Remove loose and damaged stucco so you’re not trapping soft substrate. Don’t seal or repoint over wet material—let it dry as much as possible per product guidance.
What should I verify about flashing, weep screed, and capillary breaks before rebuilding?
Confirm that flashing and weep screed are in place and not blocked. Ensure there’s a clear capillary break path so water can drain away from the base. Always follow the manufacturer instructions and local rules for installation details.
How do I choose a capillary break and bonding approach for the rebuild?
Match the break to the substrate and the stucco system you’re using, and use a bonding method recommended by the product label. If in doubt, check the datasheet or instructions from the manufacturer and pick options that suit your wall assembly and climate.