
Introduction
Water staining on stucco under windows is damp marks caused by moisture seeping or condensing near the window area.
It often shows as brown, gray, or darker streaks and can come from leaks, condensation, or improper flashing. Check the window flashing, sealants, and the siding above to find where moisture is entering.
To address it, fix obvious leaks, clean the area, and improve drainage before repainting. If staining persists, consider resealing joints and ensuring proper flashing and weep drainage, or consult local codes. Always follow product labels and local rules for any patching or paint work.
Key takeaways
- Inspect window flashing and siding joints for gaps or deterioration; reseal promptly.
- Water stains indicate moisture migration; verify from exterior leaks before interior repairs.
- Drying stucco is slow; allow thorough curing after repairs to prevent recurrence.
- Temporary fixes include resealing cracks and improving drainage around the window.
- Permanent options require professional assessment for flashing, lath, and proper stucco repair.
- Safety: shut off power if water leaks near electrical outlets; avoid shocks.
Table of Contents
- Introduction
- Key takeaways
- Quick Overview and Scope
- How Water Travels into Stucco Assemblies
- Diagnosing the Problem — Step-by-Step Inspection
- Common Causes Categorized with Symptoms
- Repair Options: Temporary Fixes Vs Permanent Repairs
- Preventive Measures and Best Practices
- Tools and Materials Checklist
- Visual Signs and Examples to Look for
- Conclusion
- FAQ
Quick Overview and Scope
The article covers common water staining under windows on stucco, including why stains appear and how they differ by source. You’ll learn who benefits from this guide, from DIY homeowners to those hiring a pro for assessment.
Expect a practical look at diagnostic depth and repair complexity, not a mystery-solving spree. We’ll outline typical staining types and realistic paths to fixes you can manage or discuss with a contractor.
What ‘water staining’ looks like on stucco
Water stains on stucco under windows often appear as dark, discolored patches. You might see:
- Discoloration: Stucco turns shades of brown or gray.
- Streaking: Water runs down, leaving visible lines.
- Texture changes: Affected areas may feel rougher or softer than the rest.
These are different from efflorescence, which is a white, powdery substance, and mold, which grows in patches and often has a musty smell. If unsure, scrape a small area to check for powder or growth underneath.
Why windows are a vulnerable spot
Windows can be trouble spots because they break up the stucco’s continuous surface. Here’s why:
- Window terminations: Where windows meet the wall, if not properly sealed, water can seep in.
- Sills: Water can sit on sills and soak into the stucco below.
- Junctions: Corners and edges around windows are susceptible to gaps or cracks that let water through.
Even a tiny breach in the weather barrier can lead to big stains. So, it’s crucial to inspect these areas closely when diagnosing your problem.
How Water Travels into Stucco Assemblies
Water enters stucco mainly through gravity, wind-driven rain, capillary action, and condensation. These mechanisms matter because they influence stains that show up under window heads and sills.
Focus is on paths inside the wall assembly, not just surface drips. You’ll learn where leaks likely originate in the framing, flashing, or insulation layers that interact with the window opening.
Flashing failures and improper integration
Missing, misaligned, or improperly lapped flashing can direct water into the stucco cavity. Flashing is like a shield for your walls, but if it’s not installed right, it won’t protect against water.
Check your window flashings. Make sure they’re present and properly lapped over the house wrap or drainage plane. If they’re missing or damaged, that’s an open invitation for water to get in.
Improper integration with other building materials can also cause problems. Flashing should seal tightly against the window frame and any adjacent siding or trim. Gaps here let water sneak behind your stucco.
Penetrations, gaps, and degraded sealants
Fastener holes, vents, and failing caulk can become focused entry points for water. These are like tiny doors that water can use to get behind your stucco.
Inspect around windows. Look for any gaps or cracks where water could enter. Check caulking around windows – if it’s cracked, peeling, or missing, water will find its way in.
Vents and other penetrations should be properly sealed to keep water out. If they’re not, water can wick through these openings and into your walls.
Stucco substrate and drainage plane issues
The stucco itself and the drainage plane behind it (like a house wrap) can trap moisture if they’re not installed right. This trapped water can lead to staining under windows.
Check your stucco’s condition. Cracks or holes in the stucco let water get behind it. Also, make sure the stucco is thick enough – too thin and it won’t hold back water.
The drainage plane behind the stucco should be intact and properly installed. If it’s damaged, missing, or not lapped correctly at windows, water can get trapped behind your stucco and cause problems.
Diagnosing the Problem — Step-by-Step Inspection
Start with a methodical exterior and interior walkaround, noting stain patterns and moisture indicators. Look for gaps, cracks, and improper flashings around the window.
Document findings with photos and simple notes for later comparison. Create a consistent record to track changes over time and after any repair attempt.
Step-by-Step Process
Before you start any repair work, use this checklist to diagnose the problem accurately. This will help you understand what’s causing the issue and prevent costly mistakes.
- Preparation & Safety: Put on appropriate safety gear (gloves, goggles, etc.) and ensure the area is well-lit and clear of obstacles. Check manufacturer instructions for any specific safety precautions.
- Inspect Surrounding Area: Look for signs of water damage, cracks, or other issues nearby that might be related to the problem at hand.
- Check Moisture Content: Use a moisture meter to test the affected area and surrounding concrete. This helps determine if the issue is due to excess moisture.
- Measure Concrete Thickness: Use a simple masonry drill bit or a screwdriver to measure the thickness of the concrete. This can help identify if there’s an underlying structural issue.
- Inspect Reinforcement: If accessible, visually inspect any visible rebar or other reinforcement for signs of corrosion or damage.
- Check Expansion Joints: Ensure expansion joints are intact and not filled with debris. Check if they’re allowing the concrete to move freely as it expands and contracts.
- Test Concrete Hardness: Use a sledgehammer or a simple hardness test kit to check the concrete’s compressive strength. This can help identify if the concrete is too weak for its intended use.
- Inspect Drainage: Check nearby drainage systems, gutters, and downspouts to ensure they’re not contributing to the problem by directing water towards the affected area.
Quick rule: Always start with a thorough inspection. Skipping this step can lead to incorrect diagnoses and expensive rework.
Visual inspection checklist
Before you start any repair work, use this visual inspection checklist to identify the source and extent of the stain. This will help you fix the problem right the first time.
- Stain location: Check where the stain is most prominent. Is it on the wall, ceiling, or floor?
- Stain pattern: Look at the shape and size of the stain. Does it suggest a leak from above (round), below (rectangular), or within the walls (irregular)?
- Adjacent finishes: Inspect nearby surfaces like paint, wallpaper, or tiles. Are they also affected?
- Water marks: Check for telltale rings or streaks that indicate water has been present.
- Mold or mildew: Look for signs of growth, which can appear as black, green, or white spots. If found, wear protective gear before proceeding.
- Leak sources: Inspect plumbing fixtures (sinks, toilets), appliances (washing machines, dishwashers), and roofing for any visible issues.
- Exterior walls: Check for cracks, gaps, or missing caulk around windows, doors, and where the wall meets the roof. These can let water in.
- HVAC systems: Inspect air vents and ducts for signs of moisture or mold. They could be a hidden source of stains.
Quick rule: Always start your inspection from the top (roof) and work your way down to ensure you don’t miss any potential leak sources.
Moisture testing and tools to use
Before you start any repairs or improvements, it’s crucial to understand the extent of moisture intrusion. This checklist helps you identify problem areas using non-destructive tools.
- Check tool calibration: Ensure your moisture meter is calibrated according to the manufacturer’s instructions before starting.
- Inspect walls and floors: Use a moisture meter to test walls and floors for excess moisture. readings above 17% indicate potential problems.
- Look for patterns: Check for consistent high readings in specific areas, which could indicate recurring water issues or leaks.
- Test behind baseboards: Moisture can hide behind baseboards. Use a thin probe moisture meter to check these areas.
- Inspect around windows and doors: Check for moisture around openings, as this could indicate water intrusion from outside.
- Check concrete slabs: Test concrete floors and slabs for excess moisture. High readings can lead to delamination or other issues.
- Use a thermal camera (optional): If available, use a thermal camera to detect temperature differences that may indicate moisture intrusion.
- Verify tool capabilities: Always check the specifications of your tools to ensure they’re suitable for the job. Some meters may not read through paint or vinyl, for example.
Quick rule: If you find consistent high moisture readings in specific areas, consider consulting a professional to diagnose and address the underlying cause before proceeding with any repairs or improvements.
Probing and minor invasive checks
When visual inspection and moisture testing aren’t enough to pinpoint the problem, it’s time for some safe, limited invasive checks. Here’s a quick guide to help you confirm moisture issues and hidden rot without committing to large demolition.
- Remove trim: Carefully pry off baseboards or other trim where you suspect problems. This exposes the wall or floor for closer inspection.
- Check for soft spots: Gently press on walls, floors, and joists with your hands or use a screwdriver to probe for soft or spongy areas that could indicate rot.
- Drill small cores: If you suspect moisture issues behind walls, drill small (1-1.5″) diameter cores at varying heights to check for dampness or rot.
- Inspect insulation: Check the condition of any visible insulation. Wet or damaged insulation can indicate moisture problems.
- Examine joists and beams: Look for signs of rot, such as crumbling wood, fungal growth, or a spongy feel when probed.
- Check for pest damage: Inspect for signs of insect or rodent activity, which can cause hidden damage and contribute to moisture issues.
- Inspect plumbing: Look for water stains, leaks, or condensation around pipes, as these can indicate plumbing problems that may be causing moisture issues.
- Test for mold: Use a simple mold test kit to check for the presence of mold, which can grow unseen behind walls and indicates high moisture levels.
Quick rule: Always wear appropriate safety gear (gloves, eye protection) when performing invasive checks. If you’re unsure about any findings or need further testing, consult a professional before proceeding with repairs.
Common Causes Categorized with Symptoms
Group common root causes with their typical staining signatures, such as flashing failure, sealant gaps, weep hole blockages, and condensation buildup. Use real-world clues rather than theory alone to narrow possibilities.
Clues like rust-colored streaks, mineral halos, or dark, damp patches help differentiate issues. Color and pattern often point to exterior vs interior moisture sources and material interactions.
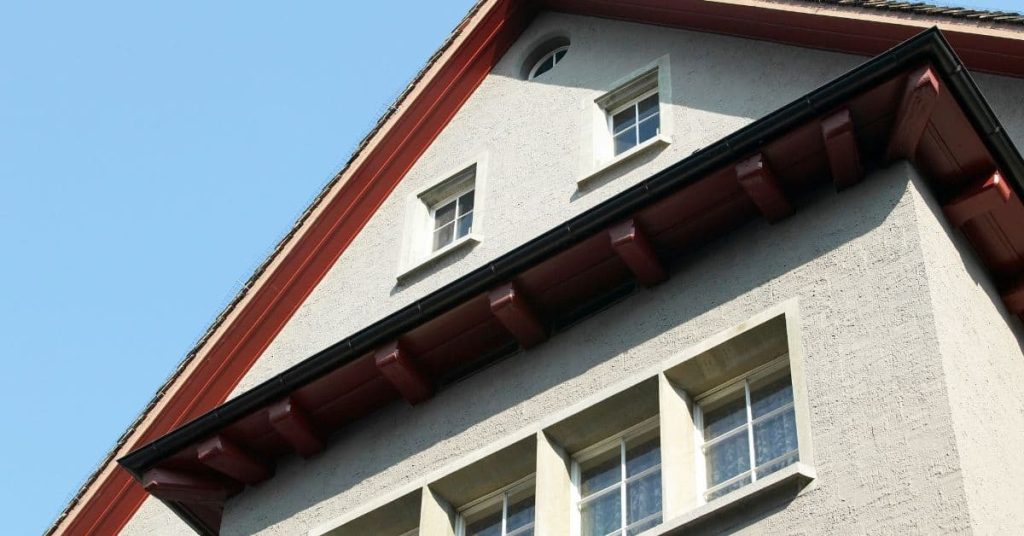
Window Flashing and Head/Sill Issues
Water staining on stucco under windows often points to problems with the window’s flashing. Flashing is the metal or membrane that seals around windows, directing water away from the opening.
Missing or damaged head flashing can cause water to seep in along the top of the window, leading to staining directly below it. You might see a horizontal line of discoloration matching the window’s width.
Failed sill flashing allows water to pool on the windowsill and run down the sides, creating vertical streaks beneath the window. Check for rusted or missing metal flashing, or cracked caulk at these locations.
Window Installation and Sill Slope Problems
Improper window installation can lead to water staining. The key issue is incorrect sill slope. Windows should be installed with a slight pitch, usually 1/4 inch per foot, to encourage water runoff.
If the sill is flat or sloped towards the house, water will pond on the sill and find its way into the stucco. This results in staining directly below the window’s bottom edge. Inspect the sill for signs of standing water or moisture.
Poor fastening can also cause problems. If windows aren’t securely fastened to the framing, they can shift over time, breaking seals and allowing water entry. Tapping on the window frame should feel solid; if it feels hollow or gives way, further investigation is needed.
Exterior Sealant and Junction Failures
Cracked, missing, or incompatible caulking around window frames and trim can cause water to seep into the stucco, leading to staining. These junctions are critical for directing water away from the wall.
Streaking often indicates failed sealant. Water runs down these paths, leaving visible trails on the stucco below. Check caulking at the top and sides of windows, as well as where trim meets stucco.
Localized stains might point to incompatible materials. Different types of caulk have varying degrees of flexibility and adhesion. If they don’t bond properly with the surrounding materials, water can seep through, causing staining. Inspect sealants for signs of deterioration or incompatibility.

Repair Options: Temporary Fixes Vs Permanent Repairs
Describe immediate actions to slow damage, like drying out the area, cleaning existing stains, and resealing critical joints. Distinguish between temporary measures and what requires proper construction work.
Follow the sequence: diagnose, dry out, then repair. Reserve permanent repairs for issues that recur after initial steps or involve flashing and structural elements.
Short-term containment and drying
While you plan your permanent repairs, stop further water damage with these temporary fixes.
Redirect runoff: Temporarily install diverters or extend gutters to move water away from the affected area. This buys time for a proper repair.
Improve ventilation: Open windows and use fans to increase airflow, helping the stucco dry faster. Keep in mind that excessive heat can also cause damage, so maintain a balance.
Temporary sealing: Use a flexible, paintable sealant to temporarily block water entry points. This won’t solve the problem but will slow down further damage until you can make permanent repairs.
Replacing or repairing flashing and WRB
The key to preventing future water staining is proper integration of flashing and the weather-resistive barrier (WRB).
Flashing: Inspect and replace damaged or missing flashing. Ensure it extends at least 4 inches up the wall and laps properly with adjacent pieces.
WRB: If your WRB is compromised, repair or reinstall it. This could be housewrap, felt paper, or a similar material that protects the stucco from water intrusion.
Proper integration of these components ensures water runs off and doesn’t get trapped behind the stucco, causing stains.
Stucco patching and finish restoration
Once you’ve addressed the underlying causes, it’s time to repair the damaged stucco. Here’s how:
Remove damaged stucco: Carefully cut out the stained area, ensuring you remove all affected material.
Ensure substrates are dry and sound: Before patching, ensure the underlying substrate is dry and in good condition. If necessary, treat any rot or other issues before proceeding.
Patching: Use a compatible stucco mix to fill the void. Ensure you match the existing texture and finish as closely as possible for a seamless repair.
Preventive Measures and Best Practices
Adopt flashing and sealant practices that keep water out where windows meet stucco. Use durable, appropriate exterior finishes and ensure good drainage around the sill.
Include regular upkeep checks and timely maintenance tasks to reduce future staining. Focus on simple, repeatable steps homeowners can perform or supervise.
Proper window installation details to verify
When inspecting your windows, start by checking the flashing. It should be properly integrated with the stucco and extend at least 4 inches above the head of the window.
Sill slope is crucial too. It should be pitched away from the house at a minimum of 1/8 inch per foot to ensure water runs off, not into, your home.
Verify that the window’s water-resistive barrier (WRB) overlaps the flashing and extends beyond the exterior edge of the rough opening. This helps prevent water intrusion behind the stucco.
Routine maintenance schedule
Inspect your windows annually, especially after heavy rain or snow. Look for signs of damage or deterioration around the window openings.
Clean out any debris from weep holes at the bottom of your windows to ensure proper drainage. This should be done every six months, or as recommended by local guidelines.
Check sealants around windows and reapply if necessary. This will help maintain a tight barrier against water intrusion.
Upgrades for resilience (overhangs, drip edges)
Adding overhangs above your windows can help protect them from direct rain and snow. They should extend at least 12 inches beyond the window opening.
Installing drip edges along the bottom of your overhangs or roof can also help guide water away from your windows, reducing the chance of staining.
Increasing the size of returns – the area where the wall meets the roof – can also provide extra protection. A larger return will direct more water away from your windows.
Tools and Materials Checklist
Prepare a homeowner-friendly list of inspection and repair tools, plus material categories such as sealants, patch materials, and protective gear. Include safety equipment and a plan to verify product compatibility with the project.
Always cross-check product labels and manufacturer guidance before use. If in doubt, consult the datasheet or your local building requirements for acceptance criteria.
Inspection and diagnostic tools
Before you start any repairs, use this checklist to gather the right tools for inspecting and diagnosing water stains on your stucco under windows.
- Flashlight: Essential for checking dark or hard-to-reach areas. Skipping this can lead to missed issues.
- Moisture meter: Helps confirm if moisture is present behind the stucco. Don’t rely on visuals alone.
- Binoculars: Useful for inspecting high windows or tight corners safely from the ground.
- Thermal imaging camera (optional): Can help locate hidden moisture and cold bridges, but not essential if you have a good moisture meter.
- Tape measure: Needed to ensure any replacement materials match your window dimensions.
- Chalk line: Helps mark out repair areas accurately.
- Level: Verify sill slope and flashing alignment. Incorrect levels can cause water to pool.
- Ladder or scaffolding: Safe access is crucial for accurate inspection and repair. Use appropriate equipment for the job’s height.
Quick rule: Always prioritize safety when choosing your tools and access methods.
Repair materials and sealants
Use this checklist to gather the right repair materials for fixing water stains on your stucco under windows.
- Self-adhered flashing: Essential for creating a watertight barrier around windows. Ensure it’s compatible with your existing materials.
- Stucco patching compound: Match the color and texture of your existing stucco to maintain a uniform finish.
- Exterior-grade sealant: Use a paintable, flexible sealant for filling gaps and preventing future water intrusion.
- Window flashing tape: Can be used as a temporary fix or in combination with self-adhered flashing for added protection.
- Water-resistive barrier (WRB) material: If needed, match the existing WRB type to maintain your home’s weatherproofing system.
- Caulk gun and caulk: For filling small gaps and cracks before applying sealant or patching compound.
- Putty knife: Useful for applying and smoothing out repair materials. Choose the right size for your job.
- Sandpaper (fine grit): Smooth out patched areas before painting to maintain a uniform finish.
Quick rule: Always check compatibility with existing materials to avoid damaging your home’s weatherproofing system.
Safety and access equipment
Before you start any repairs, use this checklist to ensure you have the right safety gear and access equipment for working on your home’s exterior.
- Hard hat: Protects against falling debris during repair work. Skipping this can lead to serious injuries.
- Safety glasses: Essential for protecting your eyes from dust, debris, and chemical splashes.
- Work gloves: Prevent hand injuries when handling tools or materials.
- Ear protection (optional): Useful if you’re using power tools near occupied spaces.
- Ladder or scaffolding: Choose the right equipment for the job’s height and complexity. Always prioritize stability and safety.
- Harness (for high access): Essential for safe working at heights above 6 feet. Never risk a fall.
- Safety harness lanyard and anchor points: If using a harness, ensure you have the right equipment to secure yourself safely.
- Dust mask or respirator (optional): Protect against dust inhalation when sanding or disturbing old materials.
Quick rule: Always prioritize safety over speed. The wrong equipment can lead to serious injuries or property damage.
Visual Signs and Examples to Look for
Photograph stains with consistent lighting and include a scale reference for progression tracking. Develop a repeatable method to capture surface changes over time.
Use your visuals to guide contractor consultations or insurance documentation. A clear before-and-after record makes it easier to assess repair effectiveness.
Angles and lighting for clear photos
When photographing water stains on your stucco, remember: the clearer the photo, the better you can track progress or explain issues to contractors.
First, take wide-context shots. Stand back, show the entire window area, and capture any nearby details that might help later.
Then, move in close for detailed shots. Get perpendicular to the stain – not at an angle. This shows the true size and shape of the problem. Use consistent lighting too; natural light is usually best.
What to include in notes and timestamps
Good record-keeping helps you see changes over time and proves damage for insurance claims. Here’s what to note:
Date: When did the photo or repair happen?
Weather conditions: Was it rainy, sunny, or windy? This can help link causes to effects.
Recent exterior work: Did you recently paint, pressure wash, or do other work that might affect the stucco?
Precise location labels: Be specific. ‘North side of house, above kitchen window’ is better than just ‘window’.
Conclusion
Water staining on stucco near windows is a signal you need to act now. Fixing it the right way protects the wall, keeps water out, and preserves curb appeal. Focus on solid, lasting repairs and safe testing, not quick bandaids.
Check in this order: inspect the area around the window for cracks, gaps, or failed sealant; look for hidden moisture behind the trim or siding; confirm that flashing and weep screws are intact; then decide between temporary fixes and a proper repair plan, testing any patch in a small, unobtrusive spot first.
Avoid these mistakes: don’t ignore even small leaks or pushy patches that bypass flashing or sealants. never spray or pressure-wash systems near the stucco without knowing the risk to the substrate. and don’t mix temporary fixes with permanent repairs without a clear plan—if moisture returns, you’ll pay twice.
If the area shows widespread damage, complex flashing, or persistent staining after a test patch and basic maintenance, call a professional. When in doubt, pause, assess, and book a pro to prevent further damage. Stay steady, follow the checks, and you’ll keep water where it belongs—outside the wall.
FAQ
What causes water staining to show up under windows on stucco?
Stains usually come from water tracking down the wall or seeping through gaps around the window. Leaks at flashing, sill pan, or mis-seated siding are common culprits. Check manufacturer instructions and local rules for flashing details if you’re unsure.
How can I tell if the stain is ongoing moisture intrusion or just a dry-out from past leaks?
Look for active dampness on the surface after rain or flushing from a hose test. If the stain darkens or expands with moisture, the issue is ongoing. If it stays the same, it may be a residual stain that needs cleaning and sealing.
What are practical steps to clean up staining before doing a permanent repair?
Start with cleaning the stained area with a gentle, stucco-safe cleaner and a soft brush. Rinse well and let it dry completely before any patching or sealant. Avoid high-pressure washing that can damage the stucco or flashing.
How can I prevent staining from coming back after repairs?
Fix the water entry point first—seal gaps, repair flashing, and ensure proper drainage away from the wall. Re-seal the stucco surface and inspect around windows regularly after rain. Use products per the label and follow any local guidelines.