
Introduction
Prepping floors for tile means making the surface clean, flat, and dry enough so tile adhesive can bond properly. This article walks you through surveying the floor, testing basics, and fixes you can do with standard tools. It’s a hands-on guide, not a lecture, and I’ll point you to what to check on labels, instructions, and local rules if a spec matters.
Moisture testing methods, including simple checks and more thorough hygrothermal analysis, help you spot problems before you tile. Surface prep techniques like grinding, cleaning, and feathering transitions address common issues that cause bond failures. Inspect the floor as you go and note any uneven spots, old coatings, or dust, and always follow manufacturer instructions and local requirements for prep and primers.
Key takeaways
- Verify substrate age and condition during survey, noting cracks, stains, and movement.
- Test moisture and alkalinity using product labels and manufacturer guidelines before tiling.
- Plan surface prep with grinding, cleaning, and feathered transitions to solid surfaces.
- Address uneven slabs by identifying high spots and selecting appropriate leveling methods.
- Organize tools and materials checklist to avoid delays during installation.
- Include safety steps: PPE, dust control, and follow local code requirements.
Table of Contents
- Introduction
- Key takeaways
- Why Proper Floor Prep Matters for Tile
- Survey, Measurements, and Initial Inspection
- Concrete Moisture and Alkalinity Testing (Methods & Interpretation)
- Surface Preparation Steps Before Tiling
- Addressing Uneven Slabs and Leveling Solutions
- Tools, Materials, and Equipment Checklist
- Common Problems, Root Causes, and Fixes
- Project Planning, Budgeting, and Timeline
- Conclusion
- FAQ
Why Proper Floor Prep Matters for Tile
When you skip or short the prep work, the tile system pays the price. You can see failures in the form of loose tiles, edges that lift, and grout that fans out or cracks. Cosmetic flaws often masquerade as a larger problem, but they usually point to a weak foundation beneath. Proper prep directly affects how long the floor will look good and perform under foot traffic. It also influences warranty eligibility and total lifecycle costs because unresolved issues tend to compound over time. Start by identifying the substrate, moisture risks, and any coatings or contaminants that could interfere with adhesion.
Think of prep as the foundation for performance, appearance, and value. A thorough plan reduces maintenance and costly callbacks. You should verify substrate flatness, bondability, and environmental conditions before tiling. Documented testing steps and a clear surface-prep method help you stay on budget and on schedule. Use a practical checklist to guide the work and know when to call in a specialist for leveling or primers if needed.
Common failure modes and their visible signs
Inadequate floor prep can lead to several tile failures, each with distinct symptoms:
Cracked tiles might indicate lippage, where tiles are not level, or delamination, when the tile separates from the substrate. A hollow sound when tapping on a tile could signal delamination or a weak bond.
Moisture staining or mold growth suggests moisture-related issues like alkalinity in the substrate, high moisture vapor emission, or even water intrusion. Cracked grout often points to structural movement or improperly mixed/cured grout.
When to call a professional vs. DIY
Knowing when to seek help is crucial for a successful tile job:
DIYers can usually handle small, simple projects on stable surfaces with no major issues. But if you’re dealing with large areas, complex layouts, or significant substrate problems, consider hiring a pro.
Always call in a professional for tasks like moisture/vapor mitigation systems, major substrate repairs, or warranty-required installations. DIYers can safely handle surface preparation, leveling compounds, and basic tile installation with the right knowledge and tools.

Survey, Measurements, and Initial Inspection
A systematic floor survey helps you predict surprises before they derail the project. Begin by measuring elevations across the space to locate highs and lows and to gauge planarity. Record peak-to-peak variations to set the layout strategy. Accurate surveying reduces waste and rework later on. It also helps you choose the right leveling approach and adhesive system from the start. Keep notes organized for your tile plan and future inspections.
Next, assess substrate type and condition, including any coatings, laitance, or cracks. Check for moisture issues and alkalinity so you can select compatible primers and membranes. Document environmental factors like humidity and temperature that affect setting. Create a clear action list with repairs, schedules, and budget implications that align with your chosen tile system and surface-prep method.
Flatness and level tolerances for tile
Before you start tiling, check your floor’s flatness and levelness. This helps prevent lippage (uneven edges) and ensures a smooth finish.
- Check FF/FL numbers: Use a laser level or straightedge to measure surface deviations. Aim for an FF (flatness) of 1/8″ per 10′ and FL (levelness) of 1/4″ in 10′.
- 3-4-5 rule: Use a straightedge and level to check for high or low spots. If the gap between the floor and straightedge is more than 3/16″, you’ve got a problem.
- Peak-to-peak variation: Measure the difference between the highest and lowest points in your room. Keep it under 1/4″ for best results.
Quick rule: If your floor deviates more than allowed, you’ll need to level it before tiling.
Documenting the room and substrate conditions
Keep a record of your room’s conditions. This helps track progress, identify issues, and make informed decisions during installation.
- Room dimensions: Measure length, width, and height to ensure you’ve got enough tile for the job.
- Moisture history: Note any past moisture problems. High humidity can cause tiles to lift or delaminate.
- Vapor sources: Identify potential moisture sources like plumbing leaks, condensation, or high humidity areas.
Quick rule: Regularly update your records to keep track of any changes in conditions.
Concrete Moisture and Alkalinity Testing (Methods & Interpretation)
Know when to use different moisture tests and why. Concrete moisture meters, in-situ RH probes, calcium chloride tests, and surface dampness checks each fit different situations. Use a quick decision guide to pick the right method based on substrate, climate, and the tile adhesive you plan to use. You should plan for a combination of tests when the project scope is large or sensitive to moisture. Always cross-check readings with the adhesive manufacturer’s recommendations and local guidelines. Document the results clearly for remediation decisions.
Alkalinity or pH testing matters because high or low alkalinity can weaken bonding agents. Use appropriate test methods and interpret results with the adhesive requirements in hand. If readings are outside the acceptable range, plan primer choices or moisture barriers accordingly. Integrate testing results into a concrete-action plan that includes remediation steps and surface preparation. Ensure your final plan aligns with standards and alerts from the manufacturer instructions or local codes.
How to perform and interpret in-situ relative humidity (RH) testing
In-situ RH probes are inserted into the concrete substrate to measure moisture content directly. Here’s how:
1. Drill holes 2-3 inches deep, spaced evenly across the area. Seal any cracks first to prevent false readings.
2. Insert probes, ensuring they’re level and well-seated. Leave them for at least 72 hours to equilibrate with the substrate.
3. After 72 hours, record RH values. Acceptable thresholds vary by adhesive, but typically fall between 75-80%. If RH exceeds limits: – Wait for drier conditions or use moisture-blocking membranes.
– Consult adhesive manufacturer’s guidelines and local codes.
Quick field checks and when to deploy lab-grade tests
Before installing tile, perform quick moisture checks. Here’s why:
Surface damp tests and CM meters offer fast results but have limitations. Use them for initial screening: – Surface damp tests: Press a plastic sheet onto the floor. If it fogs up, moisture is present.
– CM meters: Measure surface moisture content quickly. However, they’re affected by temperature and humidity.
If quick checks suggest high moisture or you’re unsure:– Upgrade to lab-grade tests like RH probes or calcium chloride tests. These provide more accurate readings but take longer.
– Always follow adhesive manufacturer’s guidelines and local codes when interpreting results.
Surface Preparation Steps Before Tiling
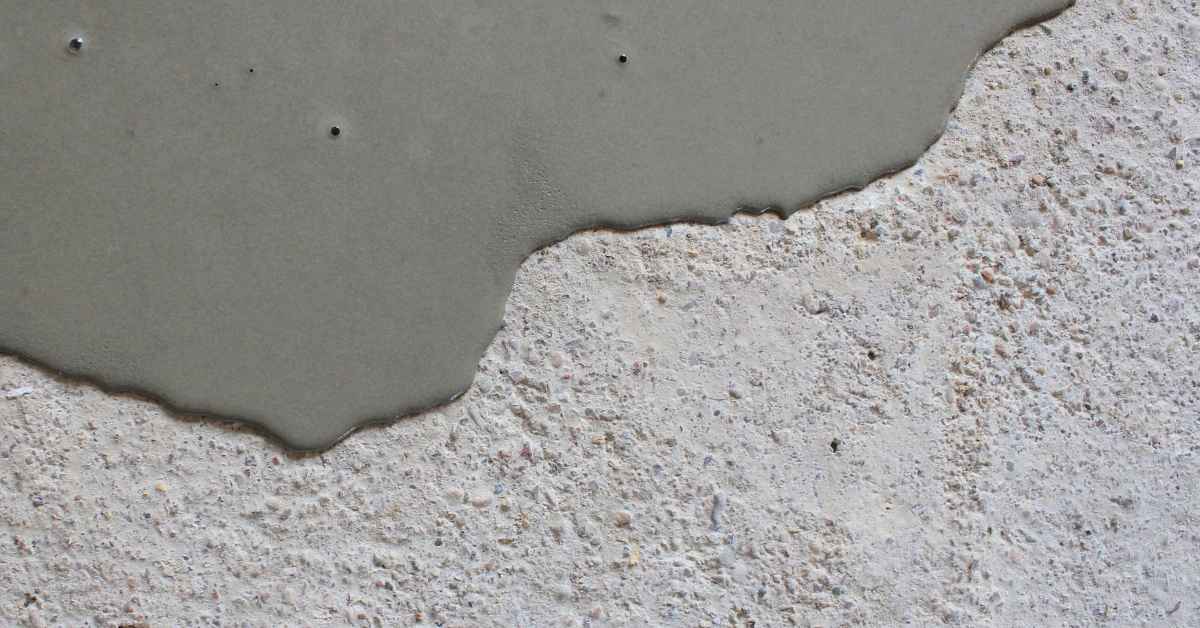
Begin with thorough cleaning to remove dust, oils, curing compounds, and sealers. Re-check the surface after cleaning to ensure there are no residues that could interfere with adhesion. Contaminants left behind are a common cause of bond failure, so take the time to verify cleanliness. The next step is profiling, which prepares the surface to receive tile by creating a suitable roughness. Choose a profiling method that matches the substrate and adhesive system, then verify with a test area if needed.
Crack repair and joint stabilization come next, since movement can ruin a flawless tile install. Use the approved repair materials and follow timing recommendations relative to tiling. Then retest moisture and alkalinity to confirm compatibility with primers and adhesives. Finish with the right primer and bonding agents to seal dust and improve adhesion, and ensure the surface is ready for tile installation according to the product instructions.
Cleaning and contaminant removal
Start by sweeping the floor to remove loose dust. Then, tackle contaminants like oils, grease, wax, paint, or sealers.
Oils and grease: Use a degreaser specifically designed for concrete. Apply, let it soak, then scrub and rinse off.
Wax: Use a strong solvent like xylene or methyl ethyl ketone (MEK). Apply, let it soak, then scrape off the wax with a putty knife.
Paint: Scrape off as much as possible. Then use a paint stripper and follow the manufacturer’s instructions.
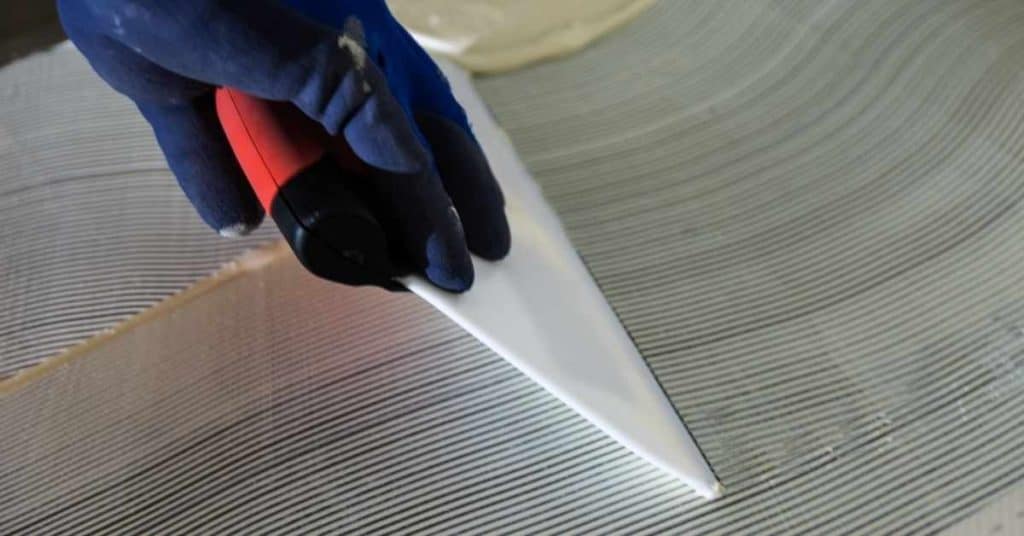
Mechanical profiling and concrete repairs
Profiling helps create a rough surface for better tile adhesion. Choose between grinding, shot blasting, or grit blasting.
Grinding: Use a diamond cup wheel on a grinder to remove the top layer of concrete. Aim for a surface roughness (Ra) of 3-5 microns.
Shot/grit blasting: These methods use compressed air to propel shot or grit at high speeds, removing the surface layer. They’re ideal for large areas and can achieve similar Ra values as grinding.
For repairs, assess cracks, spalls, and hollow areas. Use epoxy or polyurethane injections for cracks and fillers for small spalls. Allow repairs to cure before tiling.
Addressing Uneven Slabs and Leveling Solutions
Detecting unevenness starts with a careful visual check and a straightedge, followed by more precise tools if needed. Use a flooring profiler or laser setup to map highs and lows and establish flatness targets for your tile system. Record the deviations and determine the plan for remediation before any material is chosen. Understanding the depth of irregularities helps you pick the right method and avoid over- or under-correcting. Document the plan and expected timeline to prevent overruns.
Depth and traffic dictate the fix. Feathering and patching work for mild deviations, while self-leveling underlayments suit larger areas, and full resurfacing handles severe irregularities or high-traffic demands. Always check moisture and substrate compatibility before applying leveling materials. Sequence the work to maintain bonding surfaces and plan for proper cure times before tile installation. Plan around plumbing, radiant heat, or moisture-sensitive floors as needed, and validate results with a follow-up flatness check.
Self-leveling underlayments: selection and application
First things first, check your slab’s condition. Self-levelers won’t fix major cracks or structural issues. They’re for minor unevenness.
Now, let’s pick the right one:
Compressive strength: Look for 3000-4000 psi. Any lower, it might not hold up to traffic.
Cure time: Faster is better, but don’t rush. Check the label; 24-72 hours is typical.
Thickness limits: Most levelers can handle 1/8″ to 1″. Beyond that, you might need a pro or additional layers.
Application’s simple:
1. Clean and prime the slab. Check base compaction. It should be solid.
2. Mix the underlayment according to the manufacturer’s instructions.
3. Pour it on, spread it out with a trowel or screed, and let it level itself.
Avoid these pitfalls: Don’t apply in cold weather (below 50°F) or high humidity. Don’t rush the cure time. And don’t skimp on mixing; follow the bag’s instructions to a T.
Localized leveling and feather coats
When you’ve got a small area that’s out of whack, don’t go dumping self-leveler everywhere. That’s just wasteful. Instead, use a feather coat. It’s like giving your slab a quick trim.
First, check if the base is solid. If it’s not, compact it before you start. You don’t want to be fixing this twice. Now, mix your feather coat according to the manufacturer’s instructions. Don’t go all out on the water; keep it thick enough to stick.
Now, grab your trowel and start at the lowest point. Work the material up and out, thinning it as you go. You’re aiming for a smooth, thin layer that blends into the existing slab. Don’t be greedy with the material; a little goes a long way here.
Let it cure according to the product’s instructions. Once it’s hard, check your work. If it’s still not level, you might need to re-evaluate your approach or consider using a self-leveling underlayment for better results. Feather coats aren’t magic; they won’t fix everything.
Tools, Materials, and Equipment Checklist
Build a practical toolbox for surface prep with moisture meters, straightedges, and a laser level for flatness checks. Have grinders and diamond cup wheels ready for profiling, plus trowels, screed tools, and pump sprayers for cleaning and priming. Use space measurement gear to map room dimensions and plan material quantities accurately. This set keeps you efficient from start to finish and reduces rework. Always check the current status of tools and calibration before use.
Match materials to the job: primers, patching compounds, self-leveling underlayments, latex additives, and compatible tile mortars. Confirm compatibility with primers and sealers, and keep a ready supply of PPE and ventilation gear. For DIY small jobs, assemble starter kits; for larger projects, consider rentals of specialized equipment. Maintain a workflow checklist and know where to source parts and replacements if needed.
Recommended specifications and product features to look for
Before purchasing, check these specs to ensure you’re getting the right tools and materials for your job.
- Moisture meters: Non-destructive (pinless) meters are great for initial checks. Destructive tests like calcium chloride are more accurate but require drilling.
- Straightedge/laser level: Ensure it’s long enough to cover your largest tile size.
- Grinders and diamond cup wheels: Check grit size (coarse for heavy removal, fine for finishing).
- Trowels and screed/float tools: Choose the right size and shape for your underlayment or mortar.
- Pump sprayers: Opt for adjustable nozzles to suit various primer and sealer viscosities.
- Primers: Check VOC content (lower is better) and compatibility with your substrate and tile.
- Patching compounds: Ensure they’re compatible with your substrate and can be used with the primer you’ve chosen.
- Latex additives: Check if they’re suitable for your underlayment or mortar mix.
- Tile mortars: Confirm compatibility with prepared surfaces and primers.
Quick rule: Always check manufacturer guidelines and local codes to ensure you’re using the right products safely.
Safety and jobsite controls
Prioritize safety and prevent contamination during prep with these steps.
- Dust control: Use wet cutting, vacuum sanders, or HEPA vacuums to minimize dust.
- Ventilation: Ensure your workspace is well-ventilated. Consider using fans or respirators with P100 filters.
- Respirators: Wear a proper-fitting respirator for tasks generating high dust levels.
- Eye protection: Use safety glasses or goggles to protect against debris and chemicals.
- Ear protection: Wear earplugs when using power tools to prevent hearing damage.
- Gloves: Choose the right gloves for the task – rubber for wet work, leather for handling sharp edges.
- Electrical safety: Use GFCI outlets and inspect cords regularly. Keep tools dry and away from water sources.
- Surface containment: Use drop cloths or plastic sheets to contain dust and debris.
- Cleanup: Regularly clean your workspace, tools, and equipment to prevent accidents and maintain efficiency.
Quick rule: Always put safety first. Follow manufacturer guidelines for tool use and maintenance.
Common Problems, Root Causes, and Fixes
Begin with a catalog of common issues and what they indicate, such as moisture vapor drive, high alkalinity, old adhesive residues, movement cracks, and debonding. Quick diagnostic indicators help you prioritize work and avoid chasing symptoms. Connect each problem to a root cause so you can plan targeted remediation. Clear steps for each issue aid in consistent execution and future prevention. When in doubt, verify with testing and manufacturer guidance or a professional opinion.
Translate test results into actionable surface-prep plans, using grinding, patching, smoothing, priming, and the right bonding agents. Build sequences that address both the symptom and root cause, and tailor fixes to the tile type and substrate. Include DIY-safe options and professional thresholds, with clear timelines and warning signs that indicate when to call for experienced help. Track progress and confirm remediation with follow-up tests.
Adhesive failure and debonding — diagnosis and repair
Debonding can cause tiles to pop off, leading to costly repairs. Here’s how to diagnose and fix it.
Diagnosis: Tap tiles with a rubber mallet. Hollow-sounding tiles may have voids or poor adhesion. Check for adhesive compatibility issues by examining the old adhesive. Some adhesives lose their bond over time, especially when exposed to moisture.
Repair: Remove debonded tiles and any remaining adhesive using a chisel and hammer or an oscillating tool. Grind down high spots to ensure a flat surface. Clean the area thoroughly. Apply a primer suitable for the new adhesive. Use a compatible, high-quality adhesive and follow the manufacturer’s instructions.
Moisture-related tile failures and remediation options
Moisture is a common culprit behind tile failures. Here are ways to diagnose and fix moisture problems.
Diagnosis: Use calcium chloride tests or RH probes (as explained in the Concrete Moisture and Alkalinity Testing section) to measure moisture levels. If results are high, consider long-term drainage/condensation controls.
Remediation: Install a vapor barrier under the slab during construction or apply a moisture mitigation membrane on top of the concrete before tiling. For existing slabs with persistent moisture issues, use moisture-tolerant mortars and consider installing a drainage system to control long-term condensation.
Project Planning, Budgeting, and Timeline
Define the scope of floor prep for tile by listing tests, repairs, and surface conditions to address. Clarify the sequence so you can budget the work and avoid bottlenecks. Establish a planning baseline that includes contingency for unexpected findings and scope changes. A well-defined plan helps you manage expectations with everyone involved. Keep documentation organized to track progress and decisions as the project unfolds.
Identify time and cost drivers by outlining testing duration, repair extent, material quantities, and drying or cure times. Build a practical testing plan detailing which tests are needed, who conducts them, and how results influence steps. Prepare a material and labor estimate that covers grinding, patching, priming, moisture barriers, leveling, and contamination control. Create a master schedule with milestones and contingencies, and adjust it as test results evolve to keep the job on track.
Typical cost components and budgeting tips
Budgeting for floor prep involves understanding the key cost drivers. Here’s a breakdown:
Testing: Moisture, alkalinity, and surface profile tests are crucial. Expect to spend around $200-$500 per test, depending on size and complexity.
Labor: Hiring pros for grinding, patching, priming, and leveling can save time but adds cost. Plan for $30-$60 per hour, plus materials.
Materials & Equipment: Concrete prep materials range from $100 to $500 per 5-gallon bucket or bag. Rentals like grinders and vacuums can add $50-$200 daily. Reduce costs by phasing testing, pre-bidding surveys, and DIY where possible.
Scheduling considerations and cure/dry-time calendars
Cure times are critical in floor prep. Plan your schedule around these:
Primers: Allow 24-72 hours for curing, depending on the product and conditions.
Slurries & Underlayments: These can take 12-72 hours to dry and cure. Check manufacturer’s guidelines and consider environmental factors like humidity and temperature.
Account for weather effects too. Winter months may require additional heating or scheduling adjustments. Build contingencies into your timeline, and be ready to adjust as test results come in.

Conclusion
Solid floor prep pays off in a durable, good-looking tile install. Do the right tests, fix the issues, and you won’t waste time or money patching failures later.
Check the essentials in plain terms: confirm moisture and alkalinity results, verify the slab is truly flat and within acceptable tolerances, address any cracks or high spots, clean and abrade the surface as needed, allow for proper drying and conditioning, then plan the tile layout, apply the correct preparations, and proceed with measured steps until you reach the tiling phase.
Common mistakes to avoid include skipping testing or misreading the results, trying to level or patch without proper product selection, and rushing the surface prep or sealing steps. Safety rules are simple: work clean, wear eye and skin protection, ventilate when using coatings, keep tests isolated to small areas first, and never mix products not intended to work together. If the slab shows severe movement, persistent moisture, or you’re unsure about the leveling approach, stop and reassess before proceeding.
If the project would require specialized leveling, moisture mitigation, or complex substrate treatment beyond your comfort zone, call a professional. When you know the tests, follow the plan, and stay conservative, you’ll finish strong and avoid costly mistakes. Stay steady, keep your eye on the details, and you’ll get a floor that lasts as long as your tile does.
FAQ
How should I perform a basic survey and inspection to catch leveling issues and flat spots?
Walk the floor with a straightedge or laser line and look for gaps, highs, and divots. Mark suspect areas and note where the surface feels chalky or powdery. If there are hard-to-reach spots, bring in a level or a long straight edge to verify consistency.
What is hygromothermal (moisture) analysis, and when should I consider it for tile prep?
Hygrothermal analysis looks at how moisture moves through the slab and how temperature influences it. It’s more than a quick test, so use it when you expect elevated moisture or when other tests weren’t clear. Always verify methods with the product label, manufacturer instructions, or local guidelines before proceeding.
What surface prep steps are essential before tiling, especially grinding and cleaning?
Grind or mechanically abrade where the surface is smooth, dusty, or has bonds that won’t take thinset. Clean thoroughly to remove contaminants, oils, and laitance. Control dust with proper vacuums and PPE; never skip cleaning, or you’ll trap debris under the tile.
What are common issues seen in floor prep for tiling, and how do I fix them safely?
Common issues include loose coatings, adhesive remnants, and sealed or contaminated concrete. Fix by removing bond breakers, roughening the surface, and re-cleaning. For major defects, consult the product instructions and consider professional leveling or resurfacing as needed.