

Introduction
Rigid and semi-rigid joint fillers are the main options for garage slabs, with different movement tolerances and durability.
This article explains how to tell which is best for your slab and walks you through practical considerations, installation tips, and real-world examples.
You’ll learn how to assess slab movement, select materials, and apply simple rules of thumb for setup and maintenance.
Key takeaways
- Choose rigid fillers for wide control joints in high-traffic slabs.
- Semi-rigid fillers absorb minor slab movement without cracking under shrinkage.
- Prepare joint gaps clean and dry before filling to ensure adhesion.
- Follow manufacturer guidance for curing times and temperature during installation.
- Durability depends on joint width, substrate condition, and proper compaction.
- Balance cost and performance when comparing up-front filler price versus maintenance.
Table of Contents
- Introduction
- Key takeaways
- Why Garage Slab Joints Matter
- Rigid Joint Fillers — What They Are and When to Use Them
- Semi-Rigid Joint Fillers — What They Are and When to Use Them
- How to Choose Between Rigid and Semi-Rigid for a Garage Slab
- Installation: DIY Considerations and Step-by-Step Overview
- Durability, Lifespan, and Maintenance
- Cost Comparison and Value Analysis
- Common Mistakes and How to Avoid Them
- Conclusion
- FAQ
Why Garage Slab Joints Matter
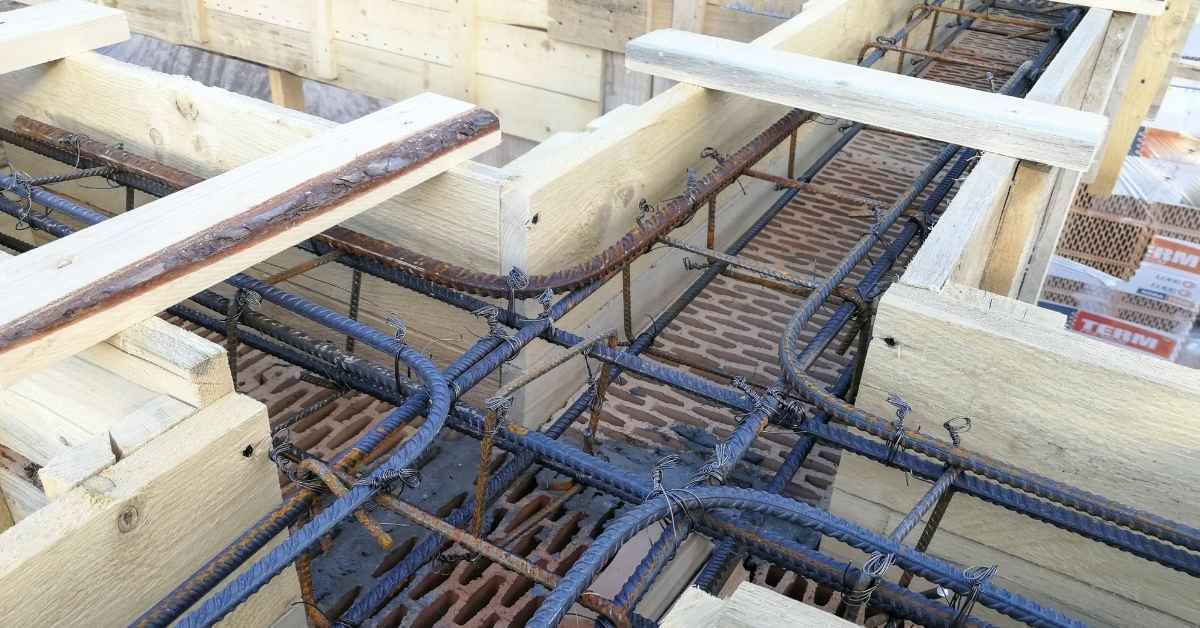
Garage slabs crack as they dry and respond to temperature changes and loads, so joints give movement a safe path. That keeps random cracks from forming across the surface. Proper sequencing of saw cuts and alignment with reinforcement matters to reduce stress and water intrusion.
Decide on filler based on how much movement you expect, whether the joint will see traffic, moisture, or chemicals, and how easy it is to seal and maintain. Rigid fillers stay solid and can crack if there is big movement; semi-rigid ones absorb more movement but may need more maintenance. Seal and inspect regularly to prevent moisture intrusion and to catch deterioration early.
Expansion, Contraction, and Shrinkage — Basics
Garage slabs move. That’s a fact. They expand when it’s hot, contract when it’s cold, and shrink as they dry after pouring.
Thermal movement is the slab’s response to temperature changes. It’s like how metal expands in summer heat and contracts in winter chill.
Drying shrinkage happens as the concrete loses moisture during curing. This can cause the slab to shrink by about 0.5% of its length, creating tension that needs to be relieved.
Types of Slab Joints (Control, Expansion, Construction)
Joints in garage slabs serve different purposes. Here are the main types:
Control joints are saw-cut into the slab to direct where cracking will occur. They’re typically filled with a joint filler.
Expansion joints are wider and deeper than control joints, allowing for more movement at the edges of the slab. They’re usually left unfilled or filled with a compressible material.
Construction joints form where one pour of concrete meets another. They should be saw-cut and filled like control joints to prevent random cracking.

Rigid Joint Fillers — What They Are and When to Use Them
Rigid joint fillers are hard-setting products used where joints have little to no movement. Common options include hydraulic cement-based fillers, epoxy-hard fillers, and cementitious epoxy blends, which cure into a stiff, low-elasticity seal. What makes them ‘rigid’ is their high compressive strength and minimal ongoing movement compared with softer, semi-rigid fills.
Use rigidity in static or near-edge joints, high-traffic slabs, or spots prone to frost cycles, where a strong, stable fill helps resist cracking. Pros are quick setting and a solid, durable fill, but they can crack if the substrate moves and may not pair well with flexible sealants or coatings. For best results, prep the surface dry, follow the product label for mixing, and check cure guidance and any movement limitations before committing.
Material examples and properties
Choosing the right material for your rigid joint filler is crucial. It affects bond strength, hardness, and how well it accommodates movement – which should be very low.
- Hydraulic Cement-Based Fillers: These are quick-setting, high compressive strength options. Look for ones with a rating of 3000 psi or more. Avoid using them in areas prone to excessive movement as they can crack easily.
- Epoxy-Hard Fillers: These offer excellent bond strength and hardness. Specs should show high compressive strength and low elasticity. They’re great for load-bearing slabs but avoid using where there’s significant ongoing movement.
- Cementitious Epoxy Blends: Combining the best of both worlds, these have good compressive strength and bond strength. Look for blends with a 1:1 cement to epoxy ratio. They’re versatile but can still crack if subjected to excessive movement.
Ideal applications and limitations
Rigid fillers excel in situations where there’s minimal joint movement. They’re perfect for static or low-movement joints, high-traffic areas, and load-bearing slabs.
Cosmetic repairs: Rigid fillers can provide a smooth, finished look for cosmetic repairs where appearance is crucial but movement isn’t an issue.
However, they have limitations. Stress transfer: If the substrate moves, rigid fillers can’t accommodate it and may crack or cause stress to transfer back into the slab. This can lead to re-cracking or even slab damage over time. Always ensure joints are properly designed and prepared before applying any filler.
Semi-Rigid Joint Fillers — What They Are and When to Use Them
Semi-rigid joint fillers sit between rigid fillers and flexible caulks, designed to tolerate a bit of movement without cracking. They come in families you’ll hear about as polyurethane-modified, elastomeric epoxy, and semi-rigid polyaspartic/urethane blends, each with its own feel and performance in terms of elasticity and resistance to compression. You’ll notice references to Shore hardness and elasticity ranges, but the key point is they’re stiff enough to support traffic while still giving a little “give” to joint movement.
These fillers handle movement seen in garages—thermal expansion, load-induced deflection, and shrinkage—well enough for small to moderate joint shifts, which keeps you from waiting for a complete return to service after every cold night or heavy use. Use them when you need faster return to service and you’re dealing with vehicle traffic or medium joint motion, but avoid them if the joint movement is large or the surface faces frequent deep flexing where a rigid filler or a highly flexible caulk would perform better. Surface prep, backing materials, and curing conditions matter, so check product instructions and match the filler to concrete, coatings, and paints you plan to apply.
Material examples and properties
The right semi-rigid joint filler will give you a strong, durable bond that looks good. The wrong one can crack or stain, so choose wisely.
- Type N Mortar: Used for most masonry work. Look for ASTM C270 compliance. It’s cheap and widely available. Avoid if you need high strength or acid resistance.
- Type S Mortar: High early strength, used where quick setting is needed. Check for ASTM C1395 compliance. More expensive but worth it when time matters.
- Thinset Mortar: Ideal for ceramic and stone tile installation. Check for ANSI A136.2 or ANSI A108.4 standards. Don’t use on concrete blocks without additives.
- Epoxy Grout: High strength, chemical resistant. Used in areas with high moisture or chemicals. Expensive but lasts longer. Not suitable for most DIY jobs due to complexity.
- Urethane Sealant: Flexible, used for control joints and expansion joints. Look for low modulus (high flexibility). Don’t use on vertical surfaces without proper backing.
Pro tip: Always buy materials from a reputable source and store them properly to maintain quality. When mixing, follow the manufacturer’s instructions to avoid waste and ensure strength.
Ideal applications and limitations
Semi-rigid joint fillers are your best bet for garage floors where you need a balance between flexibility and durability. Here’s when to use ’em:
Driveway aprons: Where the garage meets the driveway, these fillers can handle moderate movement from traffic and temperature changes.
Door thresholds: They’re great for garage doors too. Can take some wear and tear, but not as much as a fully flexible sealant.
Now, where they might let you down:
They ain’t as flexible as the fully flexible stuff. So, if you’ve got big cracks or lots of movement in your garage floor, these won’t cut it. Check your joints before you decide. If they’re wide or deep, consider a more flexible option.
How to Choose Between Rigid and Semi-Rigid for a Garage Slab
Choosing between rigid and semi-rigid filler starts with how much the slab will move and how harsh the environment will be. Look at slab thickness, expected temperature swings, sun exposure, and seasonal moisture, and weigh loads from parking and gear. If movement risk is high or climate severe, lean toward rigid; for moderate movement and coating-friendly conditions, semi-rigid can work.
This decision affects joint spacing, moisture control, and how well epoxy or coatings will stick over time. It matters because wrong choice can show up as cracks, telegraphed joints, or coating failures. Use product labels and manufacturer guidance to confirm compatibility and follow local conditions.
Step-by-Step Process
The following steps guide you through choosing between rigid and semi-rigid joint fillers for your garage slab.
- Preparation: Ensure the slab is clean, dry, and free of debris. Check for any cracks or damage that may affect filler performance.
- Measure Slab Thickness: Determine the thickness of your garage slab. This helps decide if a rigid or semi-rigid filler is needed.
- Assess Movement Risk: Evaluate expected movement due to temperature swings, sun exposure, and seasonal moisture changes. Look for signs of shrink-swell tendencies and control joint spacing needs.
- Consider Traffic Loads: Identify garage traffic patterns (pedestrian vs. vehicle, heavy equipment) and anticipated impact at joints. Estimate the expected joint depth based on usage.
- Evaluate Moisture Management: Inspect subgrade moisture levels and vapor drive. Consider using moisture barriers or sealants if necessary.
- Match Material Properties: Compare rigidity, elasticity, recovery after compression, long-term performance under load, and compatibility with epoxy or coating systems to your garage’s needs.
- Make Your Decision: If the slab is thick with high movement risk or severe climate, lean towards rigid fillers. For moderate movement, frequent thermal cycling, and coating compatibility, consider semi-rigid options.
- Final Check: Double-check that you’ve considered all factors before making your final decision. It’s better to take time now than face issues later.
Environmental and usage factors to evaluate
Temperature range, direct sun exposure, vehicle loads, and freeze-thaw cycles significantly influence your choice of joint filler.
Temperature Range: Wide temperature swings can cause significant slab movement. In hot climates, consider fillers that handle thermal expansion well, like semi-rigid options. In cold regions with freeze-thaw cycles, rigid fillers may be more suitable due to their better resistance to cracking under extreme conditions.
Direct Sun Exposure: Slabs exposed to direct sunlight absorb heat, causing them to expand. This can lead to increased movement and stress on the joint filler. In such cases, consider fillers with good thermal expansion properties, like semi-rigid options.
Vehicle Loads: Heavy vehicle traffic or equipment can put additional stress on joints. If your garage experiences heavy loads, opt for rigid fillers that can withstand these forces better than semi-rigid ones.
Quick decision checklist
Use this checklist when you’re unsure which joint filler to choose for your garage slab.
- Is the slab thick (over 6 inches)? Yes = Consider rigid fillers. No = Semi-rigid may be suitable.
- Are there wide temperature swings (>30°F/17°C) or freeze-thaw cycles? Yes = Rigid fillers might be better. No = Semi-rigid options could work well.
- Is the garage exposed to direct sunlight for extended periods? Yes = Consider semi-rigid fillers with good thermal expansion properties. No = Either type may be suitable.
- Are there heavy vehicle loads or equipment used in the garage? Yes = Opt for rigid fillers that can withstand heavier forces. No = Semi-rigid options could be sufficient.
- Do you plan to apply a coating system on the slab? Yes = Consider semi-rigid fillers that are compatible with coatings. No = Either type may be suitable.
- Is moisture management a concern (high subgrade moisture or vapor drive)? Yes = Ensure the chosen filler can handle moisture effectively. No = Moisture resistance is less critical.
- Are there signs of shrink-swell tendencies in the slab? Yes = Rigid fillers may be better at handling these movements. No = Semi-rigid options could work well.
- Is control joint spacing wide (>1/2 inch)? Yes = Consider rigid fillers for better support. No = Semi-rigid options might be sufficient.
Quick rule: If you’re still unsure, consult with a local concrete professional or supplier to get advice tailored to your specific situation.
Installation: DIY Considerations and Step-by-Step Overview
This section covers choosing between rigid and semi-rigid fillers by outlining a clear, unified pre-installation approach and walking you through the essential steps, from surface prep to the basic tools you’ll need. You’ll see a side-by-side workflow for both filler types, including joint cleaning, priming if required, mixing guidelines to avoid waste, and practical application techniques that hit target joint depth and width, followed by finishing or flattening to a smooth surface. Expect practical tips on weather and cure-time expectations so you don’t start when it’s not right, plus a focus on safety gear and general jobsite routines you can rely on.
This matters because DIYers often misjudge slab condition, moisture, and temperature, which wrecks adhesion and movement performance later. You’ll gain a realistic sense of the sequence, what to check on the label or datasheet for your product, and how to manage small-batch work without compromising results. The guidance helps you avoid common pitfalls—contamination, fumes, or uneven joints—while enabling post-install care and straightforward troubleshooting, so you can spot issues early and keep the project moving with confidence.
Tools and materials checklist
Before you start your concrete project, use this checklist to ensure you have everything you need. It’s best to gather all tools and materials before beginning to avoid delays.
- Safety gear: Hard hat, safety glasses, work gloves, ear protection (check PPE regulations).
- Protective clothing: Long sleeves, long pants, sturdy boots with good grip.
- Power tools: Circular saw or router for cutting forms, wire brush for cleaning surfaces. Ensure they’re in good working condition and have appropriate safety guards.
- Hand tools: Trowel (square-nosed and straight-edged) for finishing, caulking gun for sealing joints. Check trowels for any nicks or burrs that could mar the concrete surface.
- Vacuum: To clean forms before pouring. Ensure it’s in good working order and has a suitable attachment for concrete dust.
- Backer rod: For expansion joints. Check size (usually 1/2″ to 3/4″) matches your joint width.
- Concrete mix design: Ensure you have the correct mix for your project’s requirements (e.g., PSI, water-cement ratio).
- Forms and supports: Check formwork is level, square, and properly braced. Supports should be strong enough to hold wet concrete.
Quick rule: Always check your tools and materials before starting work. Missing or faulty items can lead to costly mistakes and rework.
Step-by-step for semi-rigid vs rigid fills
This sequence will guide you through preparing and applying both semi-rigid and rigid fillers to your concrete surfaces, ensuring a durable and long-lasting result.
- Prep the surface: Briefly clean and prime the area as previously covered. This ensures better adhesion for your filler. Check: Surface should be dry, clean, and free of debris.
- Route joints (if needed): For semi-rigid fillers, route expansion joints to a depth of 1/4″ to 3/8″. This provides space for the filler and allows it to bond properly. Check: Joints should be clean and uniform.
- Place backer rod (if needed): For wide joints (>1/2″), insert a backer rod to support the filler and prevent overfilling. Check: Backer rod should fit snugly in the joint without gaps or excess.
- Mix semi-rigid filler: Follow manufacturer’s instructions, typically mixing 1 part filler with 2-3 parts sand by volume. Mix until smooth and lump-free. Check: Consistency should be similar to thick peanut butter.
- Apply semi-rigid filler: Using a rubber squeegee or trowel, force the filler into the joint, ensuring it’s packed tightly. Strike off excess with a straight edge. Check: Joint should be filled flush with the surface.
- Allow semi-rigid cure time: Let it cure for 24-72 hours before sealing or walking on it, depending on temperature and humidity. Check: Filler should feel firm to touch.
- Mix rigid filler: For rigid fillers, mix according to manufacturer’s instructions, usually with a 1:3 or 1:4 cement-to-sand ratio by volume. Mix until smooth and lump-free. Check: Consistency should be similar to thick mortar.
- Apply rigid filler: Using a rubber squeegee or trowel, force the filler into the joint, ensuring it’s packed tightly. Strike off excess with a straight edge. Check: Joint should be filled flush with the surface.
- Allow rigid cure time: Let it cure for 7-28 days before sealing or walking on it, depending on temperature and humidity. Check: Filler should feel very firm to touch.
Pro tip: Always follow manufacturer’s instructions for mixing ratios and cure times. These can vary significantly between products.
Durability, Lifespan, and Maintenance
Rigid fillers typically resist traffic and load well but can crack or debond with sharp wheel loads, wide temperature swings, and moisture in a garage. Semi-rigid fillers handle some movement better but may creep, lose elasticity, or surface roughness over time. Watch for debonding, cracking at joints, loss of elasticity, hardening, and rough surfaces, and plan routine cleaning, resealing, and regrouting to keep joints protected; follow the label for compatible sealants or fillers and don’t mix products without checking instructions.
These issues matter because garages see real stresses from wheels, jacks, vibration, and water ingress that accelerate deterioration. A simple maintenance rhythm and clear decision points help you budget and act fast, replacing or topping joints when signs worsen or performance drops, using labeled products and manufacturer guidance as your baseline. Check labels or datasheets for guidance, and tailor the interval based on climate, slab age, and how you use the space—parking vs workshop—and keep a basic inspection routine so you catch trouble early.
Inspection and repair intervals
Regularly inspect your garage slab to catch issues early. Here’s a simple checklist.
- Every 6 months: Check joints for cracks, gaps, or crumbling. Skipping this can lead to water ingress and further damage.
- Annually: Inspect high-traffic zones and areas near doors for signs of wear. Overlooking these spots can accelerate deterioration.
- Before winter: Ensure joints are well-sealed to prevent water damage from snow melt and ice. Neglecting this can cause freeze-thaw damage.
- After severe weather: Inspect for any new cracks or joint issues. Prompt attention helps prevent minor problems from becoming major ones.
- When repainting the garage: Check joints before applying paint to ensure they’re in good condition. Painting over damaged joints can trap moisture and cause further deterioration.
- Before storing vehicles for extended periods: Ensure joints are clean and well-sealed to prevent damage from trapped moisture or chemicals. Skipping this can lead to accelerated joint degradation.
- When you notice any signs of aging or failure: Inspect the entire slab, not just the affected area. Problems often start small and spread.
- Before and after using heavy equipment or vehicles: Check for new cracks or joint issues. Prompt attention helps prevent minor problems from becoming major ones.
Quick rule: Inspect your garage slab regularly to catch and fix issues early, saving you time and money in the long run.
Long-term costs and lifecycle considerations
The initial cost of a joint filler is just the start. Maintenance frequency and downtime also impact your total cost of ownership.
Rigid fillers: Generally have lower upfront costs but may require more frequent maintenance, like resealing or replacement every 5-7 years. Downtime for repairs can be significant.
Semi-rigid fillers: Often have higher initial costs but need less frequent maintenance, typically every 7-10 years. Less downtime means more usable garage space over time.
Consider your budget and how much maintenance you’re willing to do when choosing a filler. Also, factor in the potential resale value of your home – some buyers may prefer lower-maintenance options.
Cost Comparison and Value Analysis
Material costs and installation time drive most price. Rigid vs semi-rigid fillers carry different upfront costs and labor needs. Downtime, performance, and rework risk all shape true value.
Think in terms of total ownership: lifespan, maintenance, rework risk, and what prep a coating or sealant may need. Downtime and garage usability matter because the project may block access and disrupt schedules. Use movement needs, crack control, and durability as the tie-breakers when choosing materials and method.
Typical cost drivers
When comparing joint fillers, consider these factors that can drive up costs:
Joint depth/width: Deeper or wider joints need more material. Prep work like cleaning and priming also takes longer.
Prep work: If joints are poorly prepared, you’ll use more material and spend more time fixing mistakes.
Specialty products: High-performance, moisture-resistant, or rapid-setting fillers cost more but may be necessary in certain conditions.
Accessibility: Hard-to-reach joints take longer to fill, increasing labor costs.
When paying more up front saves money later
Spending a bit extra on a high-quality semi-rigid filler can save you money in the long run. Here’s why:
A better product reduces the risk of rework, saving you from having to tear out and replace failed fillers.
It also extends the service life of your slab, delaying the need for costly repairs or replacements.
For example, a moisture-resistant semi-rigid filler might cost more initially but could save you from water damage-related issues down the line.
Common Mistakes and How to Avoid Them
Mistakes break joints fast: using the wrong product for the joint, getting the geometry off (too narrow or too wide, wrong depth, no continuous groove), and skipping backer rod or surface prep. You’ll also see failures from moisture, laitance, dust, oil, or curing compounds, and from rushing through cleaning or drying times, which wreck adhesion before you even seal.
Understanding these categories helps you plan correctly and avoid costly fixes later. Check the label and manufacturer instructions for compatibility with joint size, test surfaces before you commit, and install backer rod where required so the sealant sits in the right shape. Follow curing, temperature, and humidity guidance and don’t rush the joint; premature traffic or sealing too soon invites failures. Do a quick pre‑application check and a post‑application inspection to catch issues while they’re still fixable. If you see cracking at edges, adhesion failure, or sealant squeeze-out, stop and reassess—choose a different filler, re-cut the joints, and reseal after correcting the prep and housing for the sealant.
Visual checkpoints before and after installation
Before you start, and once you’re done, use this checklist to ensure your garage slab joint filler job is on track.
- Surface cleanliness: No dust, oil, or curing compounds. A dry, fog-free surface ensures better adhesion.
- Joint geometry: Grooves are continuous, depth is right (1/4″ for rigid, 3/8″ for semi-rigid), and width matches your chosen filler.
- Backer rod: Installed correctly, creating a proper housing for the sealant shape. No gaps or missing sections.
- Joint edges: Cleanly cut, no ragged edges that could cause cracking or adhesion failure.
- Sealant application: Even spread, not overfilled (causes squeeze-out), nor underfilled (leaves gaps).
- Curing time: Followed manufacturer’s specs to ensure proper sealant hardening.
- Joint movement: Expansion/contraction joints are budgeted for, and anticipated joint movement is considered.
- Sealant finish: Smooth, flush with the slab surface. No gaps or separations.
Quick rule: Regular visual checks catch issues early, saving you from costly rework.
Safety and compatibility pitfalls
Steer clear of these common mistakes to ensure your joint filler job is safe and compatible with your garage slab.
- Incompatible primers: Using the wrong primer can cause adhesion failure. Always match the primer to your chosen sealant.
- Moisture-sensitive products: Some fillers don’t play nice with moisture. Ensure your chosen product is suitable for your slab’s conditions.
- Safe handling: Follow manufacturer guidelines for mixing, application, and disposal to avoid injuries or damage.
- Cure time: Respect the cure time to prevent premature traffic or sealing, which can lead to failed joints.
By avoiding these pitfalls, you’ll ensure a safe, compatible, and long-lasting joint filler job.
Conclusion
Choosing the right joint filler is a practical move that pays off in safety, durability, and a clean look in your garage. Do the right type choice up front, then install with careful prep and proper curing so the slab moves without cracking.
Start by assessing joint width and expected movement, then choose rigid or semi-rigid accordingly, then prepare and clean the joint, apply the filler evenly, allow for proper curing or setting, and finally test with a light load and schedule simple maintenance checks. If you treat it like a small project with a clear sequence, you’ll avoid costly mistakes and keep maintenance easy.
Common mistakes to avoid are overfilling or underfilling the joint and skipping the prep steps like cleaning and drying the joint. Always follow safety rules: work in a dry, clean joint, wear eye protection and gloves, and observe the required temperature and cure time for the product you’re using. If the slab shows wide cracks, moisture issues, or you encounter unexpected resistance, pause and get expert help.
If you’re unsure after these checks or the condition looks risky, call a professional instead of pushing ahead. With the right approach, your garage will stay smooth, durable, and ready for years of use.
FAQ
What is the difference between rigid and semi-rigid joint fillers?
Rigid fillers stay stiff and crack with the slab as it moves. Semi-rigid fillers flex a bit and handle some movement without cracking. Choose based on how much the concrete tends to move in your setup.
When should I choose rigid filler on a garage slab?
If the joint is wide and the area carries heavy loads, go with rigid filler. It locks the joint in place and resists minor expansion and contraction. Don’t use it where there is a lot of growing or shifting soil without proper prep.
When should I choose semi-rigid filler?
Use semi-rigid when the slab has frequent temperature changes or small movements. It relieves pressure instead of cracking and is easier to work with for DIY pours. It’s a safer bet for typical garage floors with normal movement.
How do I prep the joint and apply filler safely?
Clean the joint and remove dust, debris, and old filler. Keep the edge clean and dry, then fill according to product instructions. Don’t overfill; leave a small recessed area so the surface stays level with the adjacent slab.